What Does This Feature Do?
Outreach Campaign helps you turn a lead list into a full outbound workflow inside Readdy:- Add leads with AI Search, a saved Lead List, or a
.csv/.xlsxupload - Generate a personalized website for each prospect
- Write one outreach email with dynamic variables
- Send the campaign directly through Readdy
Before You Start
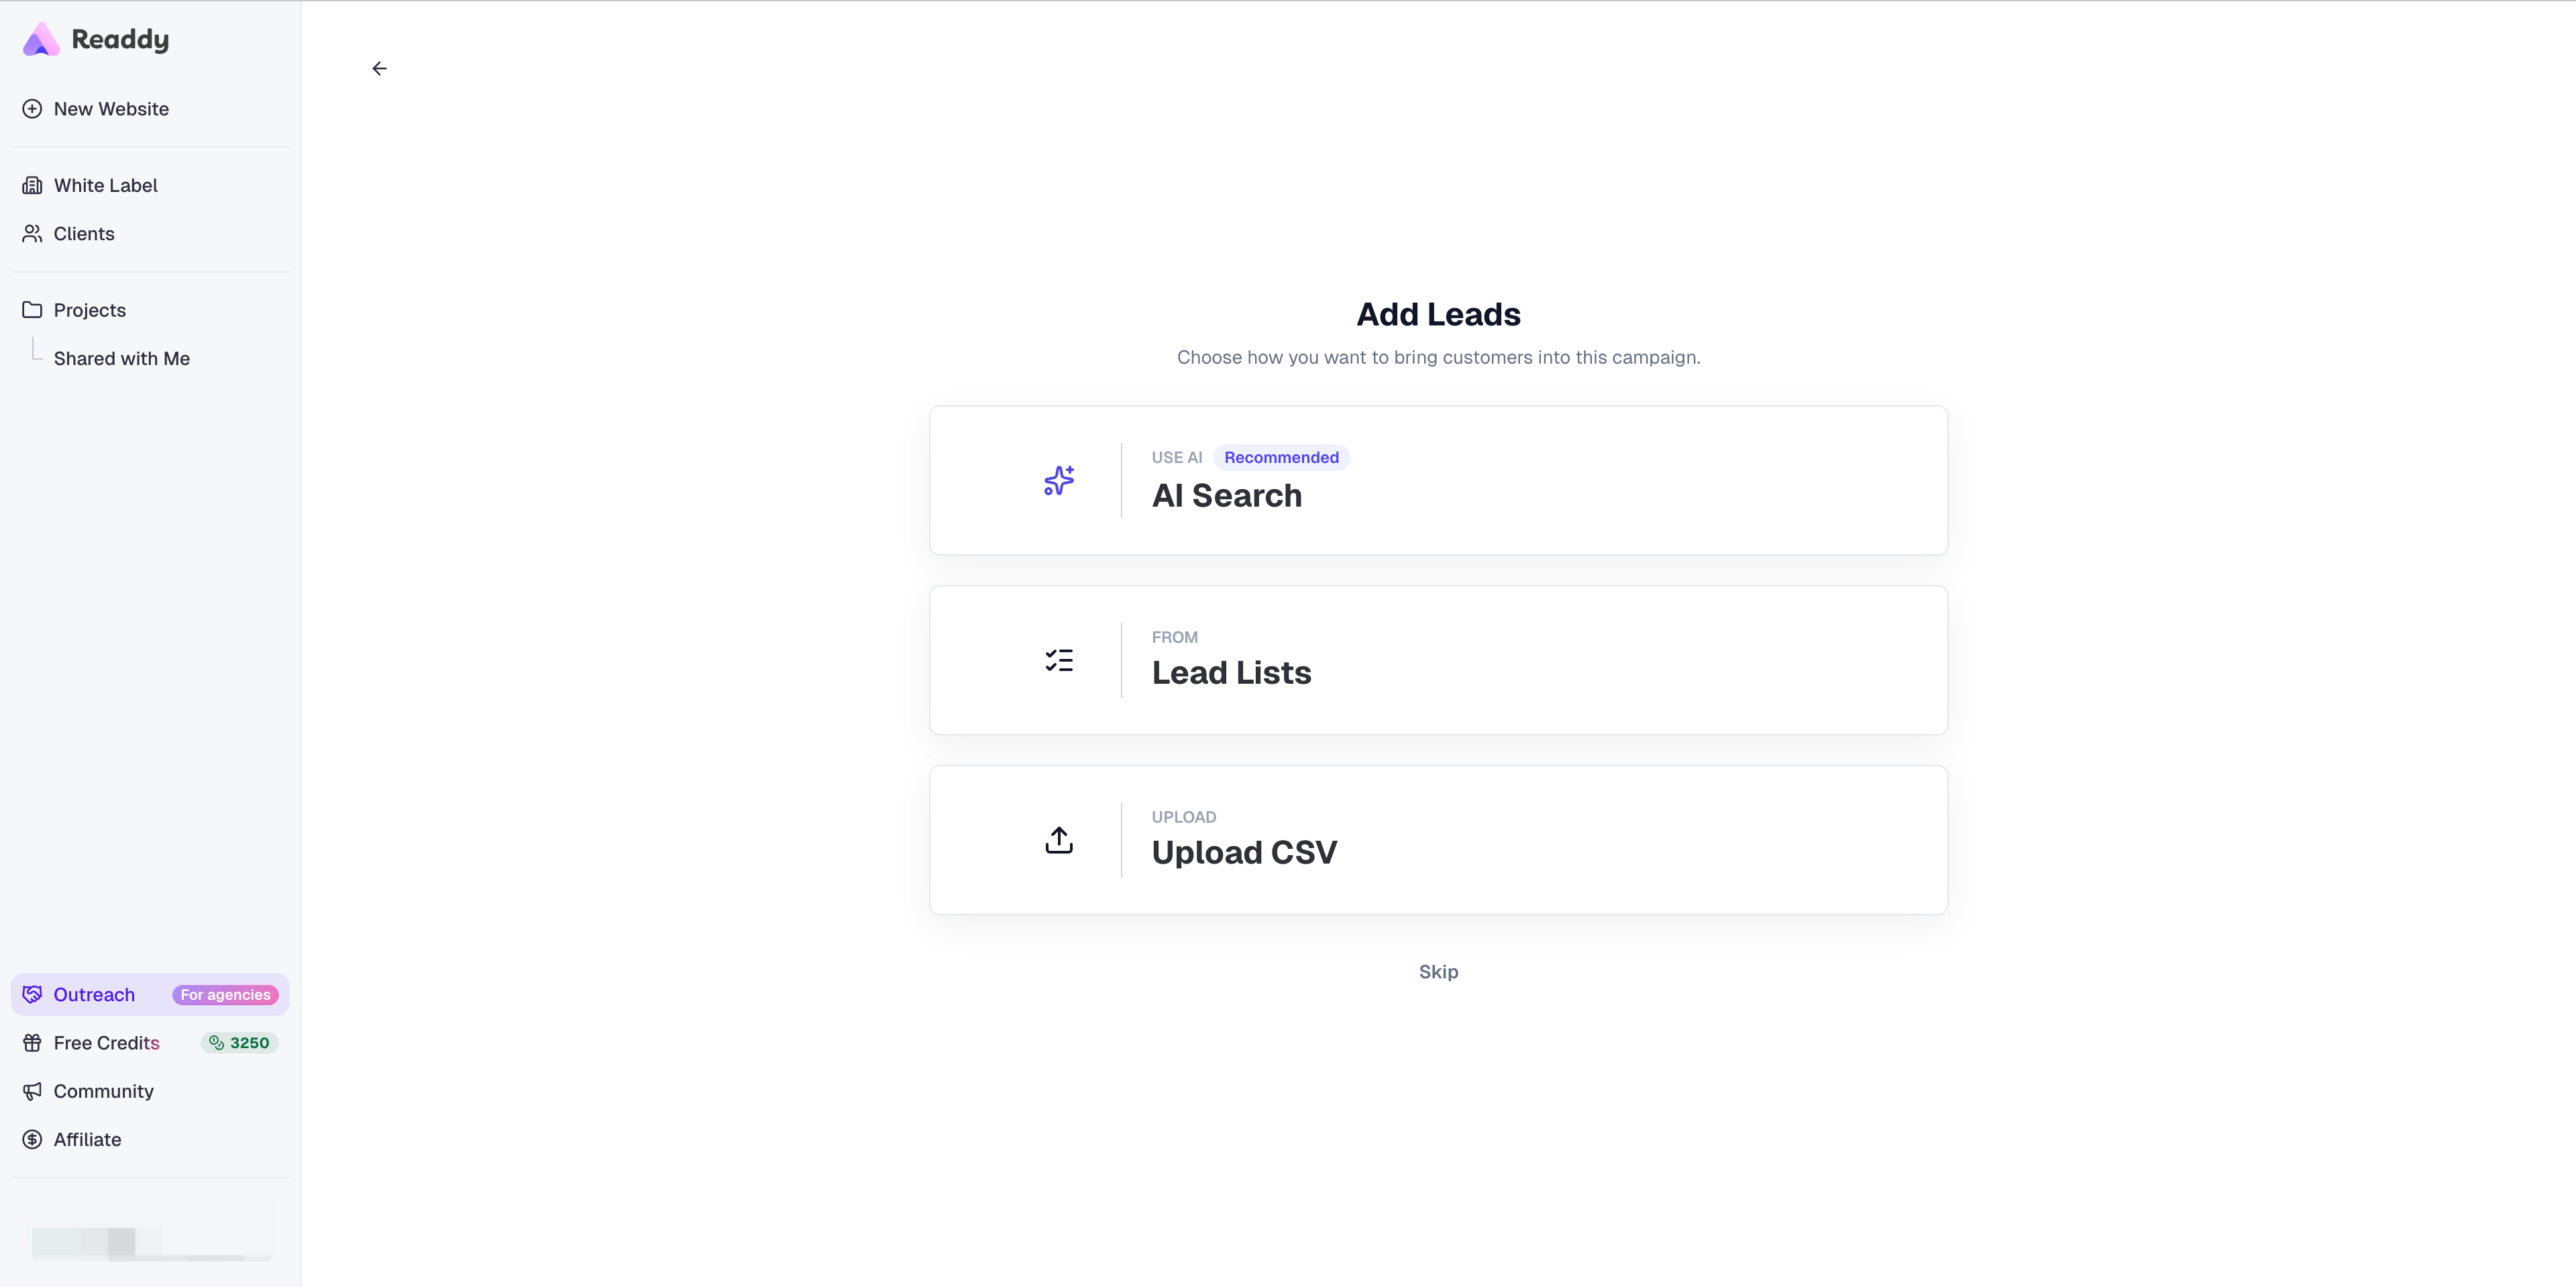
Step 1: Choose How to Add Leads
Before you start generation, choose where the campaign leads will come from.| Option | Use it when |
|---|---|
| AI Search | You want Readdy to find leads from a prompt, such as Auto repair shops in Santa Clara, USA |
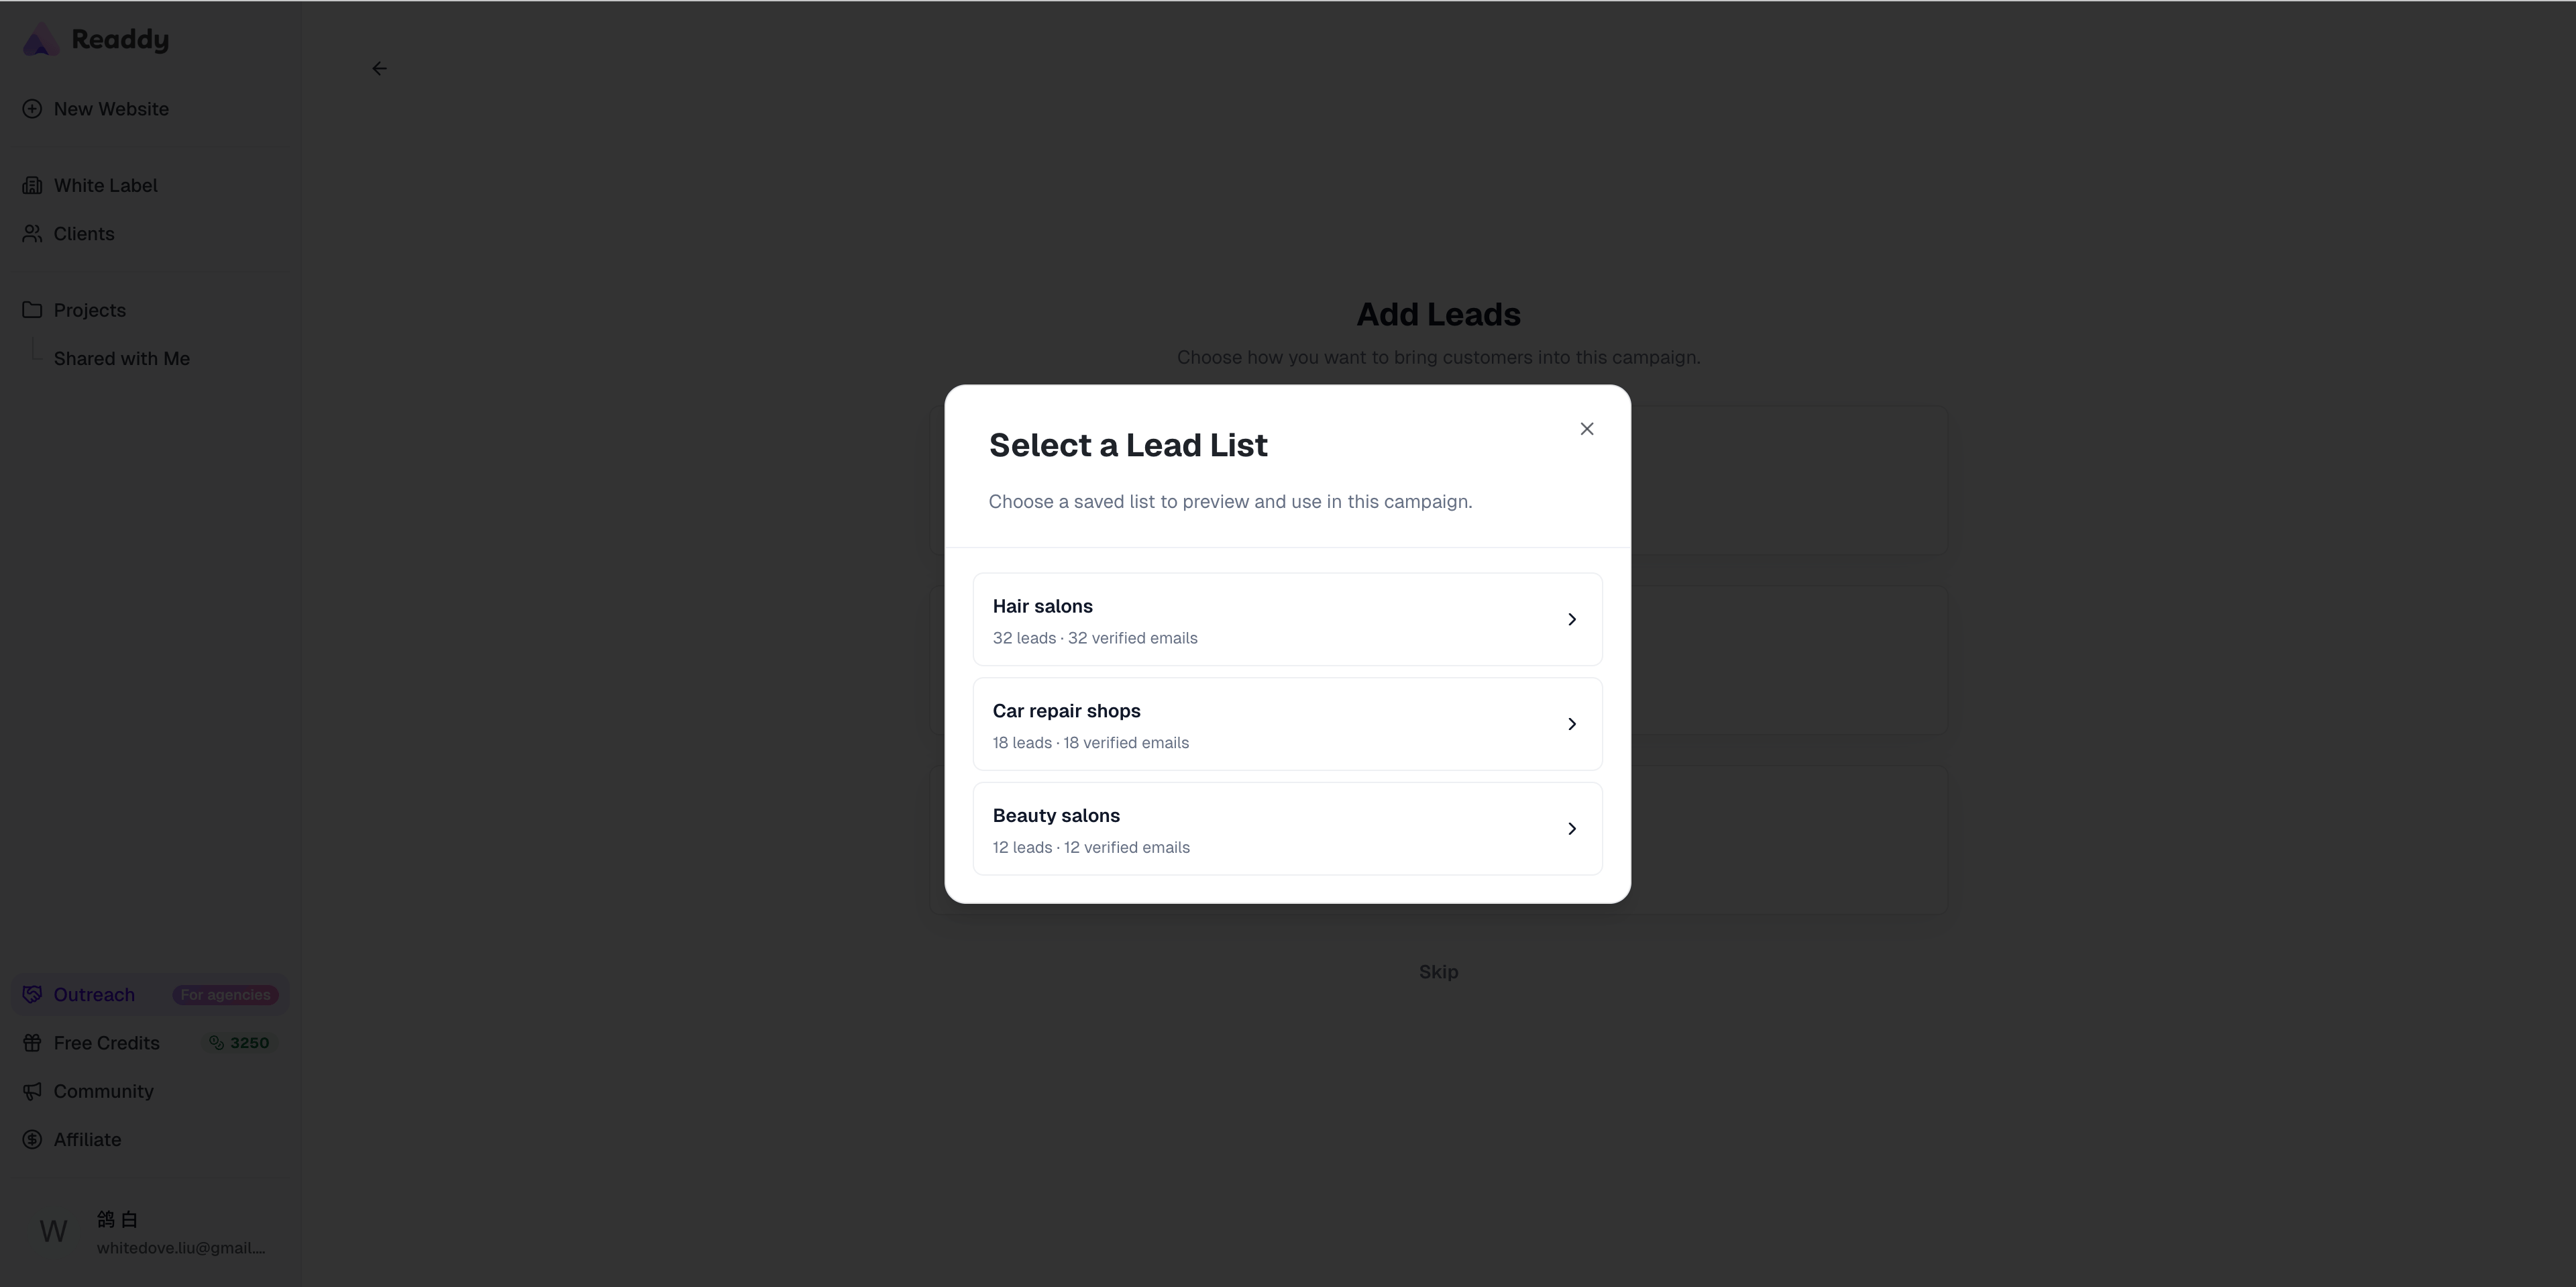
| Lead Lists | You already created a saved list in Lead Finder and want to reuse it |
| Upload CSV | You already have a prospect file in .csv or .xlsx format |
CSV File Requirements
If you choose Upload CSV, prepare a prospect list in.csv or .xlsx
format before you upload it.
Open Excel or Google Sheets
Fill in the header row
email column. You can add other columns as needed, for example:Example columns:business namedescriptionemailphone(optional)address(optional)
Baker Shop | Handmade baking for 10 years | zhang@example.com | 13800001111 | No.1 Happy RoadFlower Store | Fresh flower delivery | li@example.com | 13800002222 | No.2 Sunny Road
Fill in the data (starting from row 2)
Plan and Quota Reference
Outreach Campaign currently uses two limit types:- Generation quota: how many prospects you can generate in one Outreach cycle
- Single upload limit: how many prospect rows you can upload in one file
| Plan | Generation quota | Single upload limit |
|---|---|---|
| Starter / Starter2 | 500 | 100 |
| Pro family / Customization | 3000 | 300 |
| Agency Basic | 5000 | 1000 |
| Agency Scale | 20000 | 3000 |
| Agency Max | 50000 | 5000 |
Pro, Pro80, Pro120, Pro160, Pro200, Pro240, Pro280, Pro320, Pro360, and Pro400.
Campaign Flow
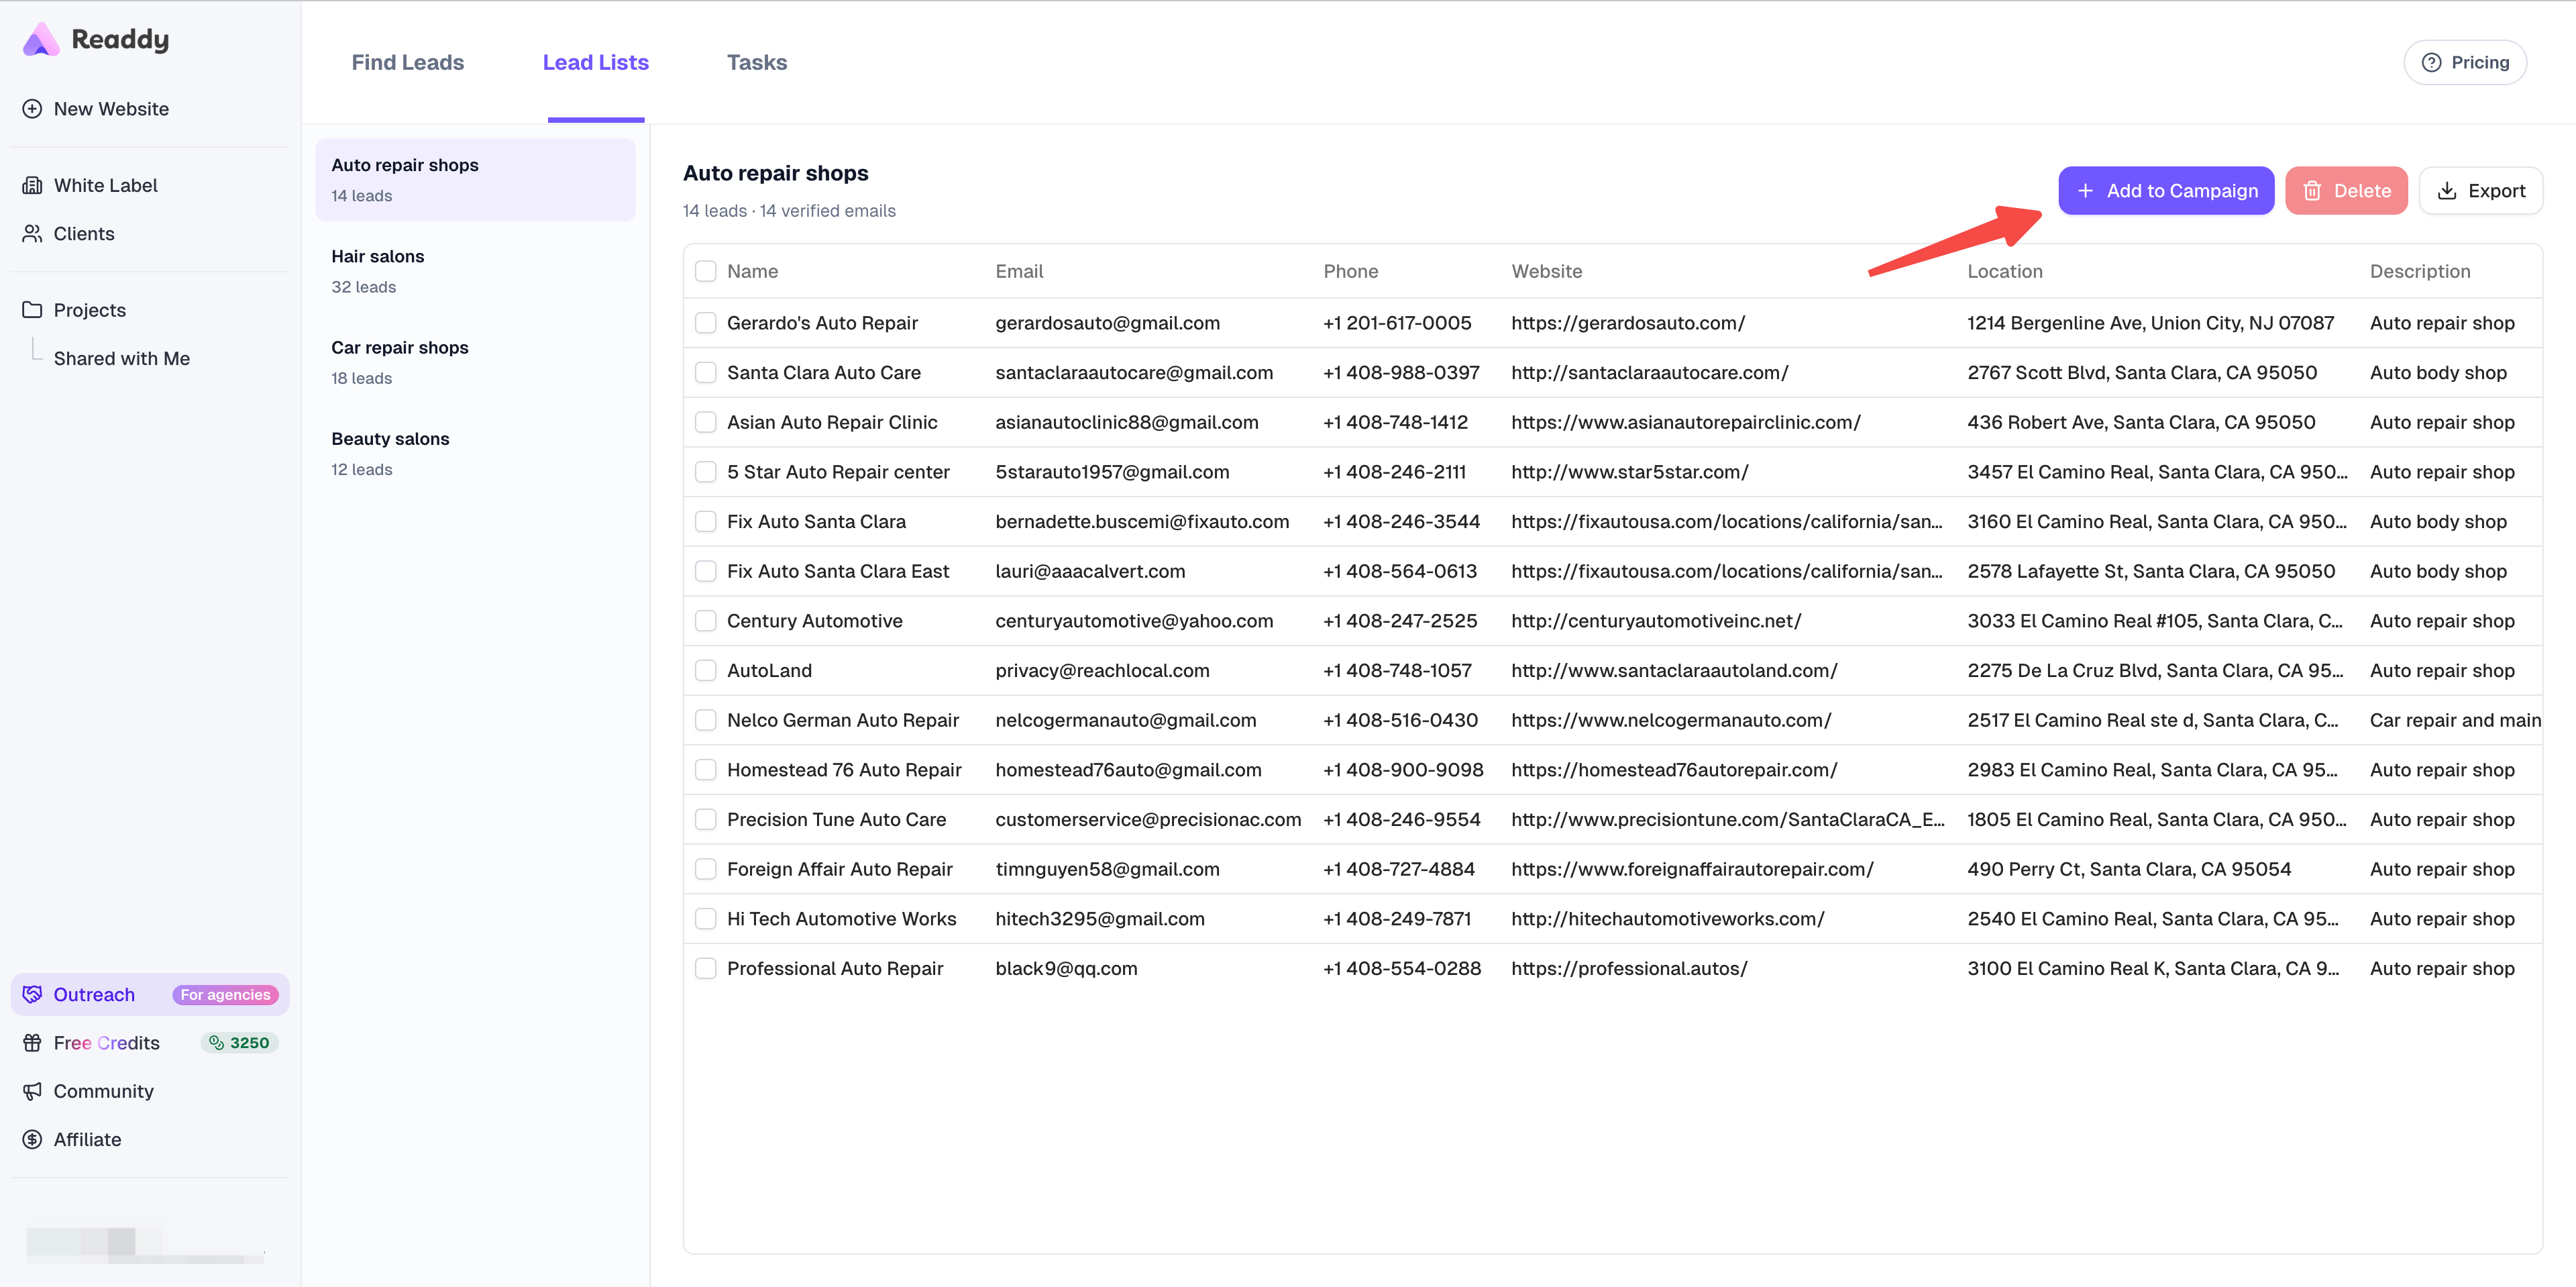
Step 2: Add Leads to the Campaign
Open Outreach Campaign
Choose AI Search

Choose Lead Lists
Step 3: Find Leads with AI Search
Use this flow when you choose AI Search from Add Leads, or when you open Lead Finder directly from the left sidebar.Barber shops in New York, Beauty salons in Paris, or
Auto repair shops in Santa Clara.Describe Your Ideal Leads
Review the Search Plan
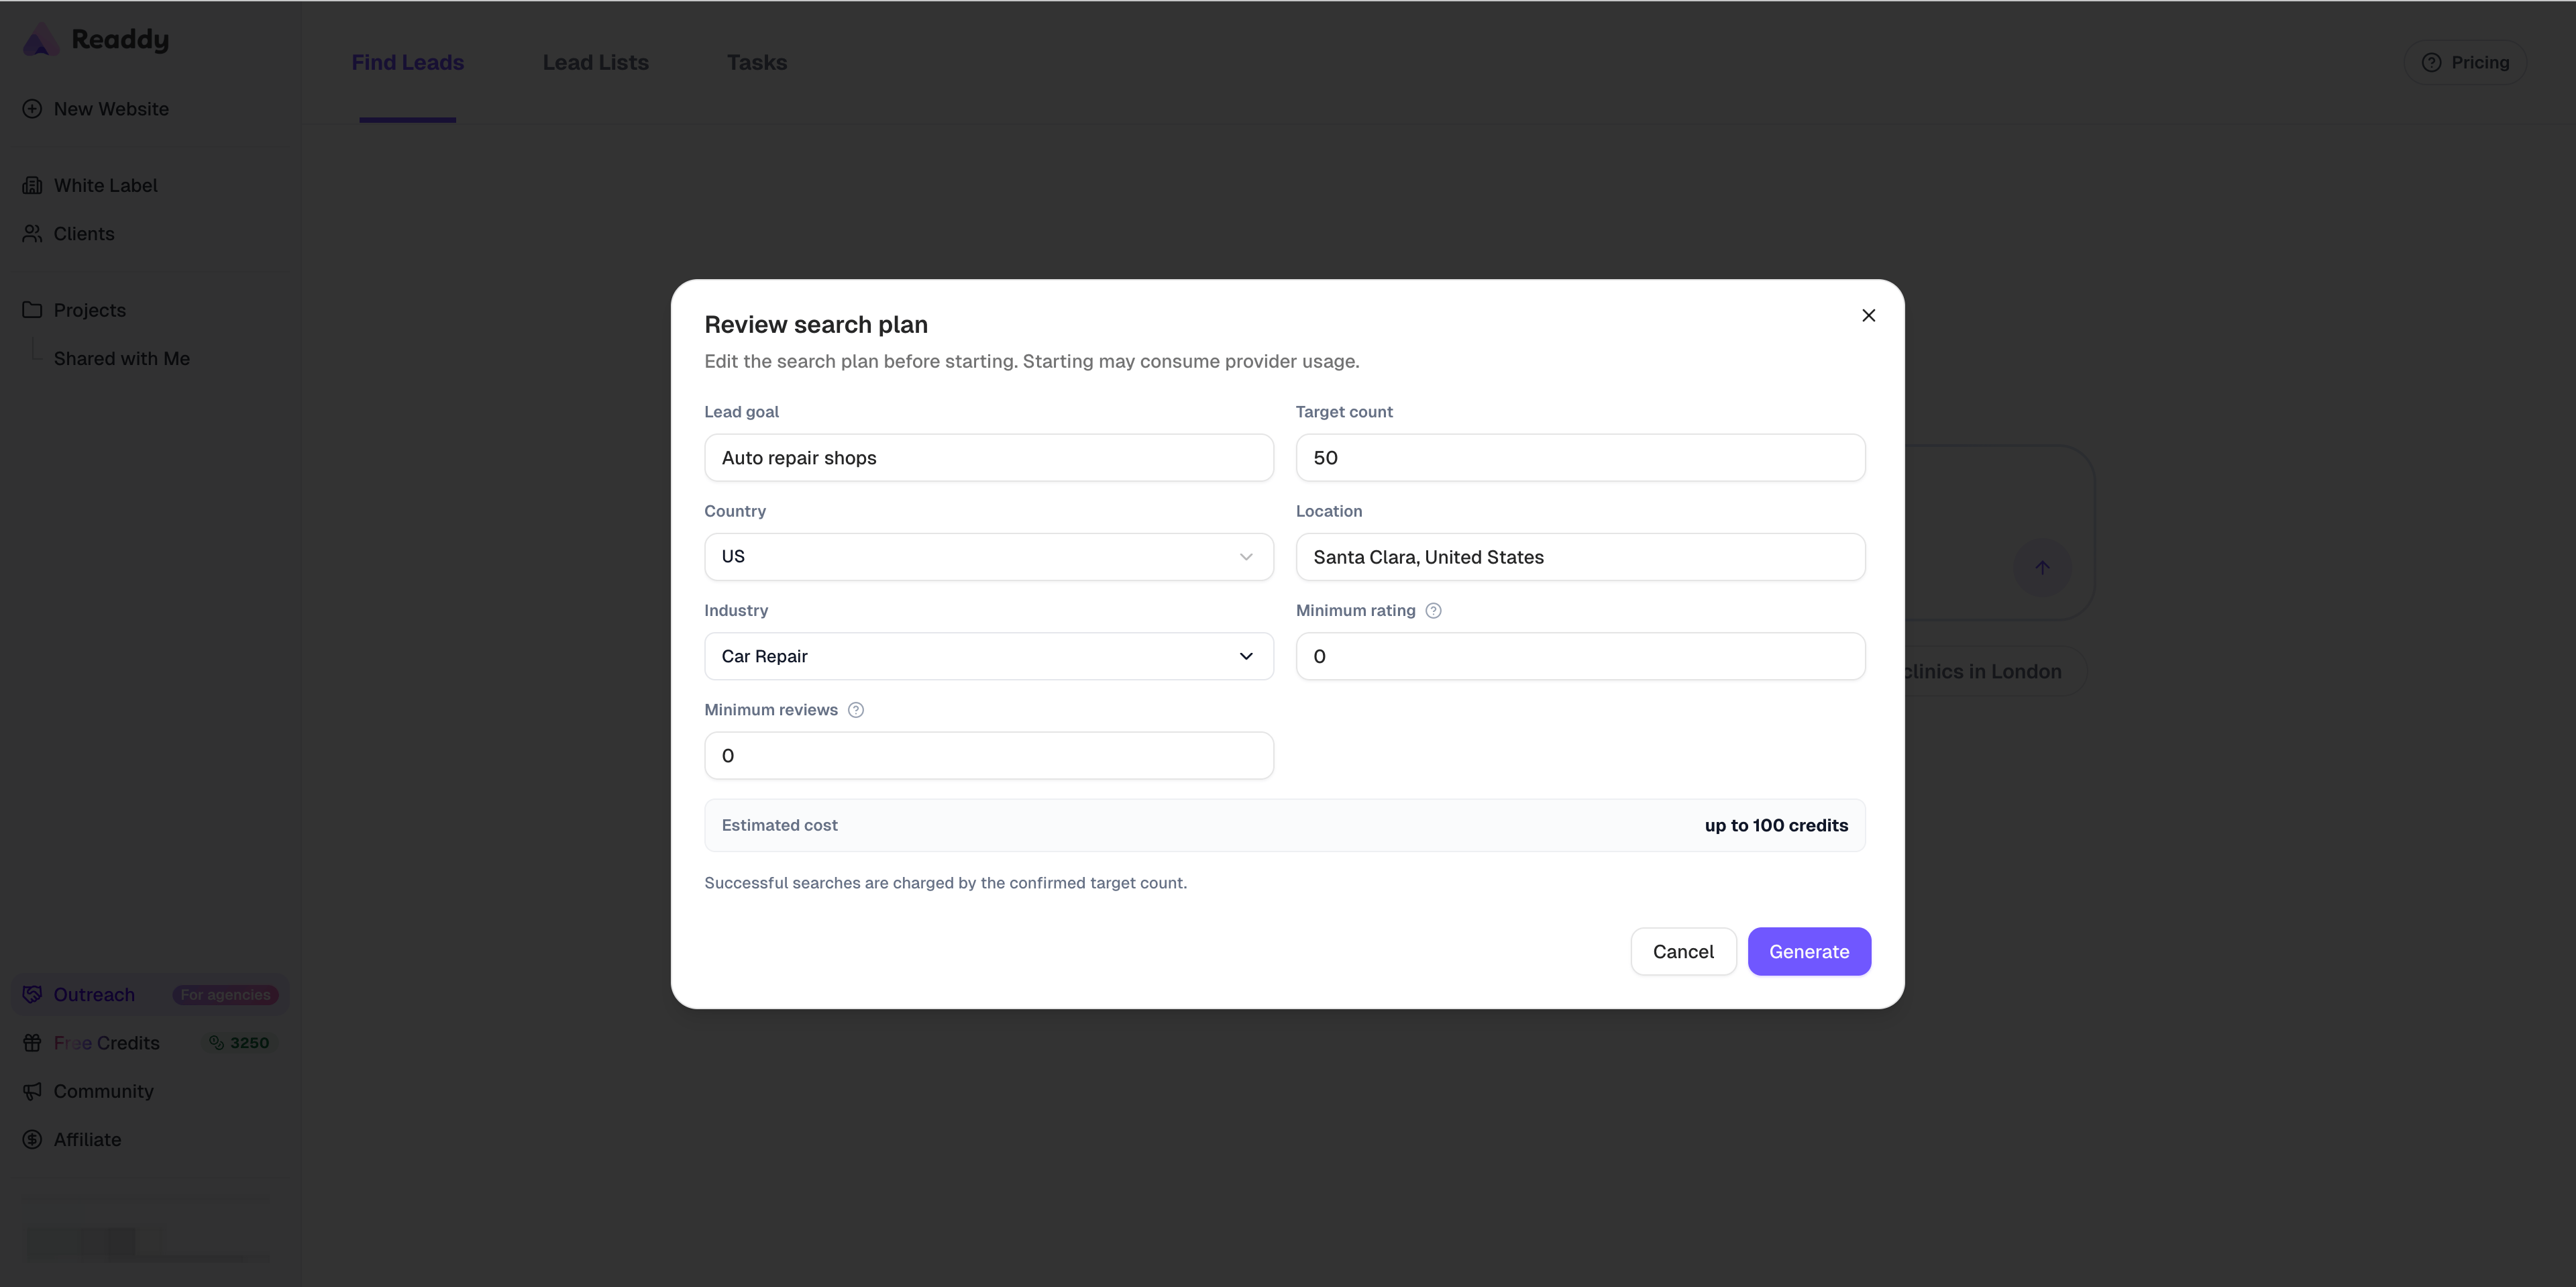
- Lead goal: The business type or audience Readdy will search for
- Target count: The number of leads you want Readdy to return
- Country: The country used to narrow the search
- Location: The city or area where Readdy should search
- Industry: The Google Maps category Readdy uses to match businesses
- Minimum rating: The lowest public rating a business can have
- Minimum reviews: The minimum number of public reviews a business must have
- Estimated cost: The maximum Credits required for the confirmed target count
Generate the Lead List
Step 4: Review the Data Table
Review and Edit the Table
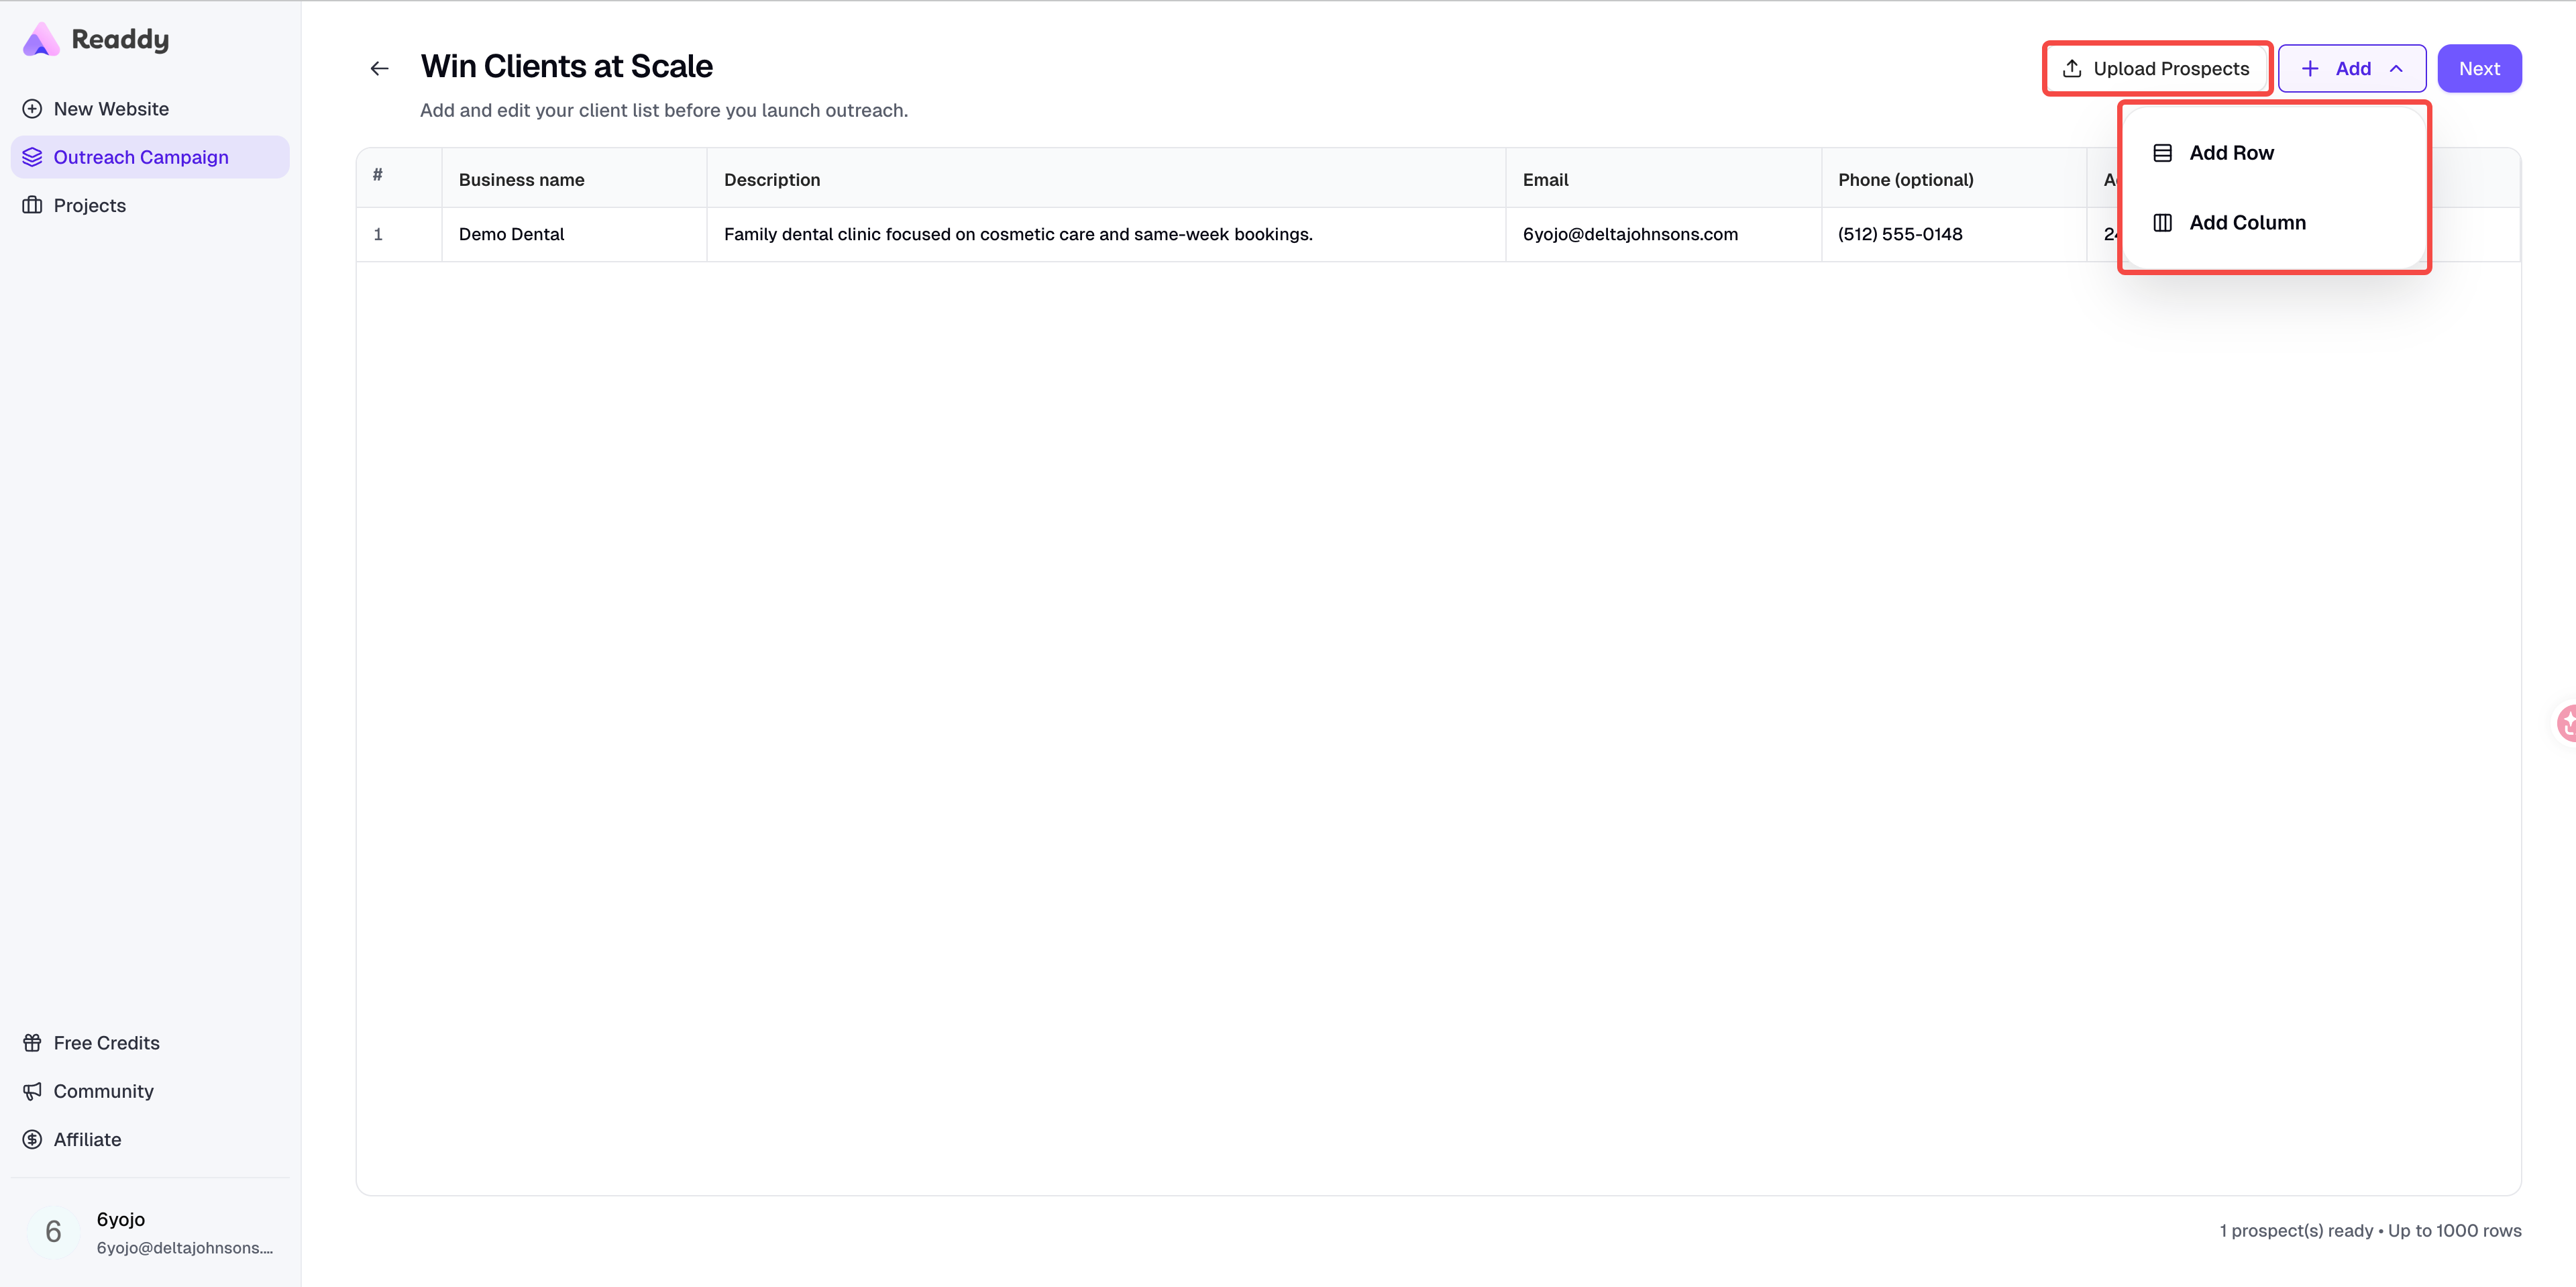
Add Rows or Columns
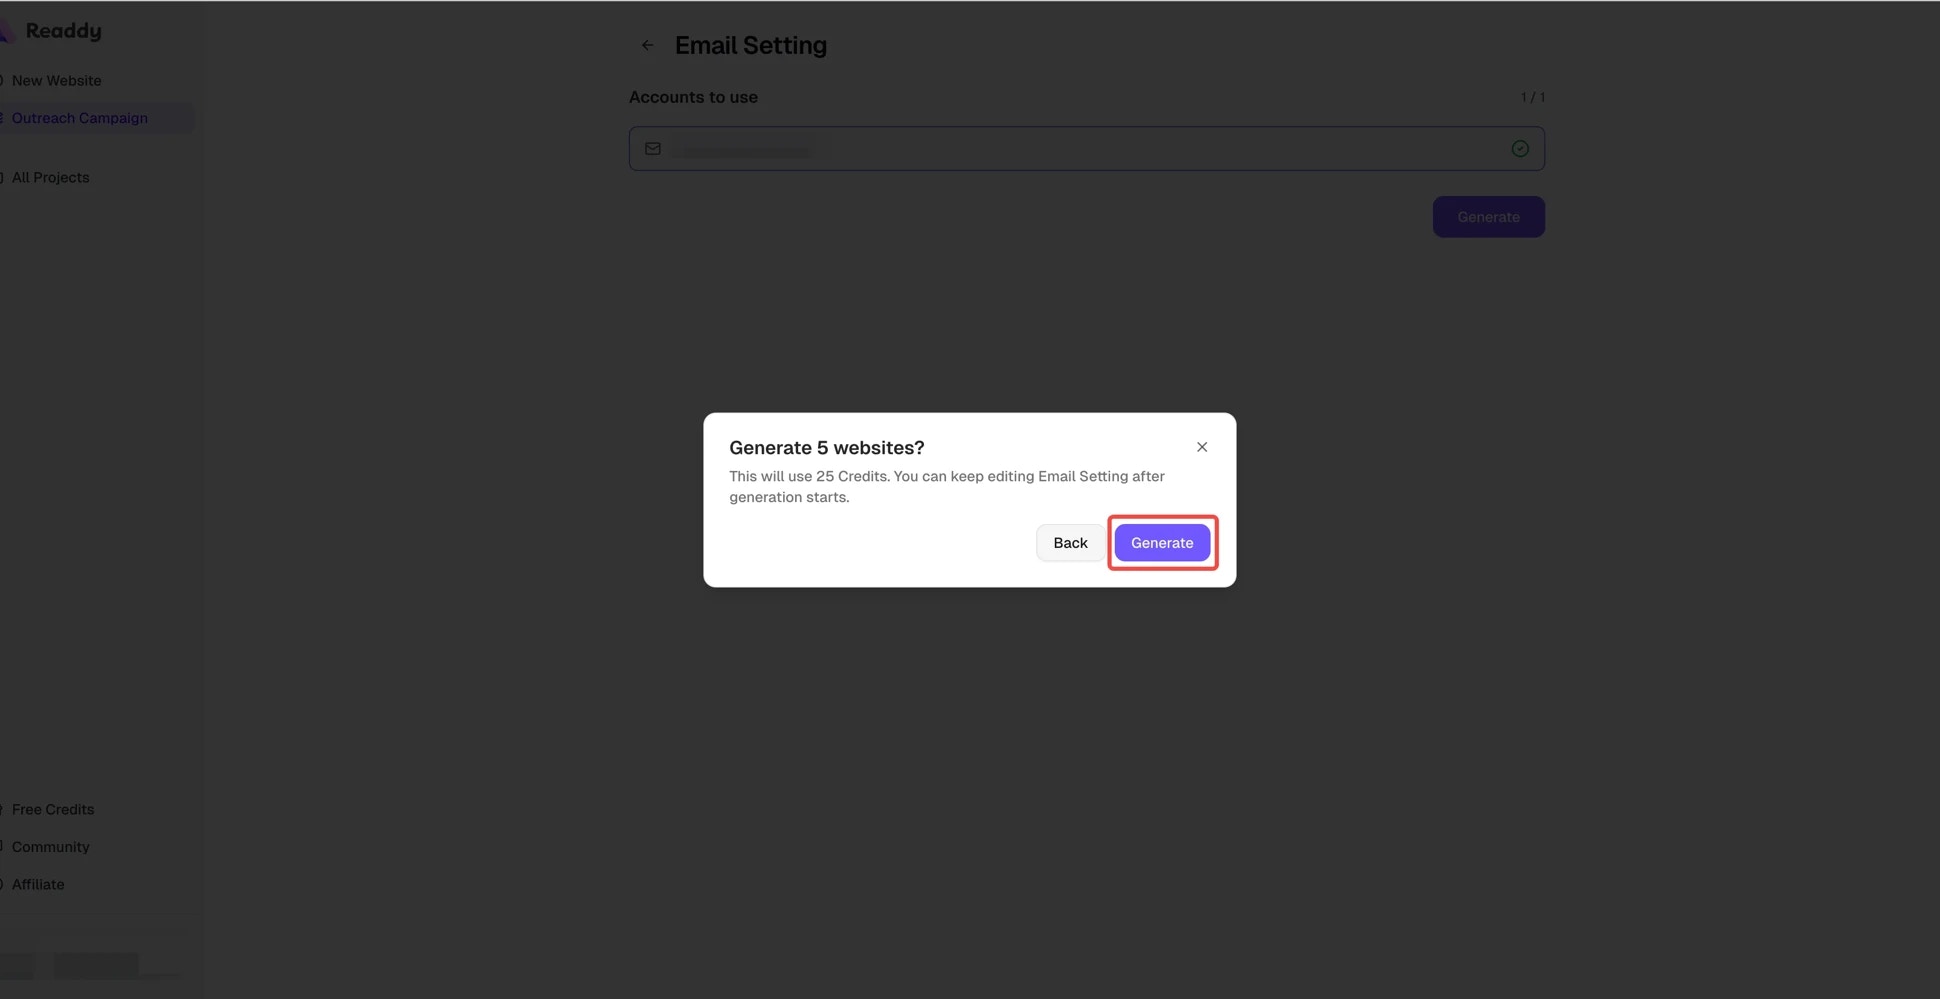
number of rows x 5 CreditsExample: 20 rows = 100 CreditsOnly successfully generated rows are charged.Step 5: Write the Email Content
Insert variables
{{Website_URL}}, so each prospect receives the link to their own generated website.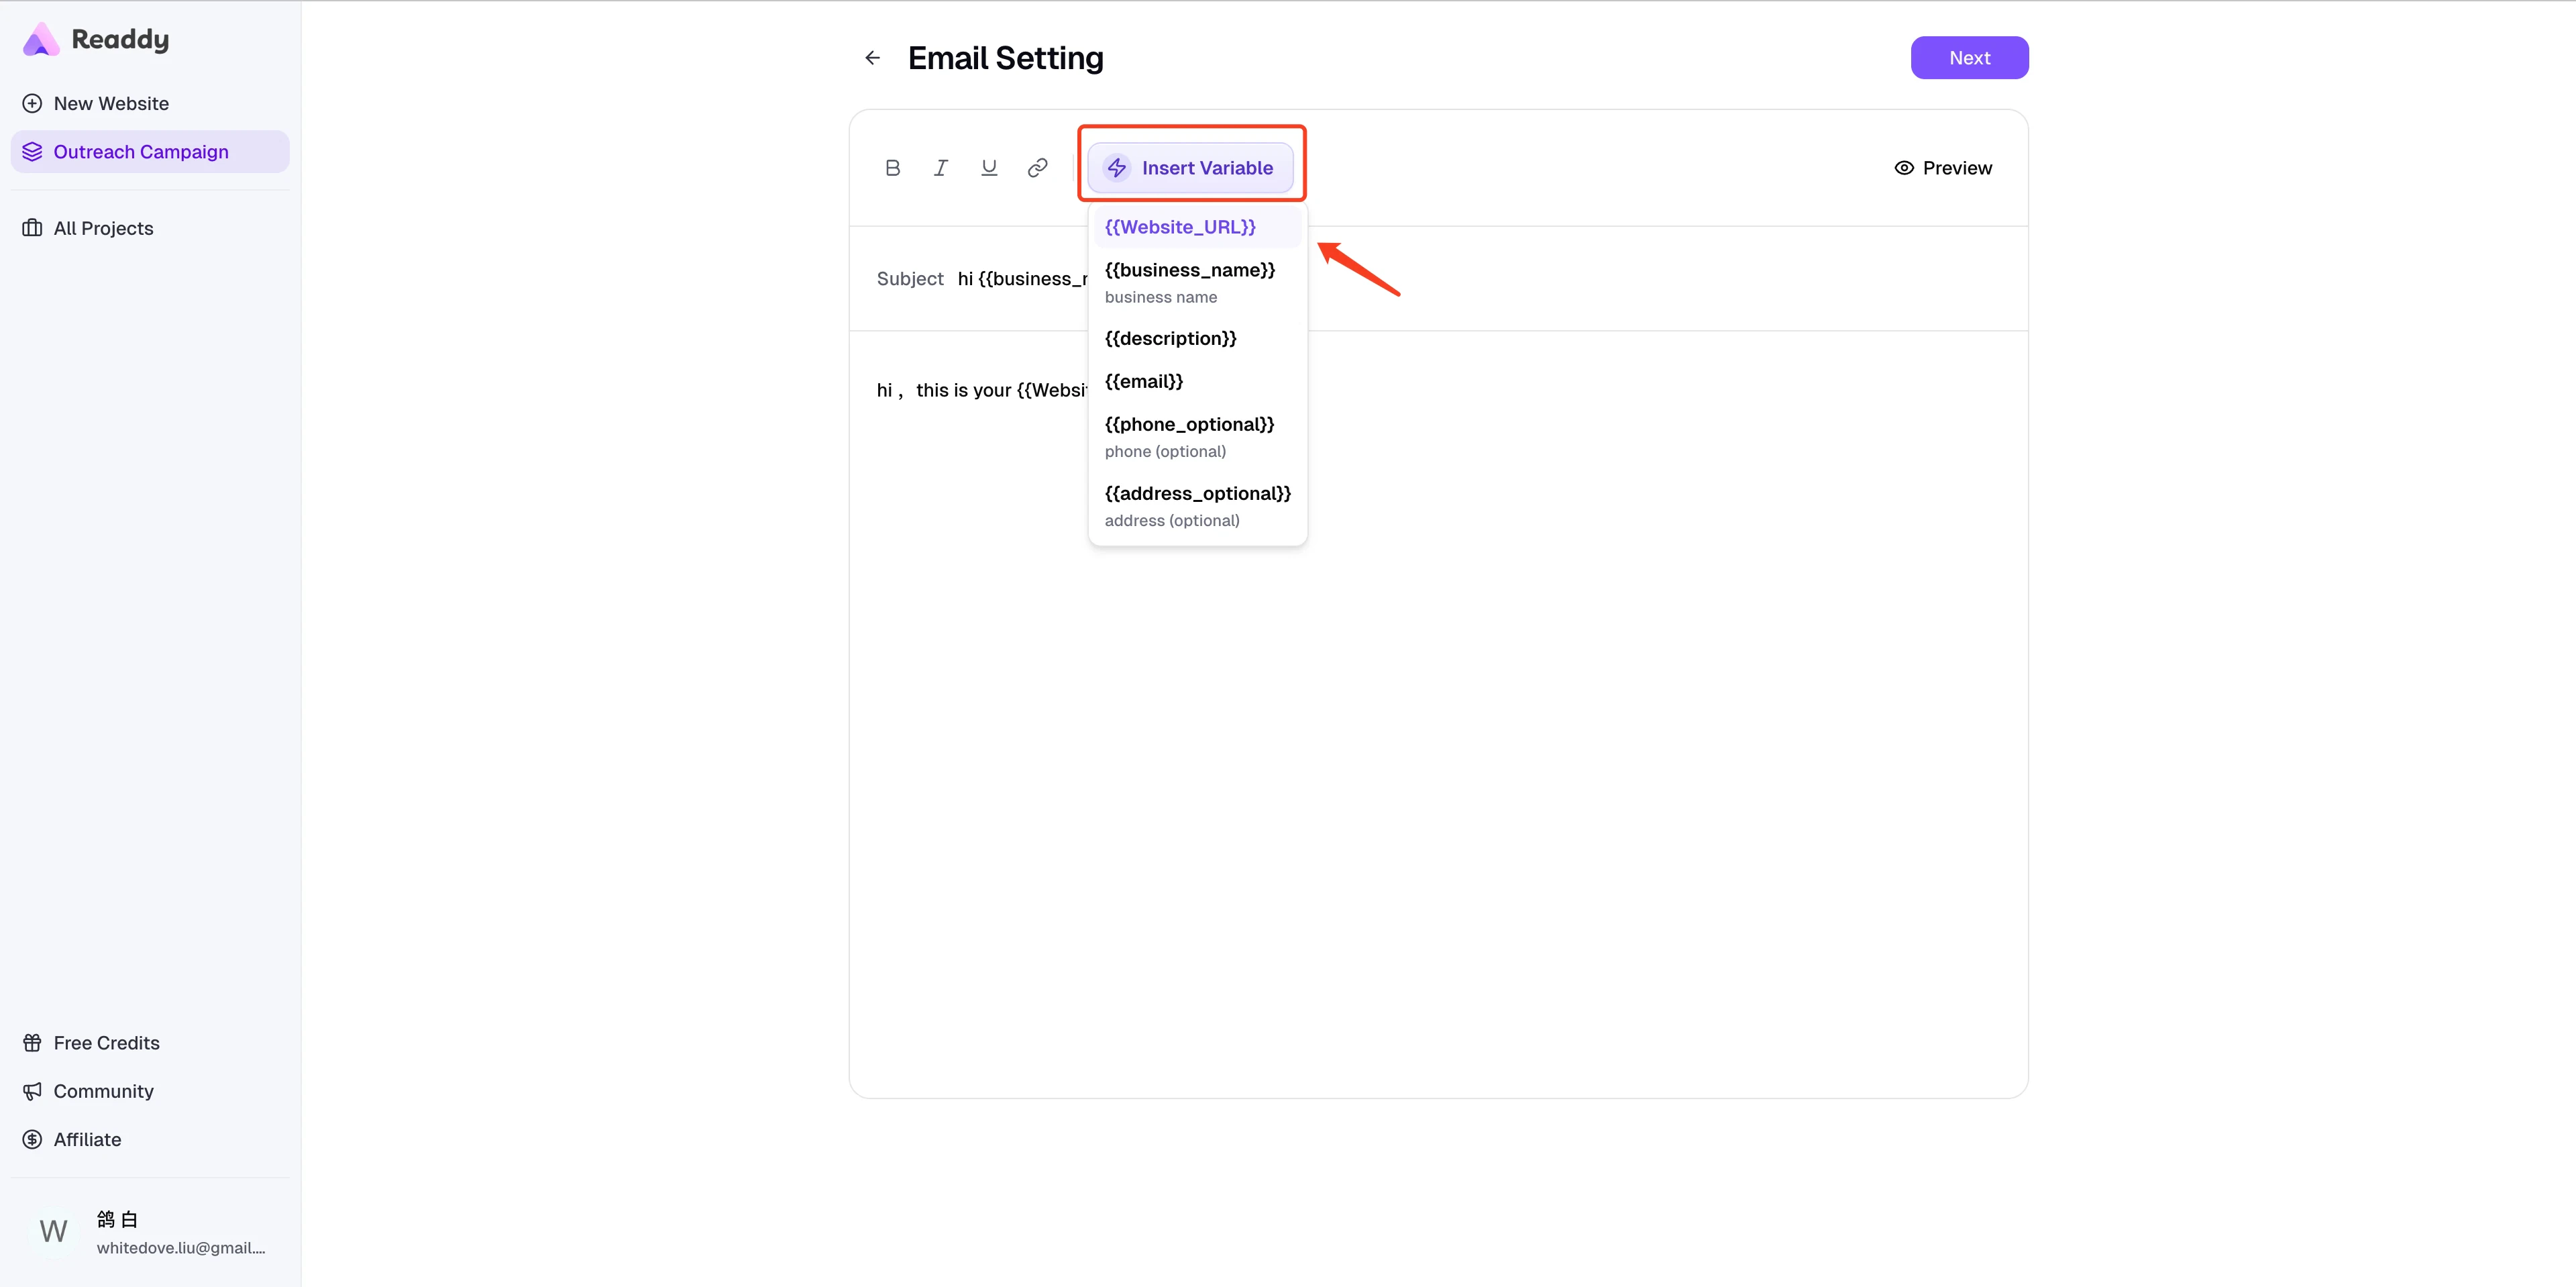
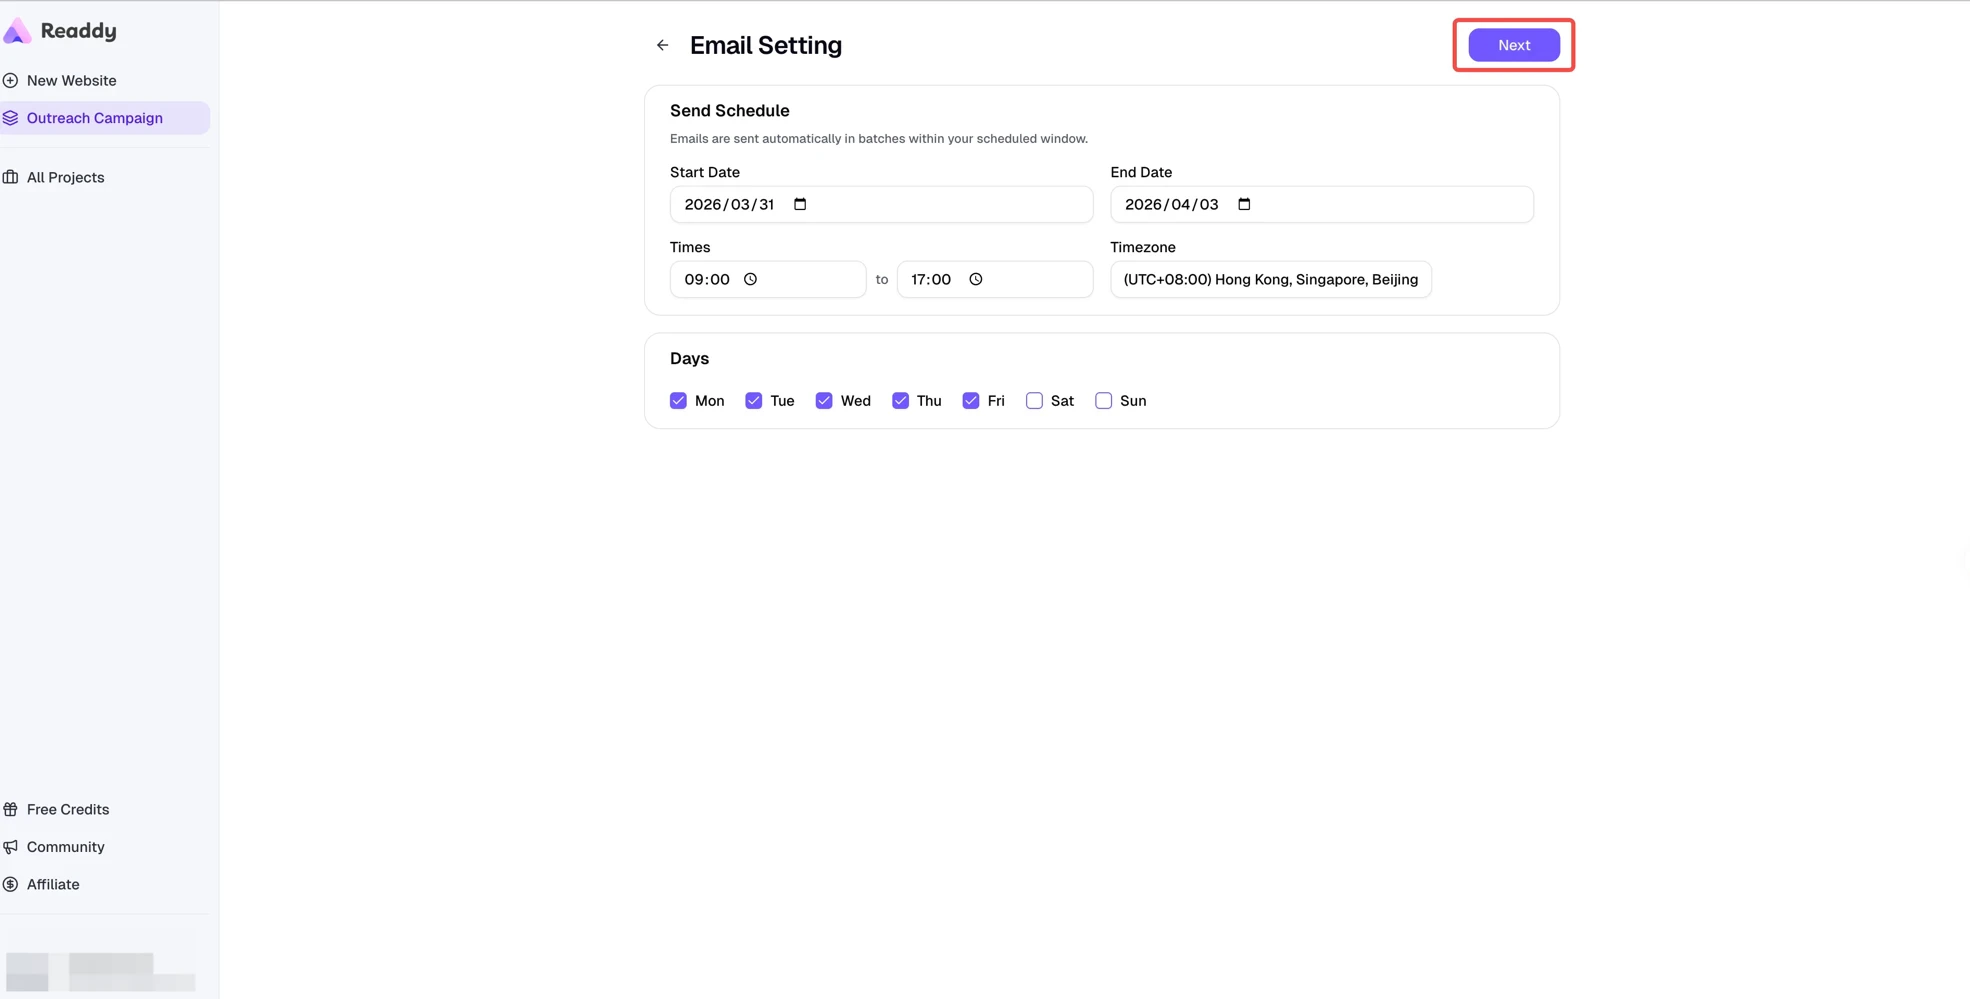
Step 6: Set the Sending Schedule
Step 7: Bind Your Mailbox in Readdy
Readdy can send the campaign directly through your own mailbox. On the Mailbox step, click SMTP / IMAP to bind a new mailbox.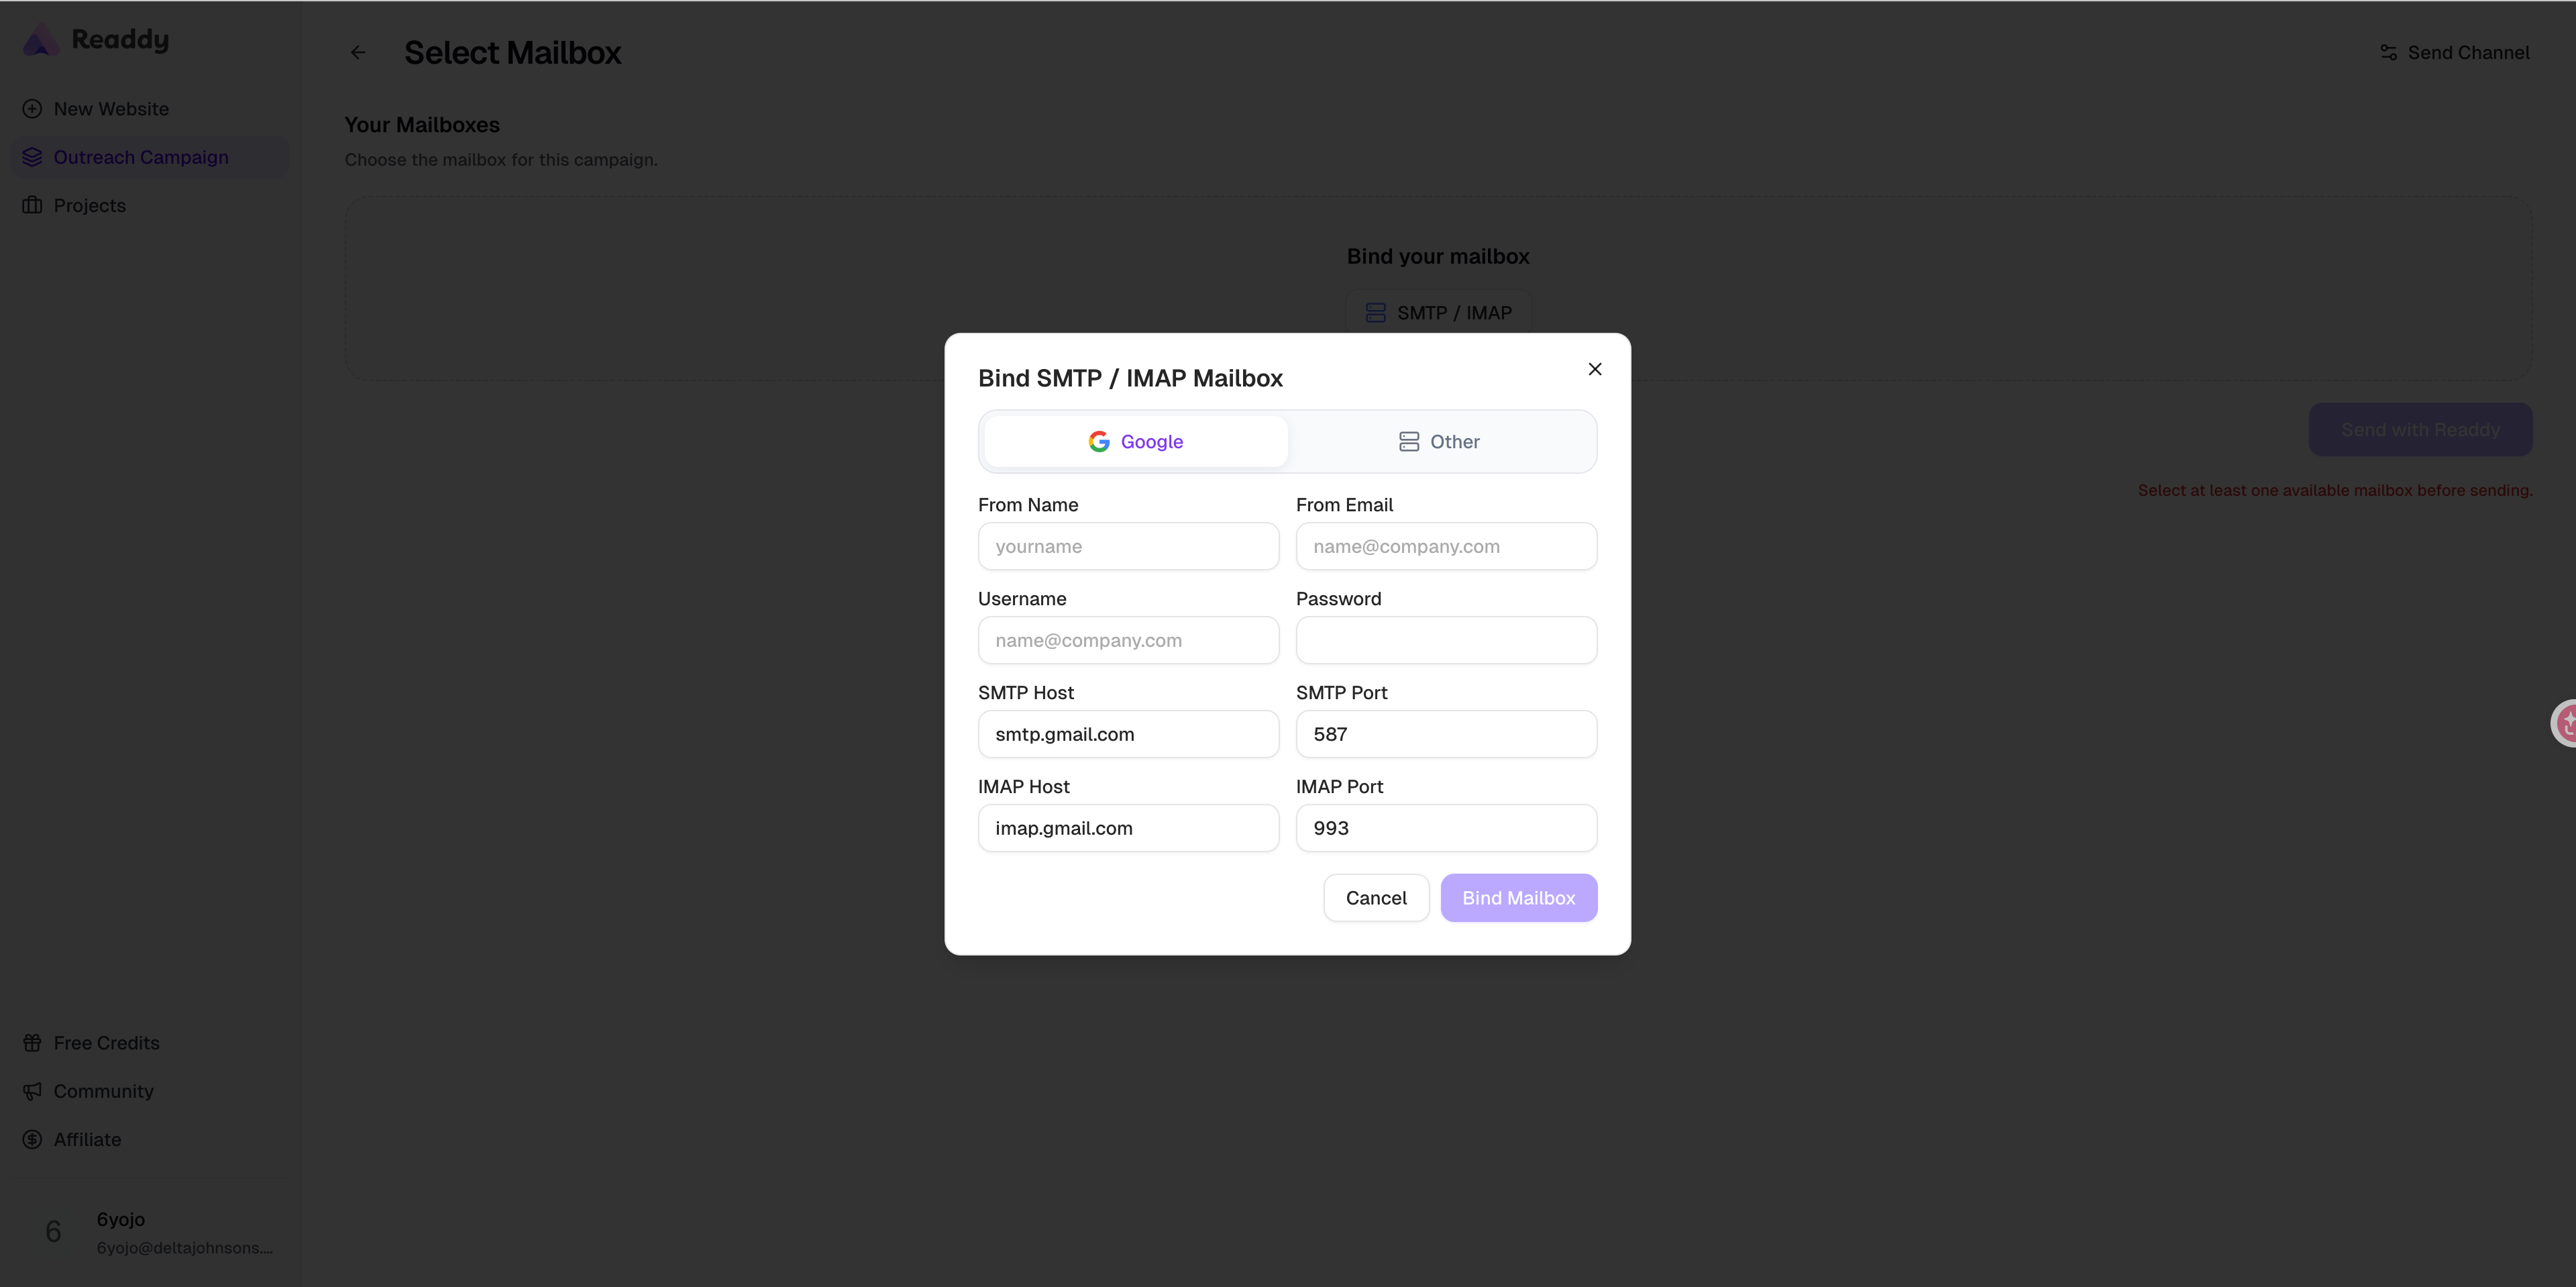
Choose Google or Other
Bind a Google SMTP mailbox
If you choose Google, Readdy automatically fills these Gmail server values for you:- SMTP Host:
smtp.gmail.com - SMTP Port:
587 - IMAP Host:
imap.gmail.com - IMAP Port:
993
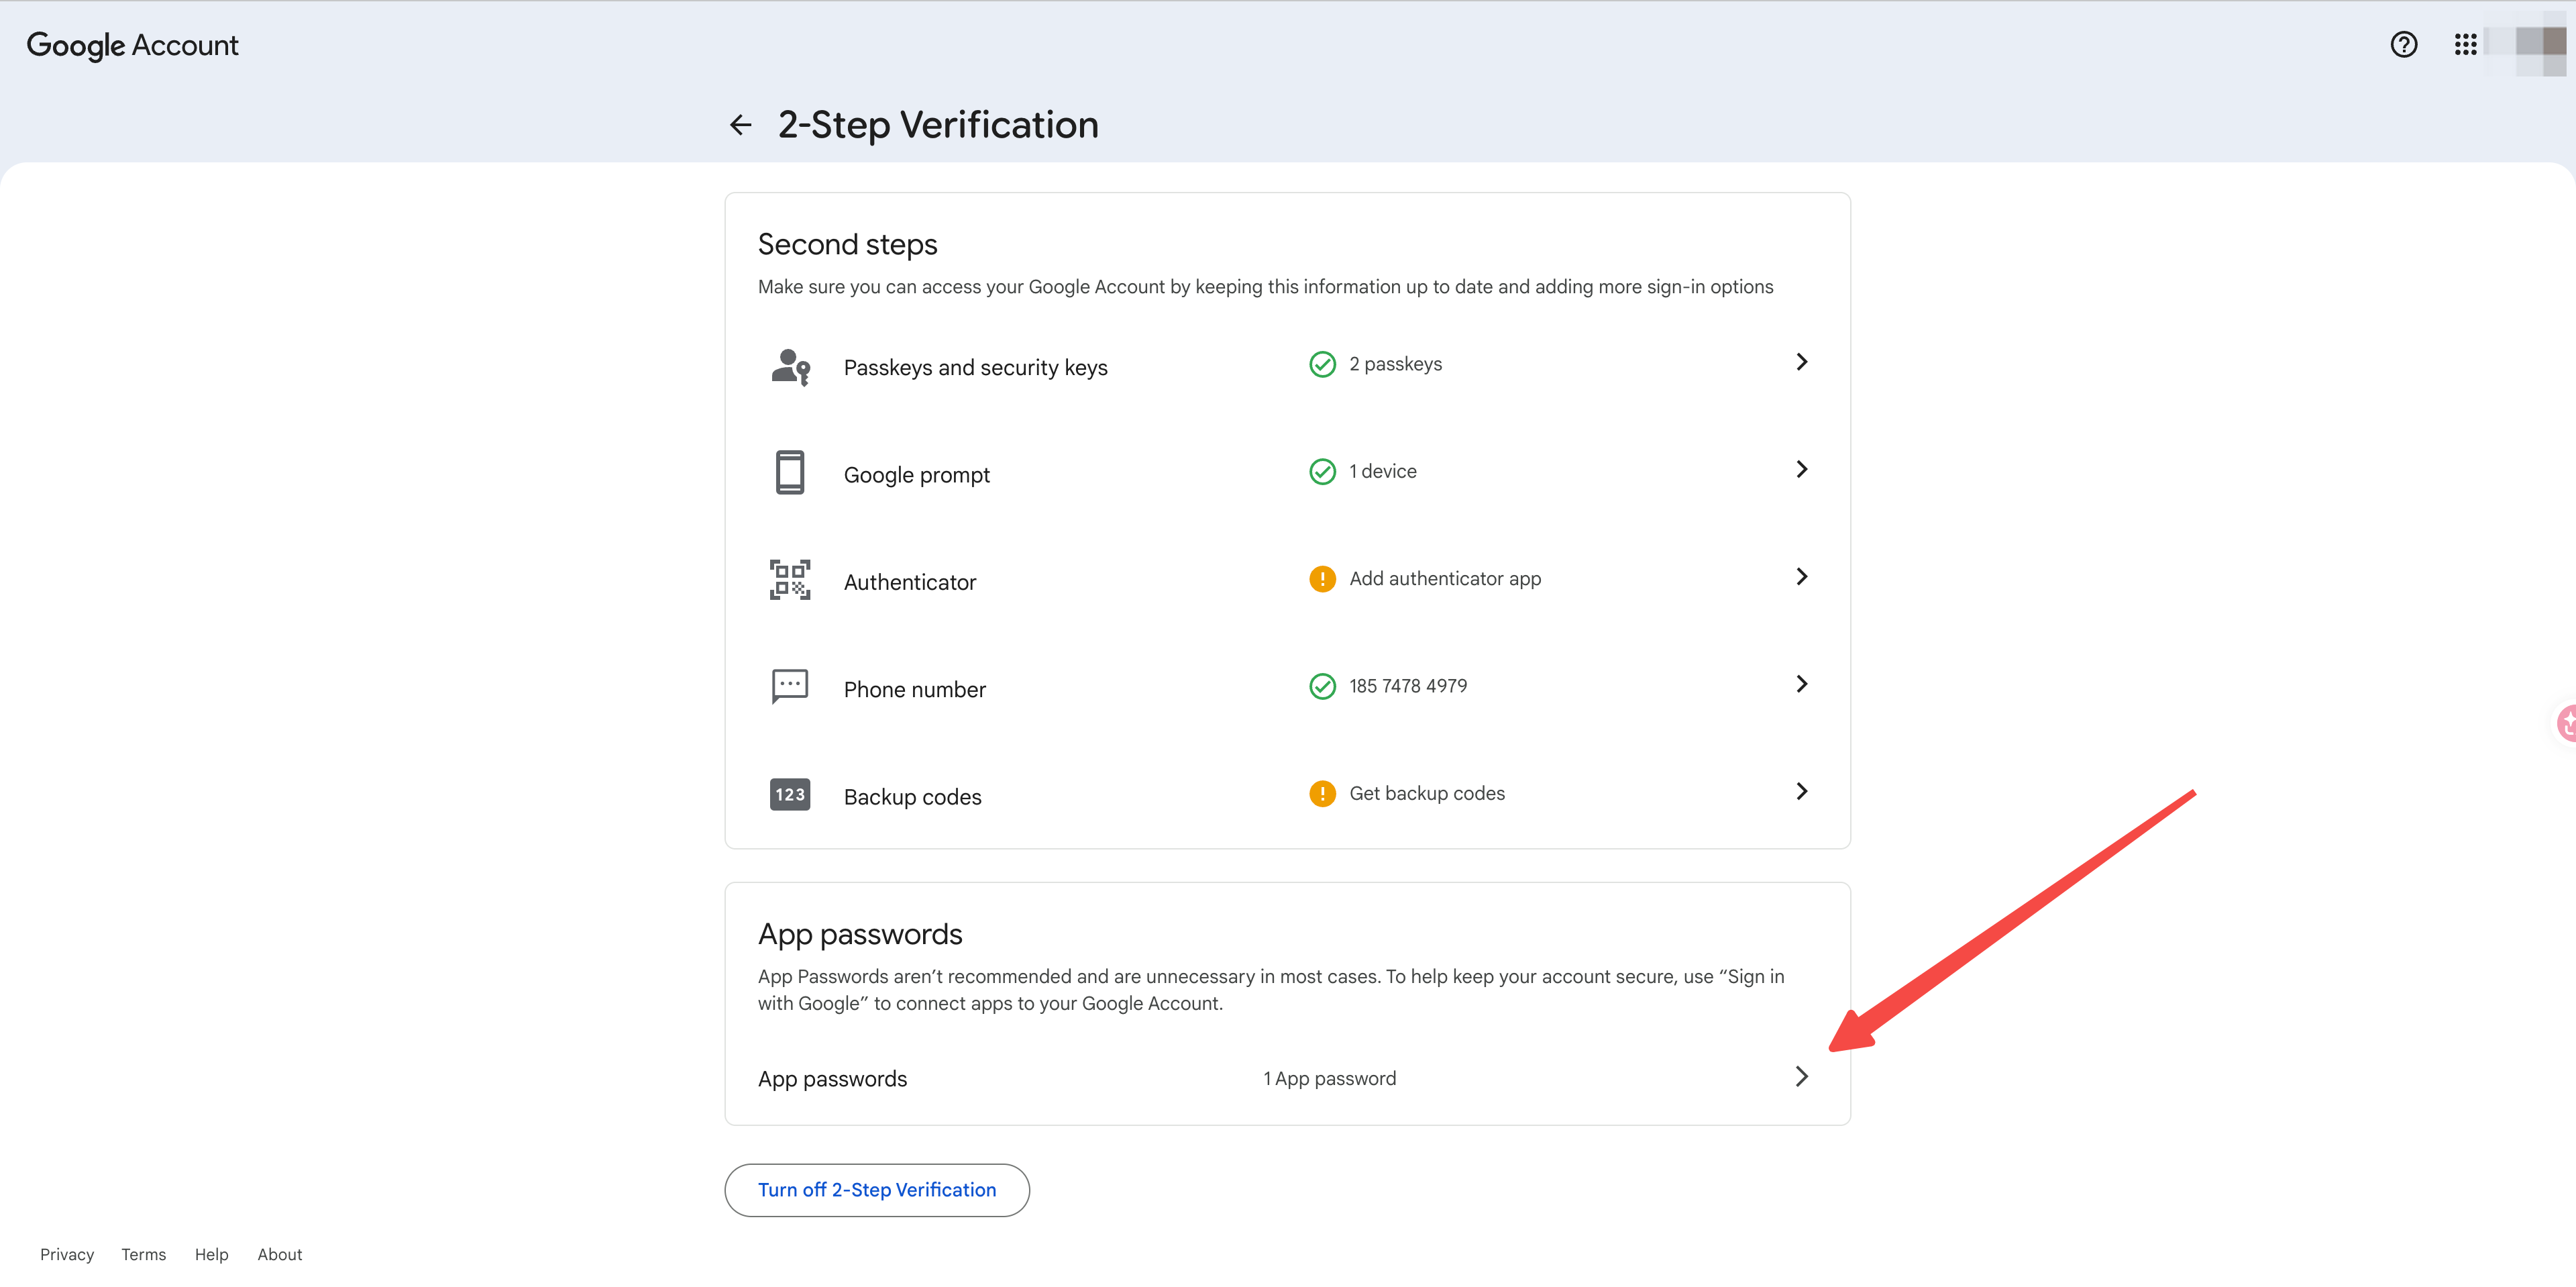
Open Google Account settings
Open Security
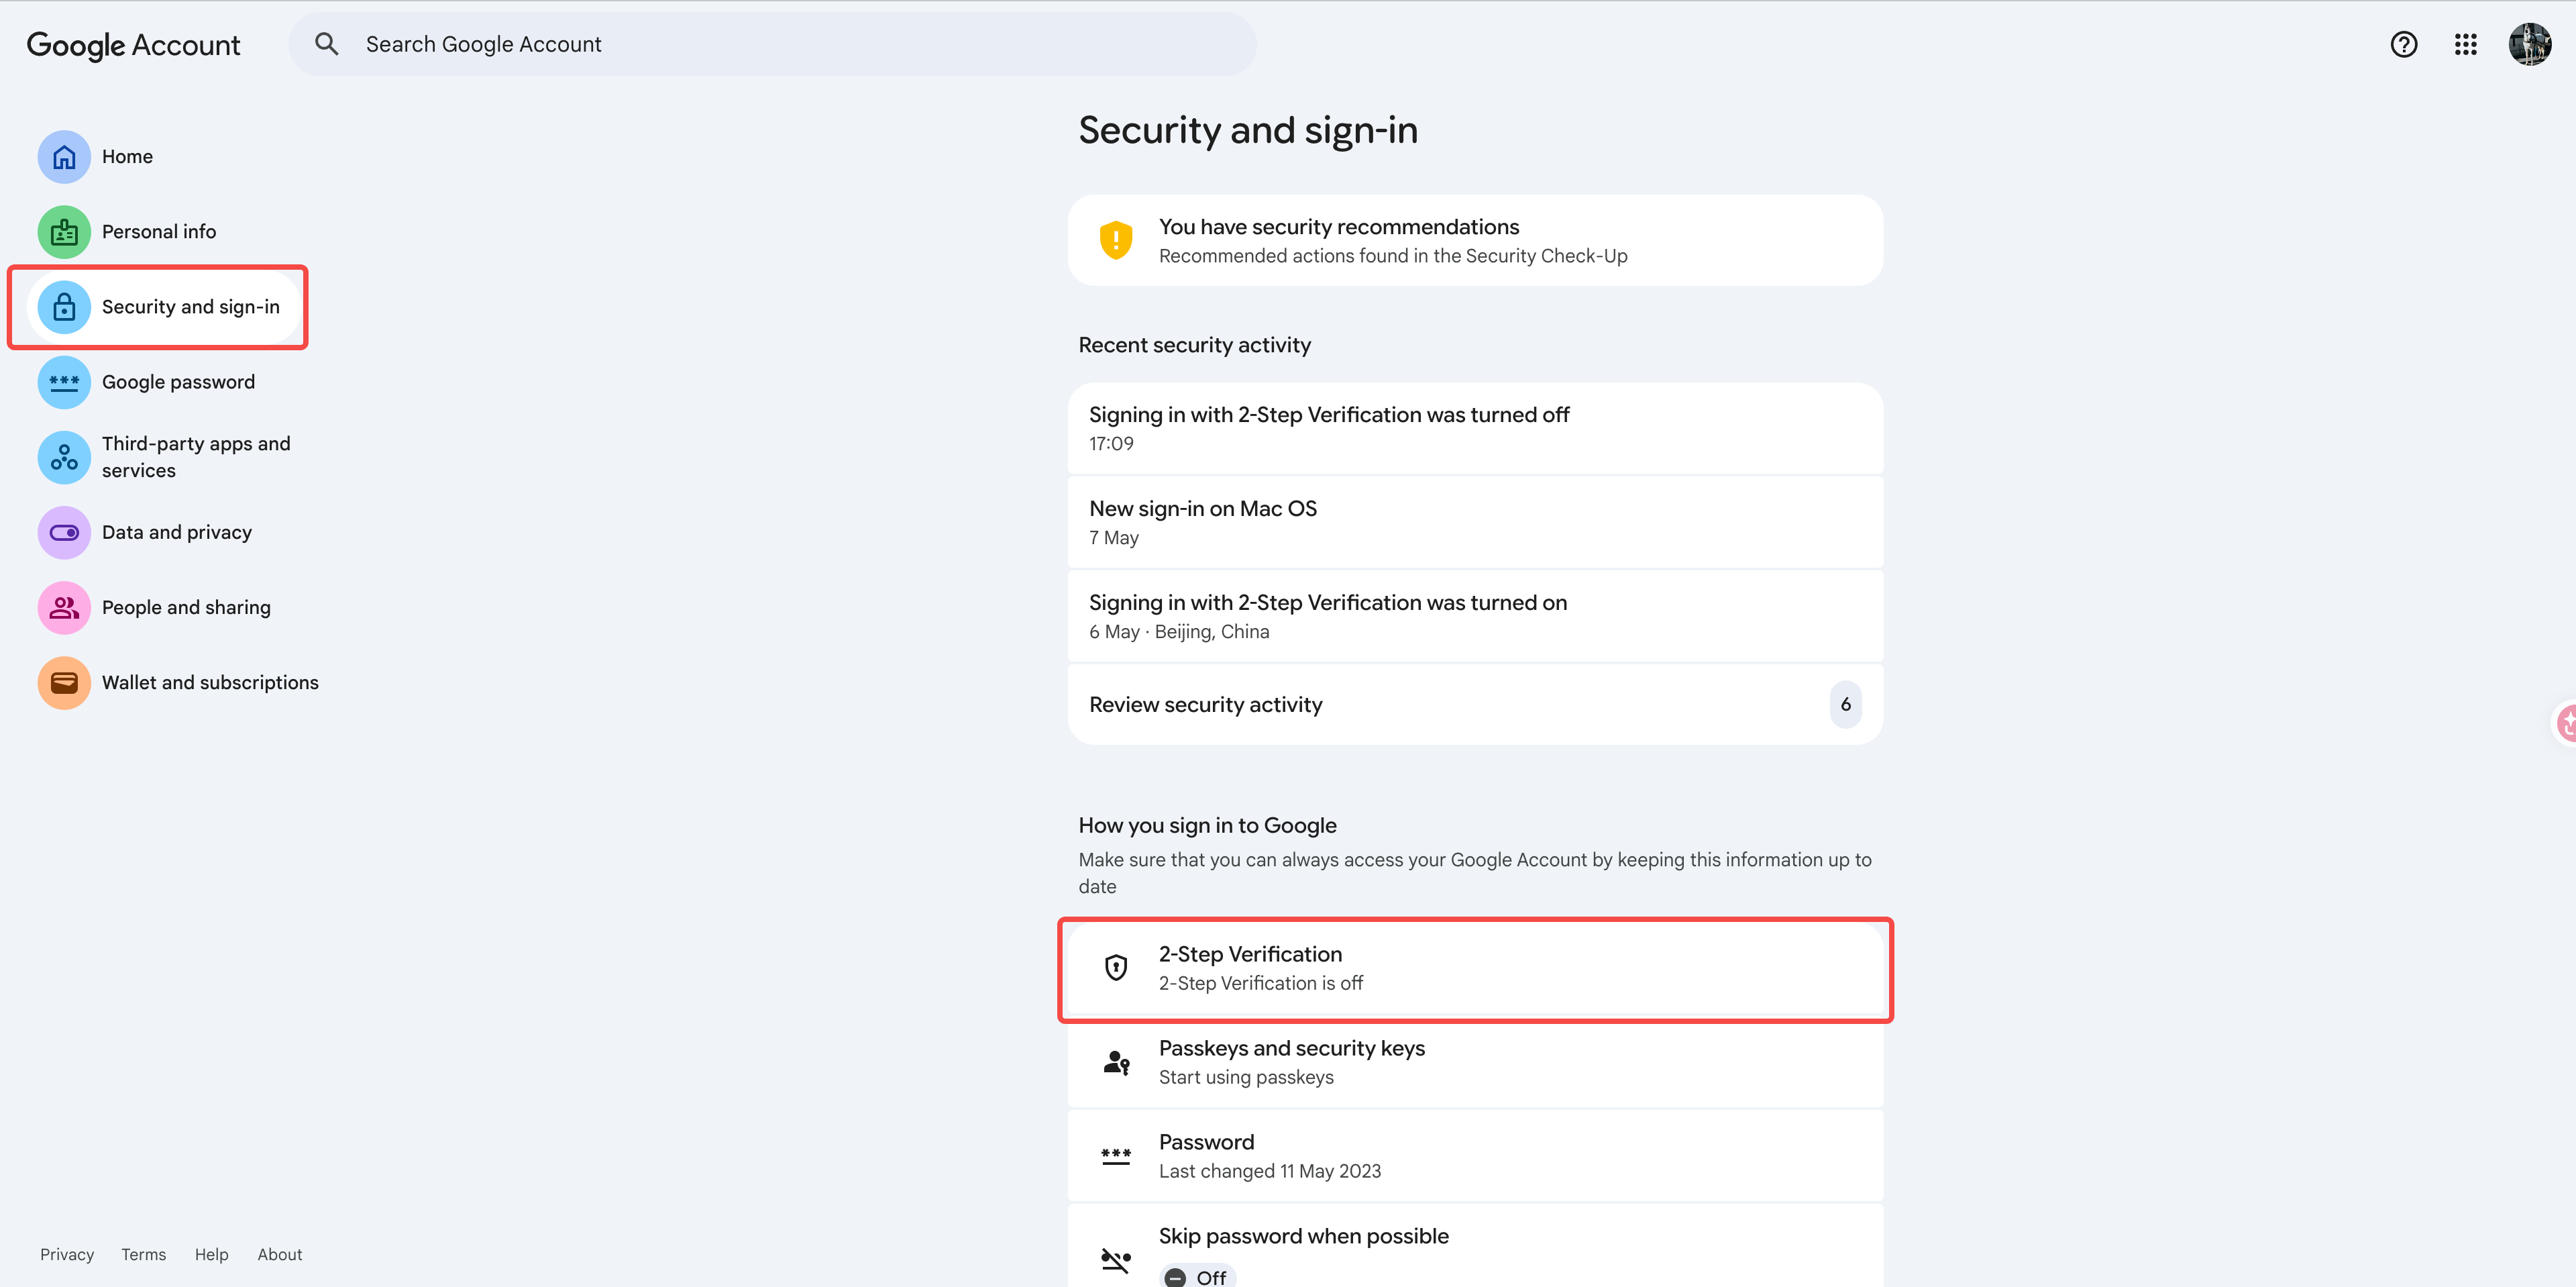
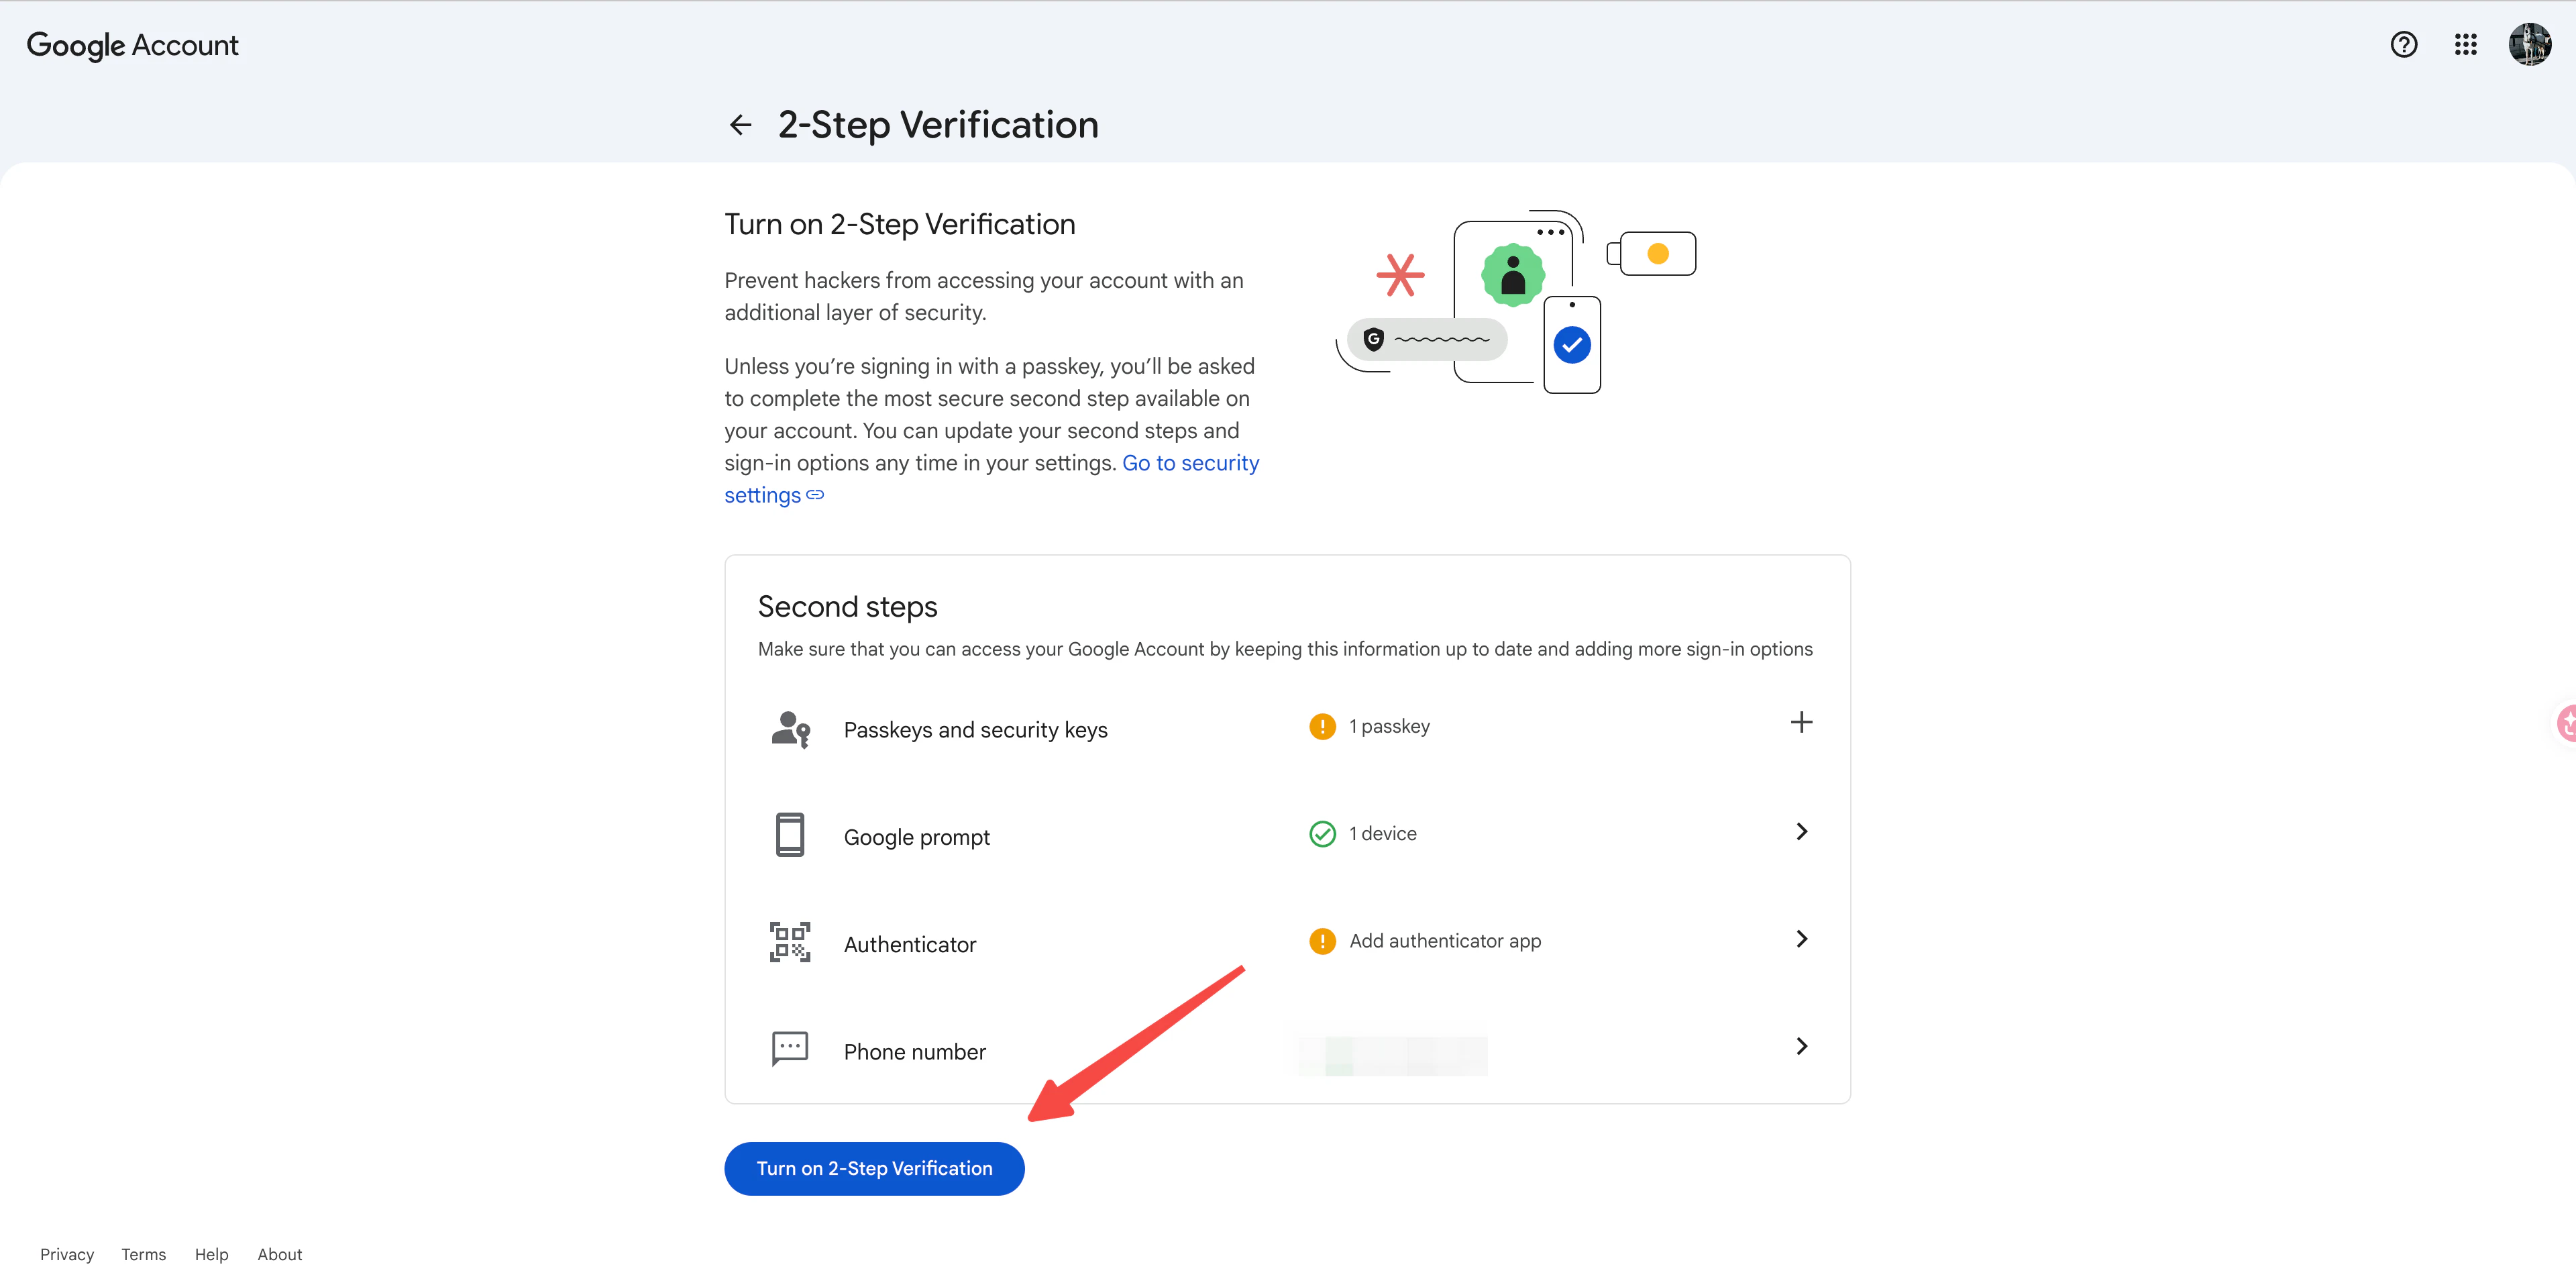
Create an App Password
Bind another SMTP / IMAP mailbox
If you choose Other, get the following information from your email provider and paste it into Readdy:- From Name: the sender name recipients should see
- From Email: the mailbox address you want to send from
- Username: usually the same as your email address
- Password: your SMTP password or app password
- SMTP Host / Port: outgoing mail server details from your provider
- IMAP Host / Port: incoming mail server details from your provider
Step 8: Start Website Generation
After your content and schedule are ready, click Start Generate.Click Start Generate
Step 9: Start Sending with Readdy
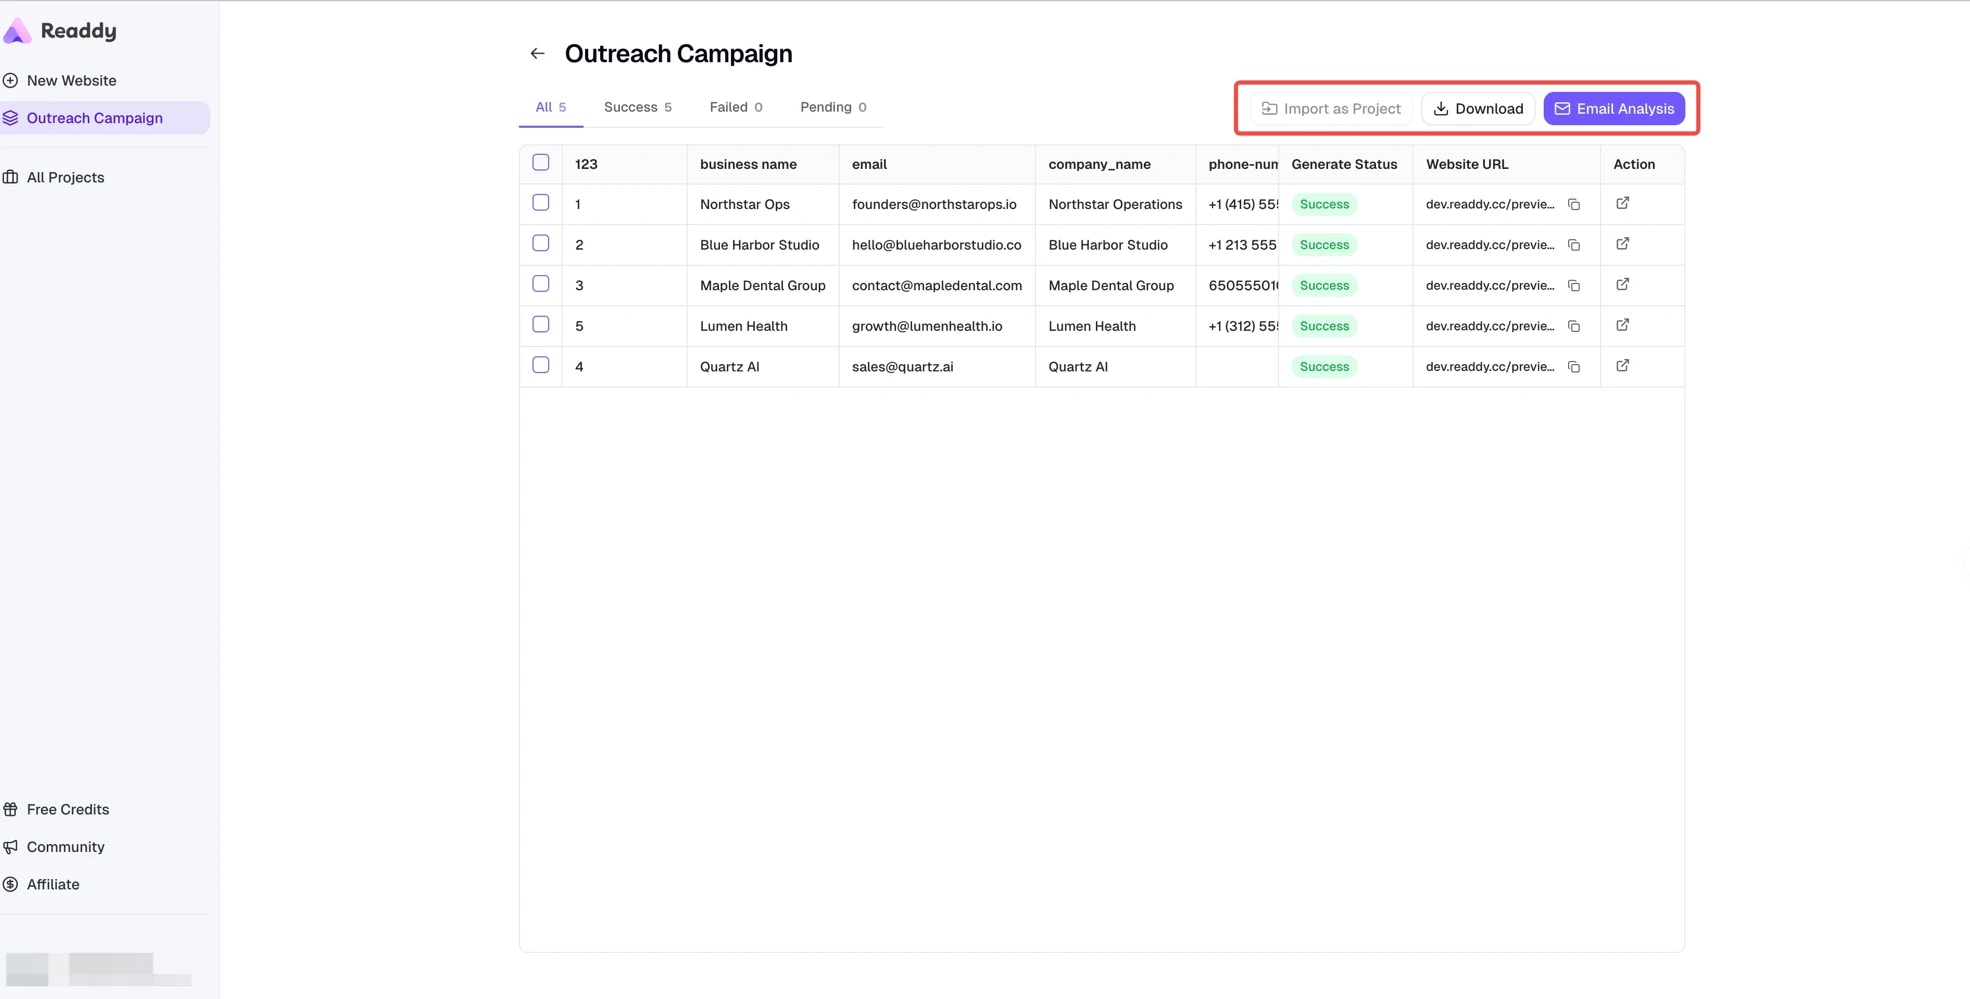
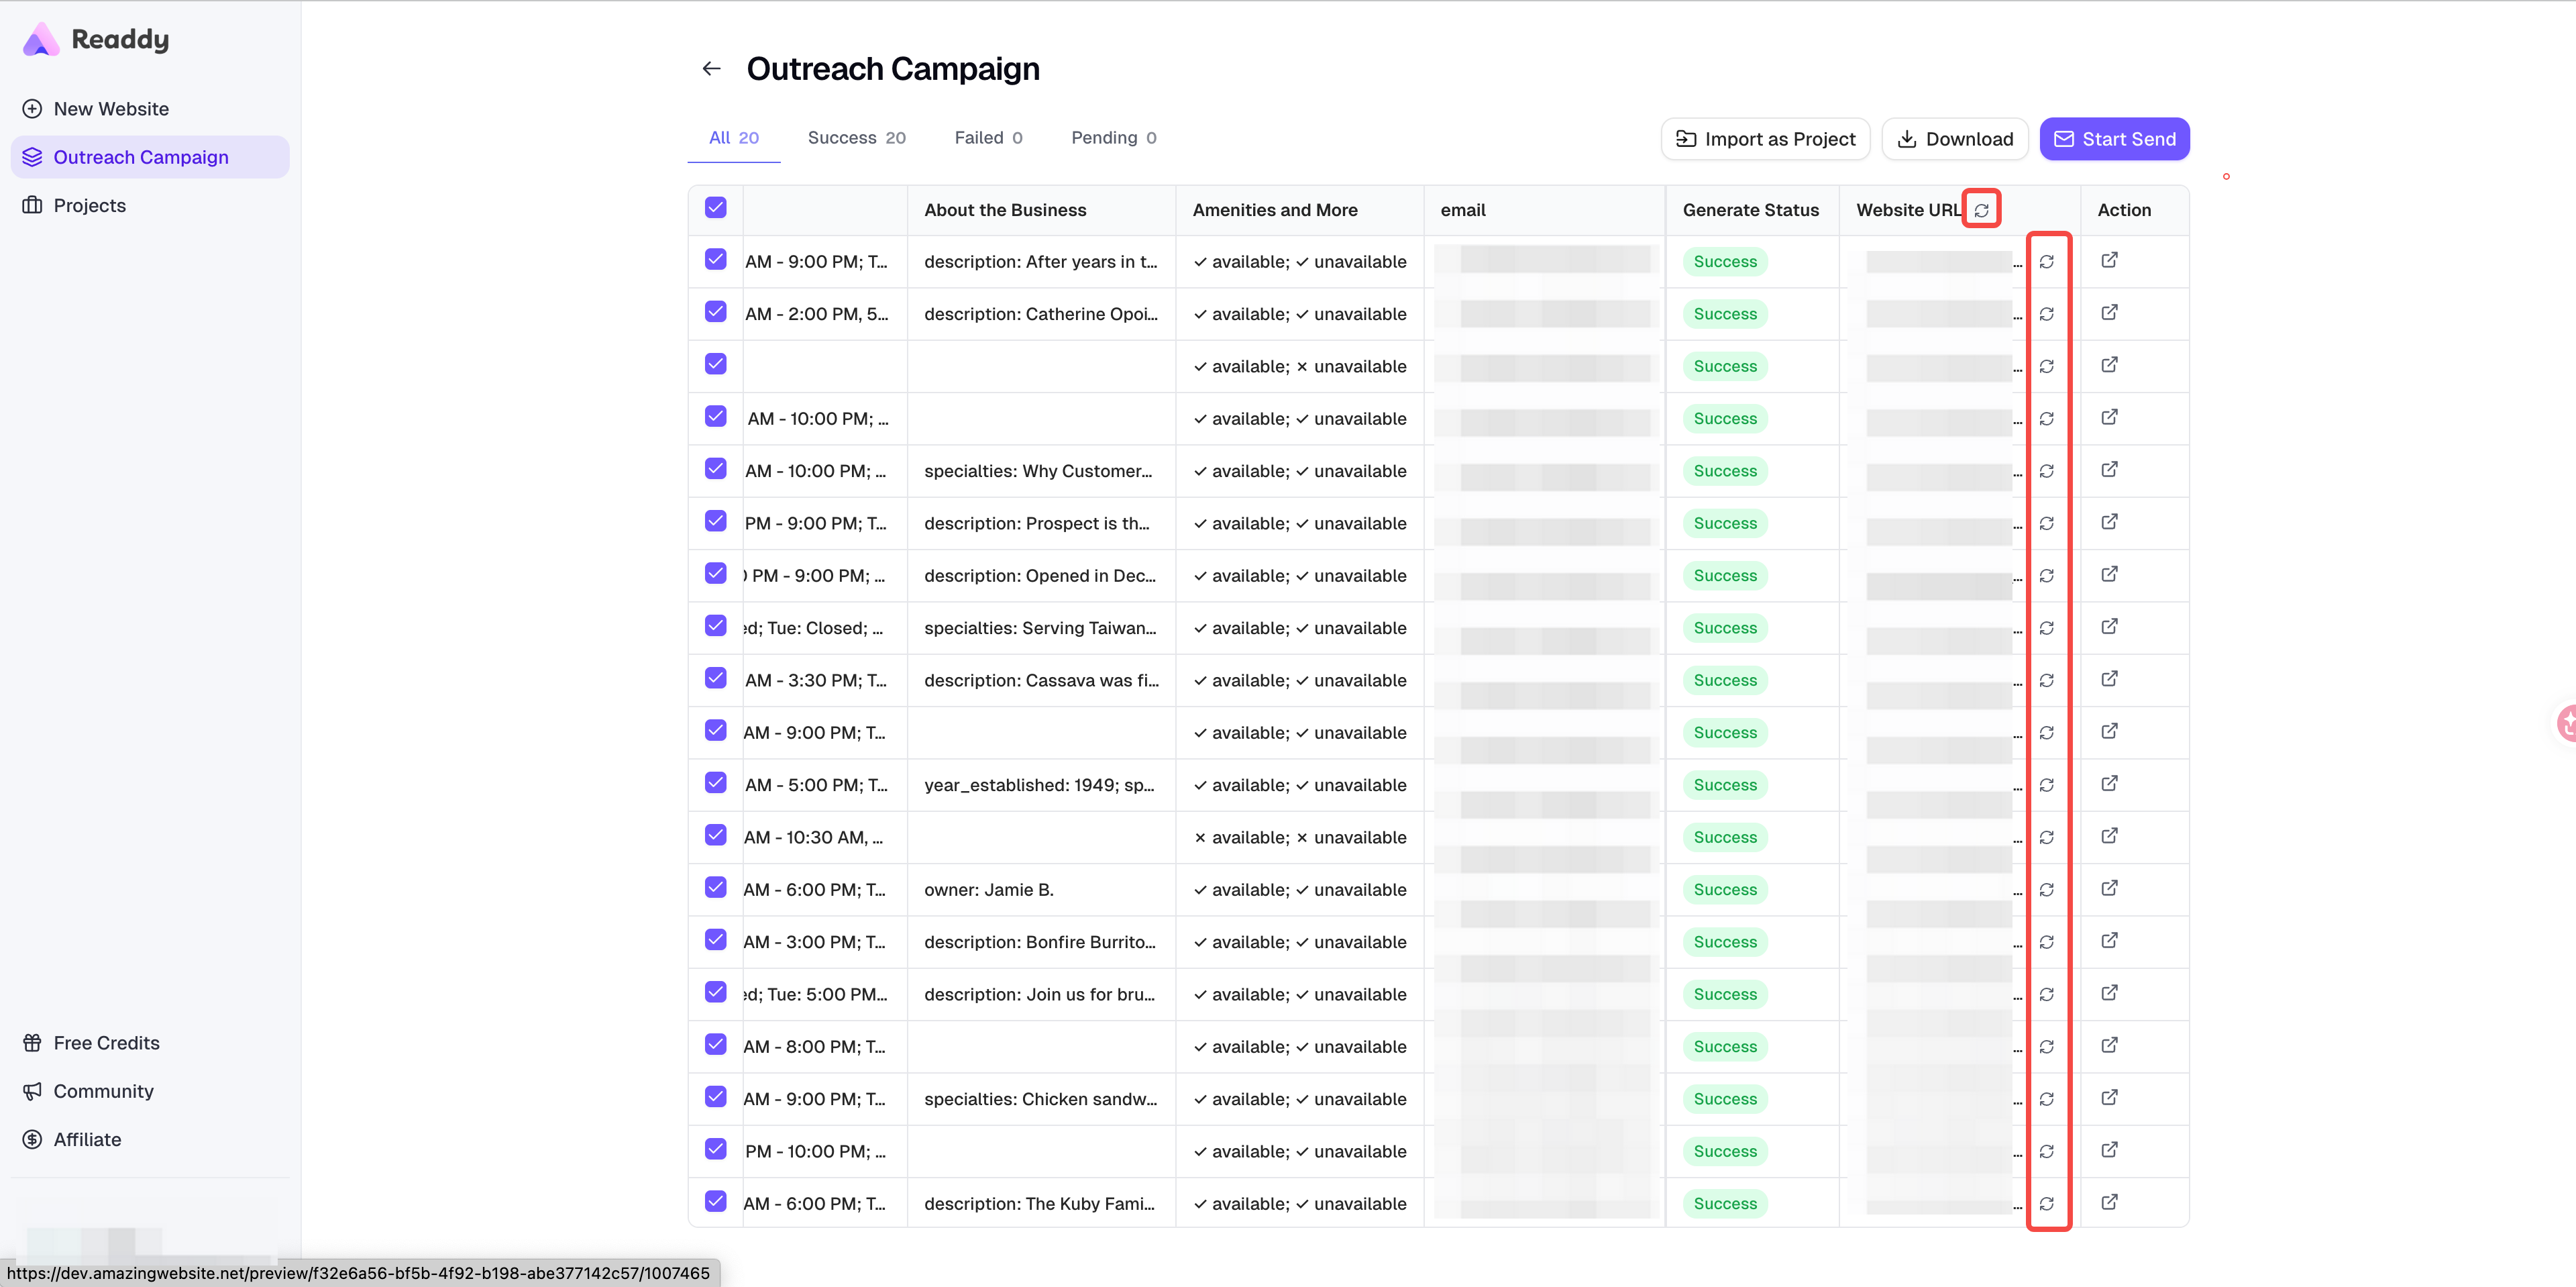
When you are ready to launch the email campaign, use the email action on the Progress or Results page and open Start Send.Step 10: Track Website Generation, Review Results, and Refresh Website URLs
After generation starts, Readdy processes each row one by one.| Stage | Description |
|---|---|
| Waiting | In queue, not started yet |
| Creating | Creating the project |
| Generating | Generating website content |
| Getting Link | Creating the website link |
| Success | Website generation is complete |
| Failed | Something went wrong and can be retried |

- Copy website links
- Import successful rows as projects
- Retry failed rows
- Download the results
- Open Start Send or Email Analysis
Not happy with a generated website?
If a generated website needs more work, select the successful row and click Import as Project. Readdy will convert it into a regular project so you can continue editing it in the normal project workspace. After you finish editing that imported project, return to Outreach Campaign and refresh the website link in the Website URL column to pull the newest version.- Use the refresh icon in the Website URL column header to refresh links in bulk
- Use the refresh icon in a specific row to refresh only that row’s latest URL
Step 11: View Email Analytics
After sending starts, the email button changes to Email Analysis. There you can check campaign performance: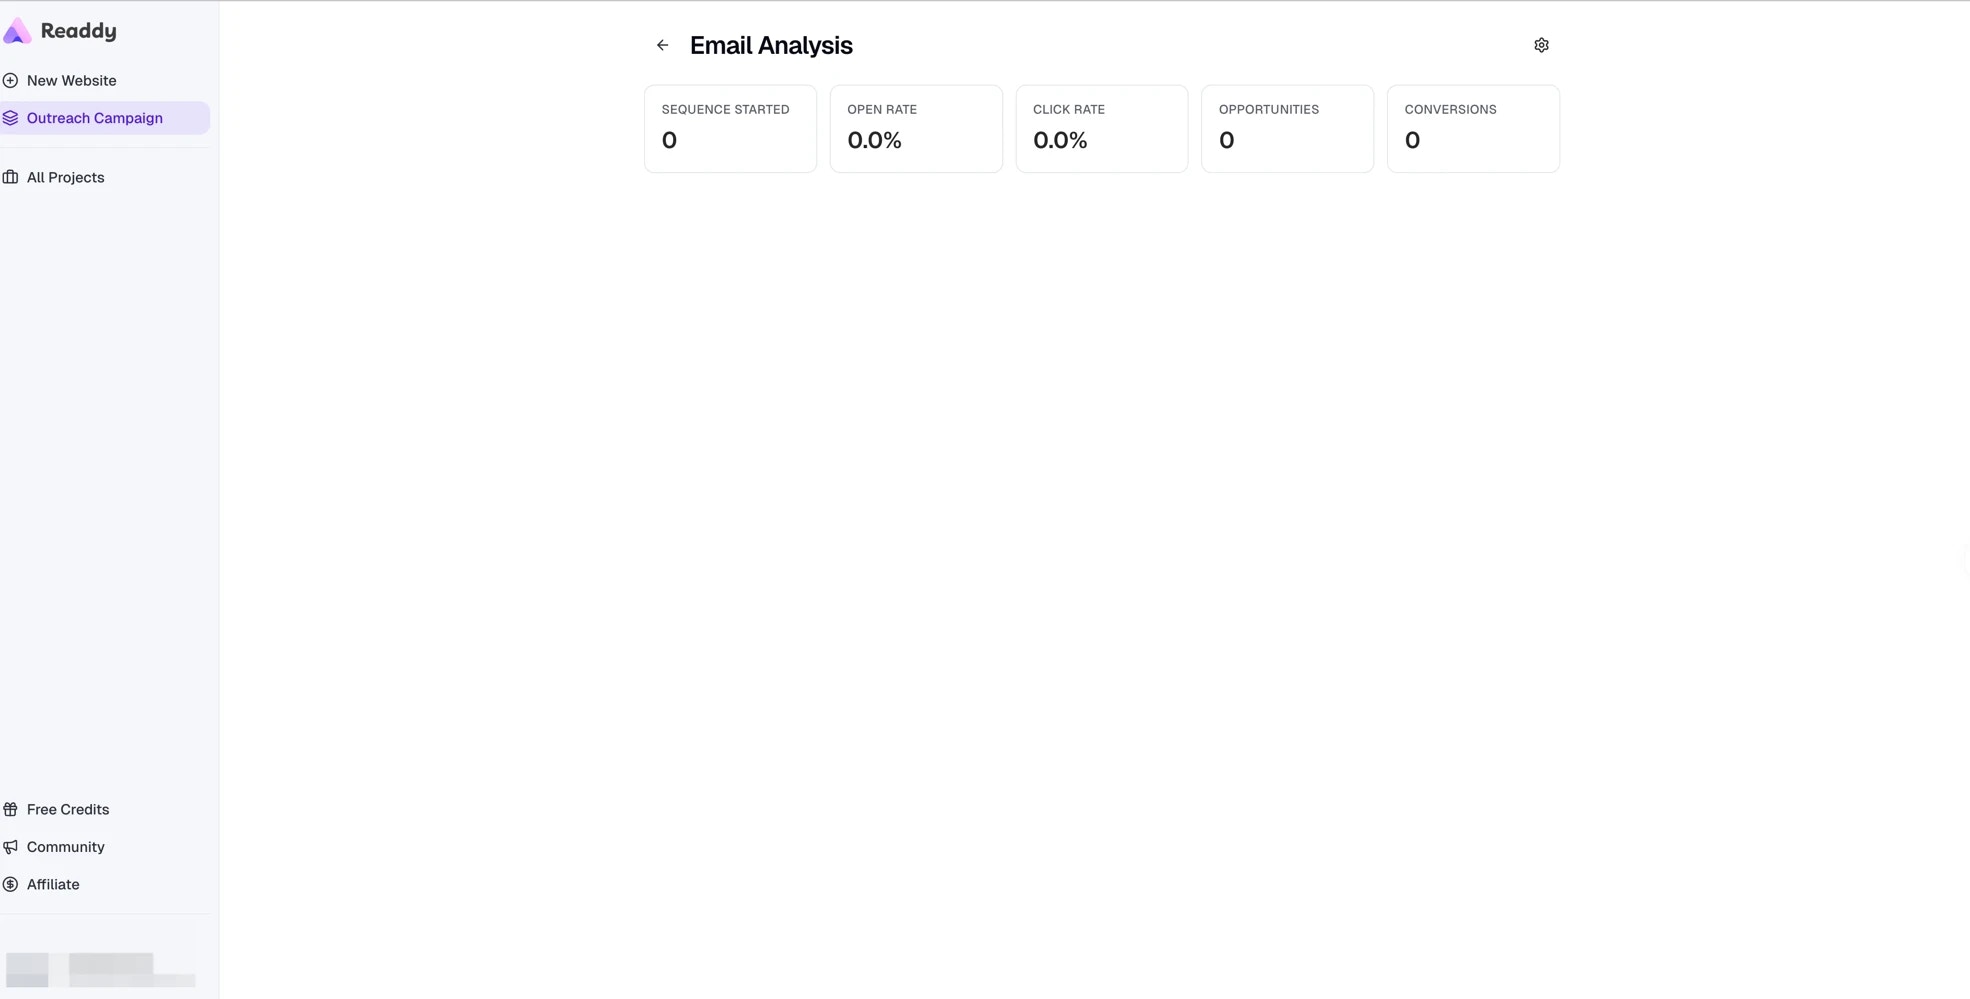
| Metric | Description |
|---|---|
| Sequences Started | Number of emails that entered the sending flow |
| Open Rate | Percentage of recipients who opened the email |
| Click Rate | Percentage of recipients who clicked a link |
| Opportunities | Number of interested recipients |
| Conversions | Number of final deals or completed goals |
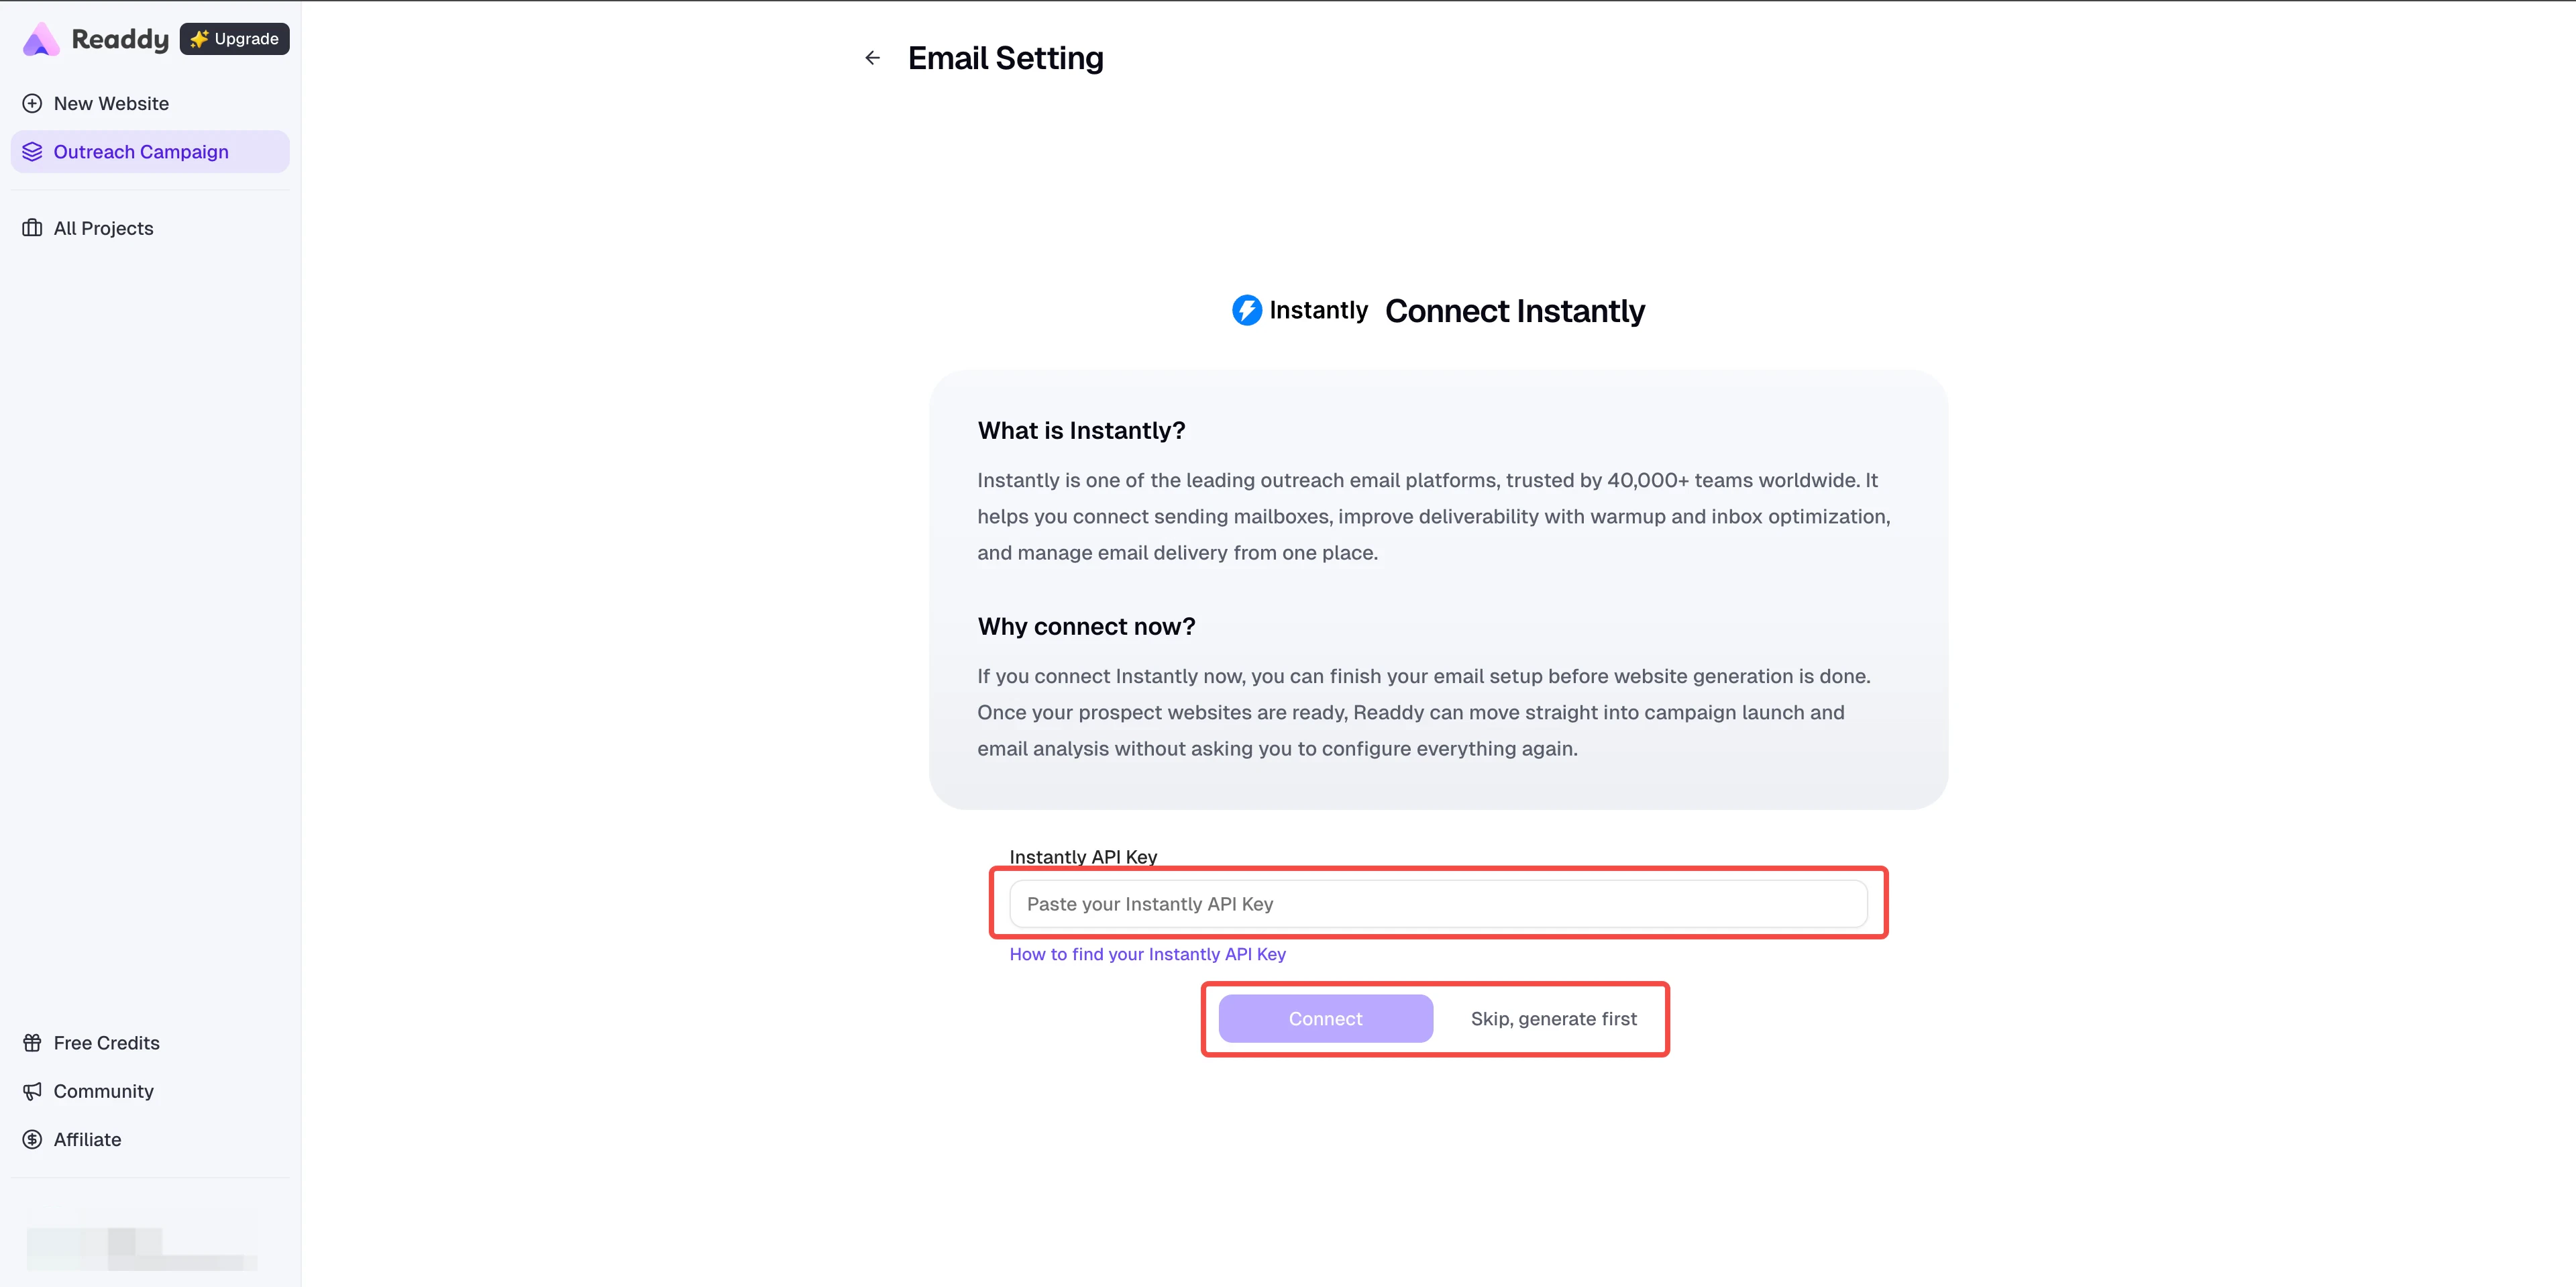
Optional: Use Instantly Instead of Readdy
If you prefer to send through Instantly, you can still do that. Readdy keeps Readdy as the default send channel, but you can switch to Instantly before the first send.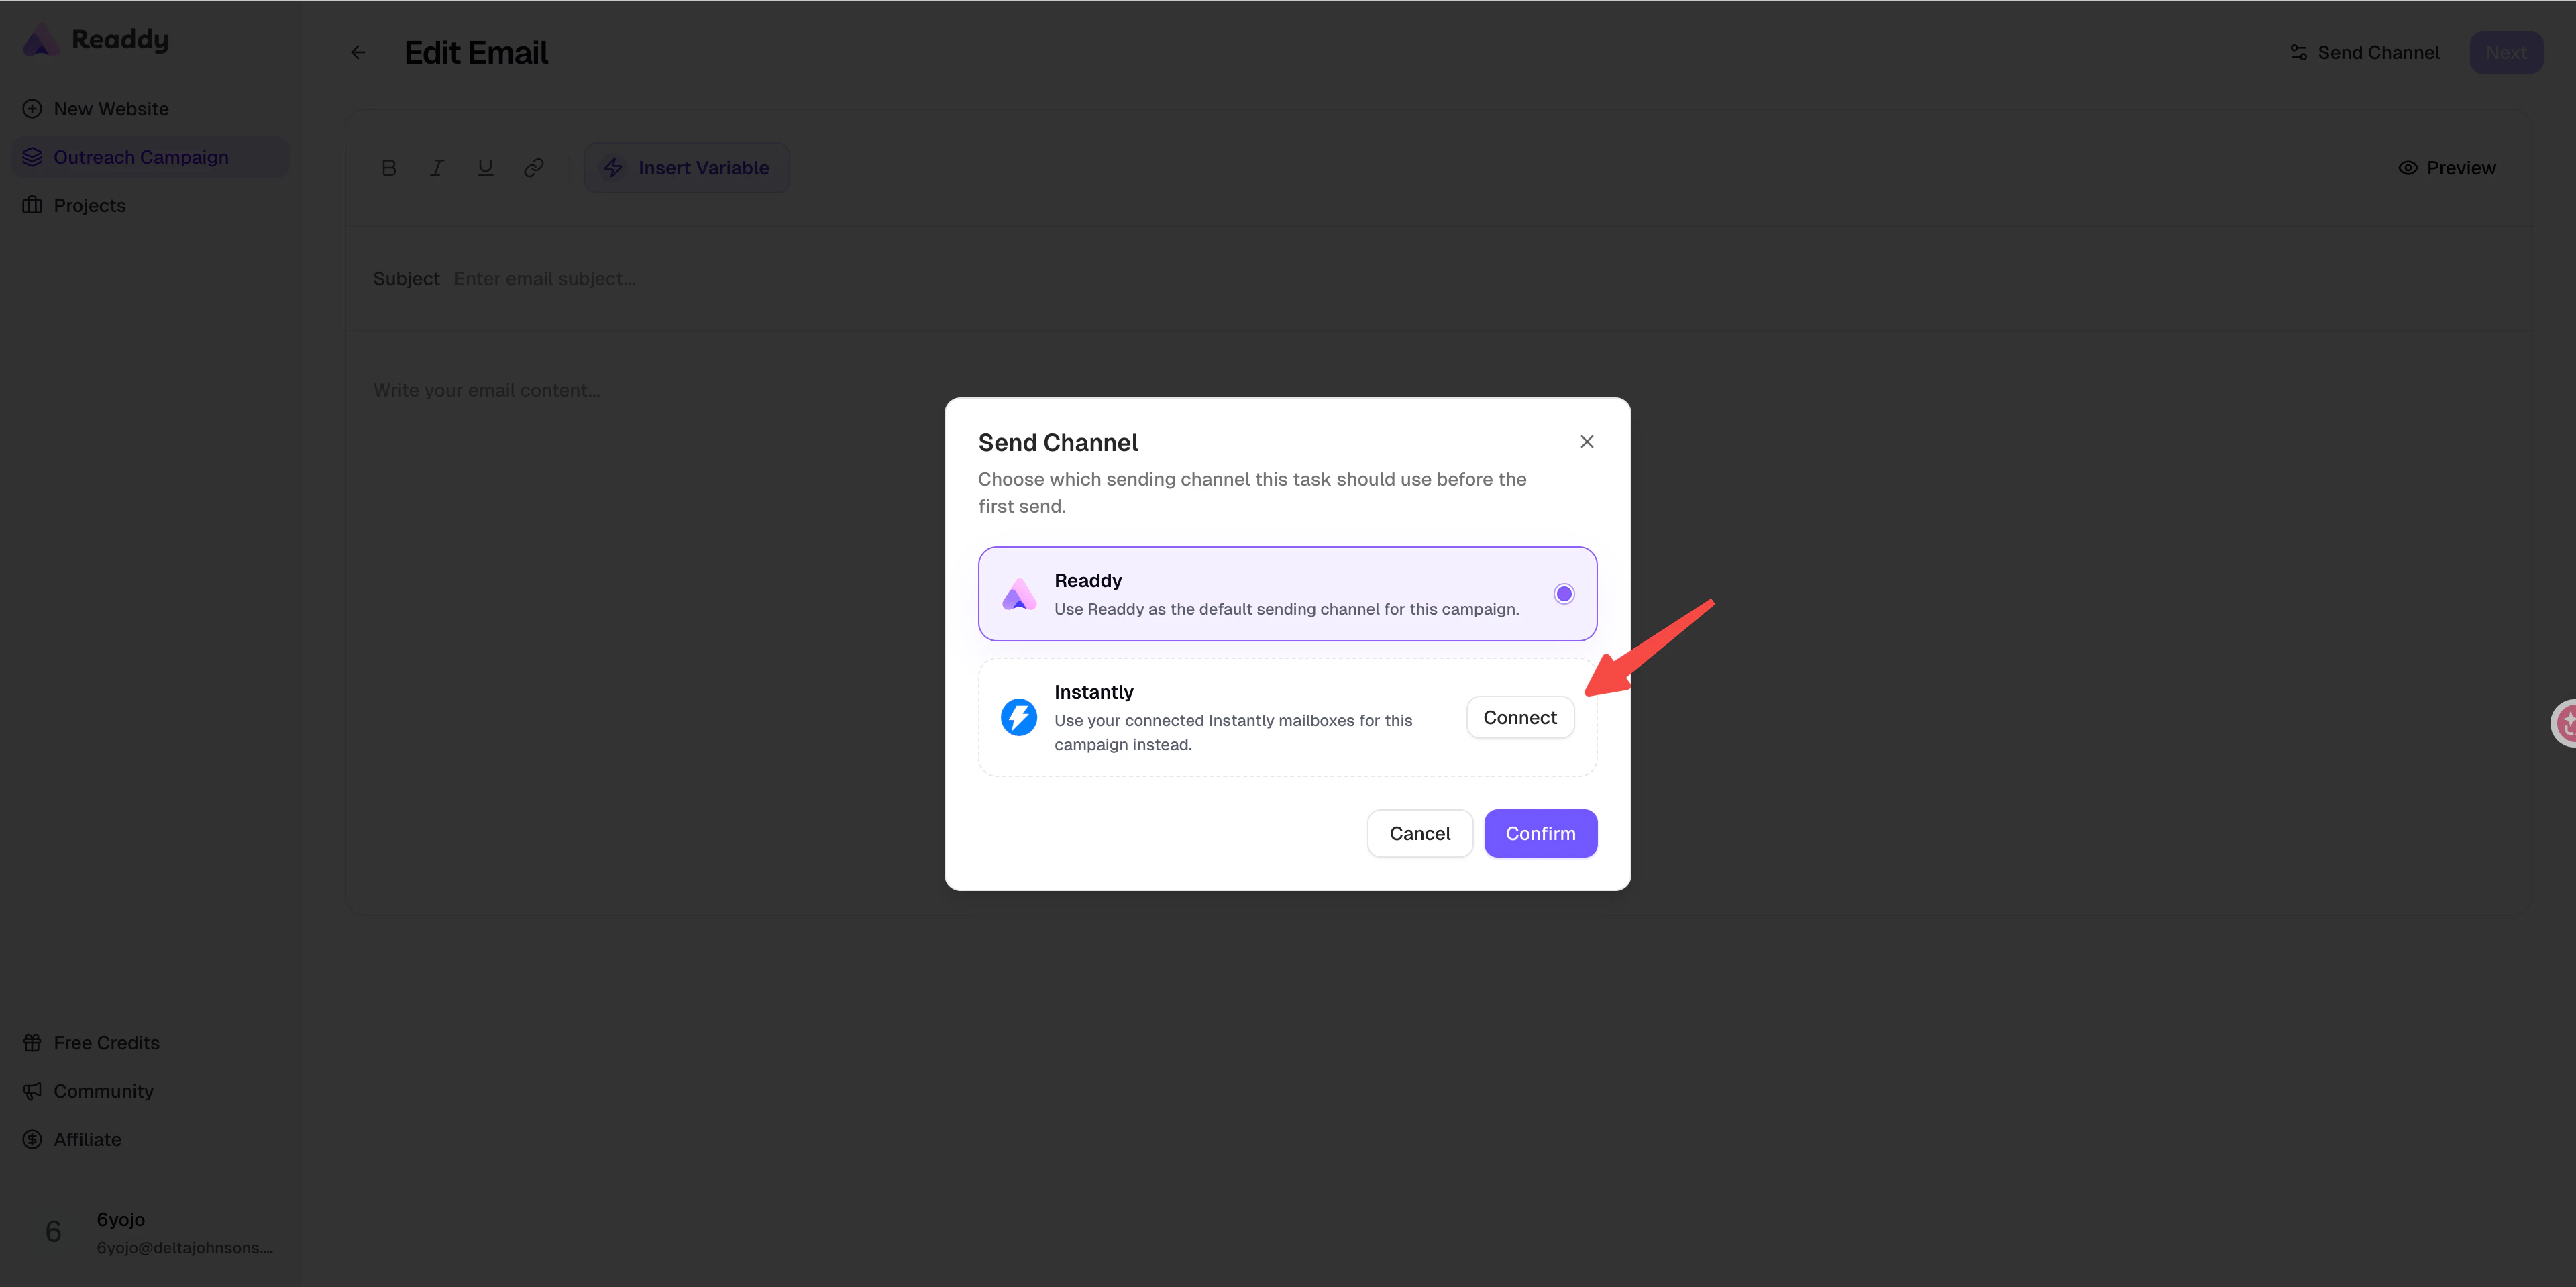
Limits Summary
Outreach Campaign Limits
| Limit | Details |
|---|---|
| Plan availability | Starter or above, or Agency Basic and above |
| Spreadsheet format | .csv and .xlsx |
| File size | Maximum 5MB |
| Single upload limit | Depends on your plan |
| Required column | Must include email |
| Email format | Each email must be valid |
| Credits cost | 5 Credits per row, charged only for successful rows |
| Browser requirement | Keep the browser open during generation |
| Tab limit | Only one tab can run batch generation at a time |
| Paid plan | Generation quota | Single upload limit |
|---|---|---|
| Starter / Starter2 | 500 | 100 |
| Pro family / Customization | 3000 | 300 |
| Agency Basic | 5000 | 1000 |
| Agency Scale | 20000 | 3000 |
| Agency Max | 50000 | 5000 |
Sending Limits
| Limit | Details |
|---|---|
| Default channel | Readdy |
| Optional channel | Instantly before the first send |
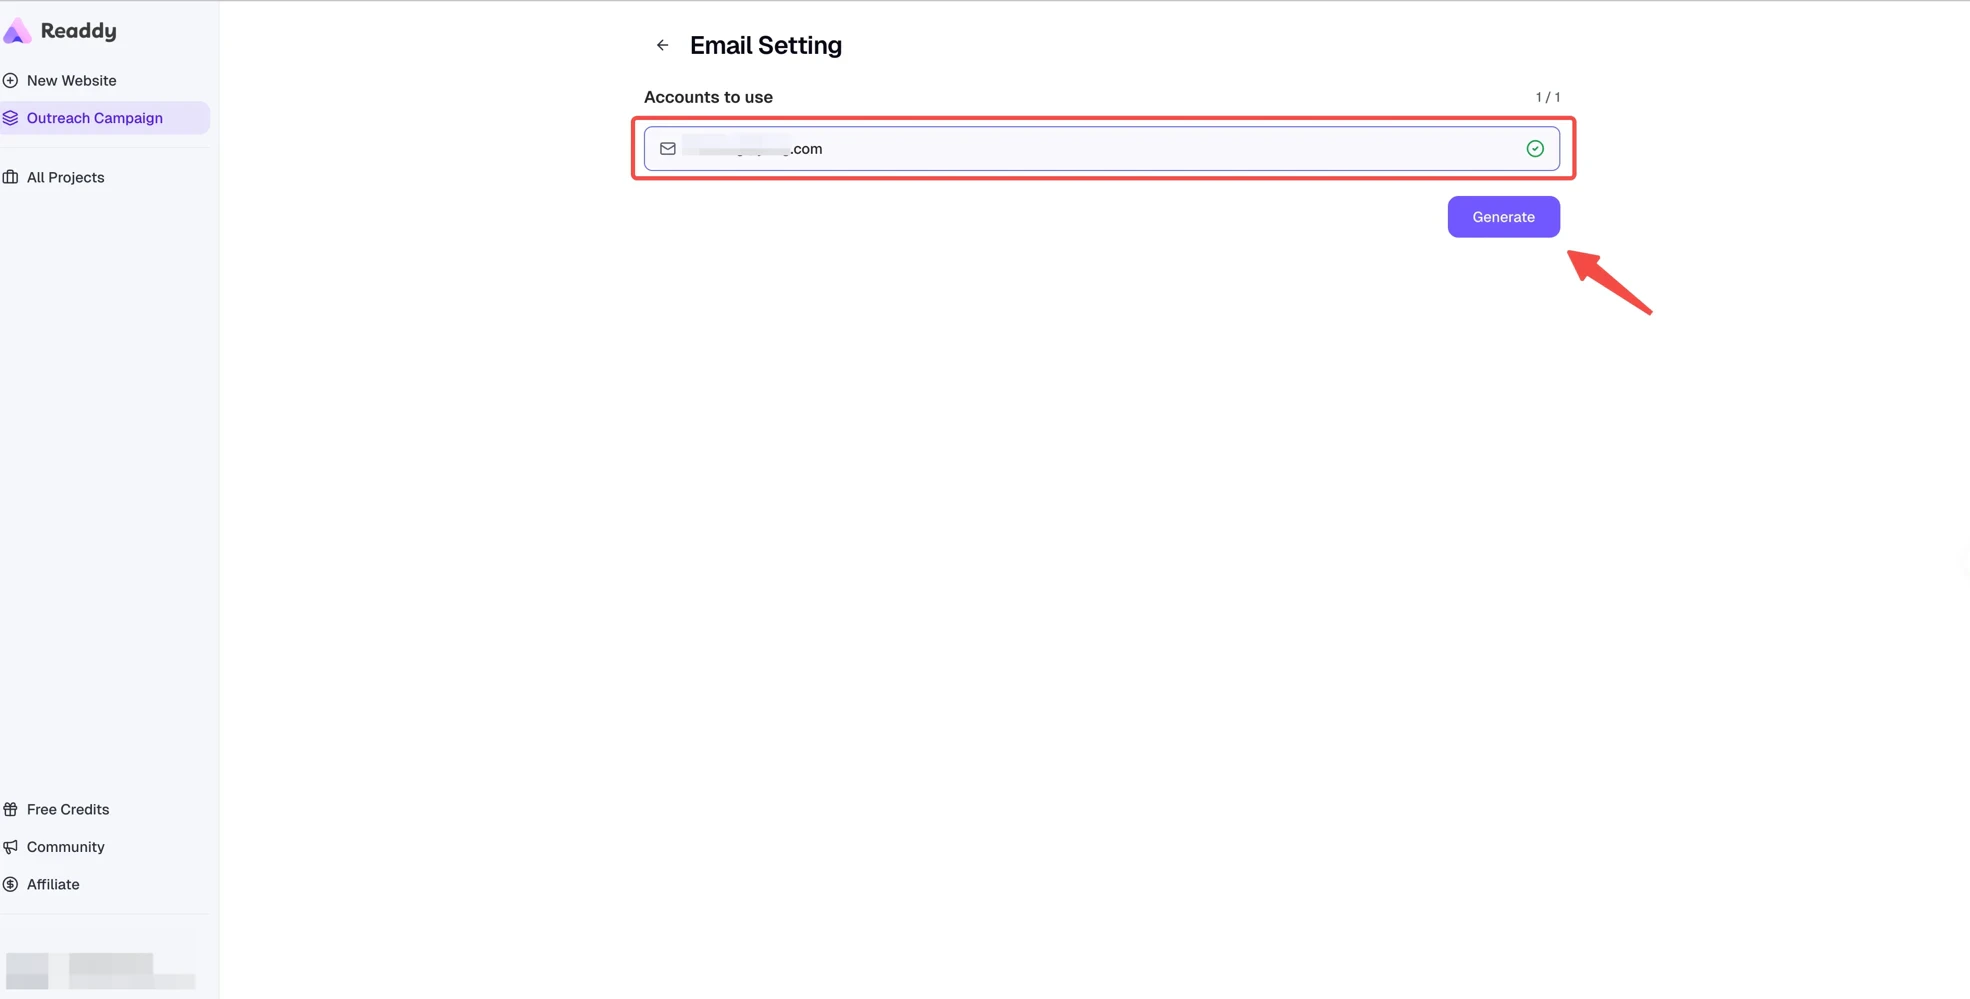
| Mailbox requirement | Select at least one available mailbox before sending |
| Email content | Subject and body are required |
| Edit rule | Pause an active campaign before editing |
| Deletion | Deleting a campaign cannot be undone |
FAQ
File upload says 'File must contain an email column'?
File upload says 'File must contain an email column'?
.csv or .xlsx file includes an email column.Extra spaces in the column name can cause validation issues. Letter case does
not matter, so Email, EMAIL, and email all work. Using Readdy’s template
is the safest option.File upload says 'Invalid email format'?
File upload says 'Invalid email format'?
@, include extra spaces, or use incomplete domains.What if I do not have a client list yet?
What if I do not have a client list yet?
.csv file, and bring that file back into
Outreach Campaign.Can I start generation before binding a mailbox?
Can I start generation before binding a mailbox?
Can I connect Gmail with SMTP?
Can I connect Gmail with SMTP?
Can I connect other mailboxes besides Gmail?
Can I connect other mailboxes besides Gmail?
What happens if I click Send while websites are still generating?
What happens if I click Send while websites are still generating?
Accidentally closed the browser during generation?
Accidentally closed the browser during generation?
Shows 'Batch generation is running in another tab'?
Shows 'Batch generation is running in another tab'?
How many emails per mailbox per day is recommended?
How many emails per mailbox per day is recommended?
How do I view campaign performance?
How do I view campaign performance?
Need Help?
If this guide doesn’t resolve your issue:- Submit a support ticket: readdy.ai/feedback
- Use the live chat in the top-right corner of Readdy