📋 Overview
📌 Why Use Readdy Agent?
Readdy Agent is built to support key customer interactions, even when your team is offline. It’s especially useful for:- Answering product or service questions from website visitors
- Assisting users outside of business hours
- Helping users schedule appointments or book services directly via chat or voice
- Save effort on handling customer inquiries
- Increase conversion and booking rates
- Improve visitor satisfaction and engagement
- Provide 24/7 real-time assistance
- Collect valuable data on user intent and behavior
💡 Feature Hightlights
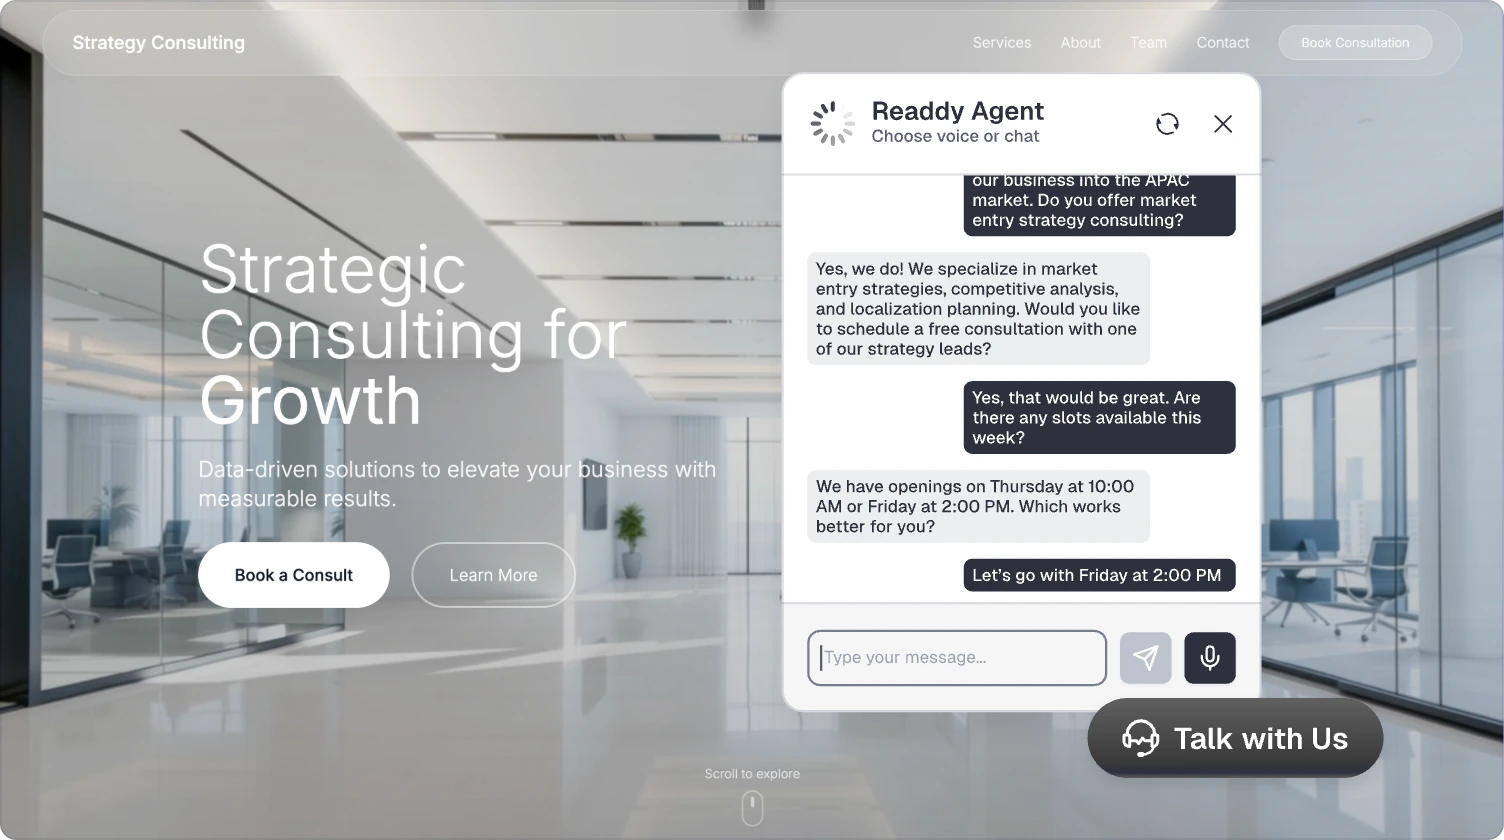
- Smart Chat & Voice Assistant – Engage visitors in real-time through natural chat or voice conversations. Understands questions and responds like a human assistant.
- AI-Powered Appointment Scheduling – Visitors can check availability, book, reschedule, or cancel appointments directly through chat or voice interaction.
- Multilingual & Region-Aware – Supports 15+ languages and regions, including English, Simplified/Traditional Chinese, Japanese, Korean, Spanish, and more.
- Automatic Lead Capture – Every interaction is logged with full conversation history or summary, timestamps, and contact info to help you capture more leads effortlessly.
- Fully Customizable Assistant – Personalize the assistant’s tone, language, prompts, and FAQs. Optional email alerts and smart settings keep you in control.
📖 How to Use
1. Getting Started - Add Readdy Agent to Your Project
You can add the Readdy Agent when creating a project or at any time afterward.Add Through Chat
- When creating a new project, simply describe your needs in the prompt. For example:
- “Set up an online booking system for easy event planning”
- “Add a smart chat and voice assistant to my website”
- “Create an AI receptionist that can answer product questions and help schedule demos”
- For existing projects, you can activate Readdy Agent anytime by chatting with Readdy:
- “Add a customer service assistant to this site”
- “Can you help me set up appointment scheduling?”
- “Enable the AI chat and voice assistant for this project”
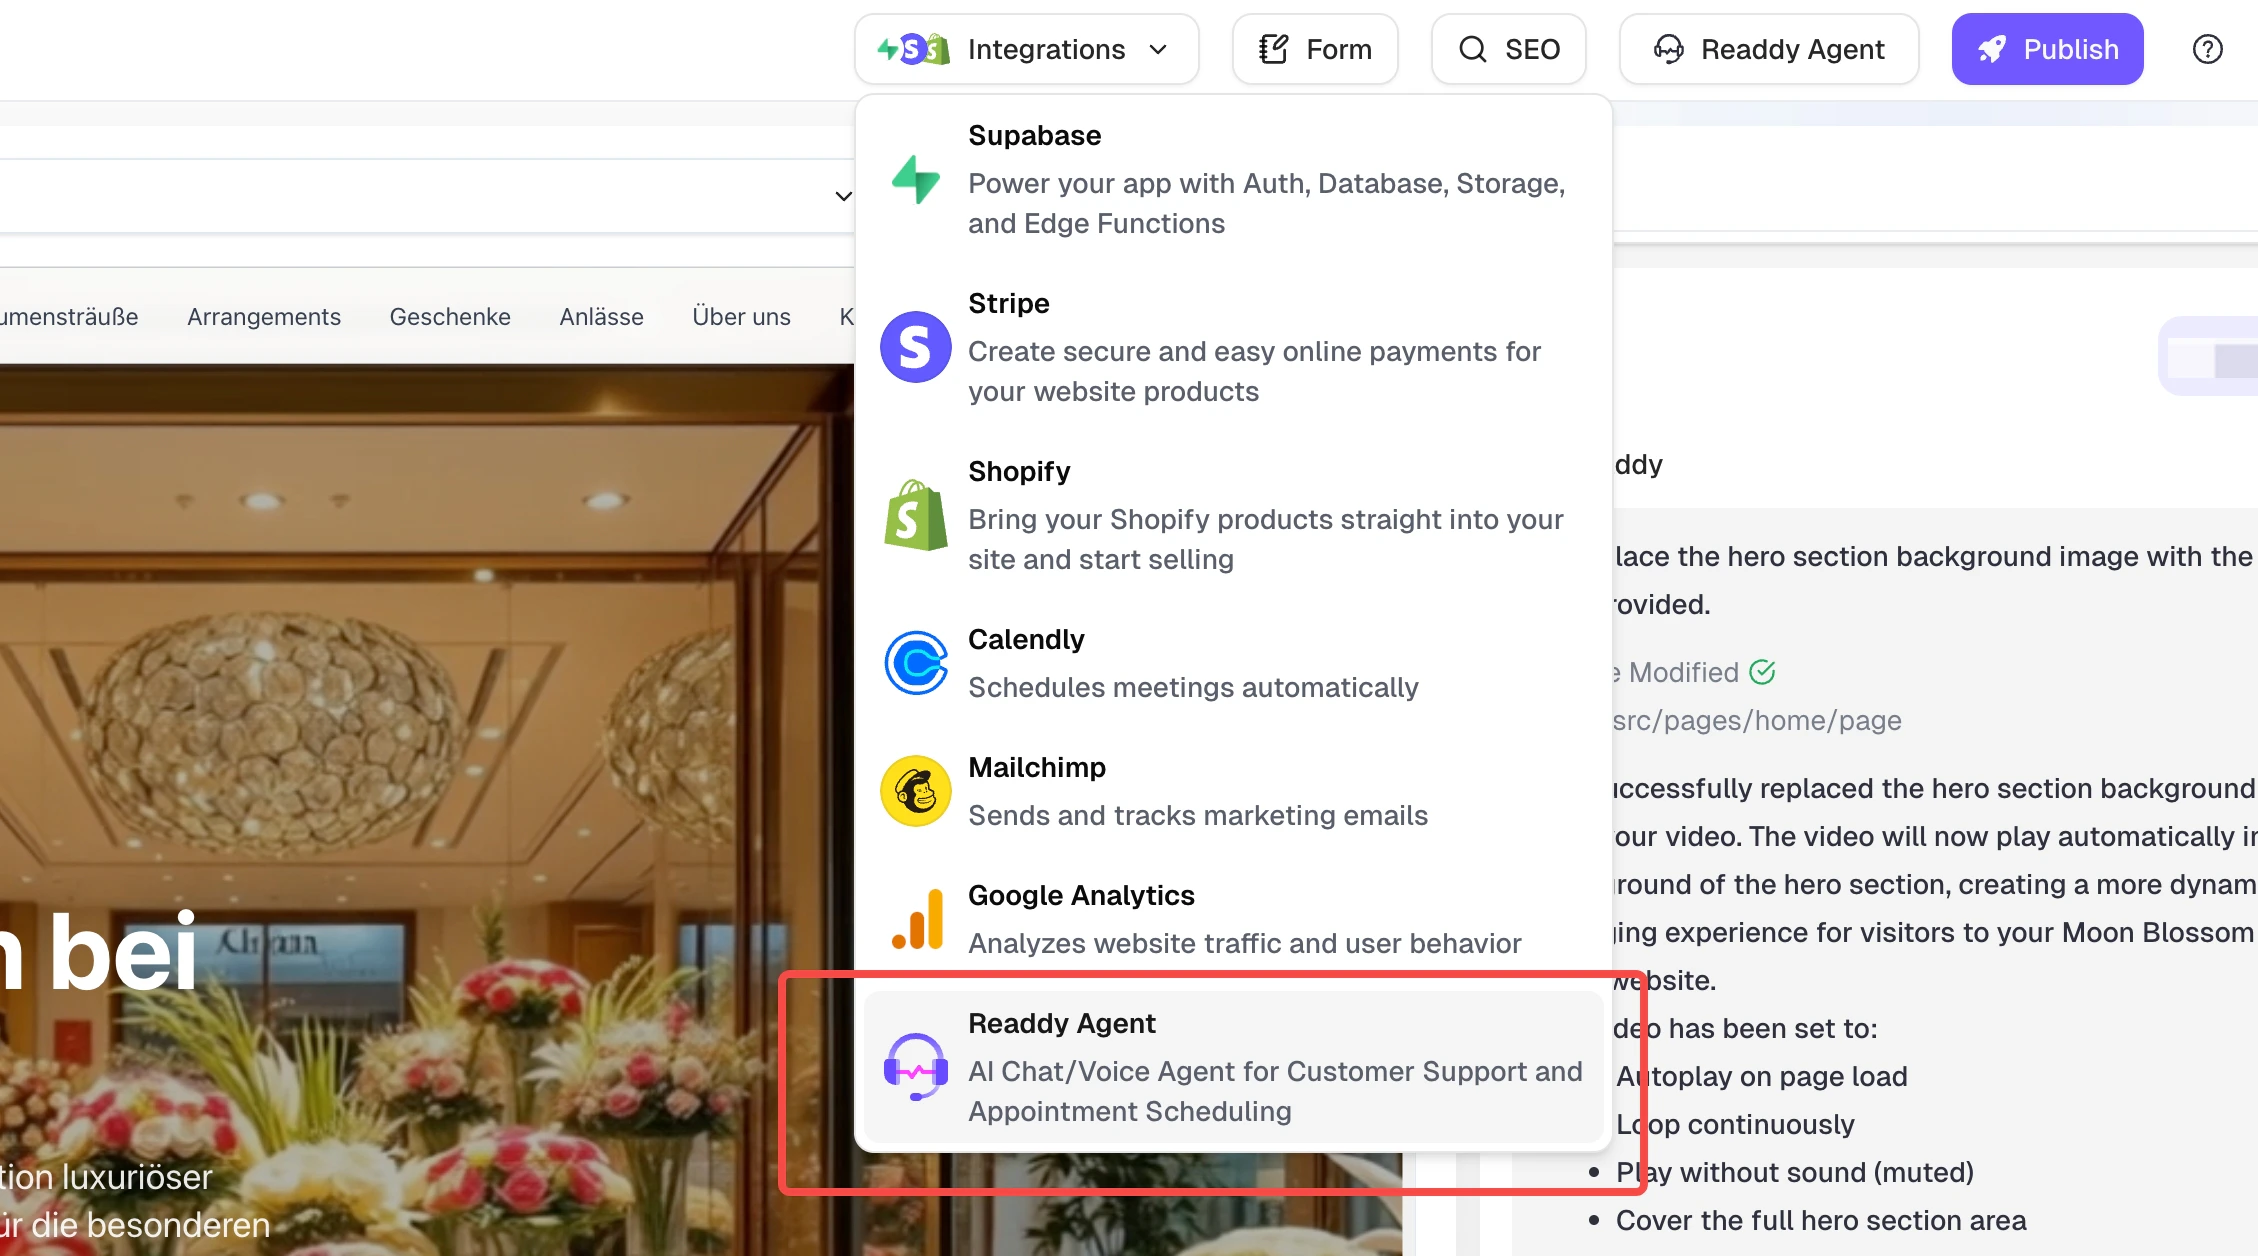
Add Through Integration Menu
Alternatively, you can also add the Readdy Agent from the navigation bar:- From the
Integrationdropdown, selectReaddy Agent - This will automatically send the message:
“Add Readdy Agent to my project”to the chat and begin the setup process.
2. Configuration – Optional, but Recommended
Once Readdy adds the assistant to your project, you’ll receive a confirmation message along with helpful suggestions like:
Accessing Configuration
You can access the Readdy Agent configuration via Project Settings in the following ways:-
From the top navigation bar: Click
Readdy Agentbutton at the top of the page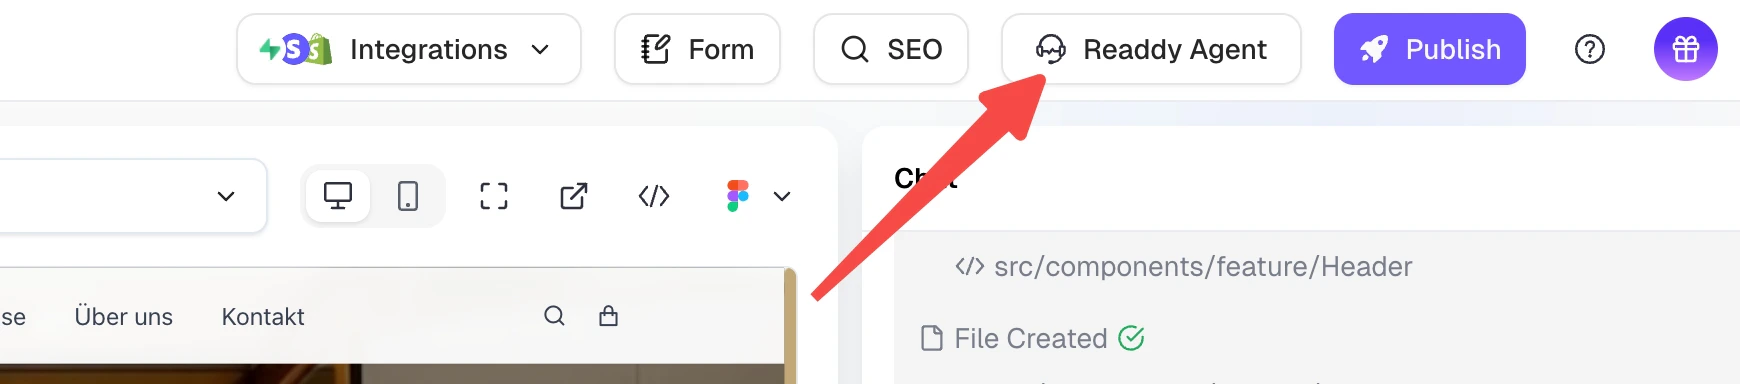
-
From the Project dropdown: Click
⋮of current project → SelectSetting
📅 Appointments - Manage Your Bookings with Ease
Setup Calendar and Availability
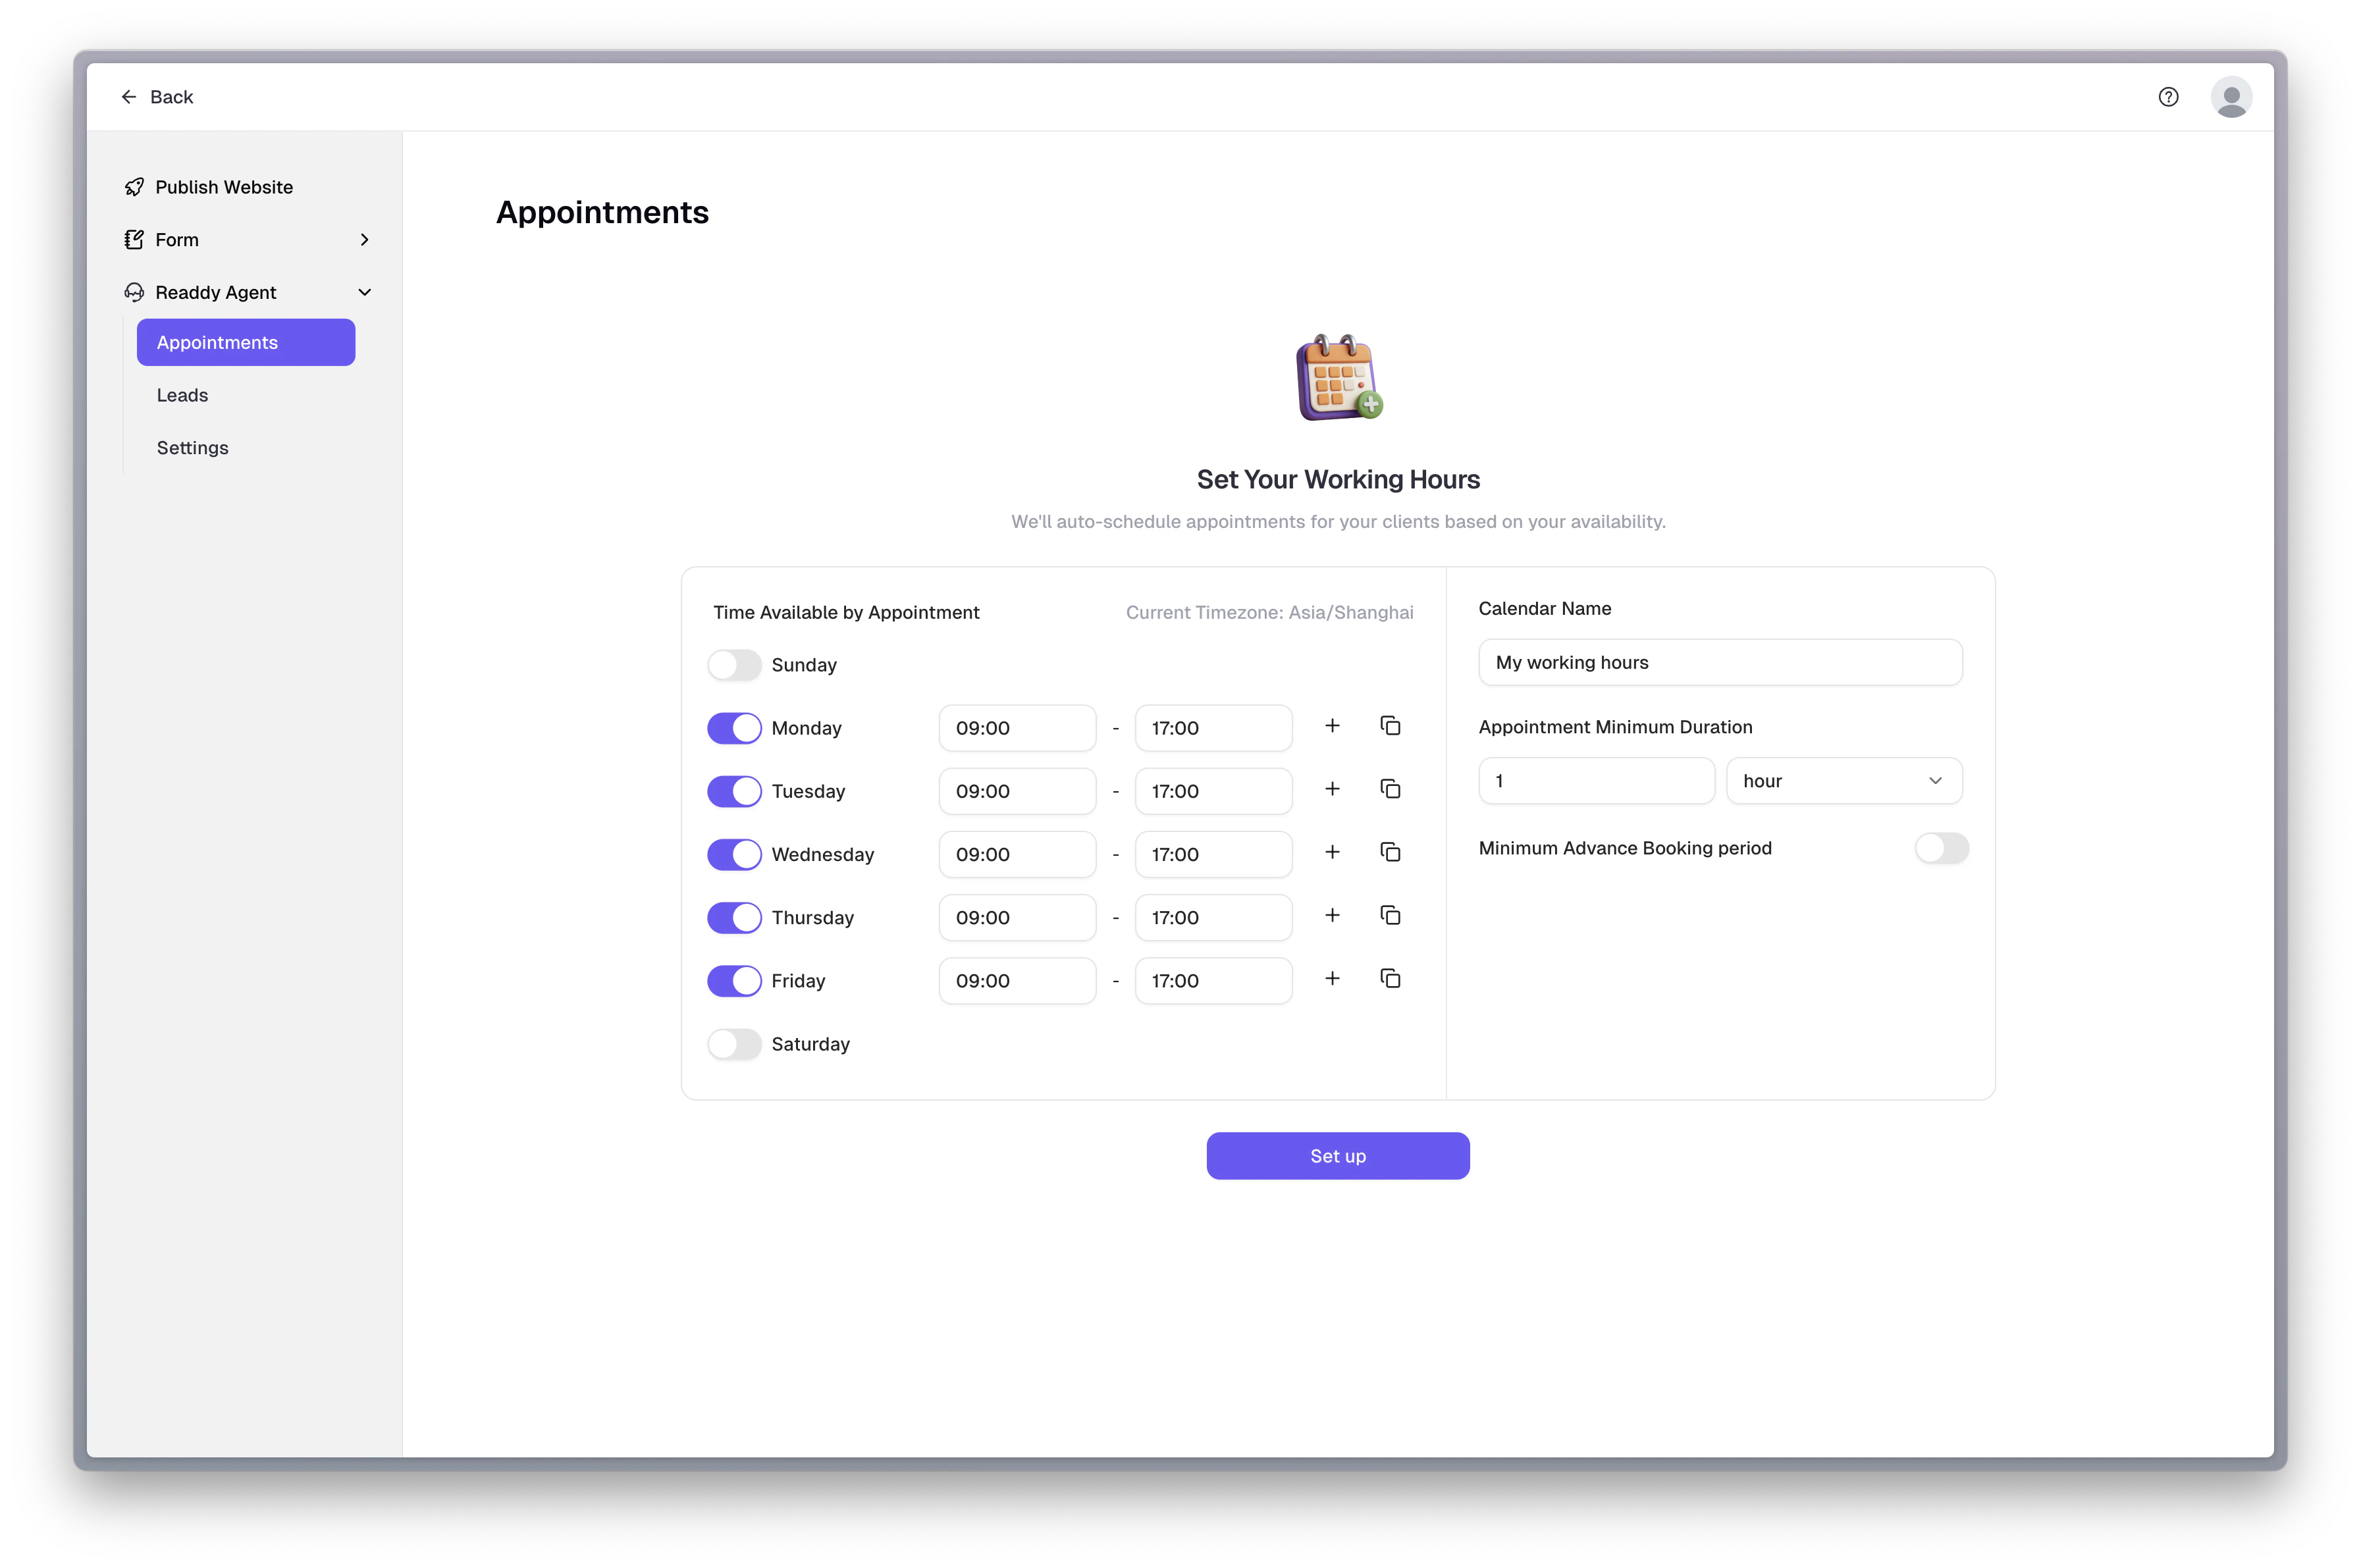
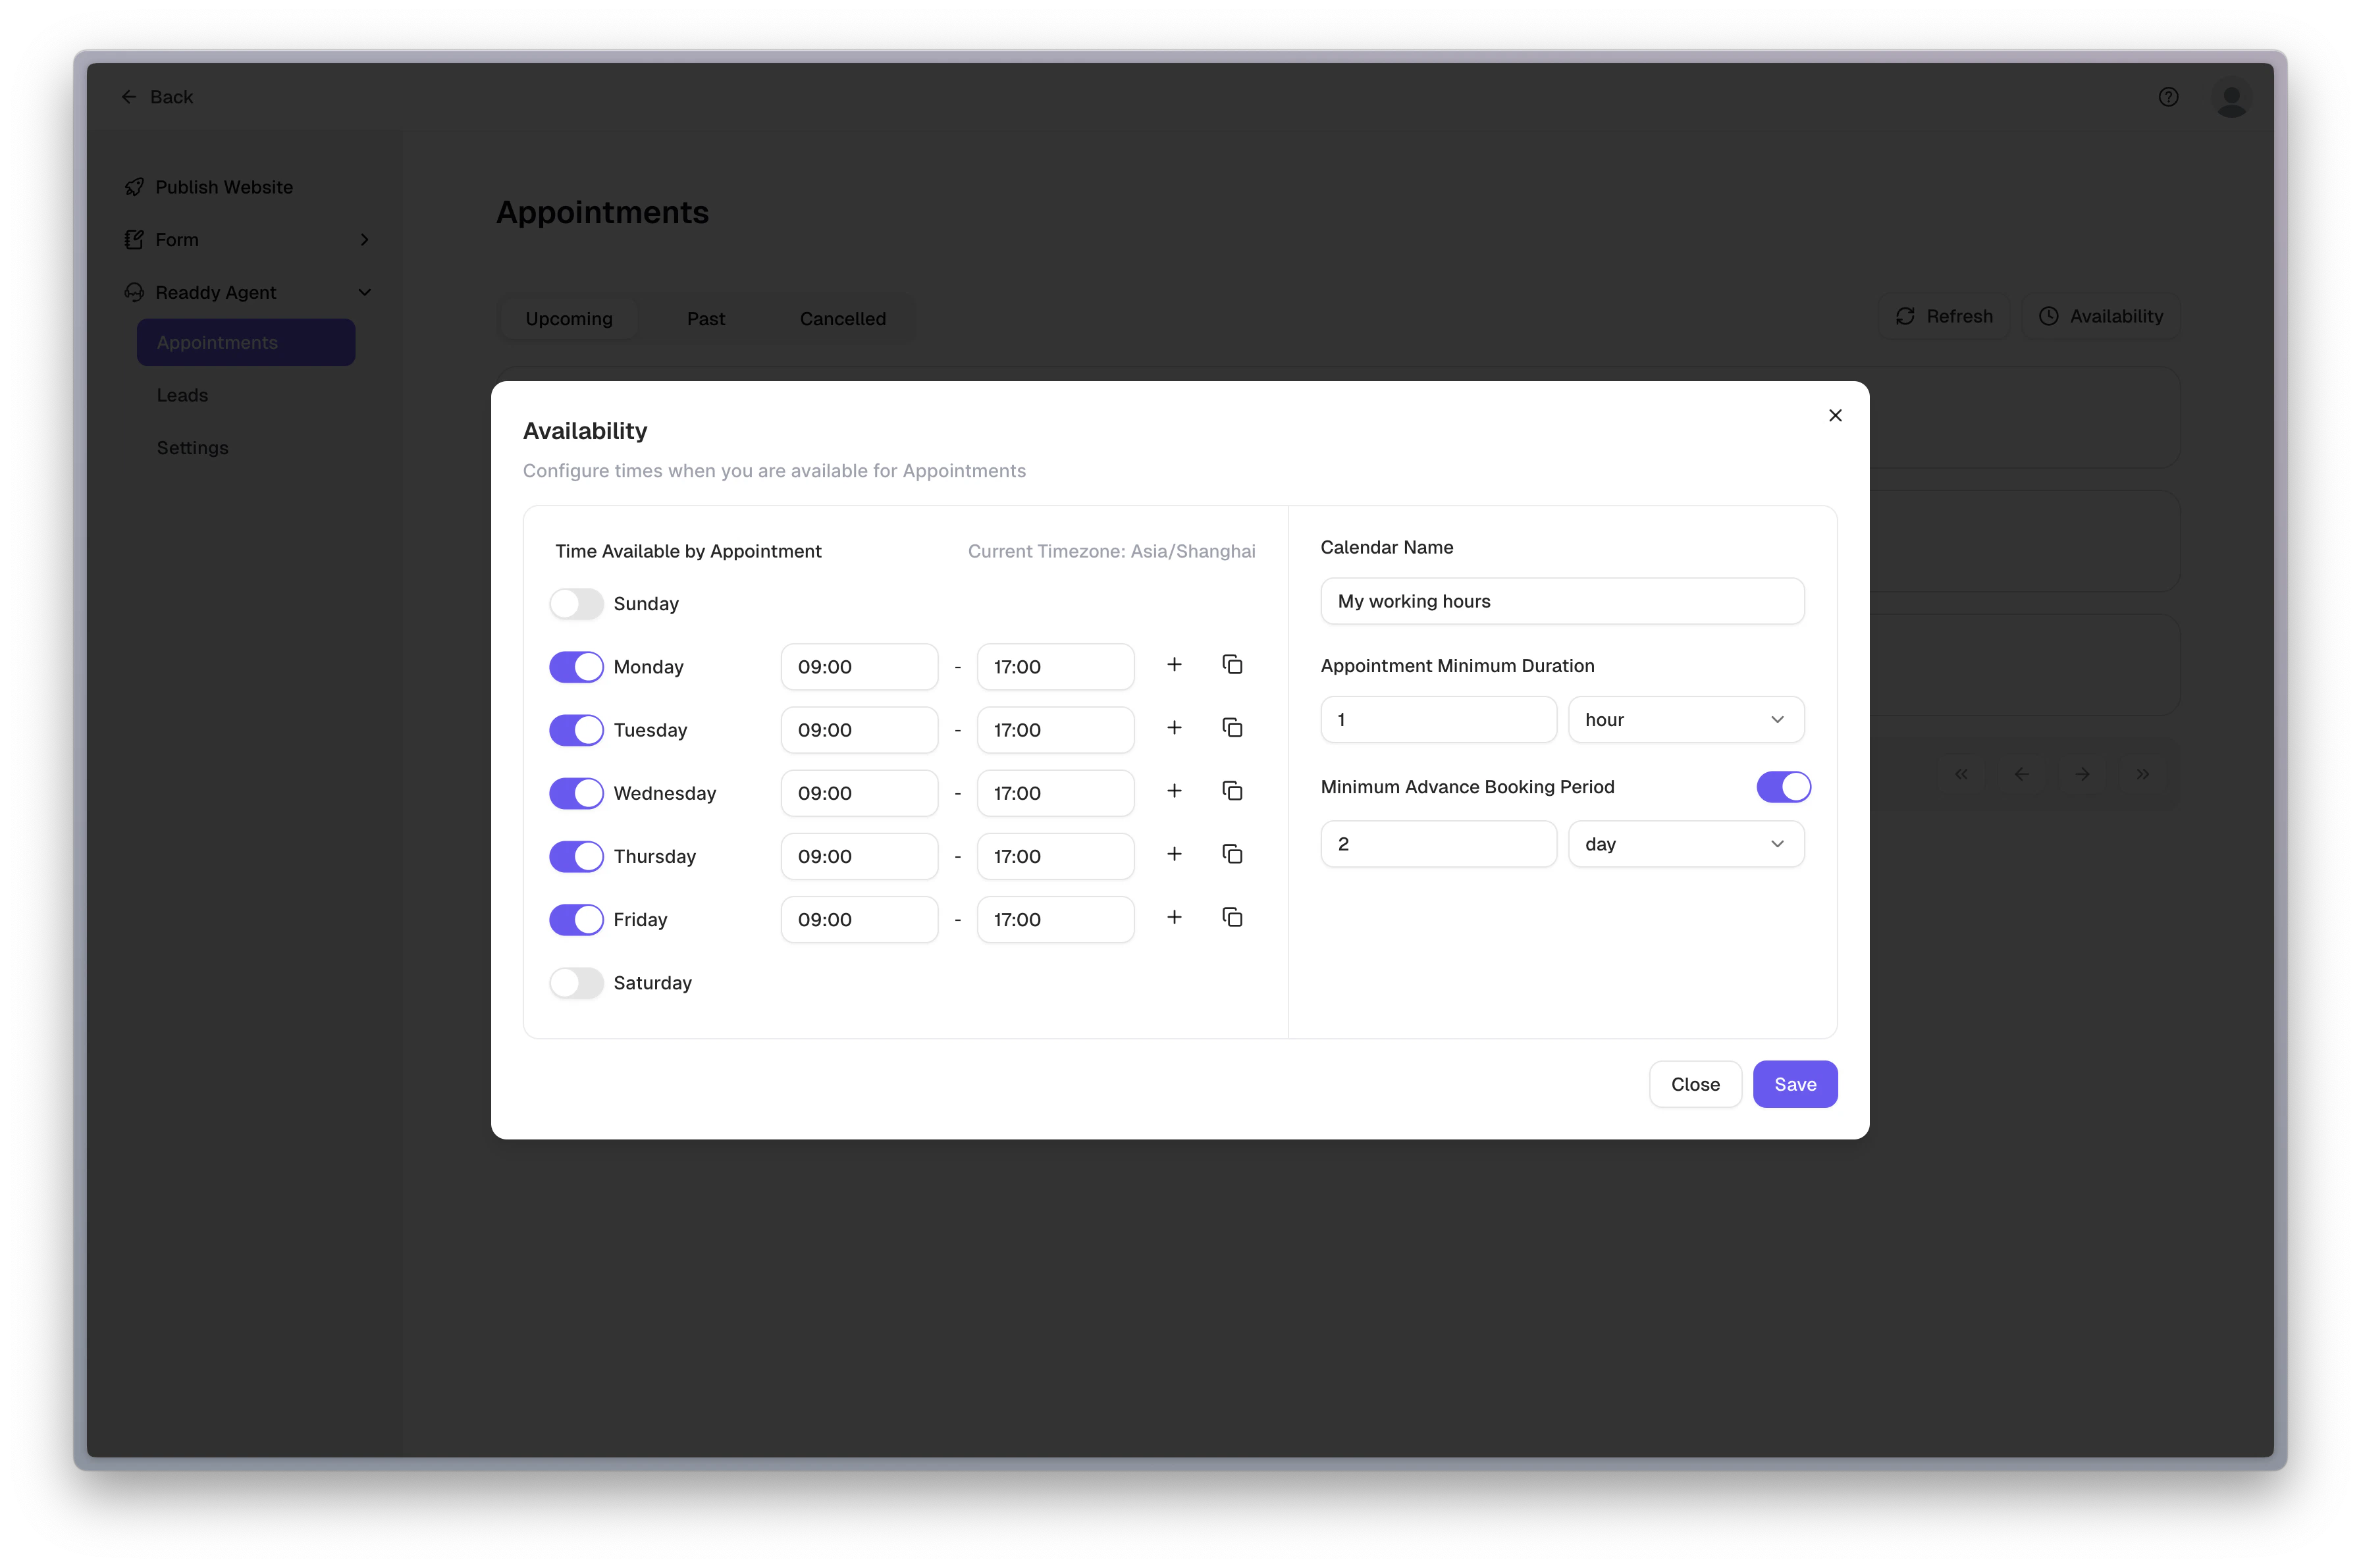
Set Your Availability
-
Availability
By default, your working hours are set to Monday to Friday, 9:00 AM – 5:00 PM.
You can adjust this by clicking on the calendar interface to add or remove time blocks. -
Timezone Display
Your calendar will automatically use your browser’s timezone.
Appointment Minimum Duration
Set the minimum duration for each appointment session.- Default setting: 1 hour
- You can enter a number and choose the time unit: Minute, Hour, or Day.
- Only whole numbers are allowed.
- The duration you set must fit within your available time slots.
Minimum Advance Booking Period (Optional)
This setting controls how far in advance users must book an appointment.- Default: Disabled.
- When disabled, no restrictions are applied.
- When enabled, you can enter a value and choose the unit: Minute, Hour, or Day.
Only whole numbers are allowed.
Appointment List
In the Appointment List, you can view and manage all your scheduled, past, and canceled appointments. This helps you stay organized and quickly access appointment details when needed.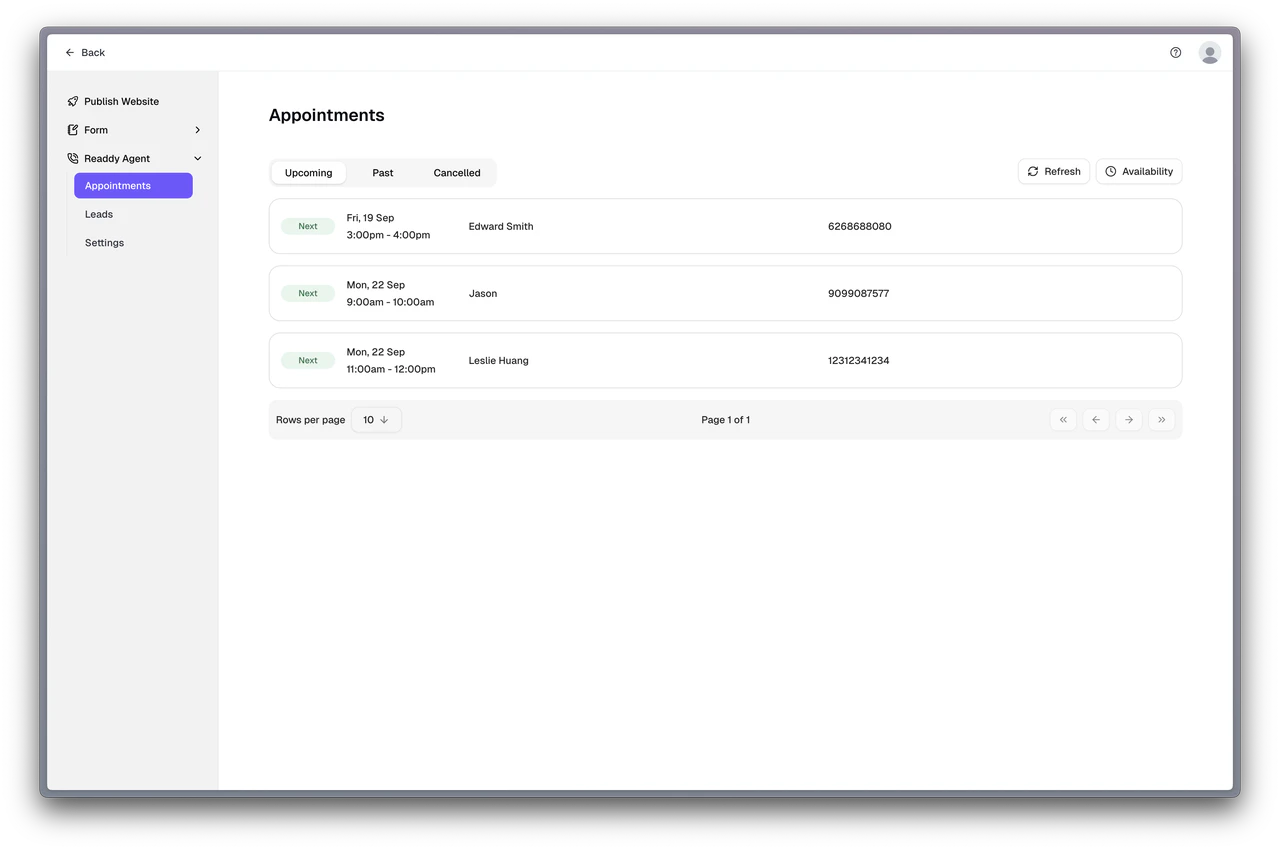
Appointment Categories
Appointments are grouped into three tabs. You can switch between them at the top of the page:-
Upcoming Shows all upcoming appointments and is further divided into:
- Today – appointments are happening today
- Next – appointments scheduled for future dates (not today)
-
Past Appointments that are scheduled for a time that has already passed
Note: This includes all appointments in the past, whether they actually occurred or not.
- Canceled Appointments that were canceled by either you or the customer.
What You’ll See in Each Appointment
- Appointment ID – A unique reference number for each booking
- Status – Only shown for appointments in the Upcoming tab
- Customer Name – The name provided by the person who booked
- Phone Number – The number provided by the person who booked
- Appointment Time – When the appointment is scheduled
- Conversation Record – Based on how the appointment was made:
- Voice: Shows a summary of the call
- Chat: Shows the chat history
Manual Refresh
Need to check for the latest updates? Click the Refresh button to reload and sync the latest data from the system.Modify Calendar and Availability
Click Availability to open a pop-up window where you can update your settings.🧲 Leads – Capturing Opportunities from Every Interaction
Leads are automatically generated records of visitors who interacted with your Readdy Agent—whether through chat or voice. Even if a visitor didn’t book an appointment, their inquiry, conversation, or intent is captured as a Lead.Think of Leads as the top of your sales funnel—every conversation is a potential business opportunity.
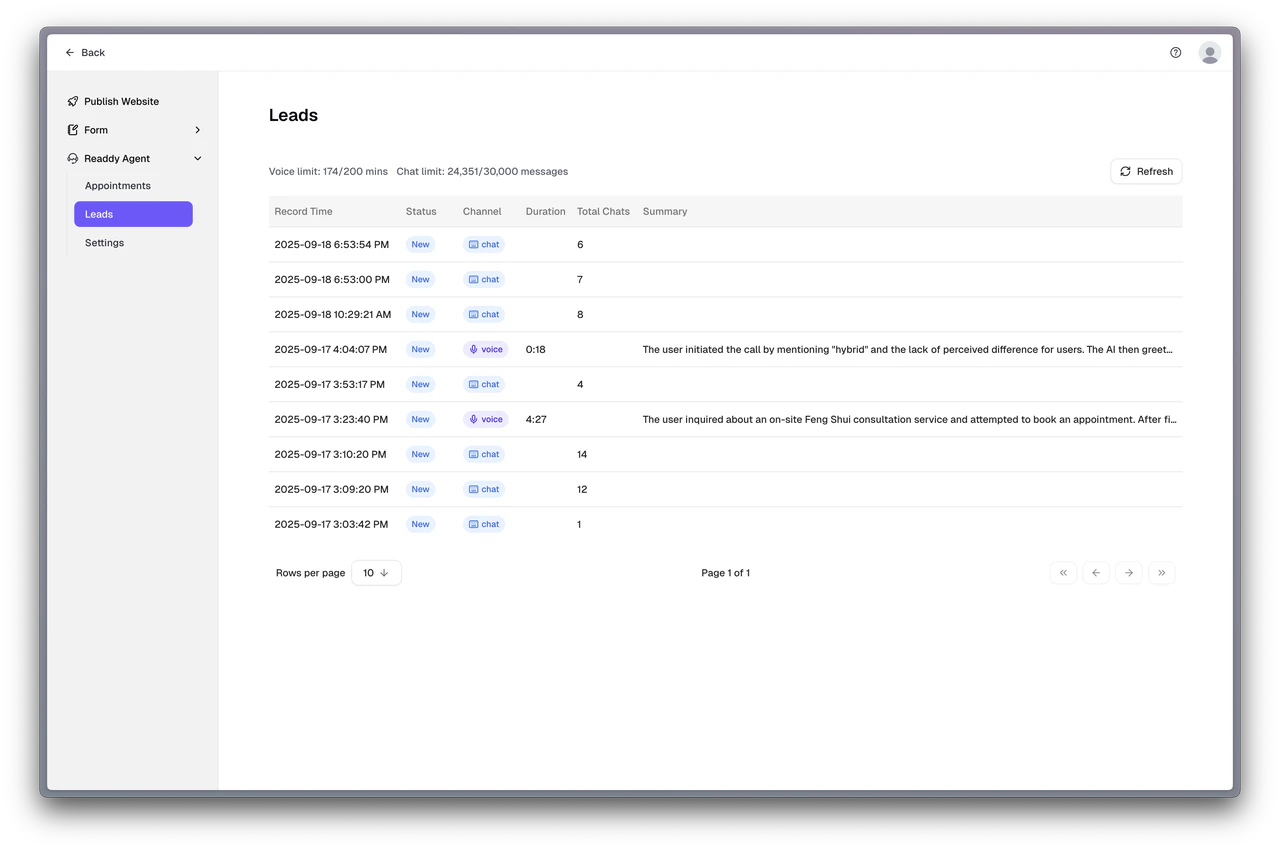
Leads Table Overview
The Leads section is displayed in a table format, where each row represents one visitor interaction. The table includes the following columns:| Column Name | Description |
|---|---|
| Record Time | The timestamp when the visitor first interacted with the Readdy Agent |
| Status | The current status of the session: New, Ongoing, Ended, Error |
| Channel | The type of interaction: Chat, Voice |
| Duration | For voice interactions: the length of the call |
| Total Chats | For chat interactions: total number of message pairs |
| Summary | For voice interactions: a brief summary of the conversation generated by the system |
- All available metadata (record time, status, channel, etc.)
- For chat leads: full chat history is displayed
- For voice leads: a concise summary of the conversation is shown
Chat-based leads do not include a summary, but you can view the entire chat transcript to understand the visitor’s intent.
Monitoring Usage
At the top of the Leads page, you can easily track your current usage:- Voice: remaining minutes / total minutes
- Chat: remaining chats / total chats
If either voice or chat usage reaches the plan limit, a warning message will appear to alert you before service is interrupted.

⚙️ Settings – Customize Your Readdy Agent
The Settings page allows you to configure how your Readdy Agent behaves and communicates with your website visitors. These settings help tailor the assistant’s tone, language, and knowledge base to better serve your business needs.
🧠 Global Prompt
The Global Prompt is the instruction set given to your Readdy Agent. It defines what the assistant should do, how it should behave, and includes important context such as:- Your business background
- Website-specific information
- Any special instructions or tone of voice
🌐 Language
When you first enable the Readdy Agent, a default language is selected based on your website content and goals. However, you can manually change the language at any time from the dropdown menu.You don’t need to worry too much about language preferences. The Readdy Agent will automatically respond in the visitor’s language based on how they initiate the conversation.
| Supported languages include: |
|---|
| English |
| German |
| Spanish |
| French |
| Hindi |
| Japanese |
| Korean |
| Dutch |
| Portuguese |
| Russian |
| Turkish |
| Vietnamese |
| Chinese |
| Chinese (Taiwan) |
❓ FAQs
The FAQs section allows you to provide additional context to your Readdy Agent by adding frequently asked questions and their answers.- These FAQs enhance the Global Prompt and help the assistant handle common visitor inquiries more accurately.
- You can manually add up to 10 FAQ entries.
Use Case: Add questions like “What are your business hours?” or “Do you offer international shipping?” to ensure quick, accurate responses.
⚠️ Keep Your Business Hour Consistent
📬 New Appointment Notification
This toggle allows you to control whether you want to receive email notifications when a new appointment is booked through the Readdy Agent.- Notifications are sent to the email address registered with your Readdy account.
- You can enable or disable this feature manually in the Settings panel.
📊 Usage Tiers & Limits
| Subscription | Voice Minutes | Chats Count |
|---|---|---|
| Free | 5 min | 50 chats |
| Starter | 20 min | 200 chats |
| Pro-40 | 80 min | 800 chats |
| Pro-80 | 160 min | 1600 chats |
| Pro-120 | 250 min | 2500 chats |
| Pro-160 | 350 min | 3500 chats |
| Pro-200 | 450 min | 4500 chats |
Chats Count
- A “chat” refers to one interaction where the user sends a message and Readdy Agent responds or takes an action.
- Most chat sessions typically consist of 2–3 messages.
Usage Limitation
- When your subscription’s voice minutes or chat limits are reached, the Readdy Agent will stop operating on your website.
- Please monitor your usage and email notifications to avoid interruptions.
- Usage limits reset with each subscription cycle.
- All published projects under the same account share the same usage quota.