> ## Documentation Index
> Fetch the complete documentation index at: https://docs.readdy.ai/llms.txt
> Use this file to discover all available pages before exploring further.

# Integrate with Resend (Supabase)

> Add email functionality to your Readdy website using Resend and Supabase for transactional emails and notifications

## What is Resend?

Resend is a powerful email API platform that makes it easy to send transactional emails at scale. By integrating Resend with your Readdy website, you can:

* Send appointment confirmation emails
* Deliver booking notifications
* Automate customer communication
* Ensure reliable email delivery

This guide will walk you through setting up Resend integration for appointment and booking scenarios.

## 1. Basic Configuration

<Steps>
  <Step title="Step 1: Connect Supabase Database">
    Connect your Supabase database to your Readdy project. This database will store booking records and user information.

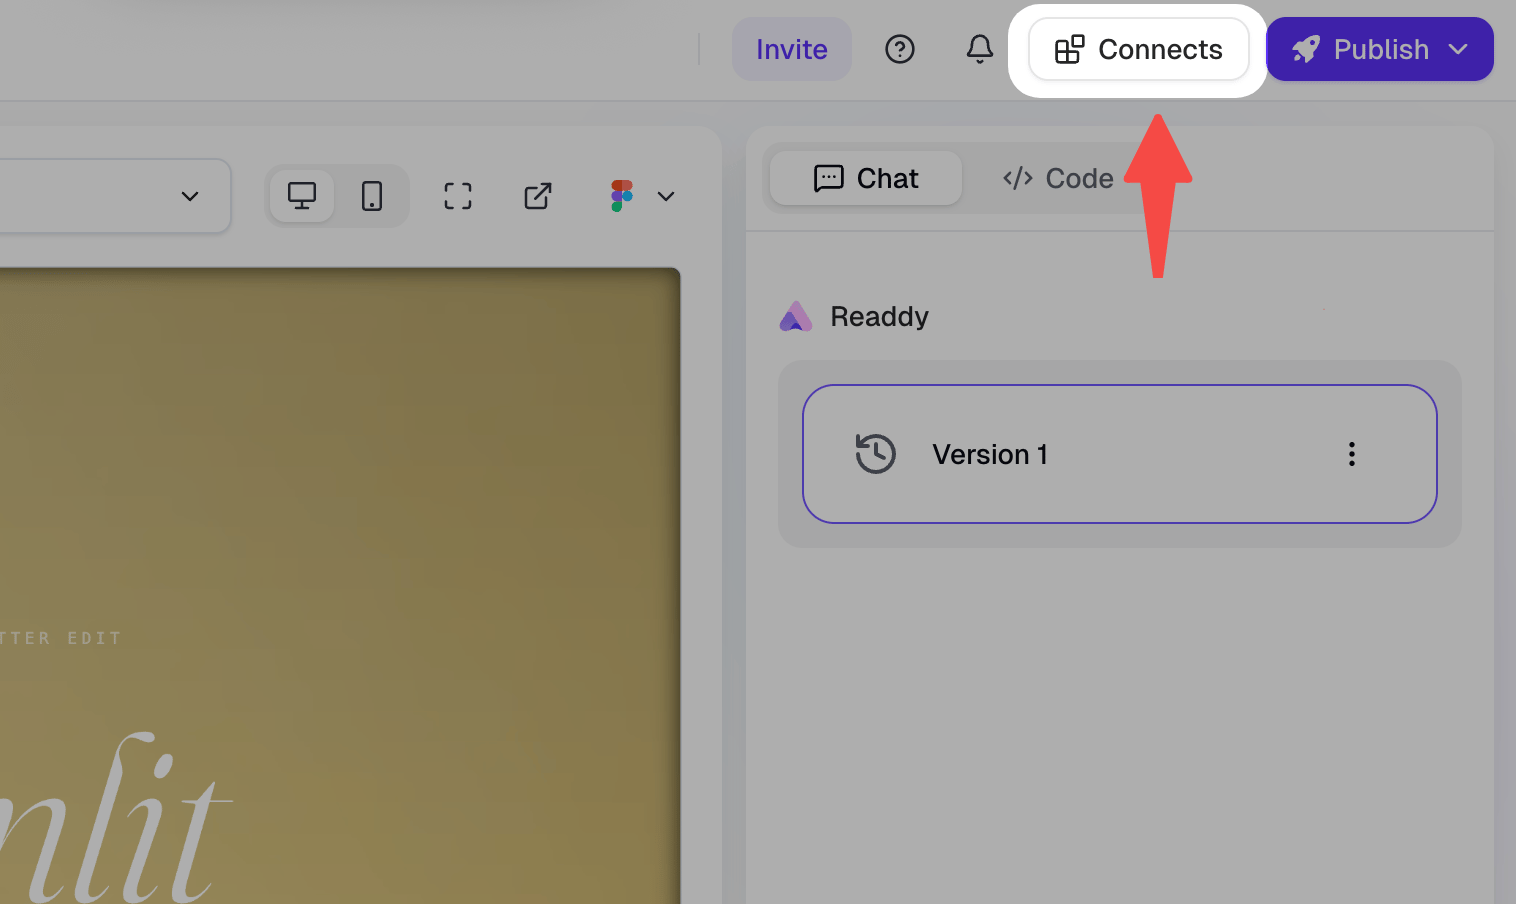
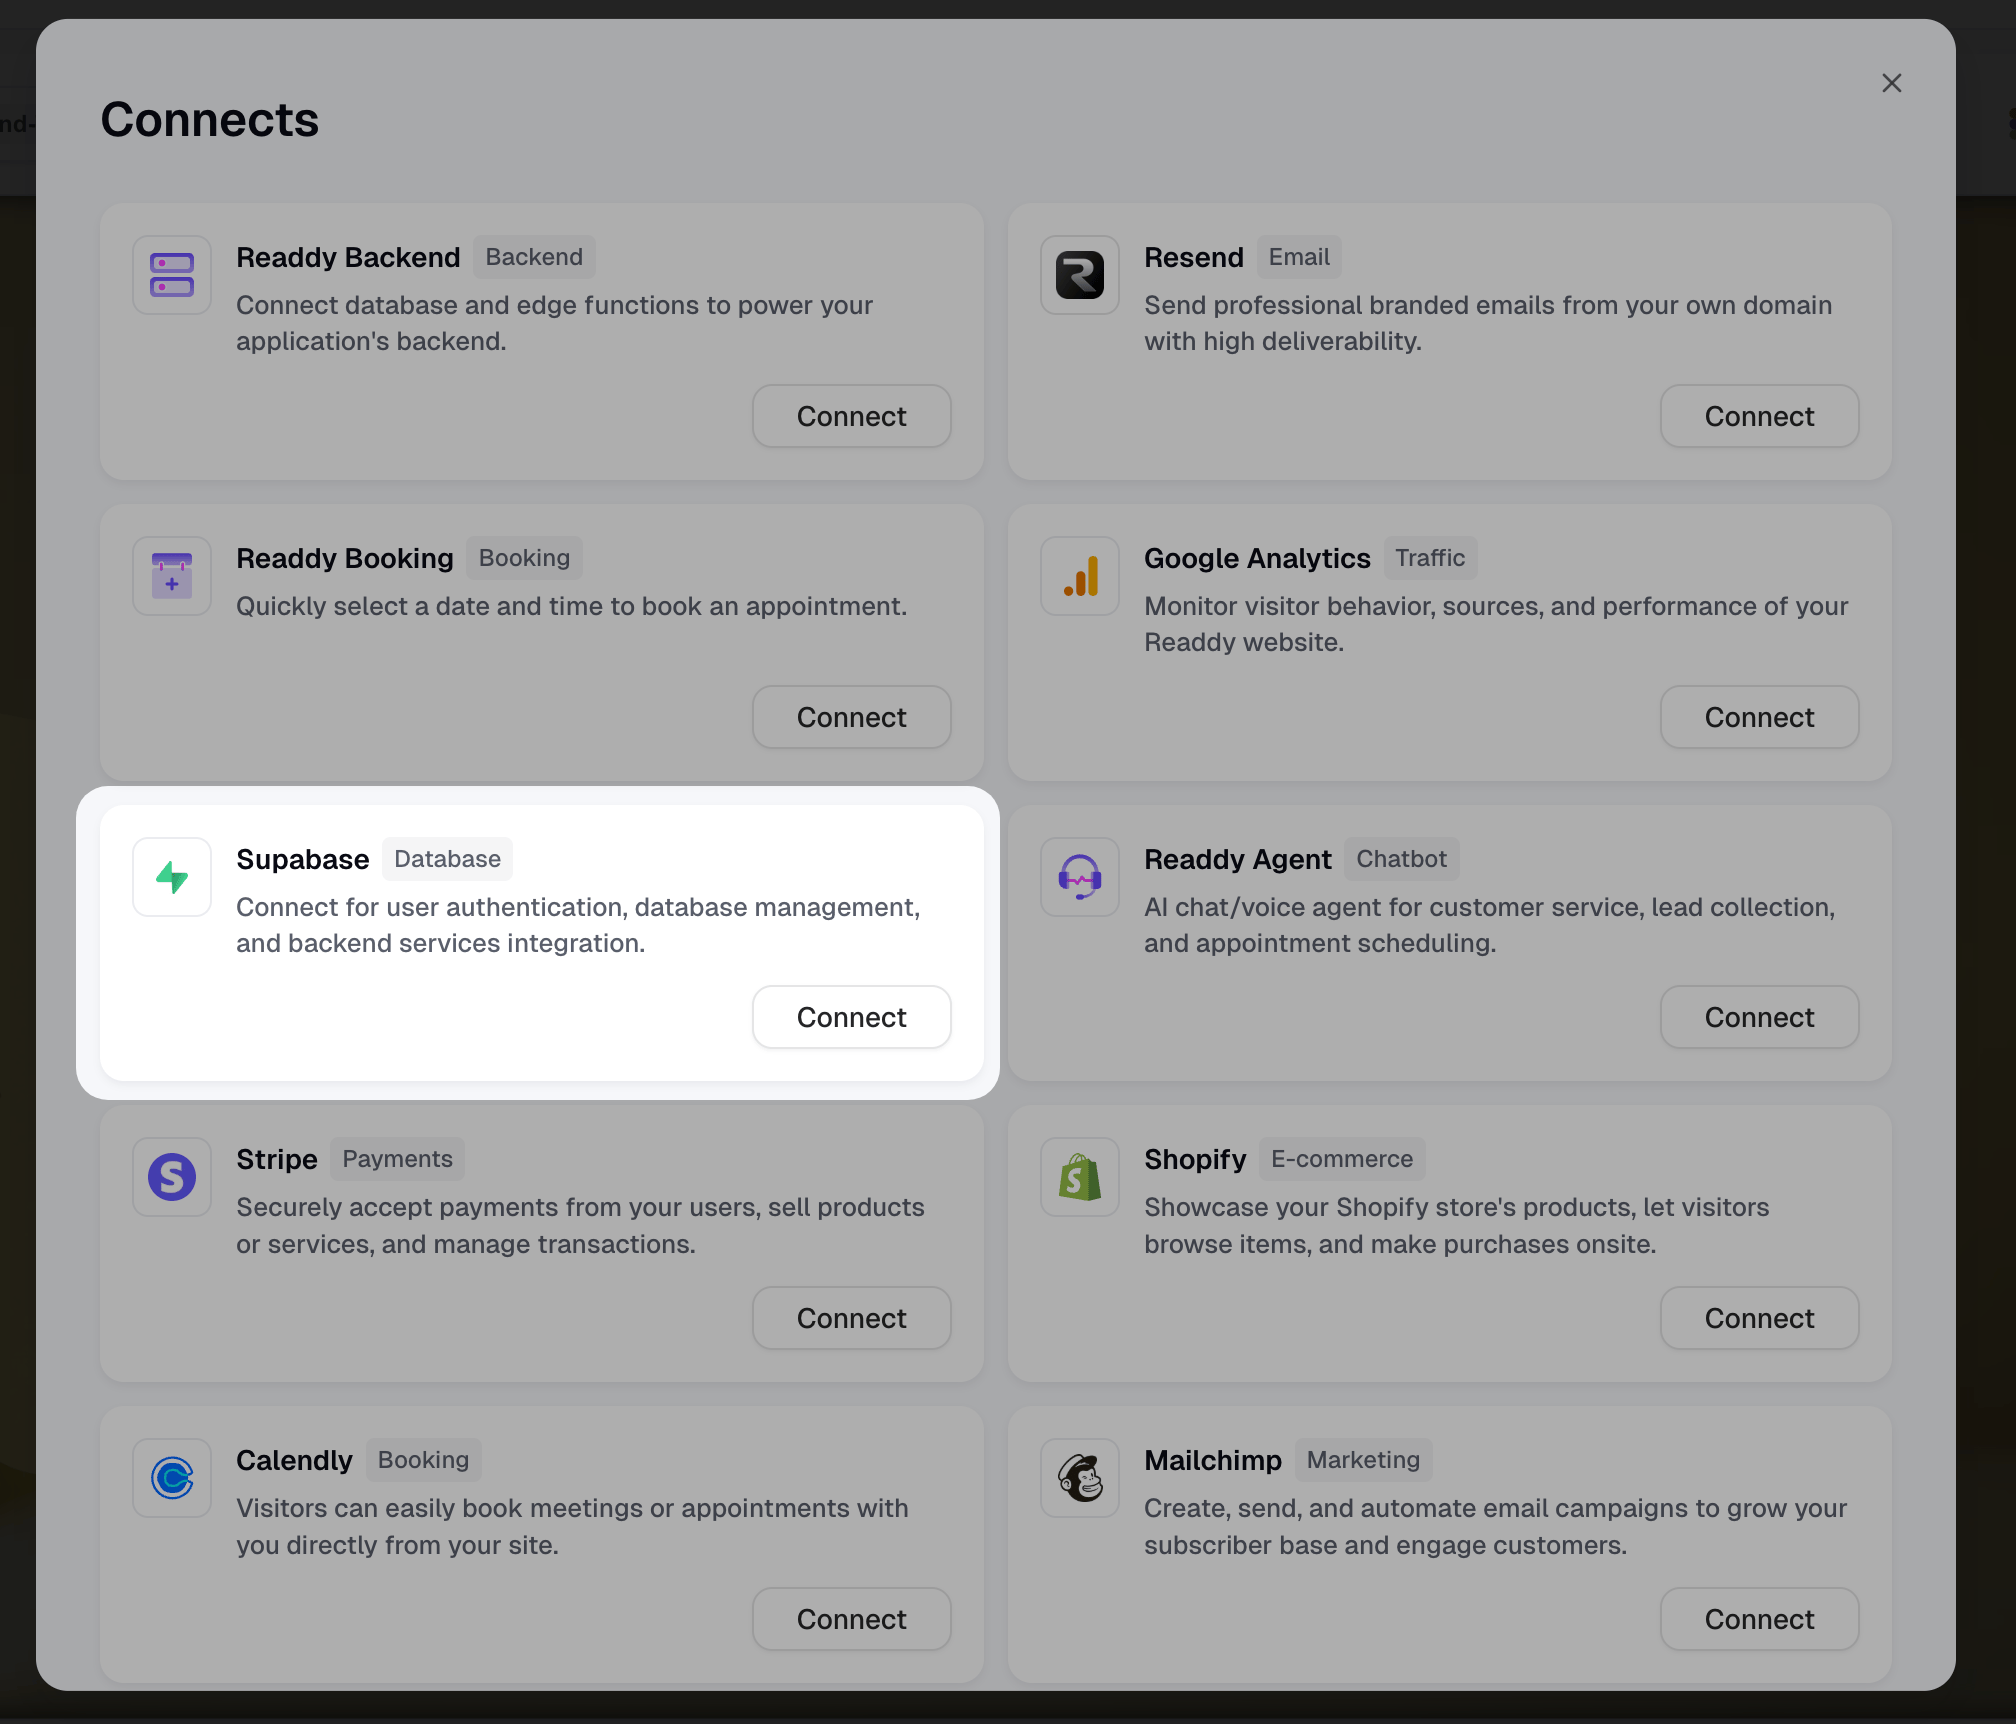
    Click the **Connects** button at the top, then select **Supabase** to connect.

    <Frame>
      <img src="https://mintcdn.com/readdy/DVR1m5KO54hpjW-t/images/go-to-connects.png?fit=max&auto=format&n=DVR1m5KO54hpjW-t&q=85&s=518b280f4f709d1d7017759adc5242f6" alt="Connects button in the top navigation bar" width="1516" height="904" data-path="images/go-to-connects.png" />
    </Frame>

    <Frame>
      <img src="https://mintcdn.com/readdy/DVR1m5KO54hpjW-t/images/connects/supabase.png?fit=max&auto=format&n=DVR1m5KO54hpjW-t&q=85&s=8fefc5b36bdc2b096fe97014a0fba336" alt="Supabase in the Connects panel" width="2016" height="1724" data-path="images/connects/supabase.png" />
    </Frame>

    📖 **Learn More**: <a href="/integrations/supabase" target="_blank" rel="noopener noreferrer">Supabase Integration Documentation</a>
  </Step>

  <Step title="Step 2: Sign Up for Resend">
    Go to [https://resend.com](https://resend.com) and create your account. Complete the registration process and log in to your dashboard.
  </Step>

  <Step title="Step 3: Get Your Resend API Key">
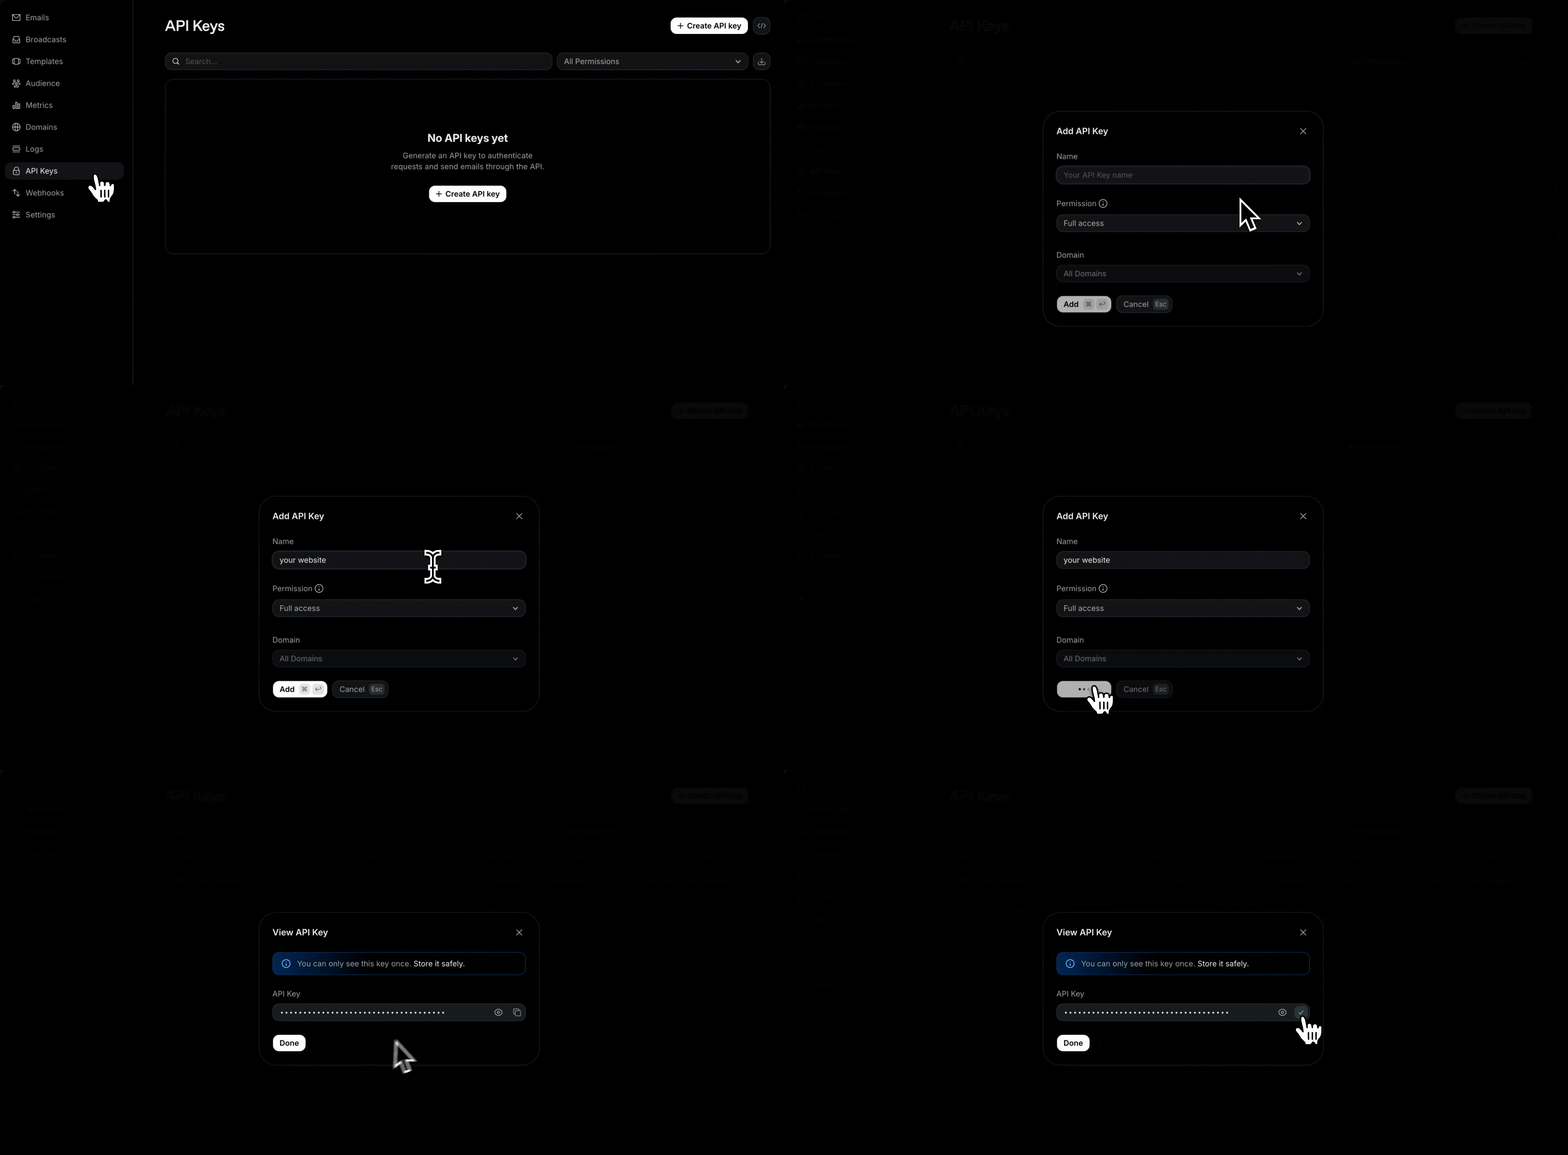
    In your Resend dashboard, navigate to **API Keys** section.

    Click **Create API Key** to generate a new key. Choose appropriate permissions for your use case.

    <Frame>
      <img src="https://mintcdn.com/readdy/avsZxRT1zcyAuKCM/images/resend-api-key.gif?s=0c19c00f75e9215f5876d2ead715dfbc" alt="Resend API key creation" width="2196" height="1080" data-path="images/resend-api-key.gif" />
    </Frame>

    <Warning>
      Keep your API key secure and never share it publicly. Store it in a safe place as you'll only see it once during creation.
    </Warning>
  </Step>

  <Step title="Step 4: Configure Resend in Readdy">
    Tell Readdy AI that you want to configure Resend for your website and ask it to help you update the Supabase Edge Function.

    You can use this prompt:

    ```
    I want to configure Resend for my website. Please help me update the Supabase Edge Function to send reservation confirmation emails.
    ```
  </Step>

  <Step title="Step 5: Add Resend API Key to Supabase">
    After Readdy AI updates the Edge Function, you need to manually add your Resend API key to Supabase Secrets.

    Follow these steps:

    1. Open your project in the [Supabase Dashboard](https://supabase.com/dashboard)
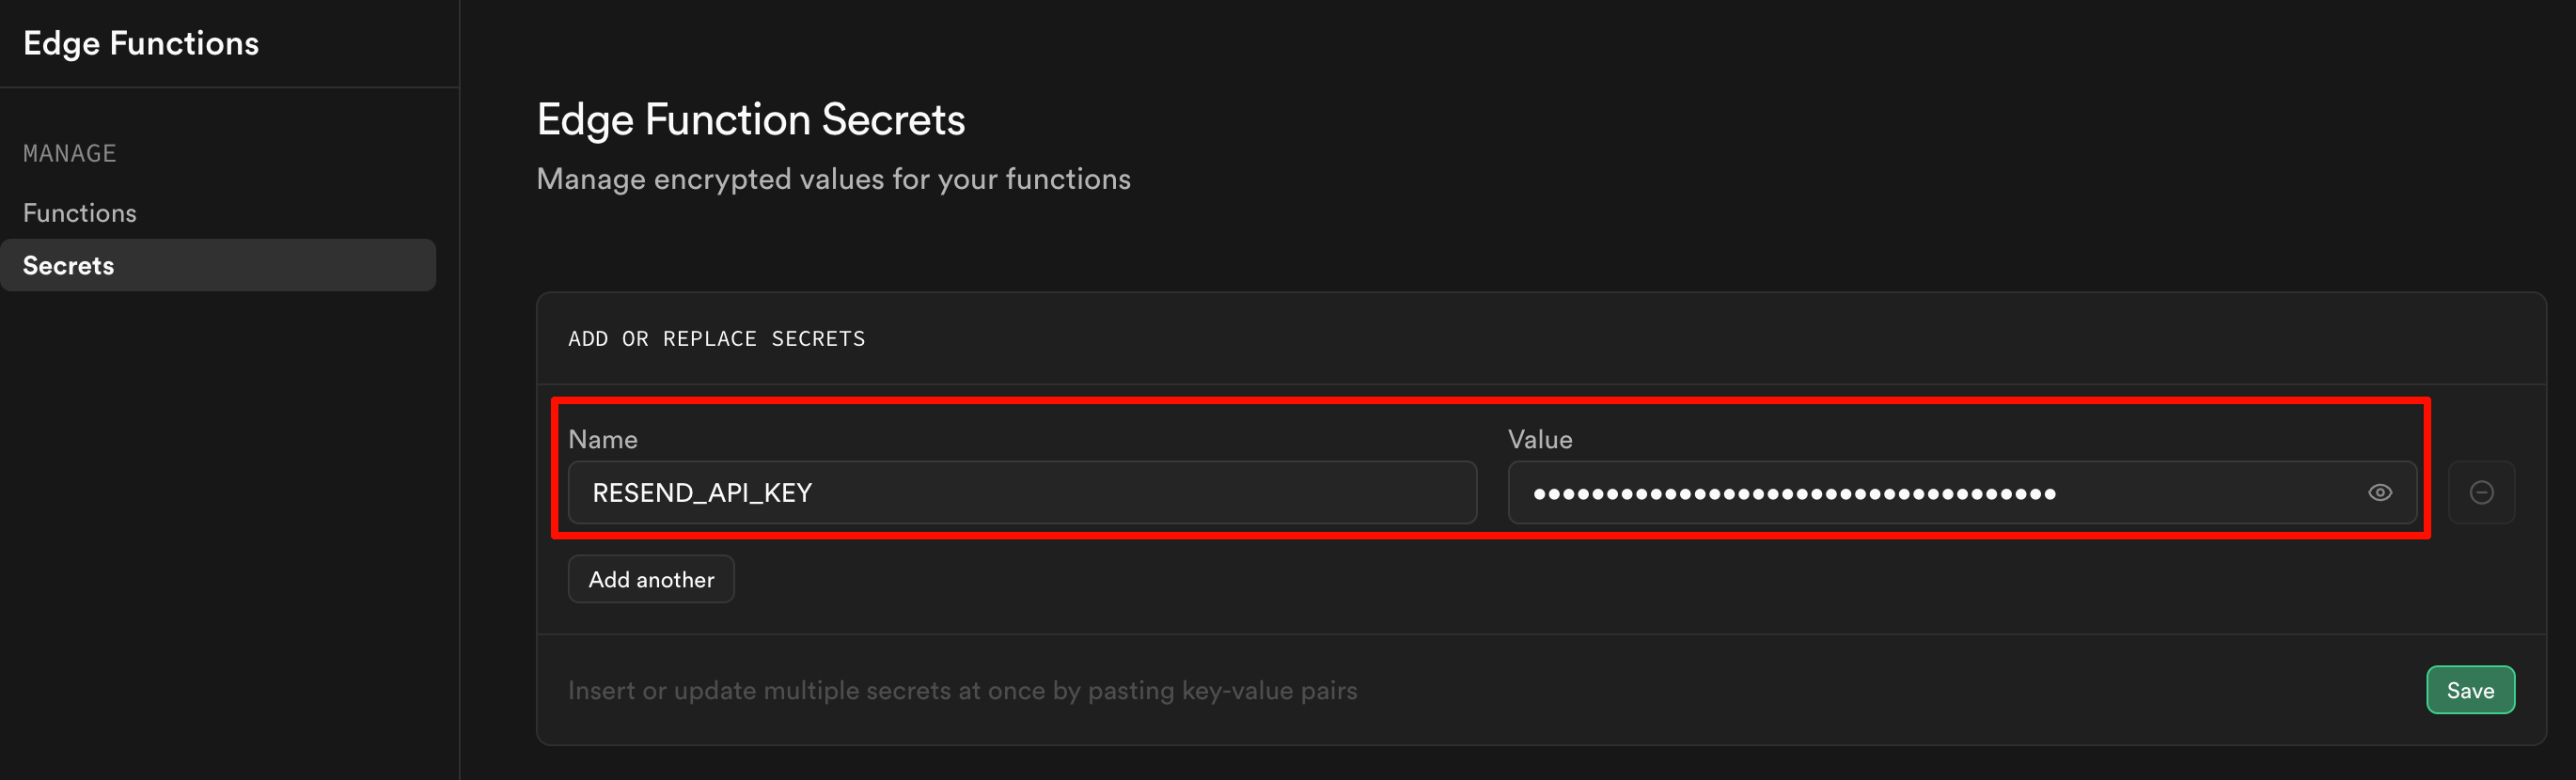
    2. Navigate to **Edge Functions** in the left sidebar
    3. Click **Secrets** to manage environment variables
    4. In the **Name** field, enter: `RESEND_API_KEY`
    5. In the **Value** field, paste your Resend API key from Step 3
    6. Click **Save** to save the secret

    <Frame>
      <img src="https://mintcdn.com/readdy/avsZxRT1zcyAuKCM/images/resend-supabase-secrets.png?fit=max&auto=format&n=avsZxRT1zcyAuKCM&q=85&s=af1746d7a47f71e77bf194093e722a1c" alt="Supabase Edge Functions Secrets" width="2740" height="830" data-path="images/resend-supabase-secrets.png" />
    </Frame>

    <Warning>
      Make sure to enter `RESEND_API_KEY` in all caps. The name must match exactly what's in the Edge Function code, otherwise the function won't be able to access your API key.
    </Warning>
  </Step>
</Steps>

## 2. Testing and Verification

After connecting Resend, you'll need to test the email sending functionality to verify everything is working correctly.

<Steps>
  <Step title="Step 1: Test Email Sending">
    In the preview interface, trigger an email send (e.g., fill out and submit a form that sends an email) to verify email sending works correctly.
  </Step>

  <Step title="Step 2: Verify Email Delivery">
    Check your email inbox to confirm you received the test email.

    <Info>
      The email will be sent from Resend's default domain `@resend.dev`. Later, you can configure a custom domain to send emails from your own domain (e.g., `noreply@yourdomain.com`).
    </Info>
  </Step>

  <Step title="Step 3: Check Database Records (Optional)">
    If your email trigger involves storing data (e.g., form submissions), check your Supabase dashboard to verify that the records were successfully stored in the database.

    <Tip>
      You can ask Readdy AI to help set up database storage for your form submissions.

      If you're using Supabase to store form data, each submission should create a corresponding record with all the user-submitted information. You can export this data later for analysis or follow-up.
    </Tip>

    <Success>
      If you've confirmed email delivery (and database records if applicable), your email system is fully operational!
    </Success>
  </Step>
</Steps>

## 3. Branding Setup

To send emails from your own domain (e.g., `reservation@yourdomain.com`) instead of Resend's default domain (`@resend.dev`), you'll need to verify your domain with Resend.

Choose the scenario that matches your situation:

<Accordion title="I Already Have a Domain">
  If you already own a domain (e.g., from GoDaddy, Cloudflare, or another provider), follow these steps to configure it for Resend:

  <Steps>
    <Step title="Step 1: Add Your Domain in Resend">
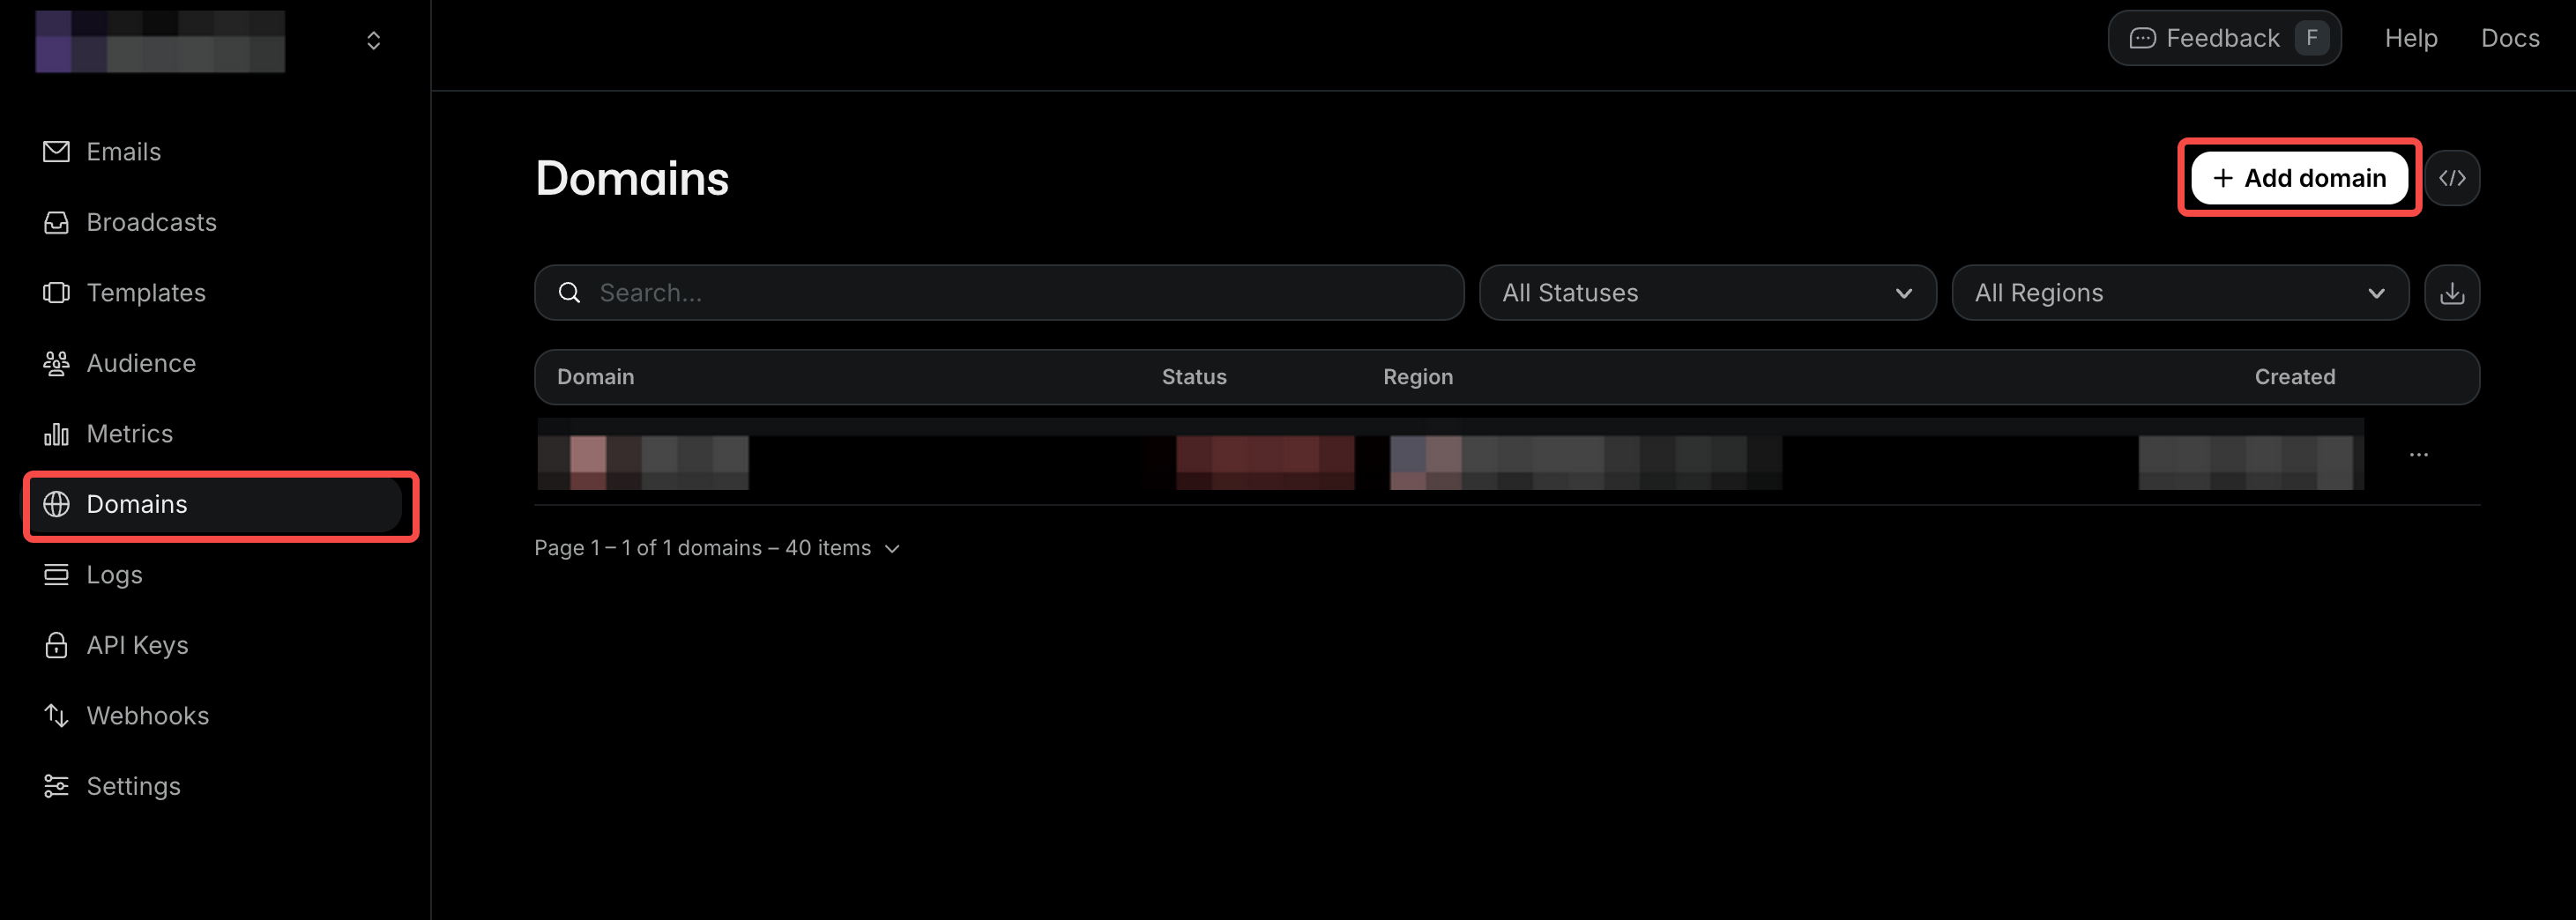
      In your Resend dashboard, go to **Domains** and click **Add Domain**.

      Enter your existing domain name and click **Add**.

      <Frame>
        <img src="https://mintcdn.com/readdy/avsZxRT1zcyAuKCM/images/resend-add-domain.png?fit=max&auto=format&n=avsZxRT1zcyAuKCM&q=85&s=bf5218f1238ecb1d5df865aaf6c7abc1" alt="Add domain in Resend" width="2922" height="1044" data-path="images/resend-add-domain.png" />
      </Frame>
    </Step>

    <Step title="Step 2: Copy DNS Records from Resend">
      Resend will display the DNS records you need to configure. Copy these records.

      You'll need to add the following records:

      * **MX records** (2) for email sending and receiving
      * **TXT record** for SPF authentication
      * **TXT record** for DKIM authentication
      * **TXT record** for DMARC (optional)
    </Step>

    <Step title="Step 3: Configure DNS at Your Domain Provider">
      Log in to your domain provider account and navigate to **DNS Management** for your domain.

      Add the following DNS records from Resend:

      <table>
        <thead>
          <tr>
            <th width="120"><div align="left">Type</div></th>
            <th width="150"><div align="left">Name</div></th>
            <th width="350"><div align="left">Value</div></th>
            <th width="80"><div align="left">Priority</div></th>
            <th width="150"><div align="left">Purpose</div></th>
          </tr>
        </thead>

        <tbody>
          <tr>
            <td><b>MX</b></td>
            <td><code>send</code></td>
            <td><code>feedback-smtp.us-east-1.amazonses.com</code></td>
            <td><code>10</code></td>
            <td>Enable Sending</td>
          </tr>

          <tr>
            <td><b>MX</b></td>
            <td><code>@</code></td>
            <td><code>inbound-smtp.us-east-1.amazonses.com</code></td>
            <td><code>10</code></td>
            <td>Enable Receiving</td>
          </tr>

          <tr>
            <td><b>TXT</b></td>
            <td><code>send</code></td>
            <td><code>v=spf1 include:amazonses.com \~all</code></td>
            <td><code>-</code></td>
            <td>SPF Authentication</td>
          </tr>

          <tr>
            <td><b>TXT</b></td>
            <td><code>resend.\_domainkey</code></td>
            <td><code>p=your-dkim-key-value</code></td>
            <td><code>-</code></td>
            <td>DKIM Authentication</td>
          </tr>

          <tr>
            <td><b>TXT</b></td>
            <td><code>\_dmarc</code></td>
            <td><code>v=DMARC1; p=none;</code></td>
            <td><code>-</code></td>
            <td>DMARC (Optional)</td>
          </tr>
        </tbody>
      </table>

      <Warning>
        The actual values will be different in your Resend dashboard. Always copy the exact values from Resend, not from this documentation.
      </Warning>

      <Tip>
        DNS configuration steps are similar across most domain providers. Refer to your provider's help documentation if you need specific guidance.
      </Tip>
    </Step>

    <Step title="Step 4: Verify Domain in Resend">
      Return to Resend and click **Verify Domain**.

      <Info>
        DNS propagation typically takes 5-30 minutes, but can take up to 48 hours in some cases. If verification doesn't work immediately, wait a few minutes and try again.
      </Info>

      Once verified, you can now send emails from your custom domain.
    </Step>

    <Step title="Step 5: Update Email Sender in Readdy">
      Tell Readdy to update the email sender address to use your verified custom domain:

      ```
      Update the email sender to use noreply@yourdomain.com
      ```

      <Tip>
        Replace `yourdomain.com` with your actual verified domain name.
      </Tip>
    </Step>
  </Steps>
</Accordion>

<Accordion title="I Don't Have a Domain">
  If you don't have a domain yet, we recommend purchasing one first. You can buy a domain from a domain provider like GoDaddy, Cloudflare, or Namecheap, then **follow the steps in "I Already Have a Domain" above**.

  Alternatively, you can purchase your domain directly through Readdy and use it for both your website and email branding:

  <Steps>
    <Step title="Step 1: Purchase Domain in Readdy">
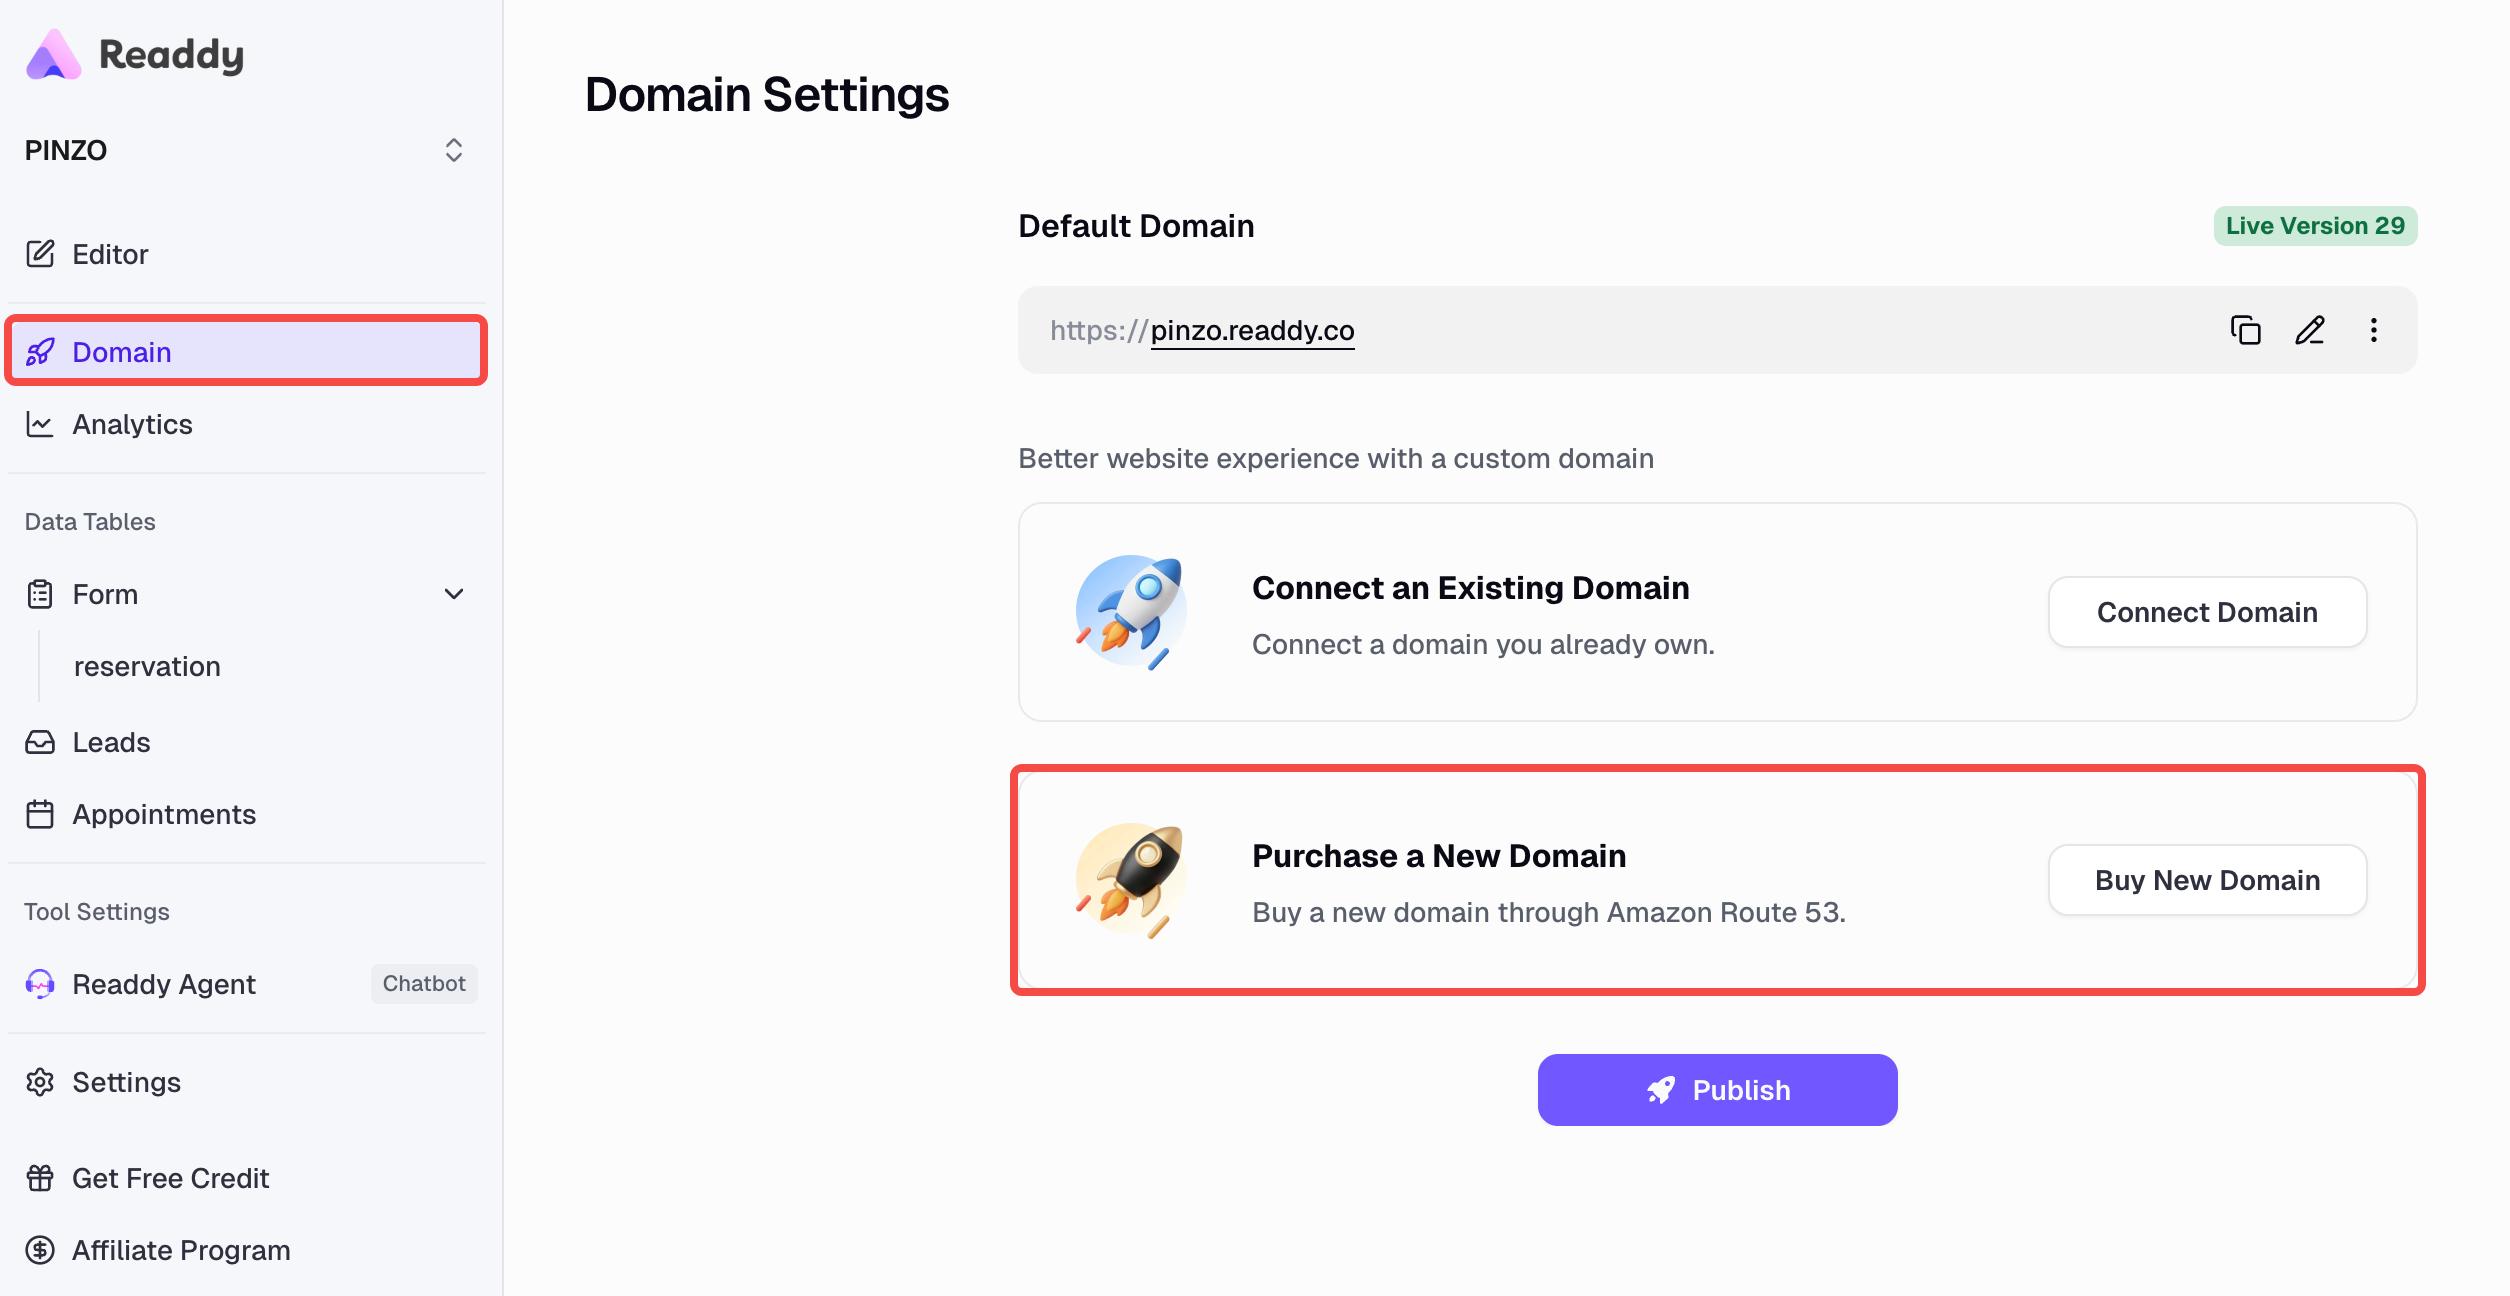
      In your Readdy project, click **Publish** and select **Purchase a new domain**.

      <Frame>
        <img src="https://mintcdn.com/readdy/avsZxRT1zcyAuKCM/images/purchase-domain-step1-input-domain.png?fit=max&auto=format&n=avsZxRT1zcyAuKCM&q=85&s=4cbc7e0af49c1067bc29f777a412e43d" alt="Purchase domain in Readdy" width="2510" height="1296" data-path="images/purchase-domain-step1-input-domain.png" />
      </Frame>

      📖 **Learn More**: <a href="/features/publish-purchase-domain" target="_blank" rel="noopener noreferrer">Complete Guide to Purchasing Domains in Readdy</a>
    </Step>

    <Step title="Step 2: Add Domain in Resend">
      After purchasing, **follow the steps in "I Already Have a Domain" above**:

      * Add your domain in Resend dashboard
      * Copy the DNS records provided by Resend (MX x2, TXT SPF, TXT DKIM, TXT DMARC)
    </Step>

    <Step title="Step 3: Configure DNS Records">
      Since your domain is managed by Readdy, you can configure DNS records through your Readdy project settings.

      Add the following records provided by Resend:

      * **MX records** (2) for email sending and receiving
      * **TXT record** for SPF authentication
      * **TXT record** for DKIM authentication
      * **TXT record** for DMARC (optional)
    </Step>

    <Step title="Step 4: Verify and Update">
      * Verify your domain in Resend (wait 5-30 minutes for DNS propagation)
      * Tell Readdy to update the email sender to use your custom domain

      <Tip>
        This method is more streamlined as both your website and email use the same domain management system.
      </Tip>
    </Step>
  </Steps>
</Accordion>

<Success>
  After connecting your domain to your website, you can proceed with testing. You'll then see that the email sender displays your configured branded name (e.g., "Pinzo Restaurant \<[reservation@yourdomain.com](mailto:reservation@yourdomain.com)>") in the email header.
</Success>

## Troubleshooting

### Email Not Sending

If emails are not being sent:

1. **Check your Resend API key** - Ensure it's valid and hasn't been revoked
2. **Verify domain status** - If using a custom domain, make sure it's verified
3. **Check Supabase connection** - Ensure database is properly connected
4. **Review Resend logs** - Check your Resend dashboard for error messages

### Email Not Arriving

If the API call succeeds but emails don't arrive:

1. **Check spam folder** - The email might be in the recipient's spam folder
2. **Verify email address** - Ensure the recipient email address is correct
3. **Check sending limits** - Verify you haven't exceeded your Resend quota
4. **Review DNS settings** - If using a custom domain, ensure DNS records are correct

### Database Not Recording Bookings

If booking data isn't being saved, ask **Readdy AI** to help check the database configuration and set up data storage for you.

## Need Help?

### Contact Support

* **Ask AI**: Available in your project
* **Readdy Support**: <a href="https://readdy.ai/feedback" target="_blank" rel="noopener noreferrer">Submit a support ticket</a>

Thank you for using Readdy and Resend. Happy sending! 📧