> ## Documentation Index
> Fetch the complete documentation index at: https://docs.readdy.ai/llms.txt
> Use this file to discover all available pages before exploring further.
# Select to Edit & Quick Edit
> Edit directly in Preview via chat or visual actions. Ship new versions faster and stay in control.
## Overview
The feature previously called “Selector” is now “Select to Edit.”
`Select to Edit` and `Quick Edit` provide two complementary workflows for editing your page in Preview. You can select an element and describe changes in the Chat, or edit content directly on the page and review those changes in a Quick Edit list. Both workflows let you submit updates to generate a new version. **Stay focused on content editing and outcomes. Fewer reruns, shorter waits, fewer credits used.**
In Selector, you pick the target element in Preview, then describe your intent in natural language (e.g., replace a headline, update a button label, add a card). AI processes your request and returns a new version.
In `Quick Edit`, you make inline changes to text, links, images, etc. All edits are collected into a “`Quick Edits`” pending list where you can review, undo, delete, or send them all at once, keeping each set of changes clear and controlled.
## Why use Select to Edit & Quick Edit?
* **Faster feedback**: edit inline in Preview or describe your change in a sentence and quickly see results.
* **Two workflows, no conflict**: chat-driven and quick editing are mutually exclusive, preventing mixed-method issues.
* **Controlled batch submission**: the `Quick Edit` list lets you confirm each change before sending, keeping edits atomic and reviewable.
* **Powerful in-place actions**: `Select Parent`, Select Stacked Layer, Undo, Delete, Add/Edit Link, Upload/Replace Image, Remove/Regenerate Background, Generate Video...
## Terminology
| Terms | Explainations |
| --------------- | ---------------------------------------------------------------------------- |
| Select to Edit | Toggle to select elements in Preview for editing. |
| Tag label | The element type name shown near the top-left of the element. |
| Edit Bar | Action bar anchored to the selected element. |
| Quick Edit list | A list of pending edits created by direct on-page changes, prior to sending. |
| Send | Submit your edits to generate a new version. |
| Discard | Abandon the current batch of pending edits and clear the list. |
## How It Works
### 1. Ways to select elements
#### 1.1 Quick-select text for inline edits (Select to Edit OFF)
* Double‑click plain text in the Preview to jump straight into edit mode and change the copy in place.
* To preserve real-page interactions, interactive components (e.g., links, buttons, inputs, embedded widgets) do not open inline edit on double‑click. If you need to edit them, turn on Select to Edit.
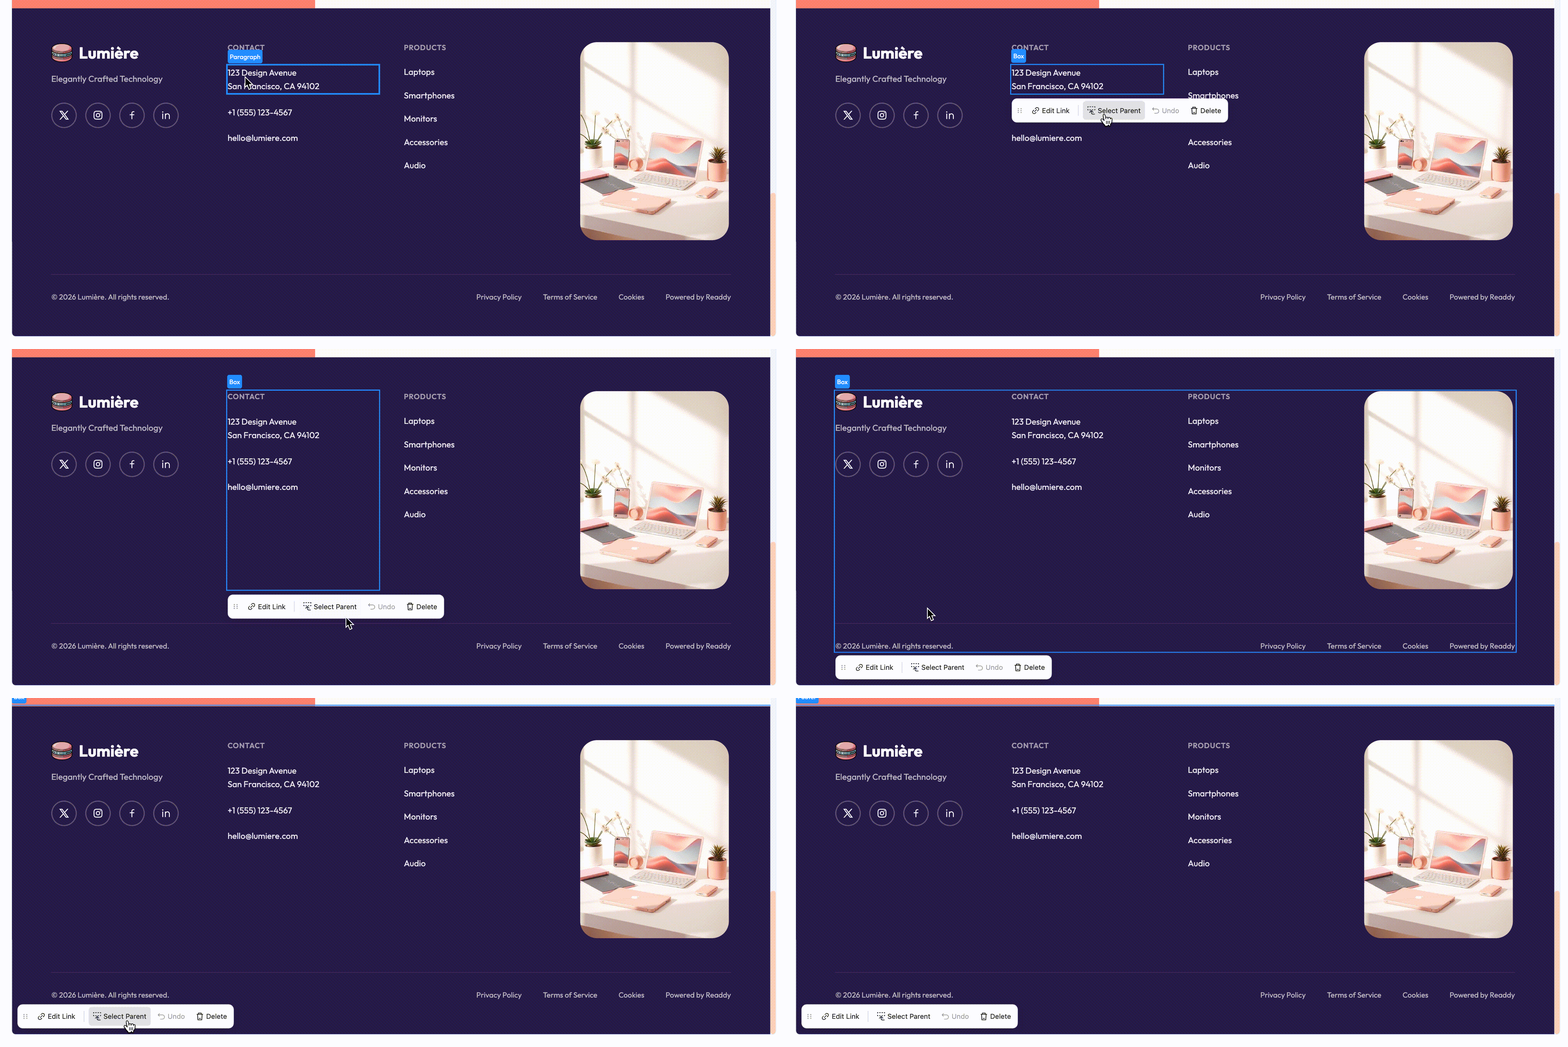
#### 1.2 Select Parent (Select to Edit ON)
> In the code, elements are nested.
* When a target element is hard to grab, use the `Select Parent` button in the Edit bar to move up the hierarchy and quickly select the parent element.
* Each `Select Parent` click climbs one level to the outer wrapper.
 #### 1.3 Select from stacked layers (Select to Edit ON)
* When multiple layers overlap and the bottom layer is hard to click, hover the target area and right‑click to open the layer list under the cursor.
* Choose the exact layer you want—this is the most convenient and precise way to select overlapped elements.
#### 1.3 Select from stacked layers (Select to Edit ON)
* When multiple layers overlap and the bottom layer is hard to click, hover the target area and right‑click to open the layer list under the cursor.
* Choose the exact layer you want—this is the most convenient and precise way to select overlapped elements.
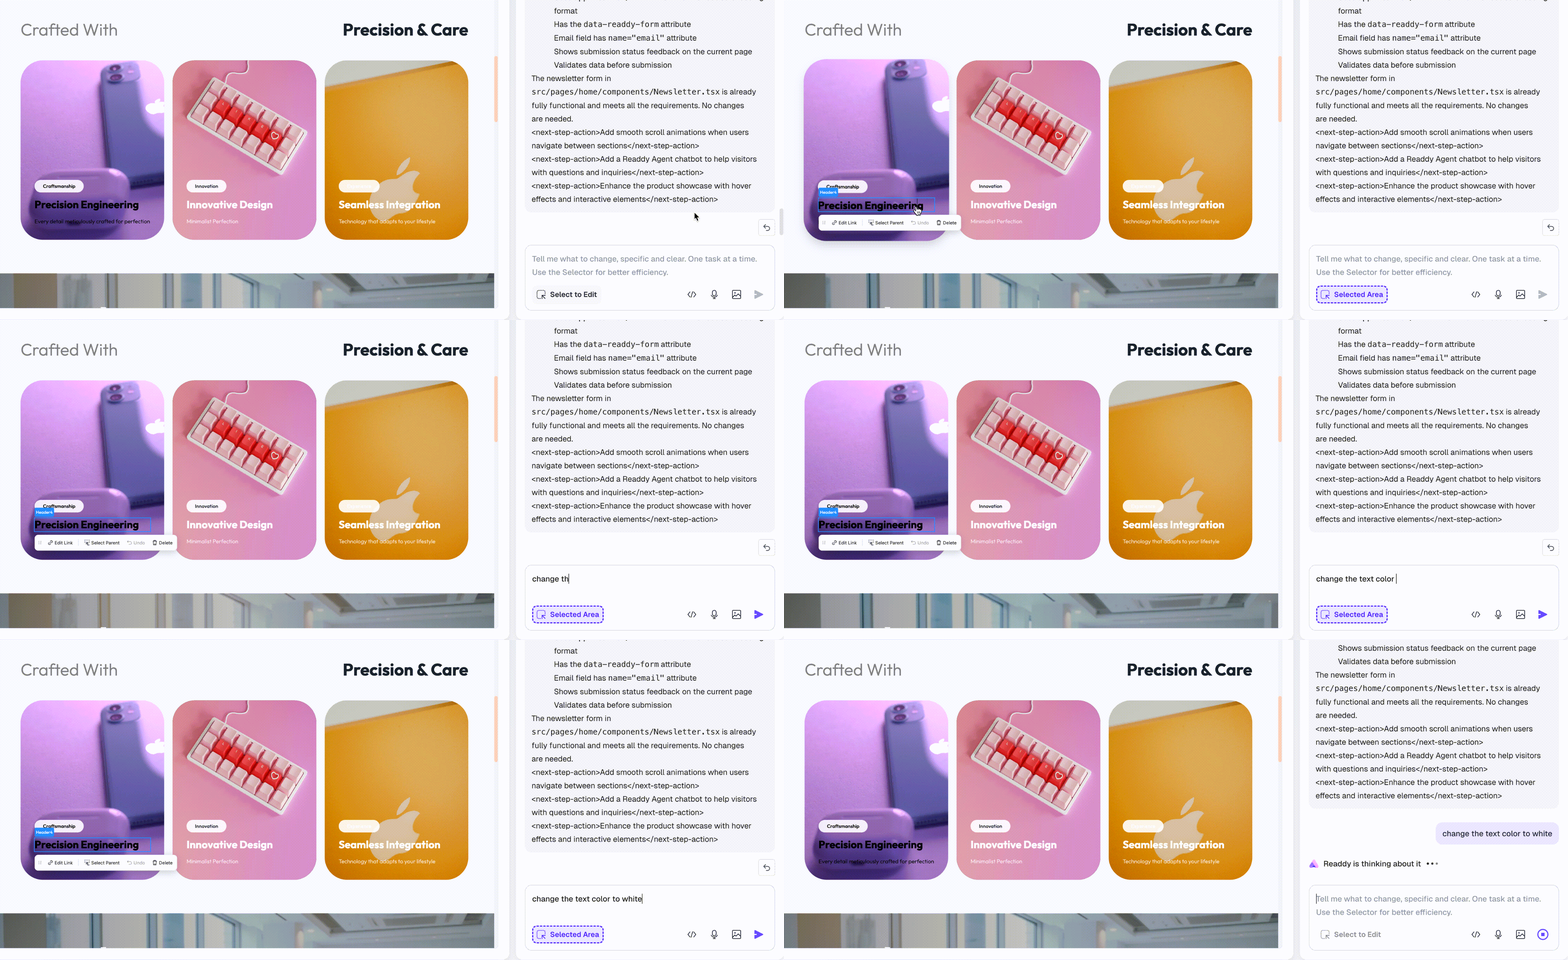
 ### 2. Select to Edit (Chat-driven workflow)
> Use this when you want to describe changes in natural language and let the system handle them.
**Steps**
1. Toggle `Select to Edit` `⌥ S`.
2. Hover and click the target element.
3. Go to the Chat panel:
* Start typing your request.
* Write clear, targeted instructions. Reference the element context in your prompt (e.g., “Change the hero title to bigger size”).
4. Click `Send`:
* The system processes your requests and returns changes in a new version.
* If results differ from your expectation, review the page and adjust your prompt or use `Quick Edit`.
### 2. Select to Edit (Chat-driven workflow)
> Use this when you want to describe changes in natural language and let the system handle them.
**Steps**
1. Toggle `Select to Edit` `⌥ S`.
2. Hover and click the target element.
3. Go to the Chat panel:
* Start typing your request.
* Write clear, targeted instructions. Reference the element context in your prompt (e.g., “Change the hero title to bigger size”).
4. Click `Send`:
* The system processes your requests and returns changes in a new version.
* If results differ from your expectation, review the page and adjust your prompt or use `Quick Edit`.
 ### 3. Quick Edit (Edit Content in Preview)
> Use this when you want to directly modify content on the page and review changes as discrete items.
**Steps**
1. Toggle `Select to Edit`
2. Select element
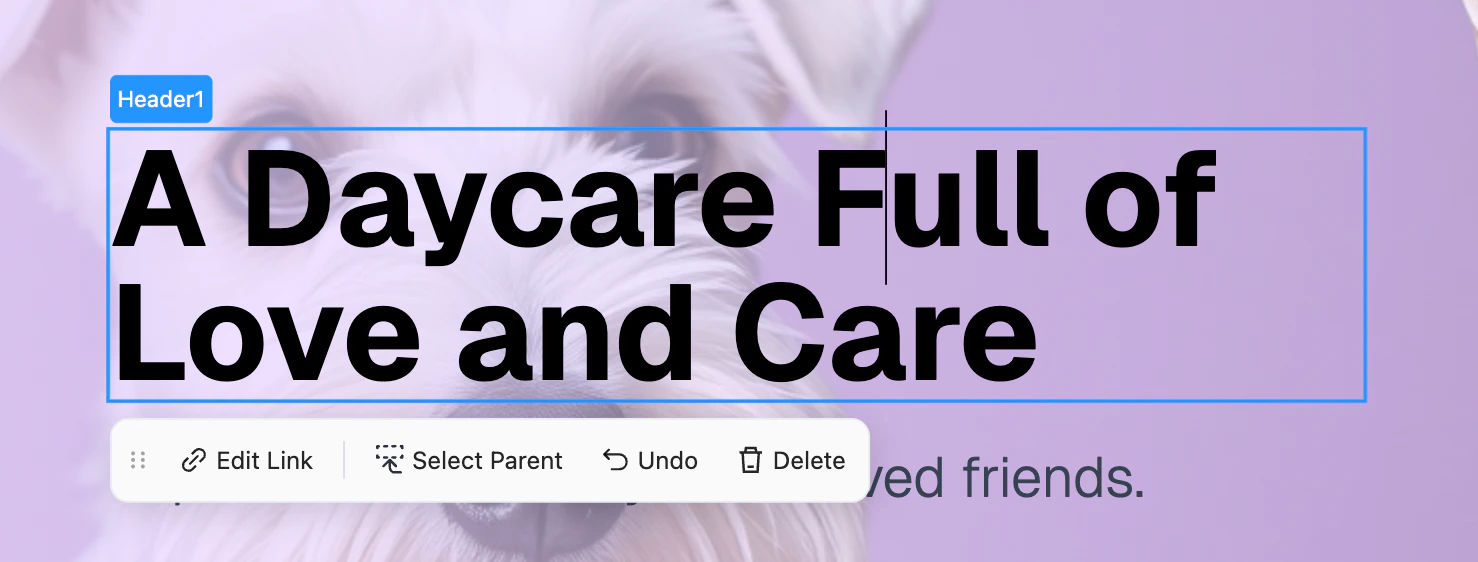
3. Use direct editing and the `Edit Bar`:
* Text: click into text elements (header, paragraph, span, label, link, button) and type; press `Enter` to comfirm the changes.
### 3. Quick Edit (Edit Content in Preview)
> Use this when you want to directly modify content on the page and review changes as discrete items.
**Steps**
1. Toggle `Select to Edit`
2. Select element
3. Use direct editing and the `Edit Bar`:
* Text: click into text elements (header, paragraph, span, label, link, button) and type; press `Enter` to comfirm the changes.
 * Link: click `Add/Edit Link` in the `Edit Bar`, update href, `Save`.
* Image: `Upload & Replace Image` via the `Edit Bar`. Optional: Remove Background, Regenerate Background, Generate Video.
* Link: click `Add/Edit Link` in the `Edit Bar`, update href, `Save`.
* Image: `Upload & Replace Image` via the `Edit Bar`. Optional: Remove Background, Regenerate Background, Generate Video.
 * Structural actions: `Select Parent`, `Undo` last change, `Delete element`.
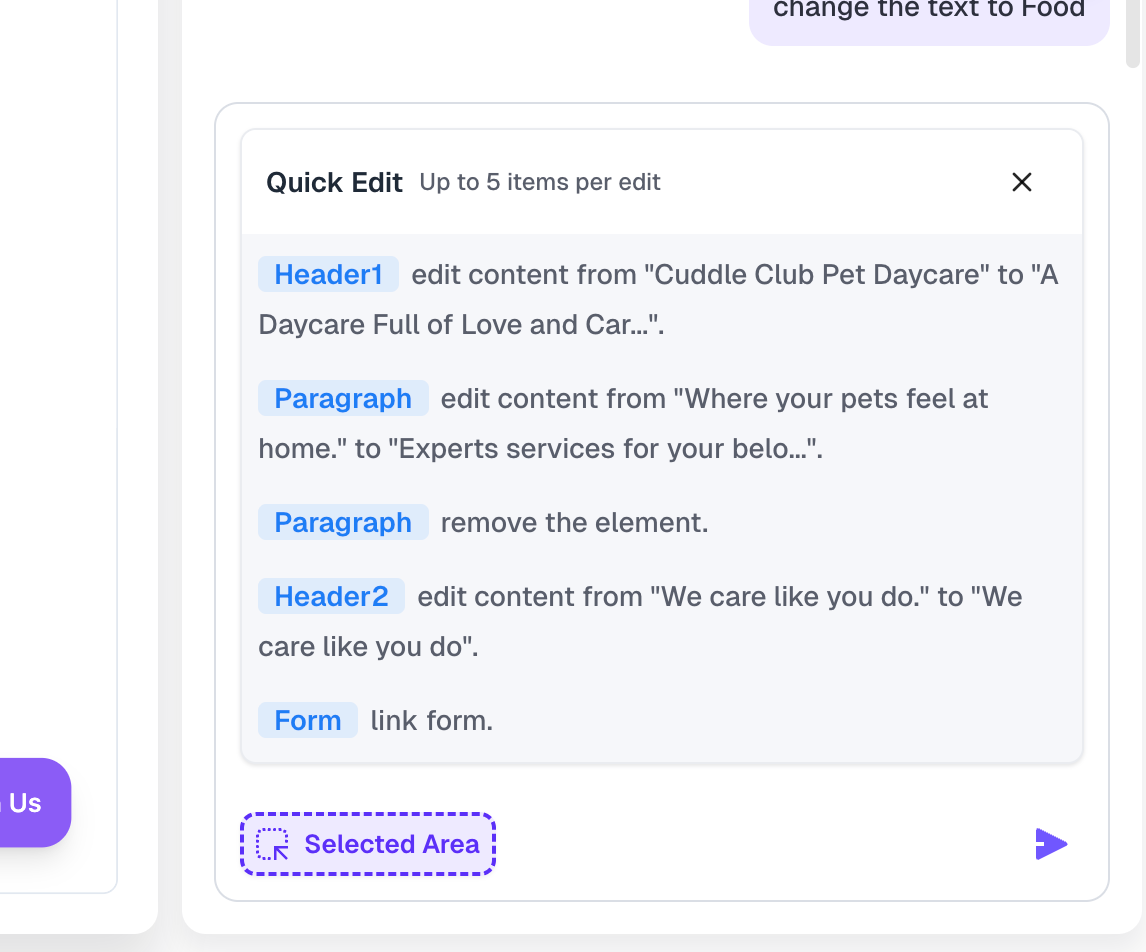
4. Review the `Quick Edit` list:
* Each change creates or updates a single line item, to record what exactly you have changed.
* **Limit: up to 5 changes at once**.
* Structural actions: `Select Parent`, `Undo` last change, `Delete element`.
4. Review the `Quick Edit` list:
* Each change creates or updates a single line item, to record what exactly you have changed.
* **Limit: up to 5 changes at once**.
 5. Manage pending edits:
* `Delete` a single item: removes the entry and reverts its change in Preview.
* `Discard` (close) the list: confirm to clear all pending edits and restore the page.
* `Undo`: revert the most recent `Quick Edit`.
6. Send:
* Click `Send` to submit these `Quick Edits` all at once; upon success, the system creates a new version.
### 4. Prompt in Place
Prompt in Place lets you edit with AI without leaving Preview. Turn on Select to Edit, click the element you want to change, type a prompt directly in the toolbar, and send it instantly. Your request is automatically added to the queue, so you can keep moving through the page without breaking your flow.
### 5. Go to Code
> Quickly locate the selected layer in the code editor for easy editing.
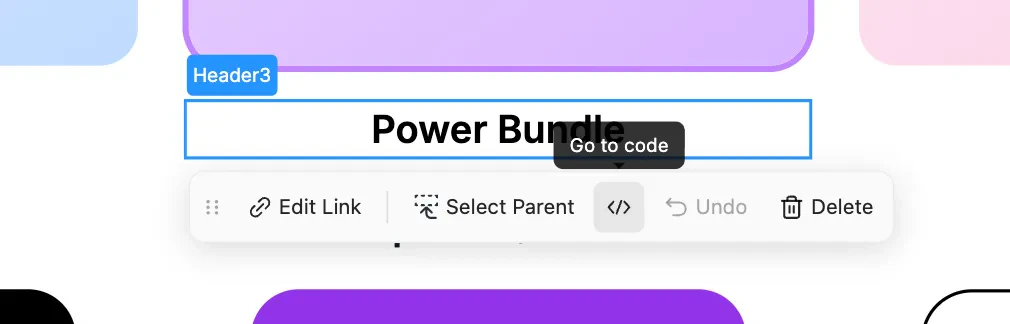
1. Select the target element, and click the `Go to Code` button in the toolbar.
5. Manage pending edits:
* `Delete` a single item: removes the entry and reverts its change in Preview.
* `Discard` (close) the list: confirm to clear all pending edits and restore the page.
* `Undo`: revert the most recent `Quick Edit`.
6. Send:
* Click `Send` to submit these `Quick Edits` all at once; upon success, the system creates a new version.
### 4. Prompt in Place
Prompt in Place lets you edit with AI without leaving Preview. Turn on Select to Edit, click the element you want to change, type a prompt directly in the toolbar, and send it instantly. Your request is automatically added to the queue, so you can keep moving through the page without breaking your flow.
### 5. Go to Code
> Quickly locate the selected layer in the code editor for easy editing.
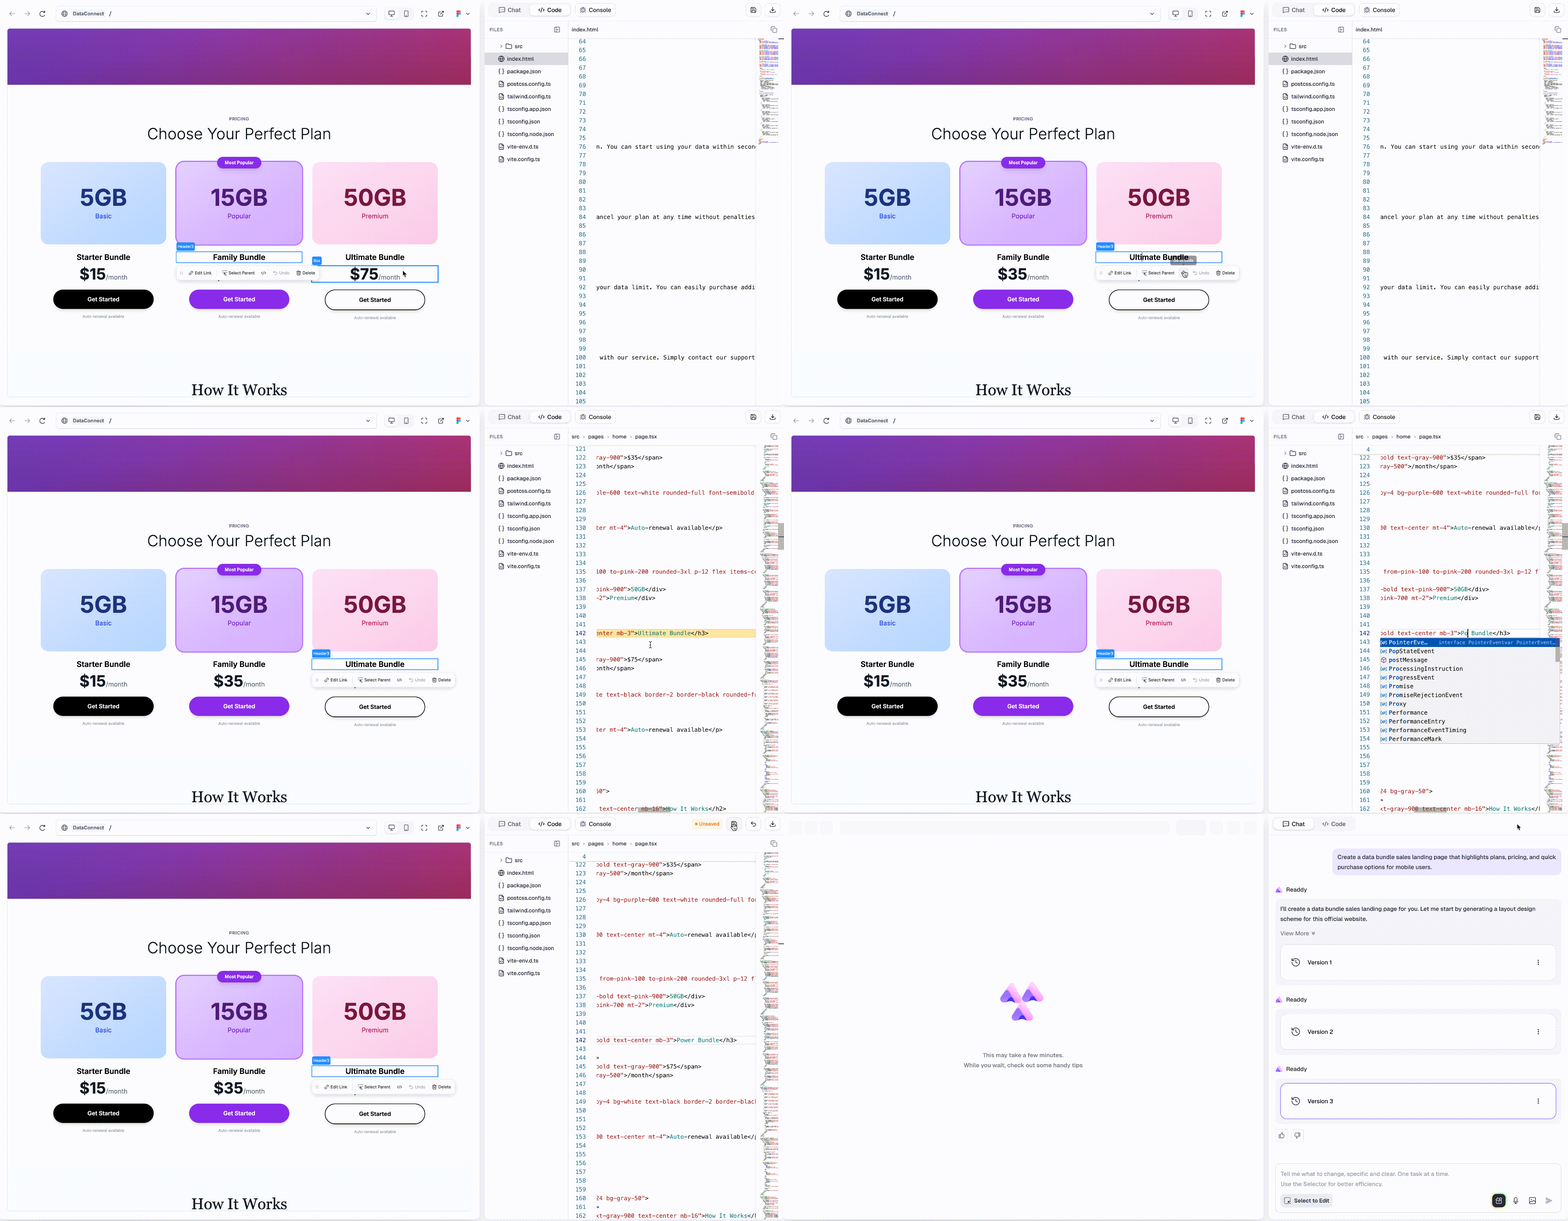
1. Select the target element, and click the `Go to Code` button in the toolbar.
 2. The editor will automatically switch to the `Code` tab, opening the file and highlighting the exact line where the element is defined.
3. The code editor lets you freely adjust content, styles, and layout to your needs.
4. **Don’t forget to `Save` after you’ve made all your code changes!**
2. The editor will automatically switch to the `Code` tab, opening the file and highlighting the exact line where the element is defined.
3. The code editor lets you freely adjust content, styles, and layout to your needs.
4. **Don’t forget to `Save` after you’ve made all your code changes!**
 ## Usage Limits and Out-of-Scope Cases
* `Quick Edit` list capacity: Up to 5 items per `Quick Edit` batch.
* Manual typing in Chat and `Quick Edit` cannot be used simultaneously. In order to allow multi-location edits at once and accelerate modification speed, you cannot send a prompt and `Quick Edit` todos in parallel.
* Manual typing in Chat is disabled while `Quick Edit` occupies the input field.
* Starting to type in Chat will hide the Preview `Edit Bar` and the `Quick Edit` List.
* Navigating away clears in‑progress `Quick Edits`
* Navigating to other Readdy settings pages, switching projects, changing pages within a project, or switching to a different version of the current project will cause the current `Quick Edit` list input to be lost. This is because you have exited the editing context.
## Tips and Best Practices
* Choose the workflow that fits the task:
* Use `Select to Edit` for natural-language, multi-step or contextual instructions in Chat.
* Use `Quick Edit` for precise, immediate changes you can visually confirm.
* Keep edits atomic and clear; shorter batches reduce conflicts and make review easier.
* For images, prepare correct formats and sizes; invalid files will be rejected.
## Troubleshooting & FAQs
1. I selected an element but don’t see the Edit Bar.
* A: Ensure `Select to Edit`is active; if you started typing in Chat, Edit Bar hides by design. Move focus away from Chat or stop typing to resume `Quick Edit`.
2. I can’t type in Chat while `Quick Edit` is open.
* A: The Quick Edit list occupies the input; send the changes in `Quick Edit` or discard all the changes if you need to type in Chat.
3. My `Quick Edit` list hit the limit.
* A: You can have up to 5 items per batch; please send, delete, or discard items before adding more. This limit helps ensure more accurate AI modifications and prevents potential bugs during page edits and modifications.
4. The AI result differs from my local `Quick Edit` preview.
* A: Review the new version. If it doesn’t match expectations, adjust and resend.
5. Upload failed for an image.
* A: Check file size and format. Unsupported files are blocked for security and consistency.
## Need Help?
If this guide doesn’t resolve your issue, contact us at [hi@readdy.ai](mailto:hi@readdy.ai) or use the live chat in the top‑right corner of Readdy. We’re here to help!
## Usage Limits and Out-of-Scope Cases
* `Quick Edit` list capacity: Up to 5 items per `Quick Edit` batch.
* Manual typing in Chat and `Quick Edit` cannot be used simultaneously. In order to allow multi-location edits at once and accelerate modification speed, you cannot send a prompt and `Quick Edit` todos in parallel.
* Manual typing in Chat is disabled while `Quick Edit` occupies the input field.
* Starting to type in Chat will hide the Preview `Edit Bar` and the `Quick Edit` List.
* Navigating away clears in‑progress `Quick Edits`
* Navigating to other Readdy settings pages, switching projects, changing pages within a project, or switching to a different version of the current project will cause the current `Quick Edit` list input to be lost. This is because you have exited the editing context.
## Tips and Best Practices
* Choose the workflow that fits the task:
* Use `Select to Edit` for natural-language, multi-step or contextual instructions in Chat.
* Use `Quick Edit` for precise, immediate changes you can visually confirm.
* Keep edits atomic and clear; shorter batches reduce conflicts and make review easier.
* For images, prepare correct formats and sizes; invalid files will be rejected.
## Troubleshooting & FAQs
1. I selected an element but don’t see the Edit Bar.
* A: Ensure `Select to Edit`is active; if you started typing in Chat, Edit Bar hides by design. Move focus away from Chat or stop typing to resume `Quick Edit`.
2. I can’t type in Chat while `Quick Edit` is open.
* A: The Quick Edit list occupies the input; send the changes in `Quick Edit` or discard all the changes if you need to type in Chat.
3. My `Quick Edit` list hit the limit.
* A: You can have up to 5 items per batch; please send, delete, or discard items before adding more. This limit helps ensure more accurate AI modifications and prevents potential bugs during page edits and modifications.
4. The AI result differs from my local `Quick Edit` preview.
* A: Review the new version. If it doesn’t match expectations, adjust and resend.
5. Upload failed for an image.
* A: Check file size and format. Unsupported files are blocked for security and consistency.
## Need Help?
If this guide doesn’t resolve your issue, contact us at [hi@readdy.ai](mailto:hi@readdy.ai) or use the live chat in the top‑right corner of Readdy. We’re here to help!