> ## Documentation Index
> Fetch the complete documentation index at: https://docs.readdy.ai/llms.txt
> Use this file to discover all available pages before exploring further.
# Publish - for React Project
> Step-by-step guide to publishing your Readdy website online
This guide is specifically for **React** projects. If your project uses a different framework (HTML, Vue, Vue-Ant Design, Vue-Element, Vue2, React-Ant Design, React-Shadcn, or UniApp), please refer to [Publish](/features/publish).
This guide will walk you through the steps to publish your project online. Before you begin, please make sure your website is fully built and ready to go live.
## Go to the Domain Settings Page
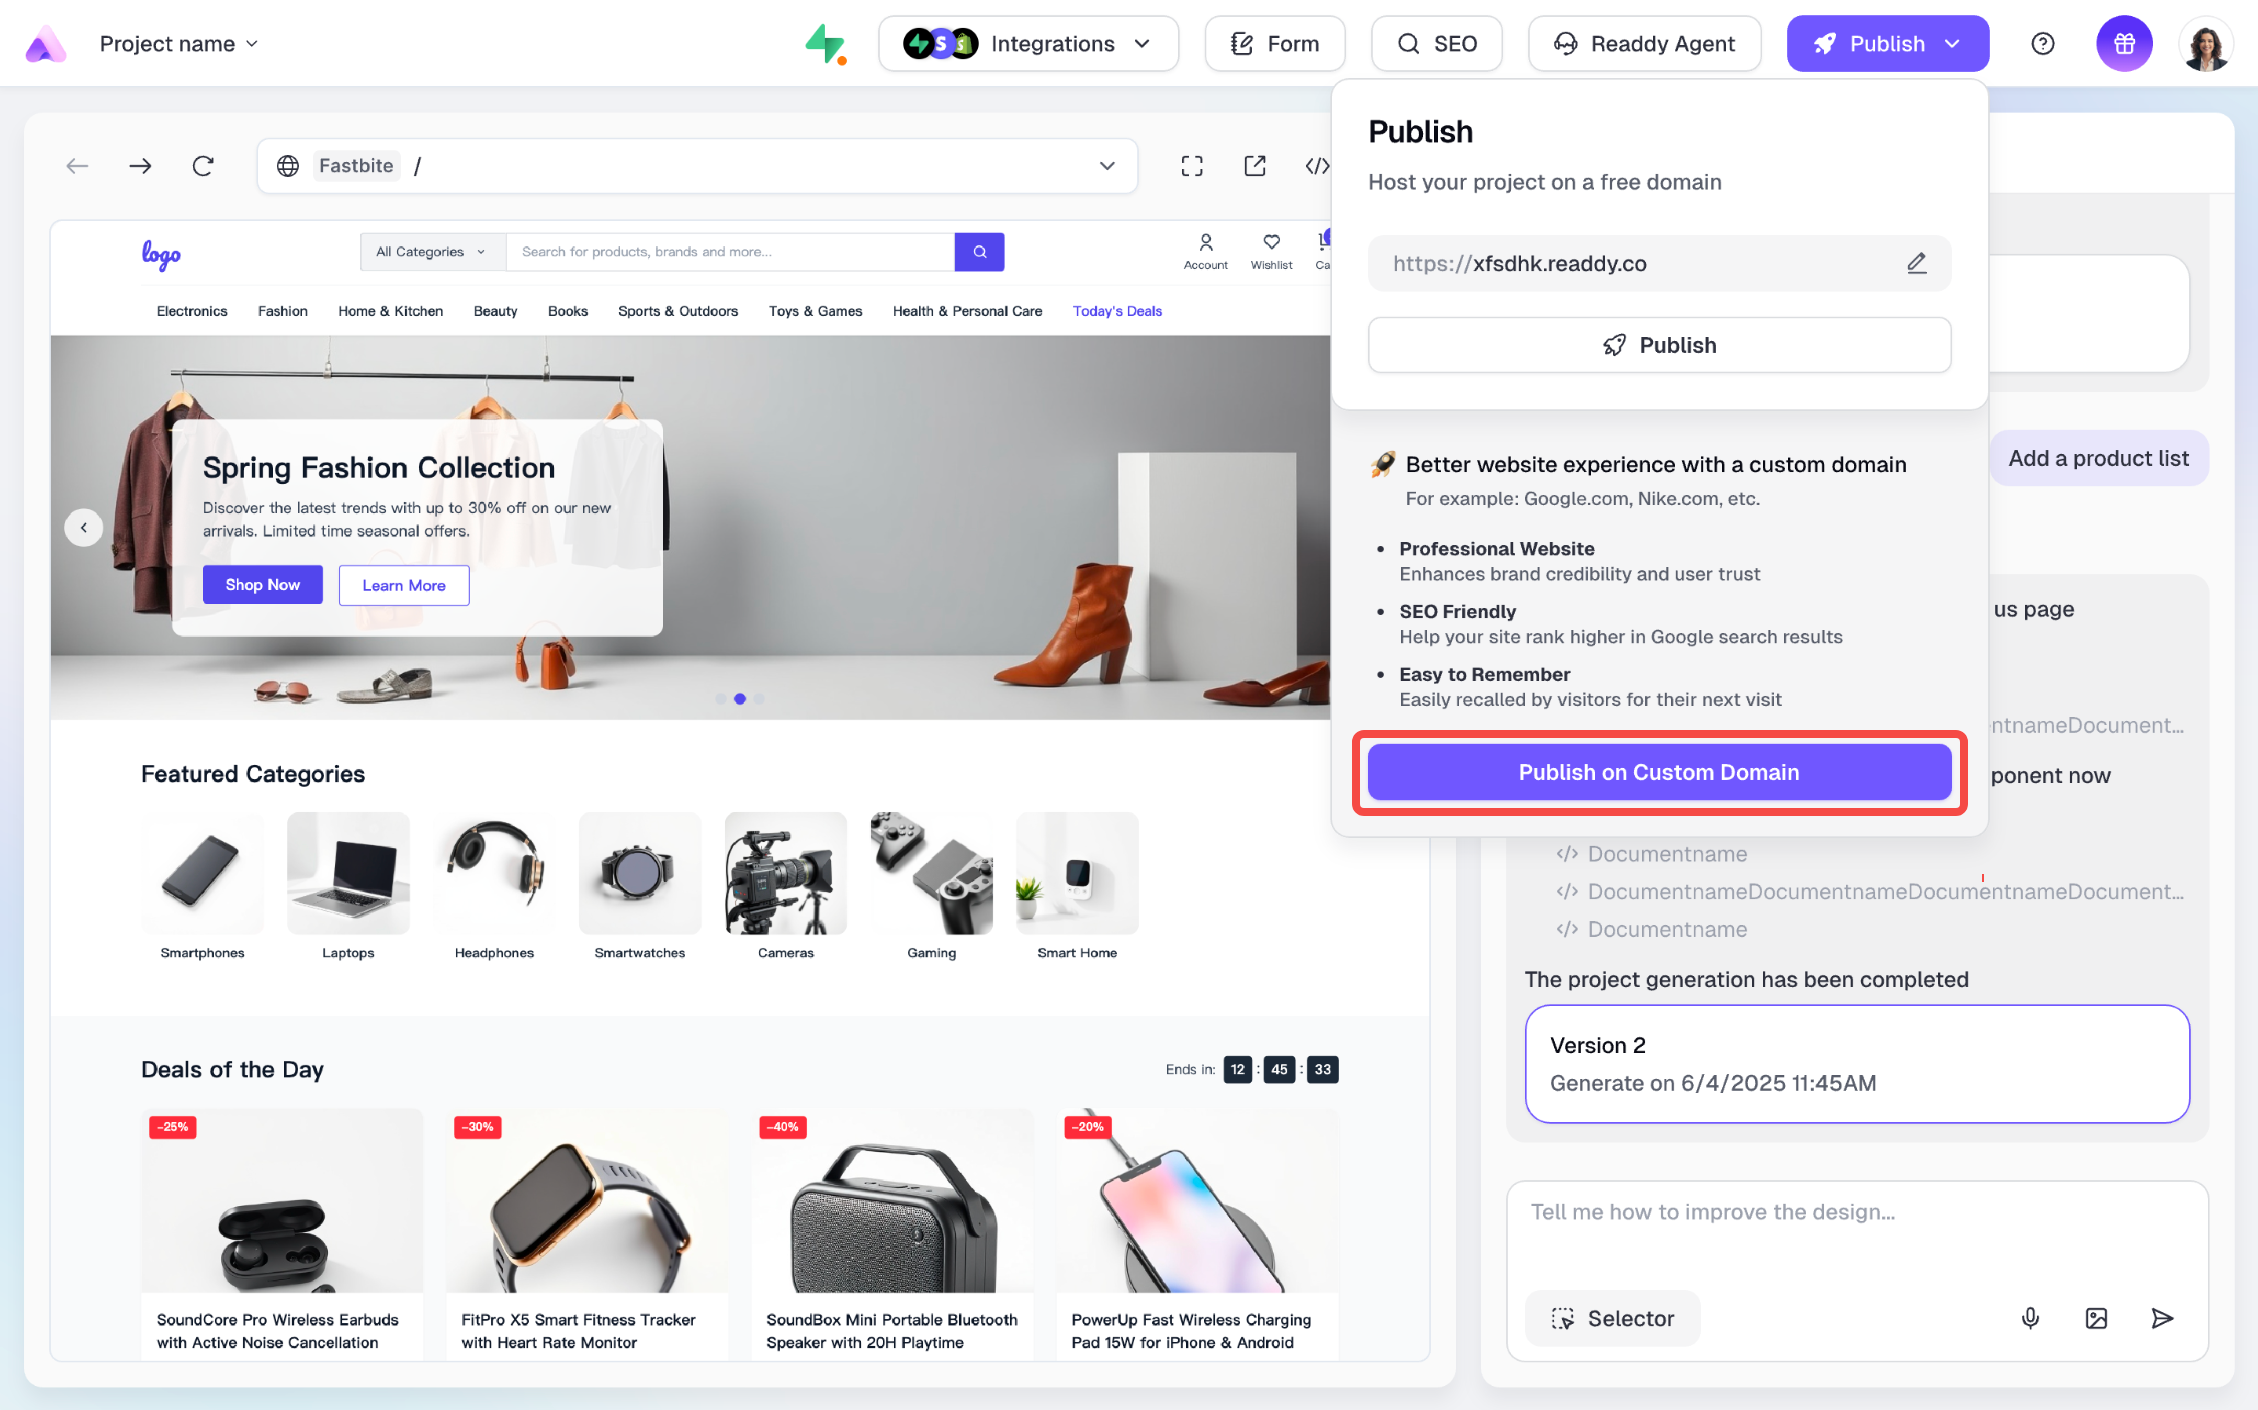
Click Publish button in the top-right corner of the page, and click **Publish on Custom Domain** to access the domain settings page.
 ## Connect an Existing Domain
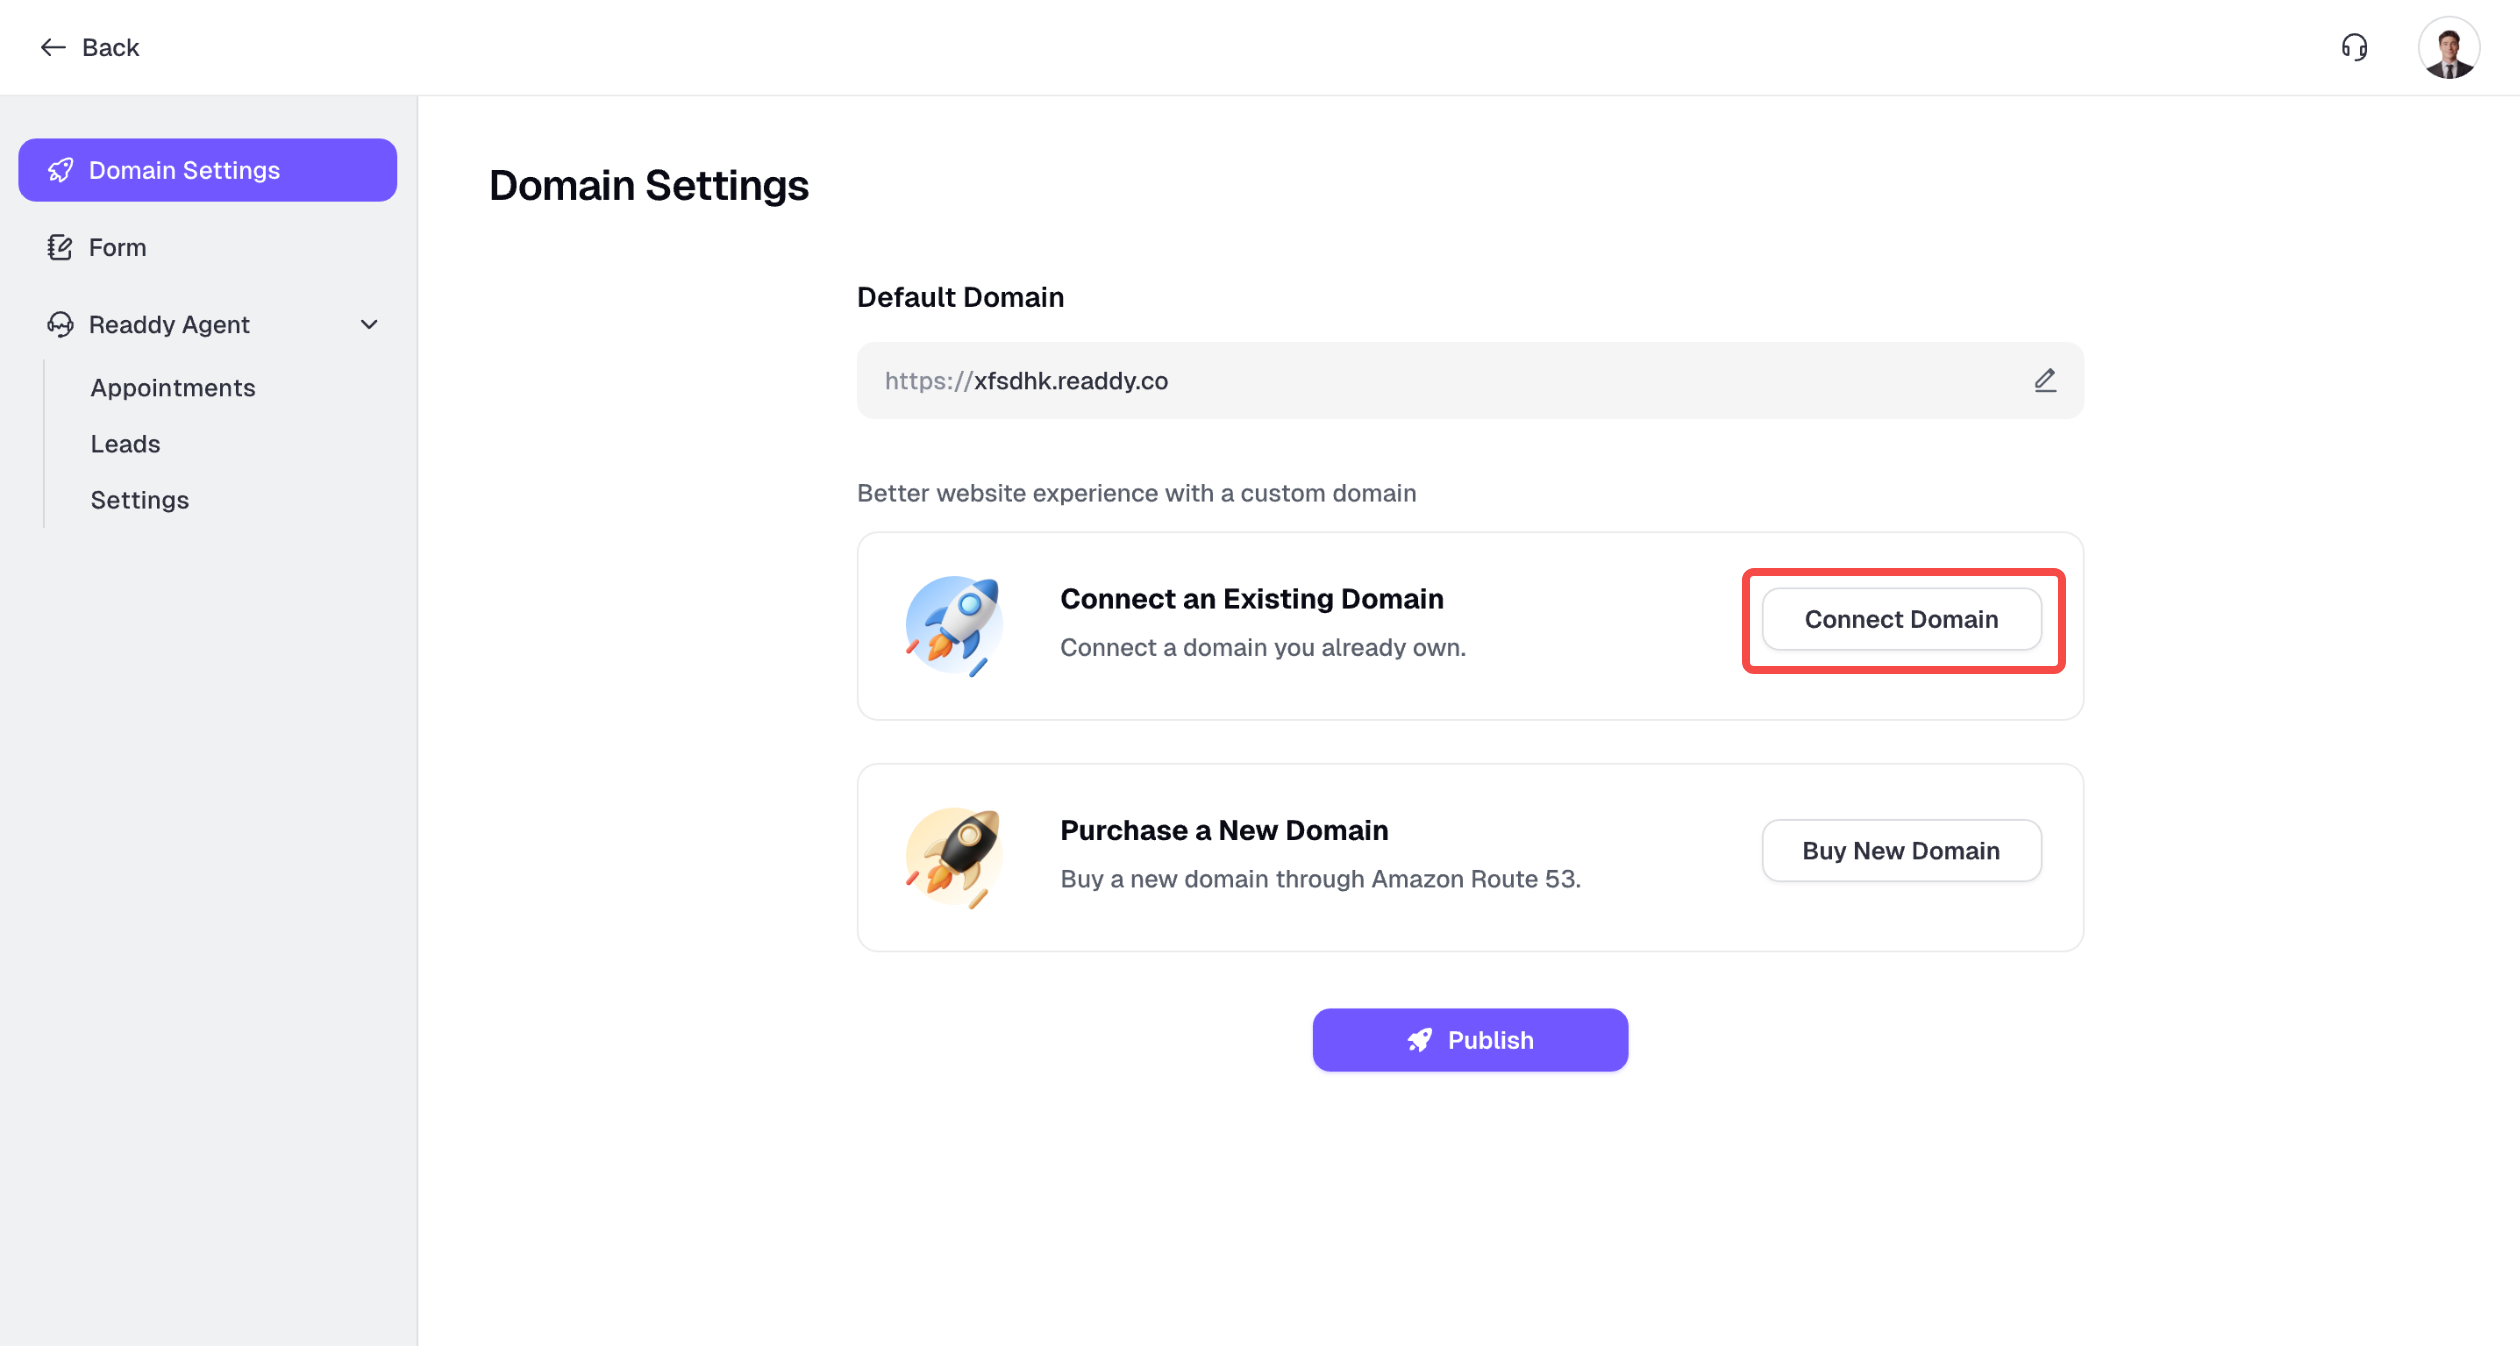
If you already own a domain, Click **Connect Domain**.
**What is domain?**\
A domain is the address of a website. For example, Google’s domain is google.com. To publish your website, you need a domain first. [Buy New Domain](/features/publish-purchase-domain)
## Connect an Existing Domain
If you already own a domain, Click **Connect Domain**.
**What is domain?**\
A domain is the address of a website. For example, Google’s domain is google.com. To publish your website, you need a domain first. [Buy New Domain](/features/publish-purchase-domain)
 ## Step 1. Enter Your Own Domain
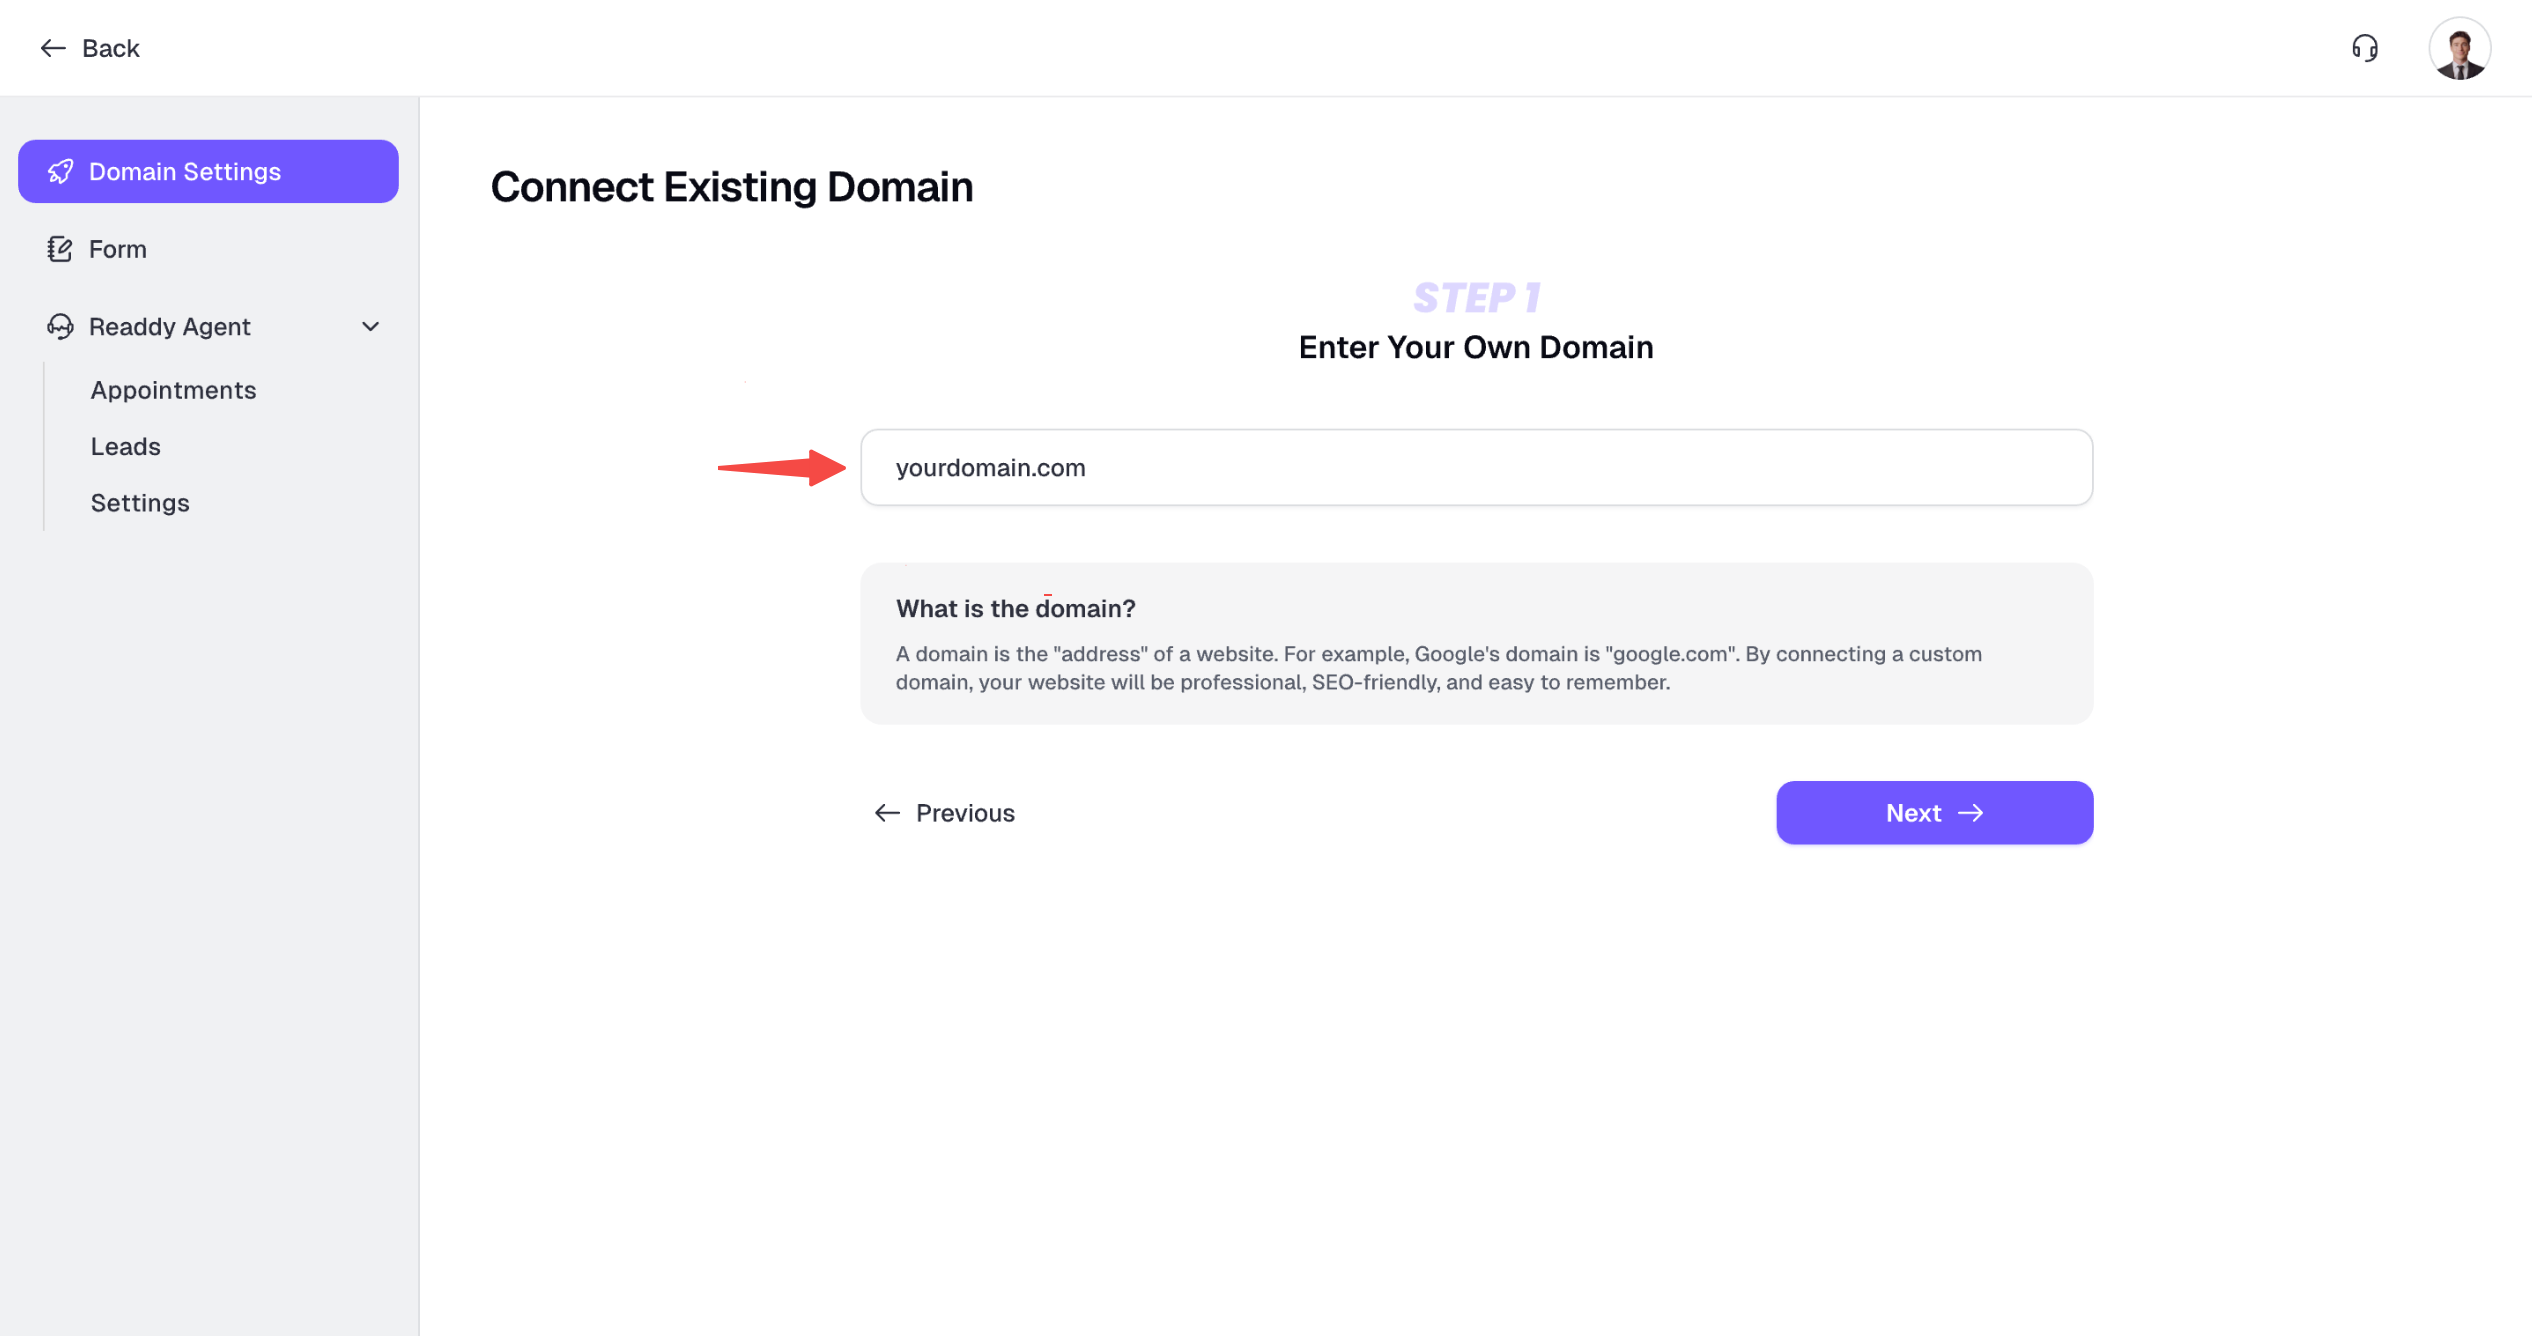
Enter the domain you want to connect and click **Next**.
## Step 1. Enter Your Own Domain
Enter the domain you want to connect and click **Next**.
 In some cases, you'll see a red error message. Here's how to interpret and resolve errors:
The domain format is incorrect. Ensure there's only one "." and no trailing spaces.\
A correct domain looks like `google.com`.
First, check that your domain is entered correctly. If the domain is correct, it means you haven't purchased this domain yet. Click **Previous** and choose [Buy New Domain](/features/publish-purchase-domain).
This domain is already connected to another one of your project (**xxx** means the project's name). You need to remove it from that project before proceeding.
This domain is in use by another user. Please choose a different one. If you're sure the domain belongs to you, please contact our support team to reclaim it.
## Step2. Set Up DNS of Your Domain
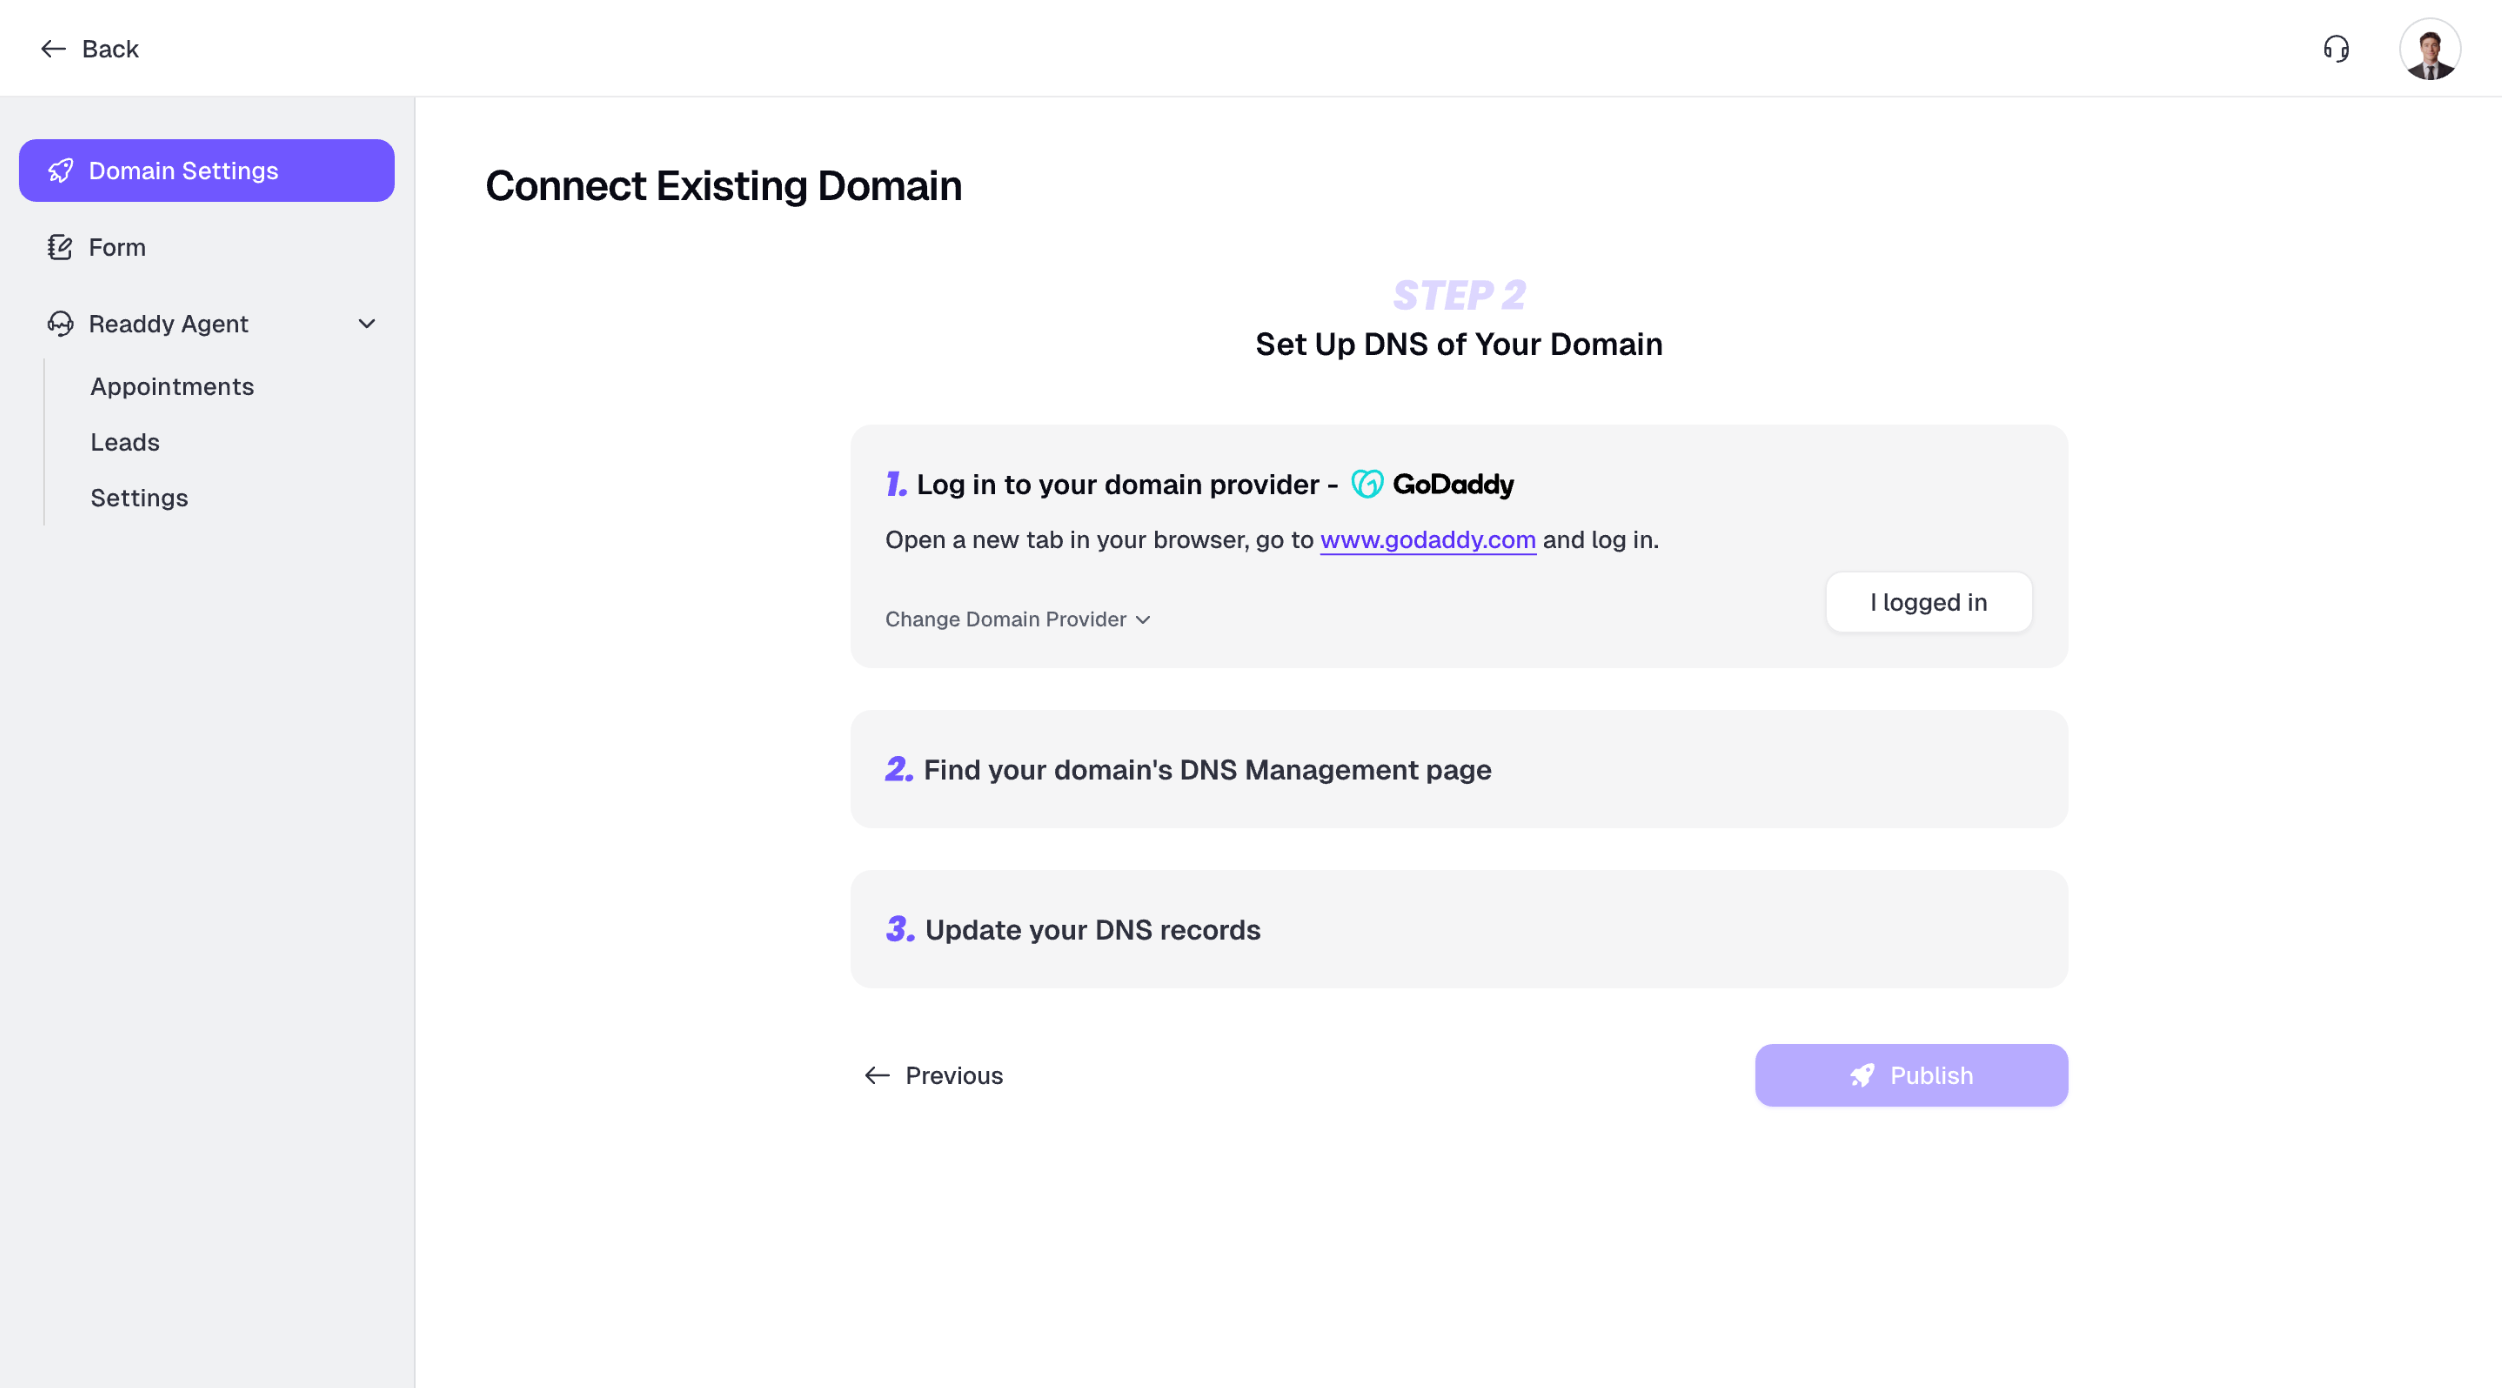
You need to set up the DNS of your domain to make it point to Readdy. Please follow the guide displayed on the interface.
In some cases, you'll see a red error message. Here's how to interpret and resolve errors:
The domain format is incorrect. Ensure there's only one "." and no trailing spaces.\
A correct domain looks like `google.com`.
First, check that your domain is entered correctly. If the domain is correct, it means you haven't purchased this domain yet. Click **Previous** and choose [Buy New Domain](/features/publish-purchase-domain).
This domain is already connected to another one of your project (**xxx** means the project's name). You need to remove it from that project before proceeding.
This domain is in use by another user. Please choose a different one. If you're sure the domain belongs to you, please contact our support team to reclaim it.
## Step2. Set Up DNS of Your Domain
You need to set up the DNS of your domain to make it point to Readdy. Please follow the guide displayed on the interface.
 ### DNS Setup Guide
We provide detailed guides for four domain providers: GoDaddy, Hostinger, Cloudflare, and Namecheap. If your DNS is managed by a different provider, you can use those guides as a reference. If you need help, feel free to contact us.
**Step 1: Log in to GoDaddy**
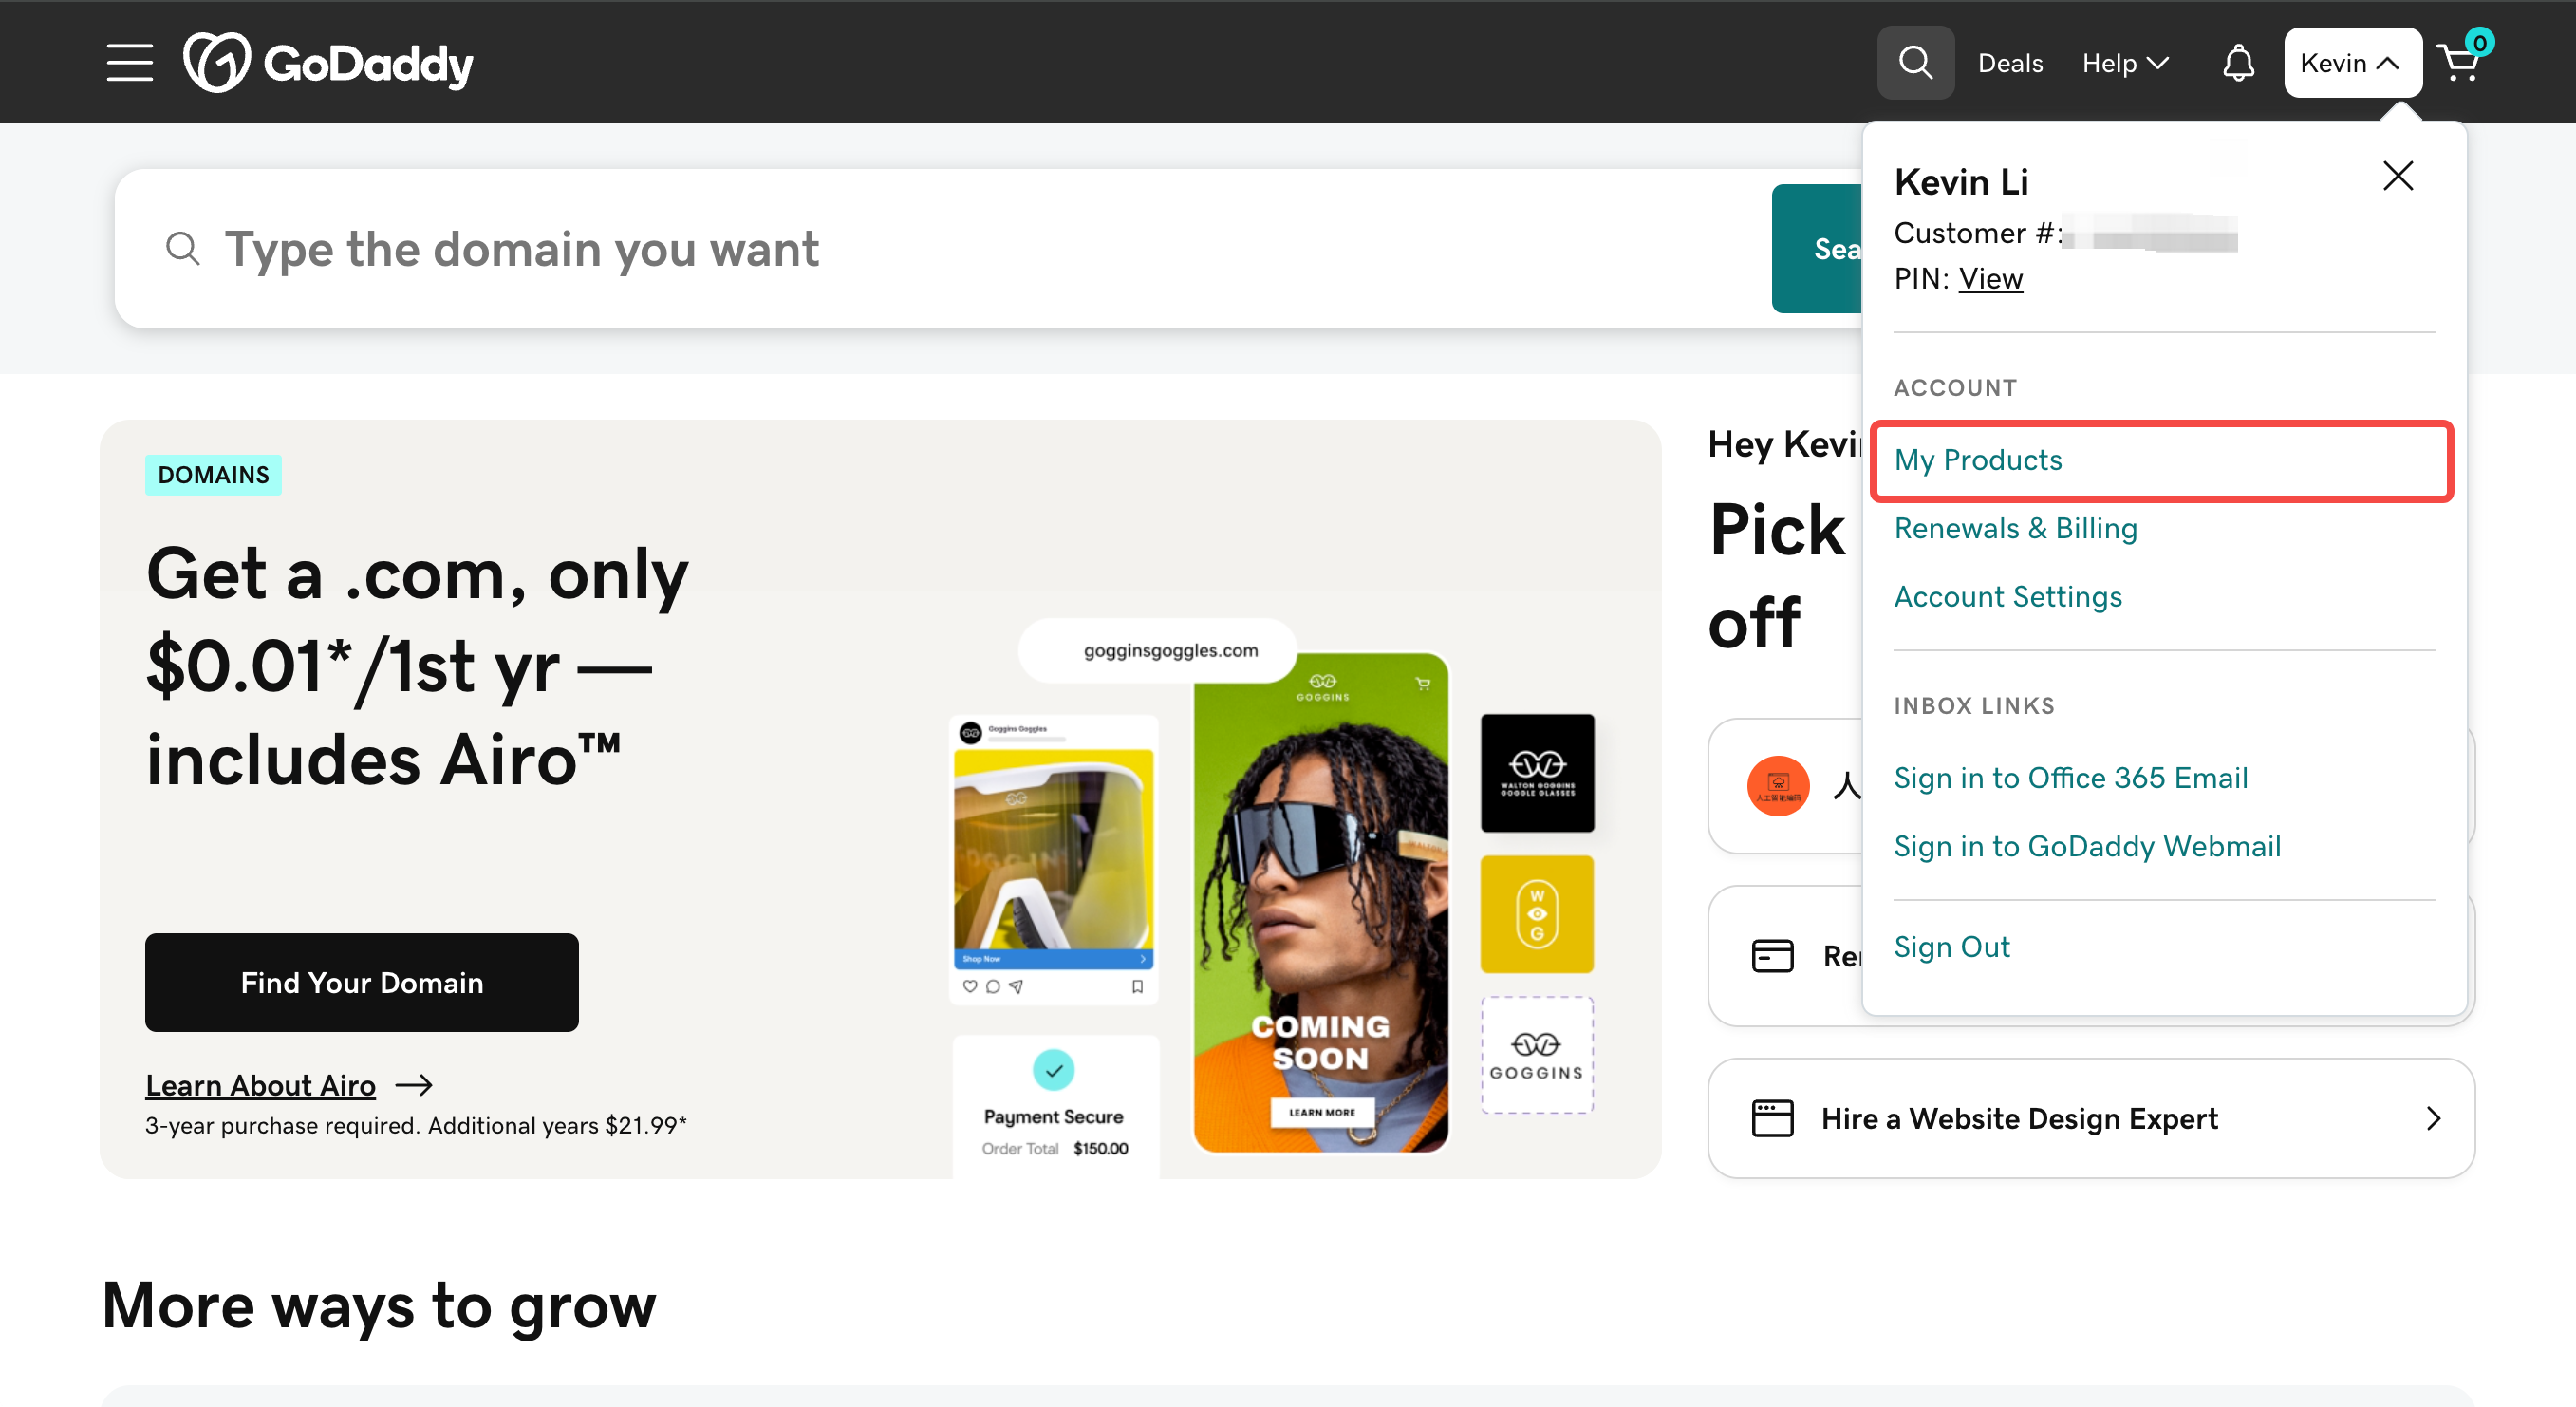
* Open a new tab in your browser, go to [www.godaddy.com/](http://www.godaddy.com/) and log in. Locate ACCOUNT in the top-right corner of the page, and click **My Products**, you will see your domain.
### DNS Setup Guide
We provide detailed guides for four domain providers: GoDaddy, Hostinger, Cloudflare, and Namecheap. If your DNS is managed by a different provider, you can use those guides as a reference. If you need help, feel free to contact us.
**Step 1: Log in to GoDaddy**
* Open a new tab in your browser, go to [www.godaddy.com/](http://www.godaddy.com/) and log in. Locate ACCOUNT in the top-right corner of the page, and click **My Products**, you will see your domain.
 **Step 2: Find your domain's DNS Management page**
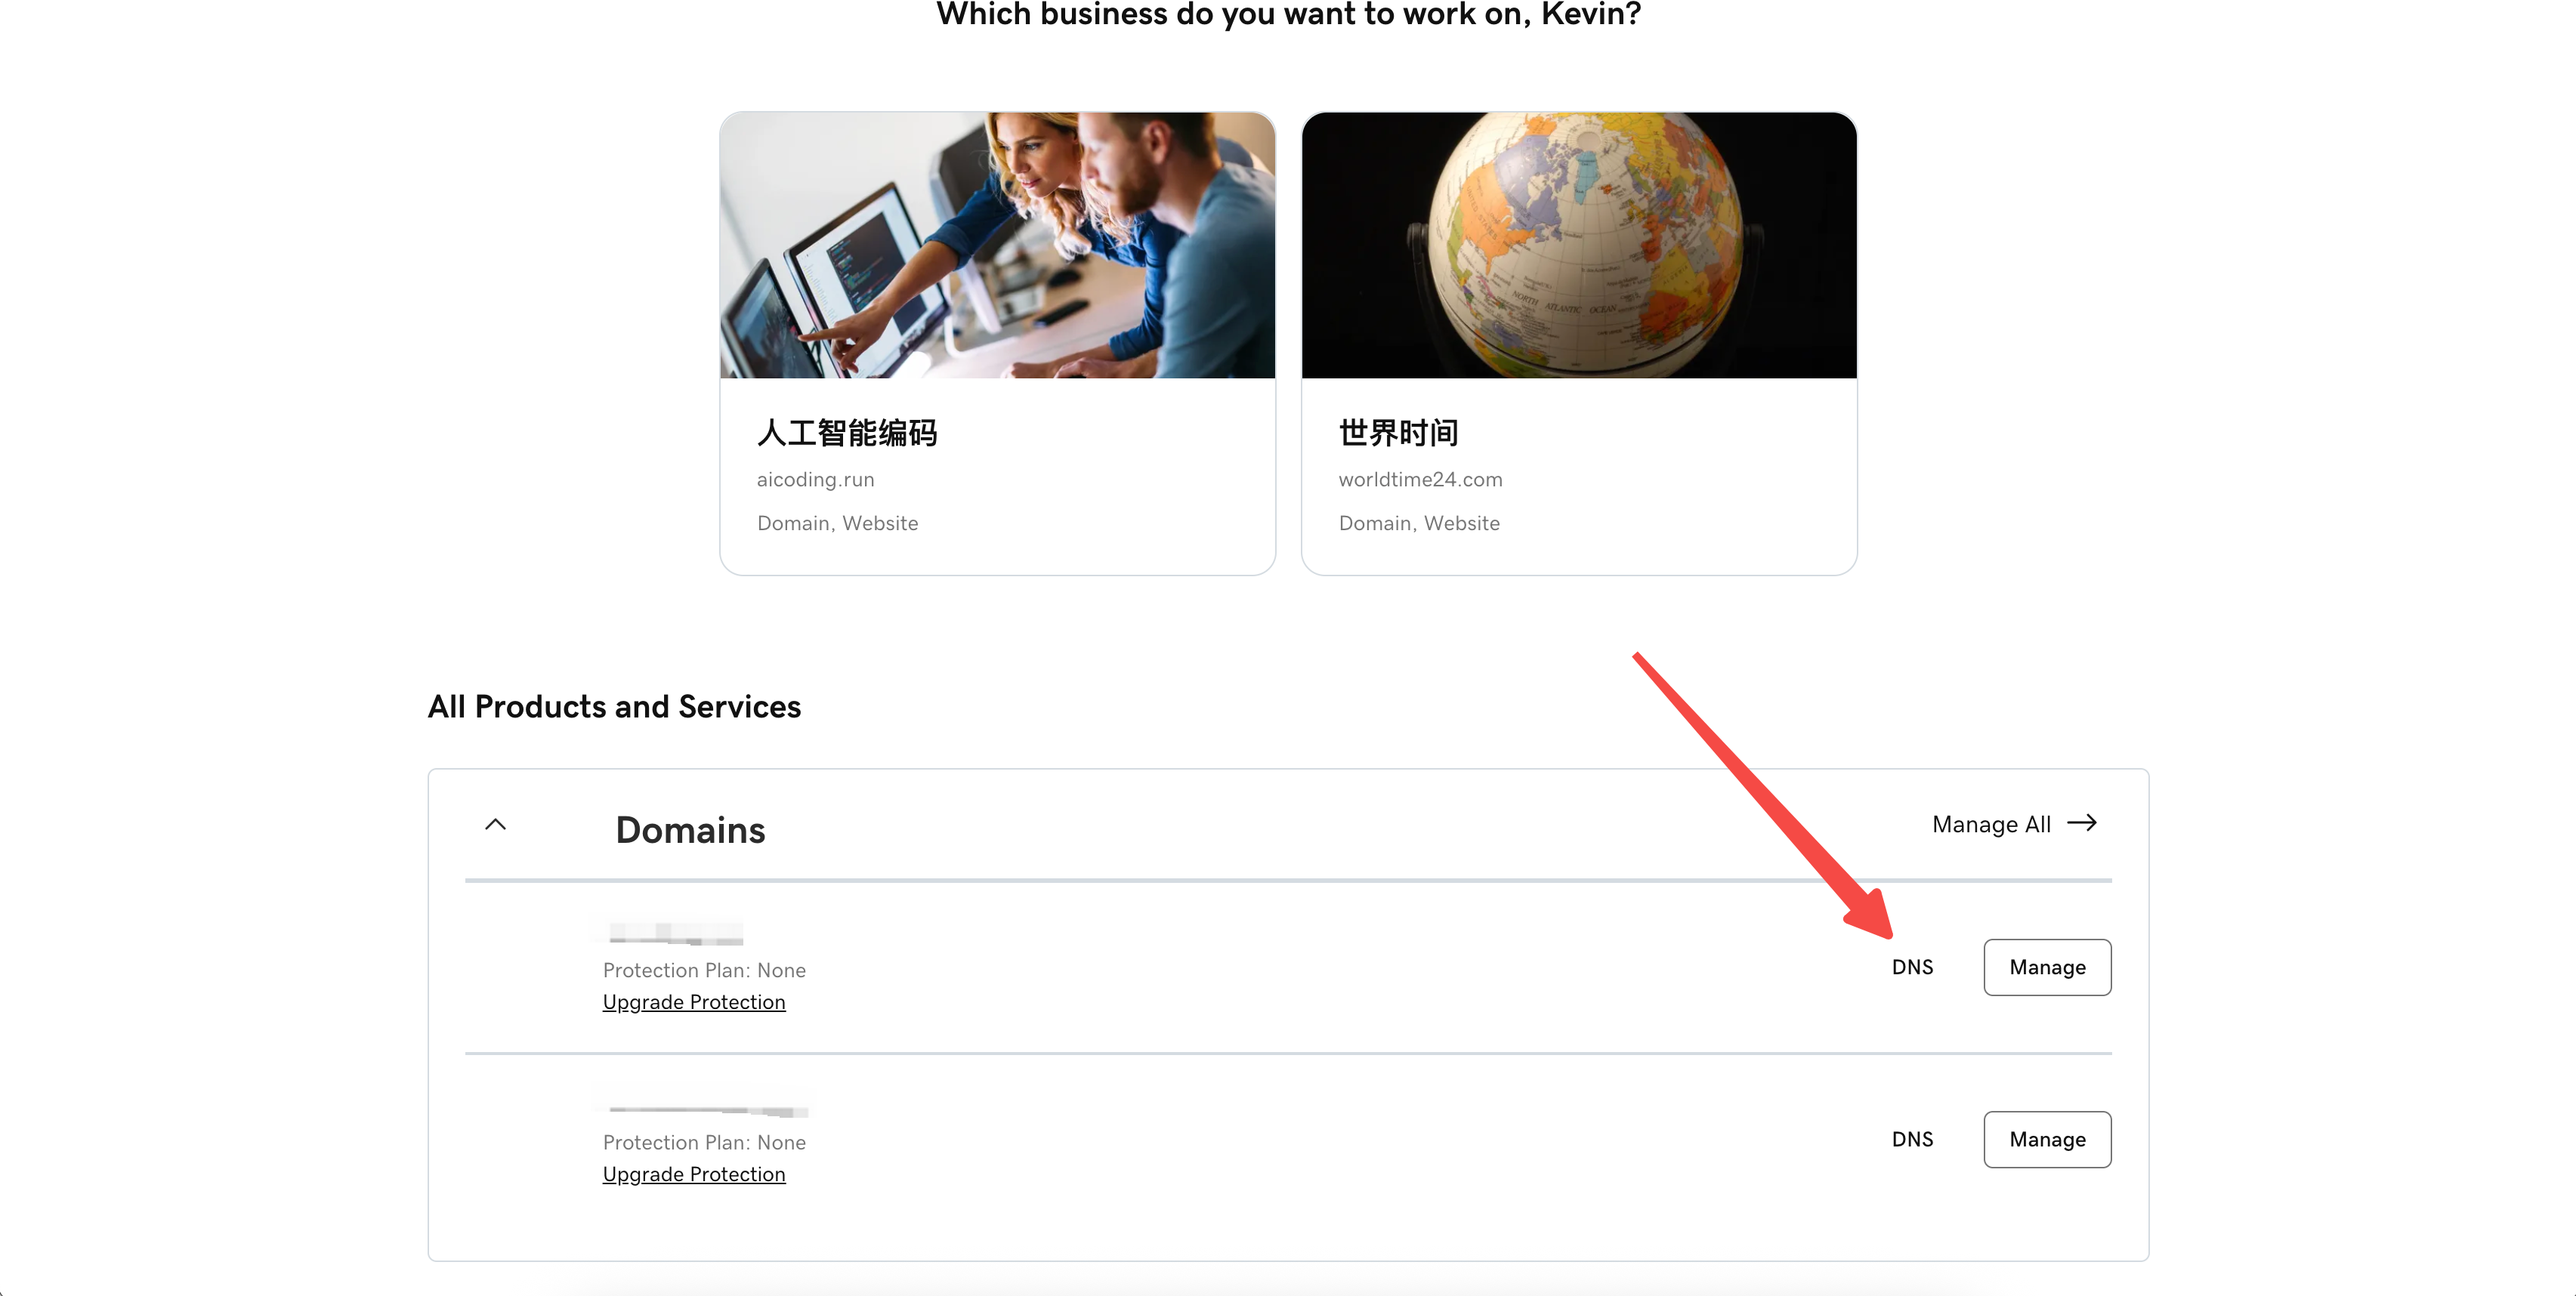
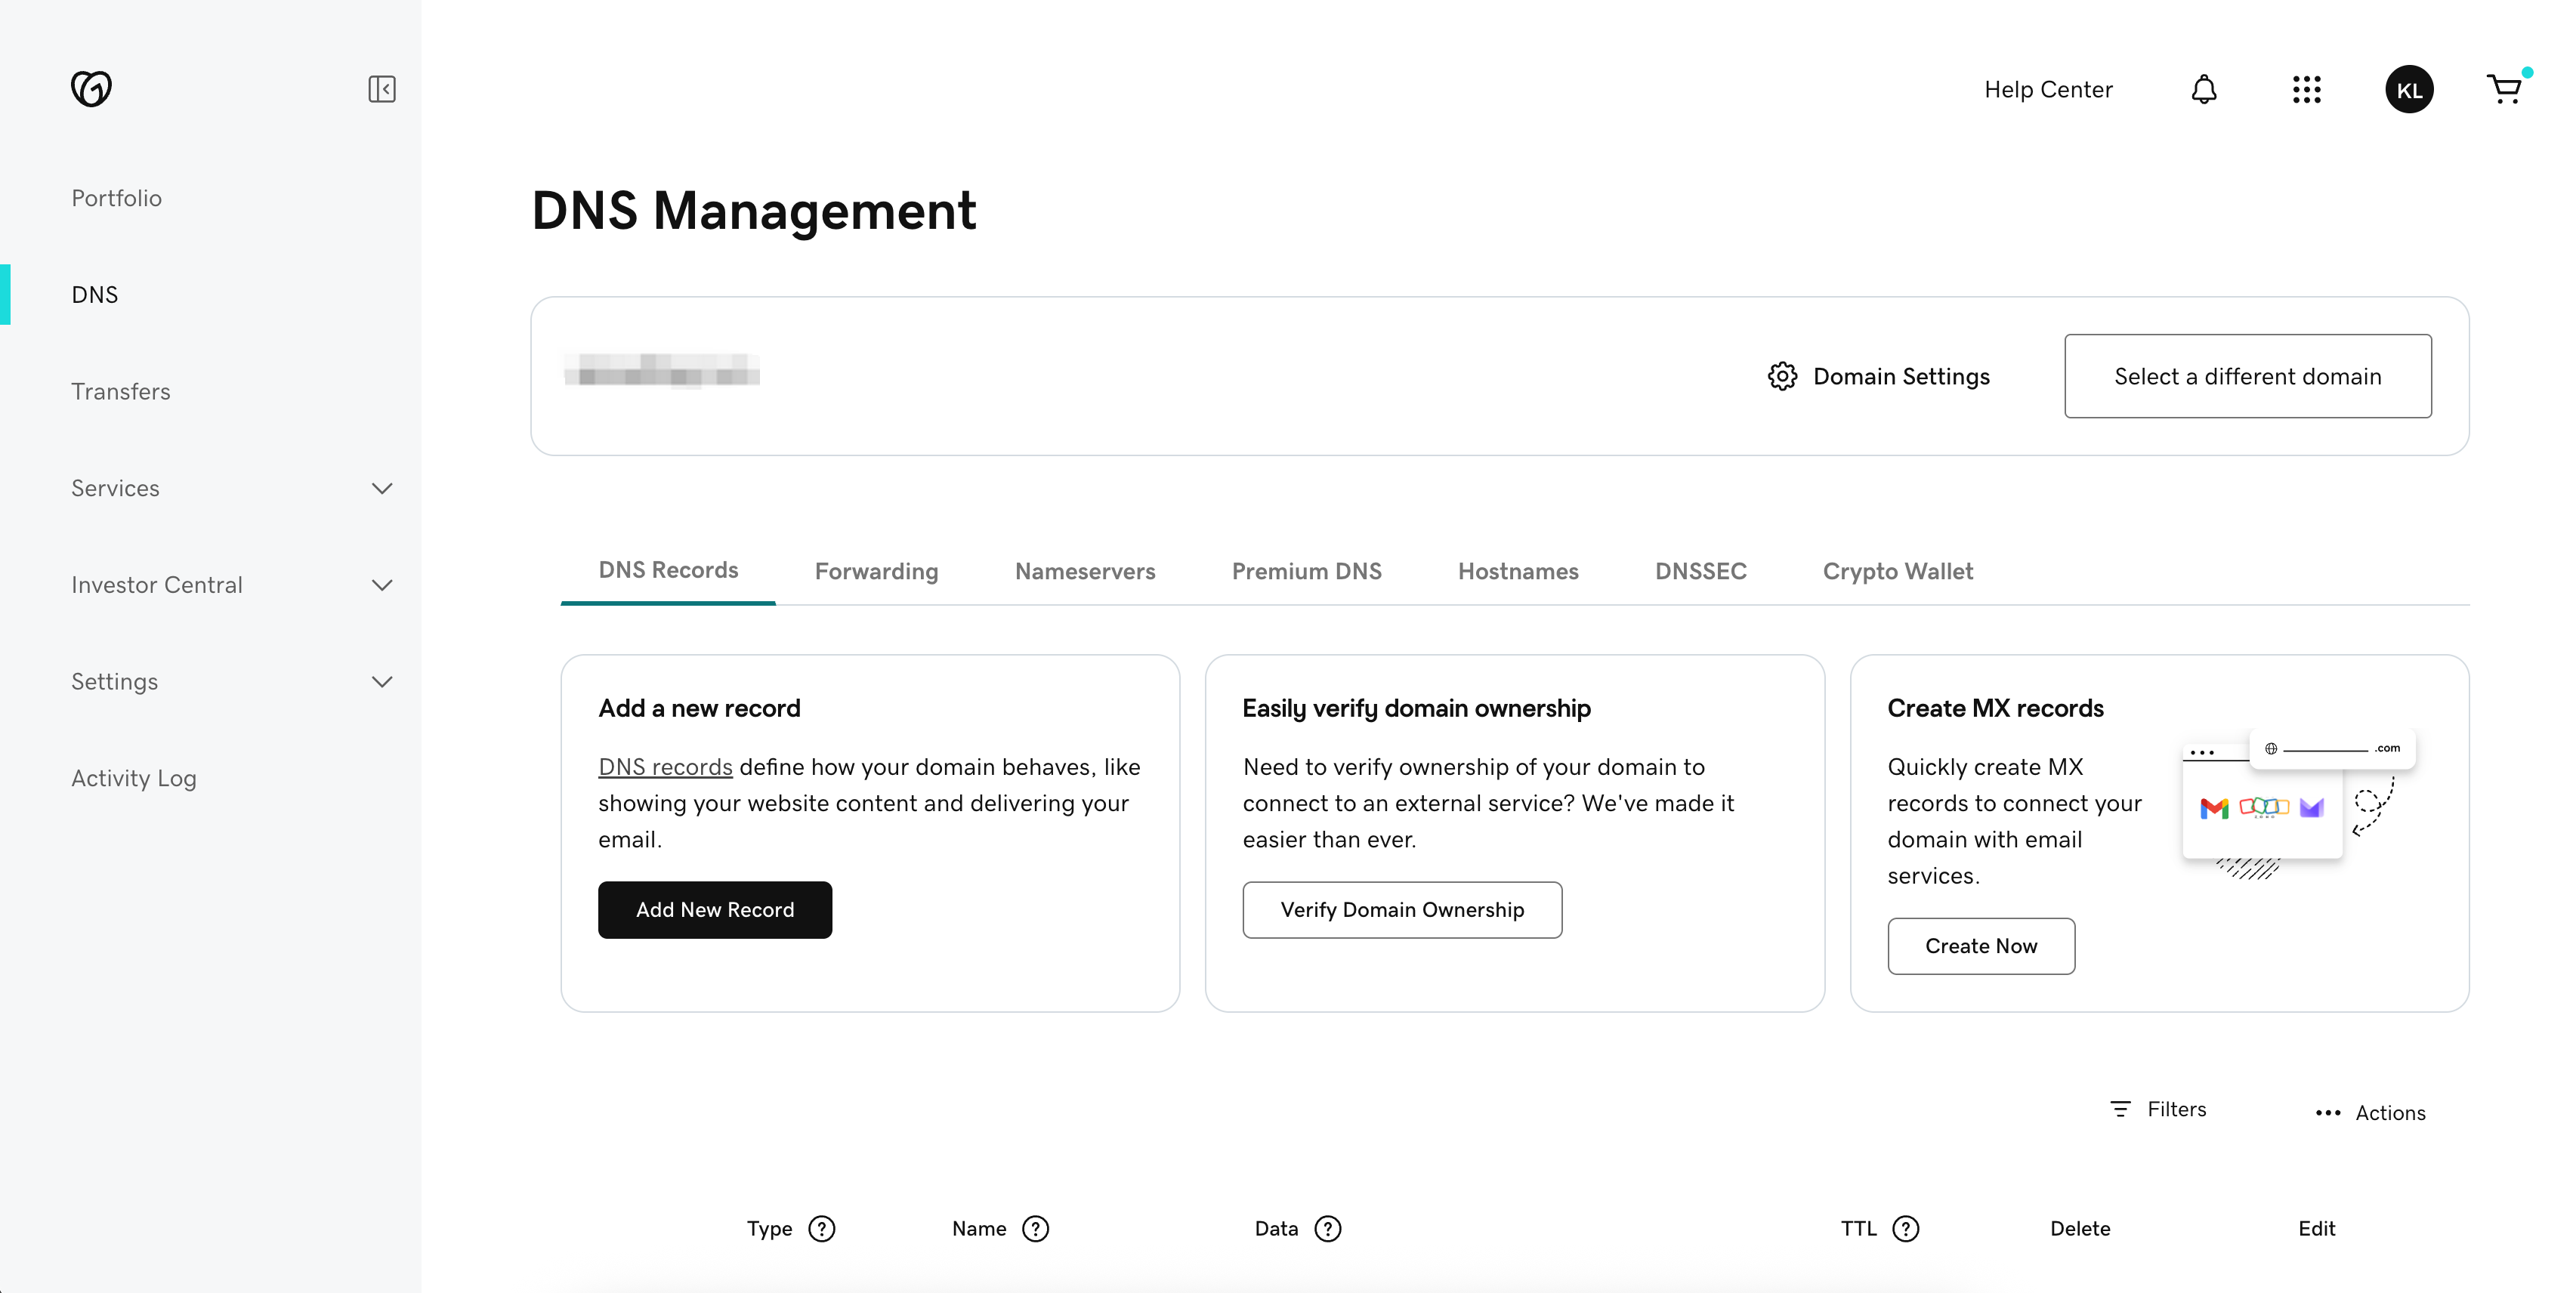
* Find the domain you want to connect and click **DNS** to navigate to its DNS Management page.
**Step 2: Find your domain's DNS Management page**
* Find the domain you want to connect and click **DNS** to navigate to its DNS Management page.
 **Step 3: Update your DNS records**
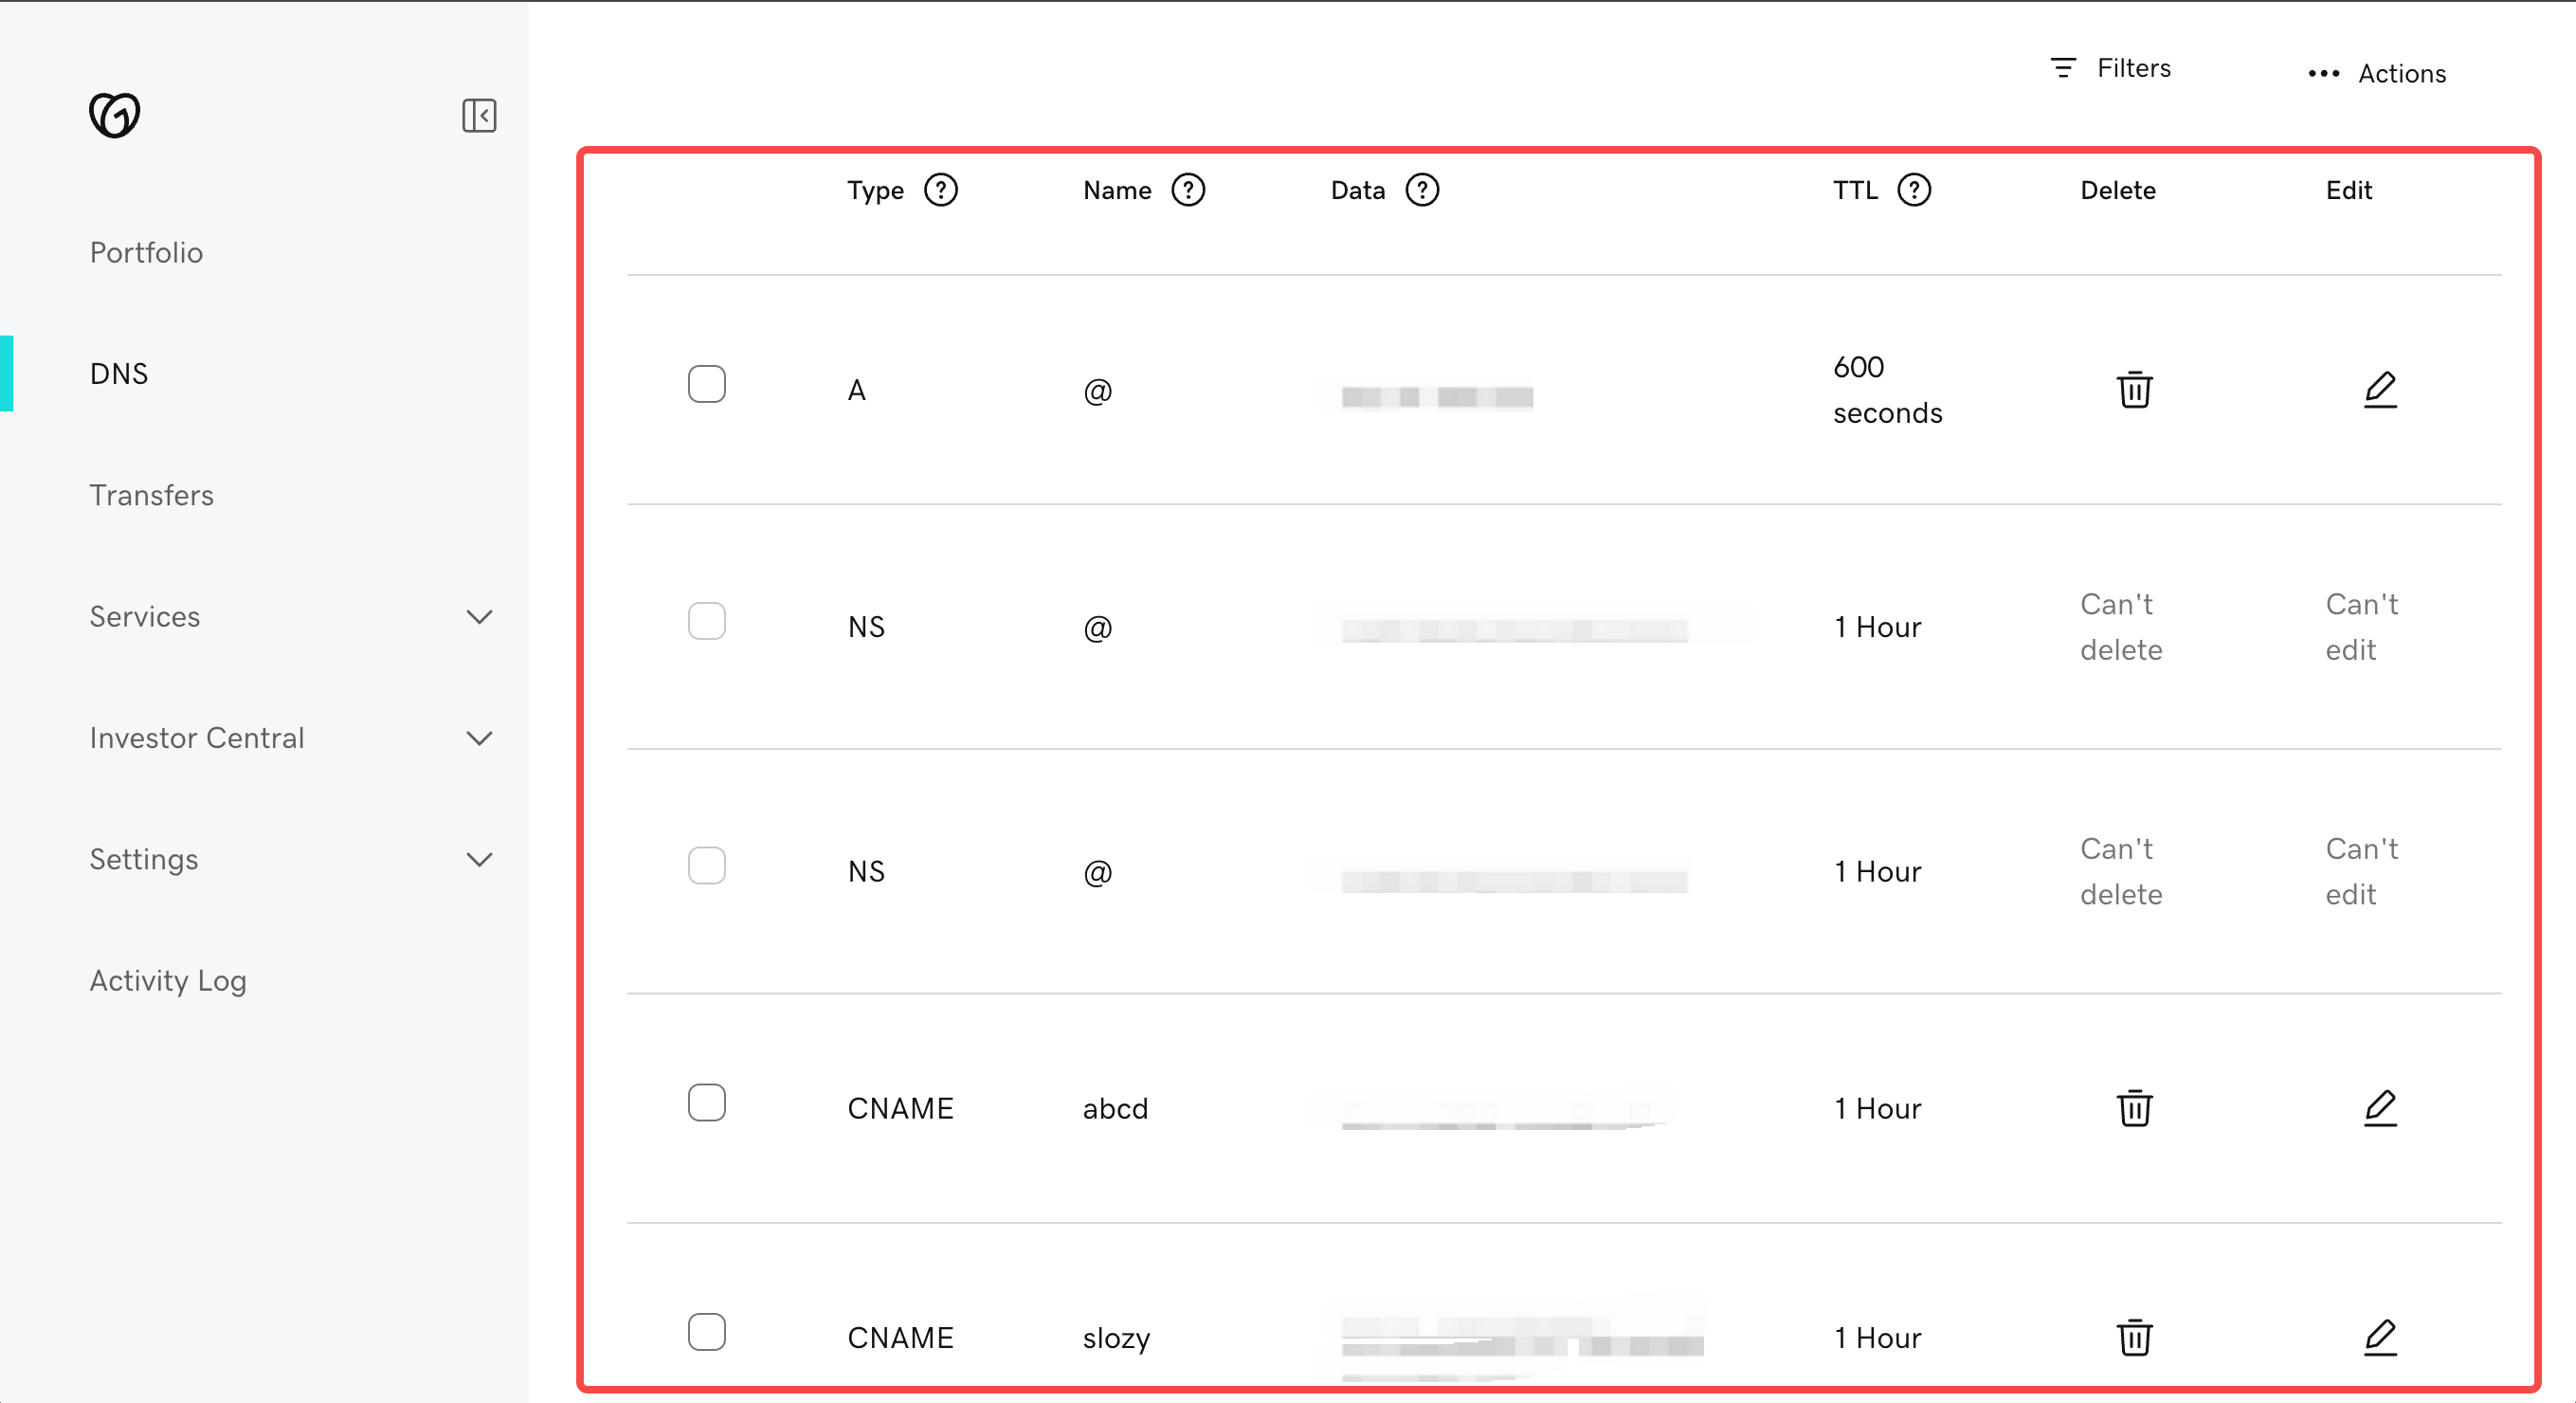
* Scroll down on the DNS Management page, and you will see all the DNS records for the current domain.
**Step 3: Update your DNS records**
* Scroll down on the DNS Management page, and you will see all the DNS records for the current domain.
 Based on your domain, you need to update these three types of DNS records: **A**, **CNAME**, **TXT** (subject to what is actually displayed on the Readdy interface).
* If you connect a root domain, such as `xxxxxx.com`,you need to update A + TXT
* If you connect a subdomain, such as `www.xxxxxx.com`,you need to update CNAME + TXT
Here we'll use an **A** record as an example; the update process for **CNAME** and **TXT** is exactly the same.
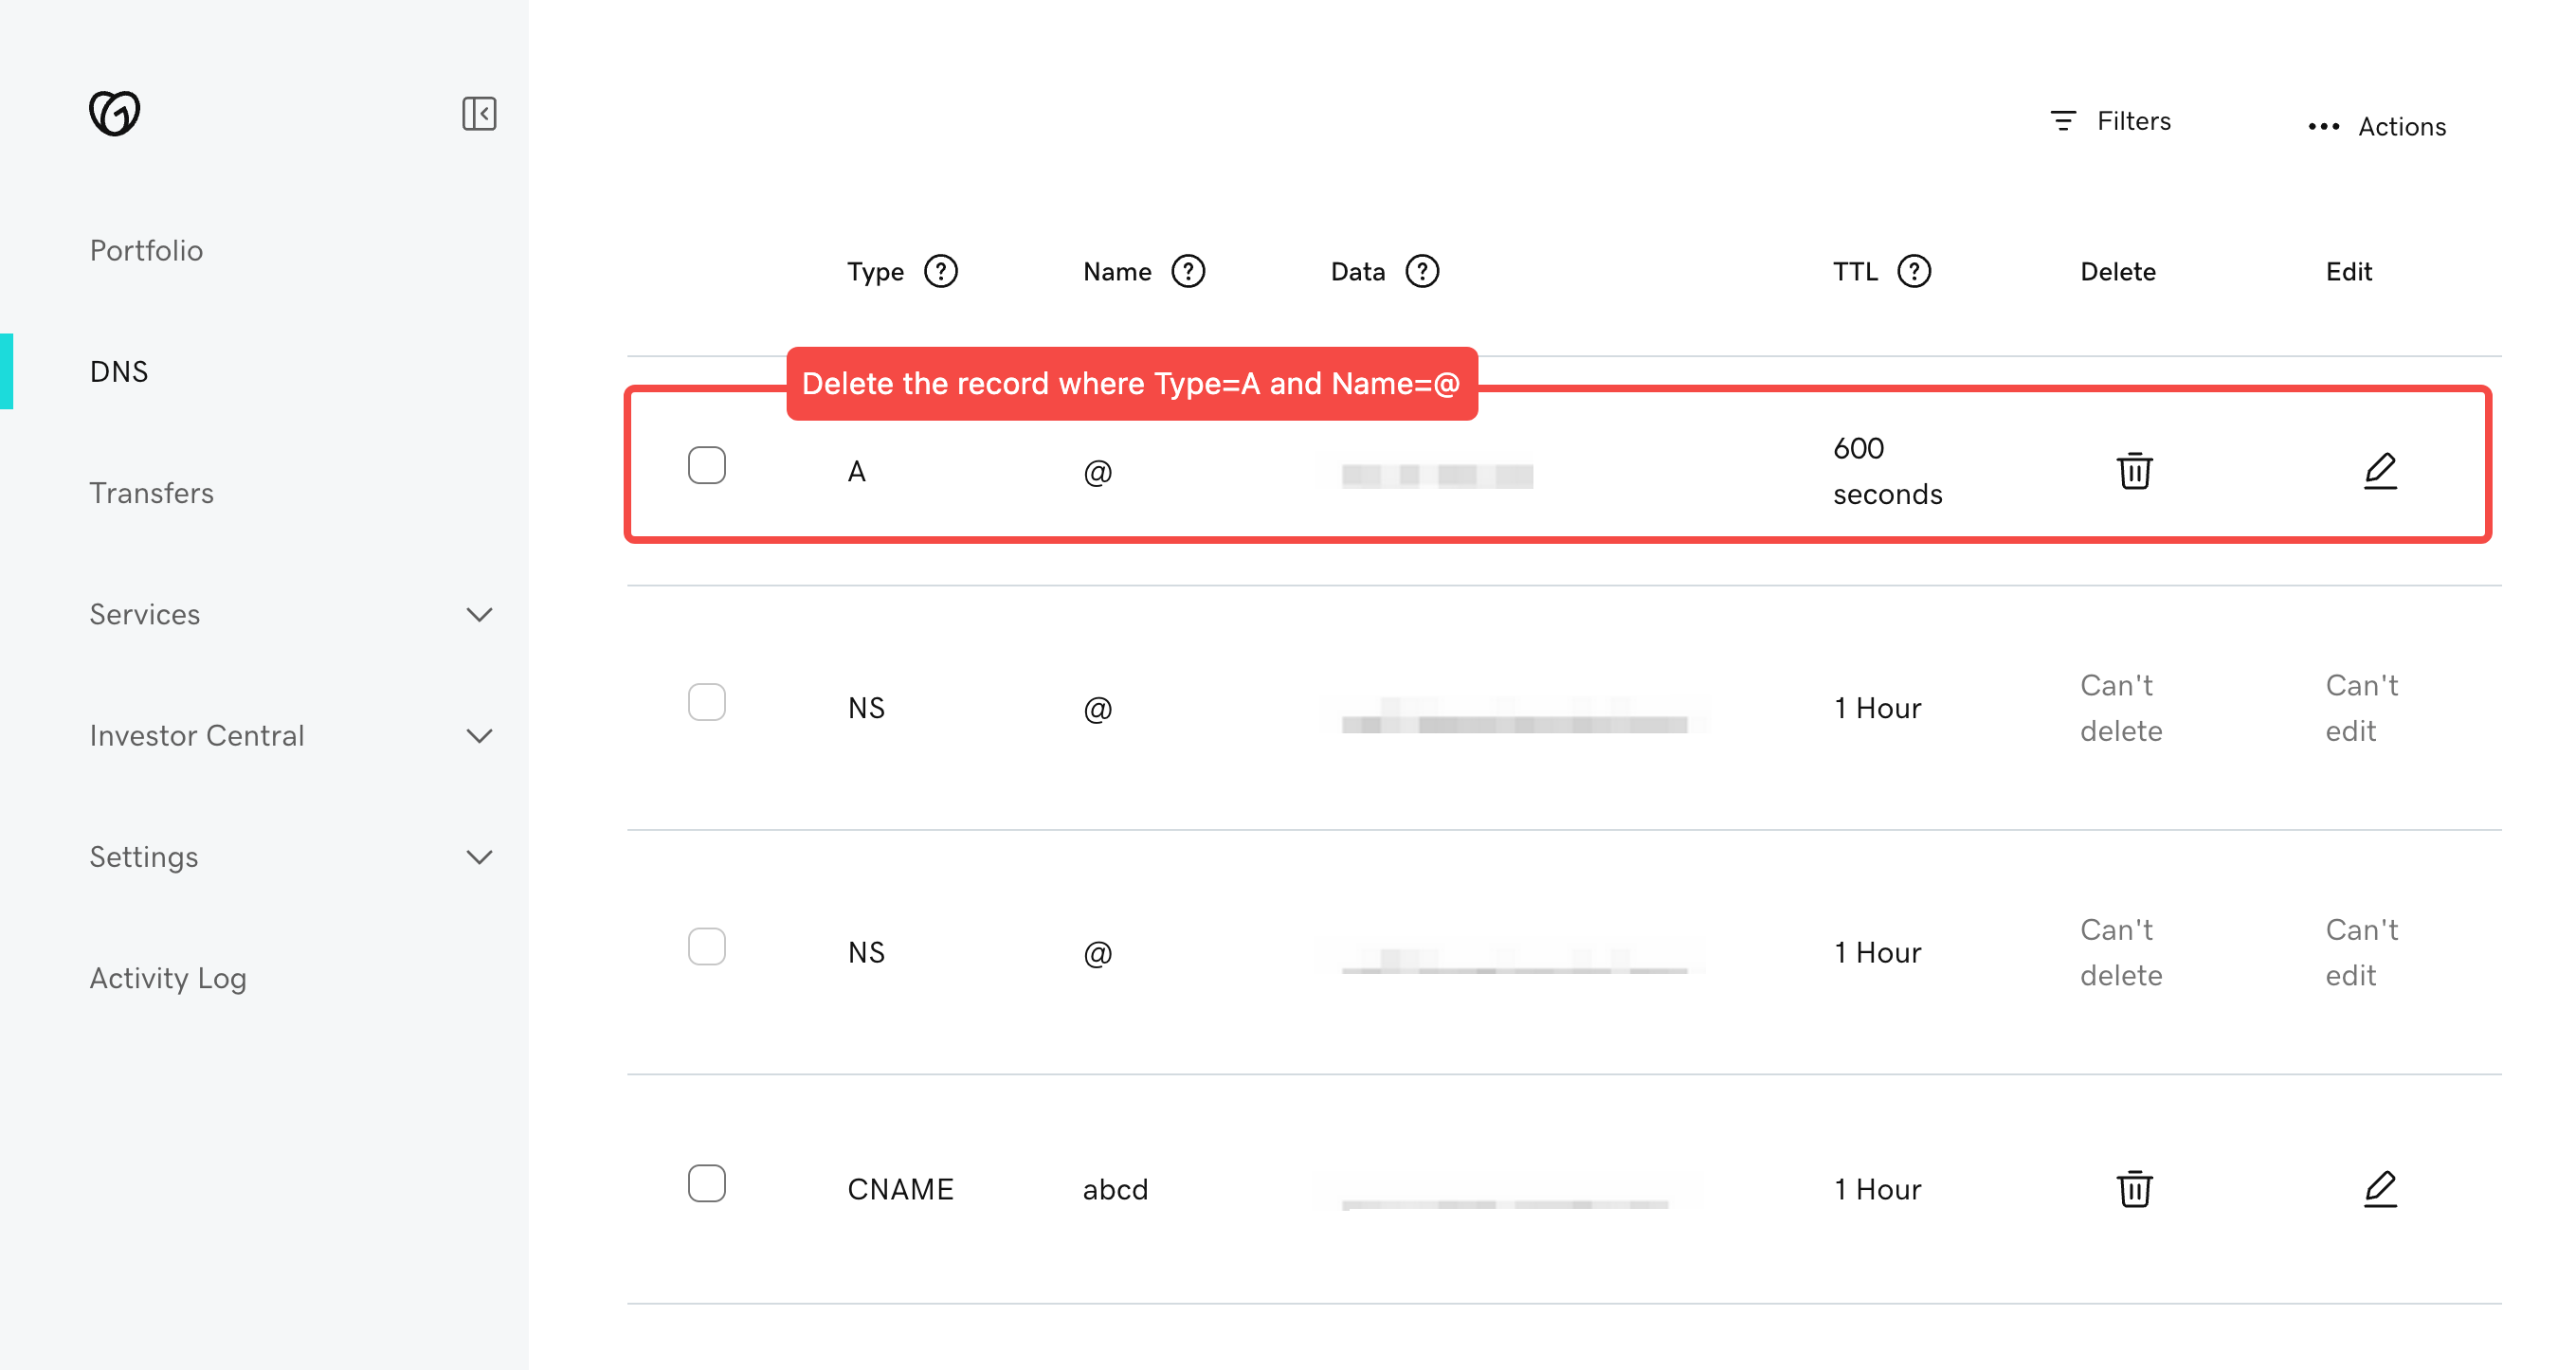
First, you need to delete the old records where **Type=A** and **Name=@** that may cause conflicts.
Based on your domain, you need to update these three types of DNS records: **A**, **CNAME**, **TXT** (subject to what is actually displayed on the Readdy interface).
* If you connect a root domain, such as `xxxxxx.com`,you need to update A + TXT
* If you connect a subdomain, such as `www.xxxxxx.com`,you need to update CNAME + TXT
Here we'll use an **A** record as an example; the update process for **CNAME** and **TXT** is exactly the same.
First, you need to delete the old records where **Type=A** and **Name=@** that may cause conflicts.
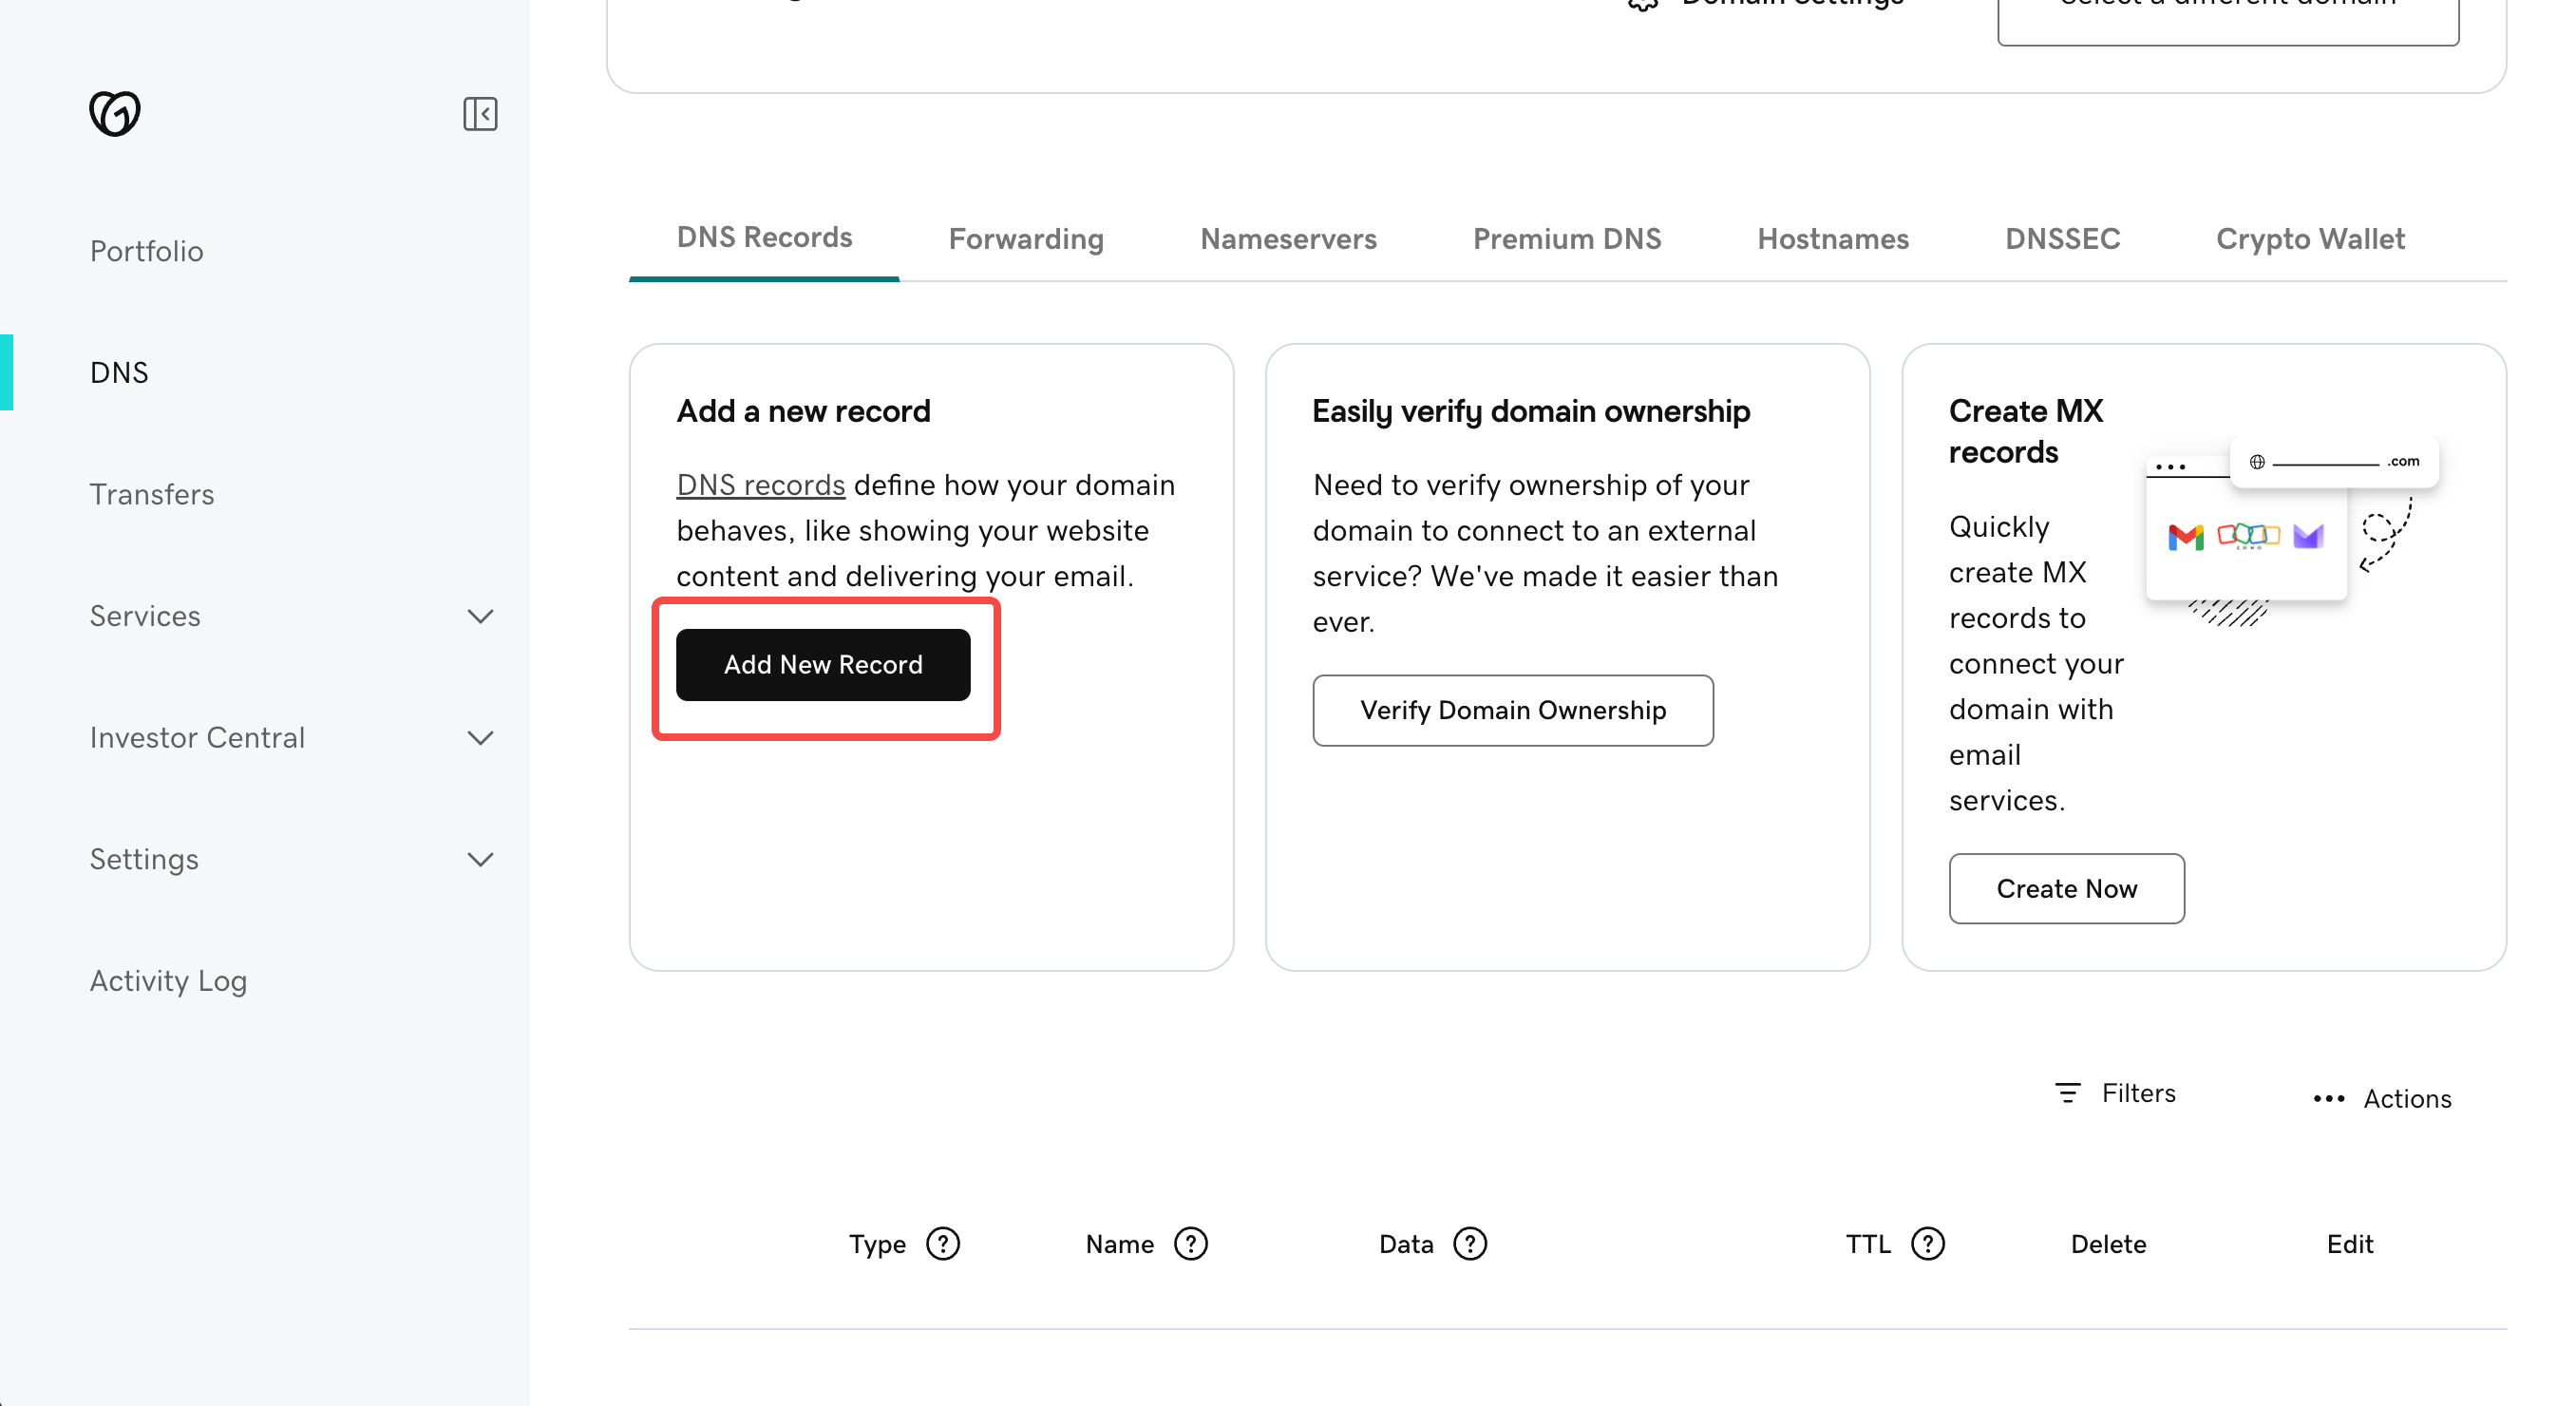
 **Then add a new record:**
> Type: A\
> Name: @\
> Value: 52.37.165.222\
> TTL: 600
**Then add a new record:**
> Type: A\
> Name: @\
> Value: 52.37.165.222\
> TTL: 600
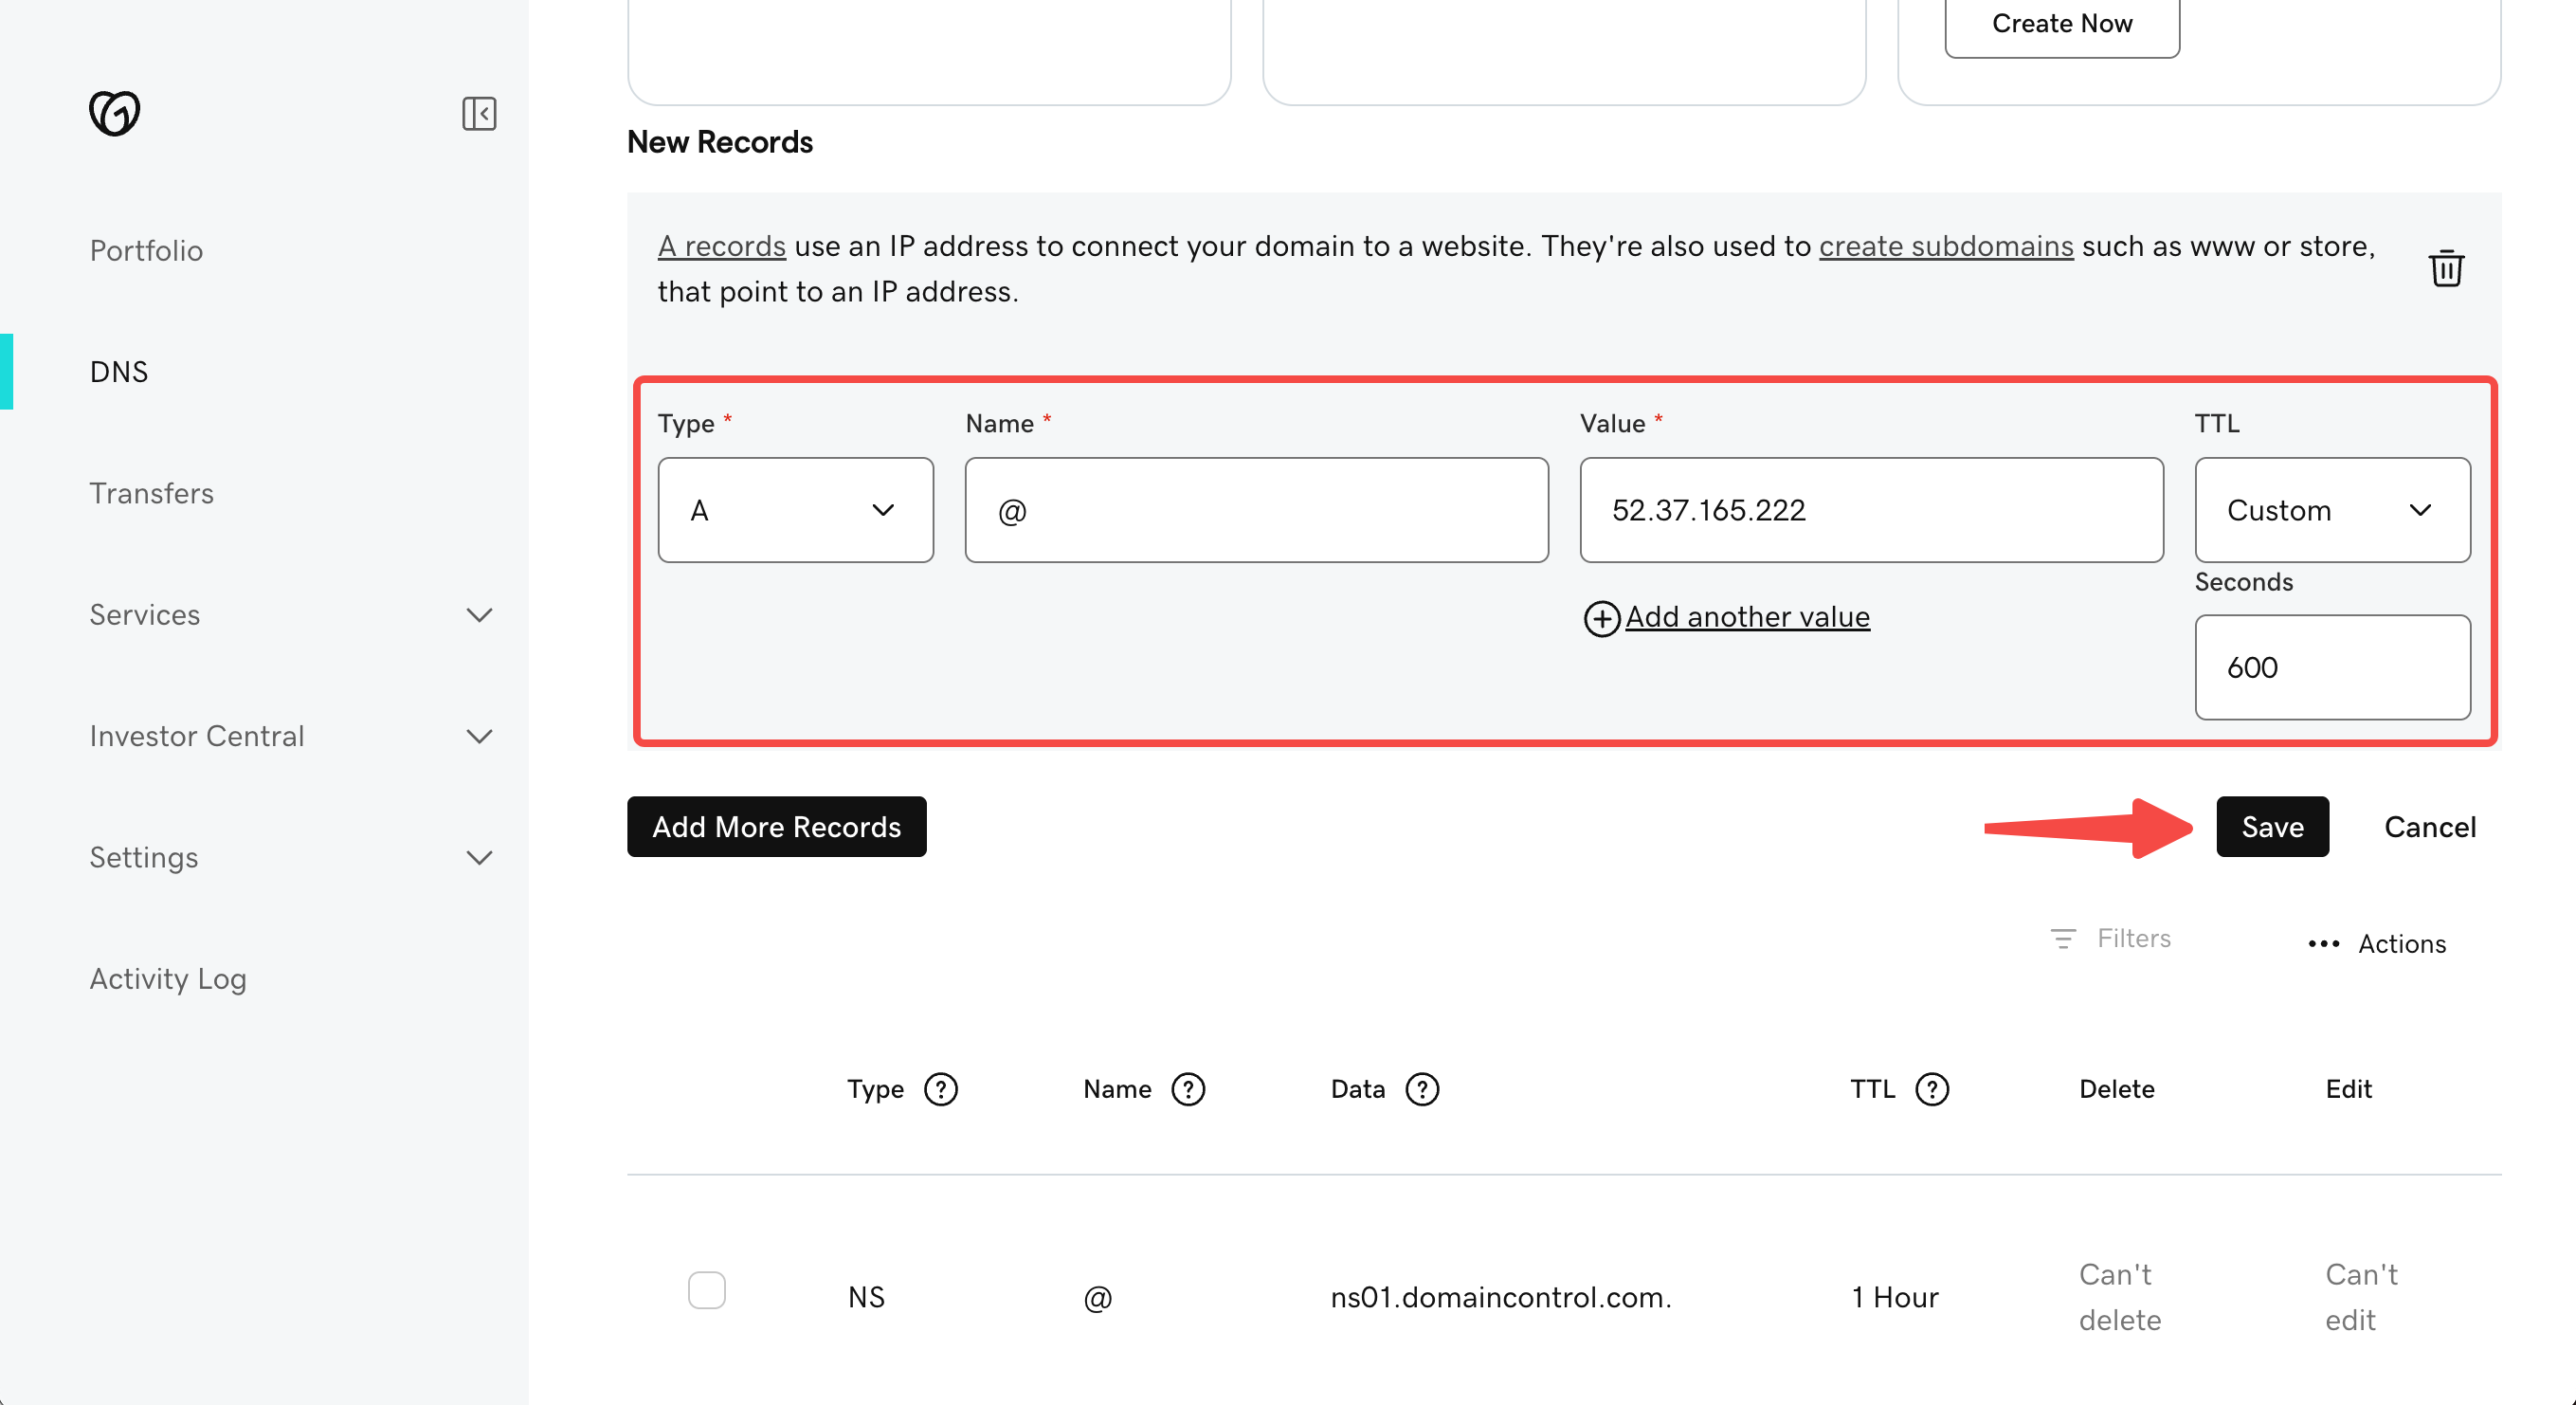 Based on the content displayed on the Readdy interface, if there are additional **TXT** or **CNAME** records that need to be updated, use the same method to update them: delete all records with the same Type and Name, and add the required records.
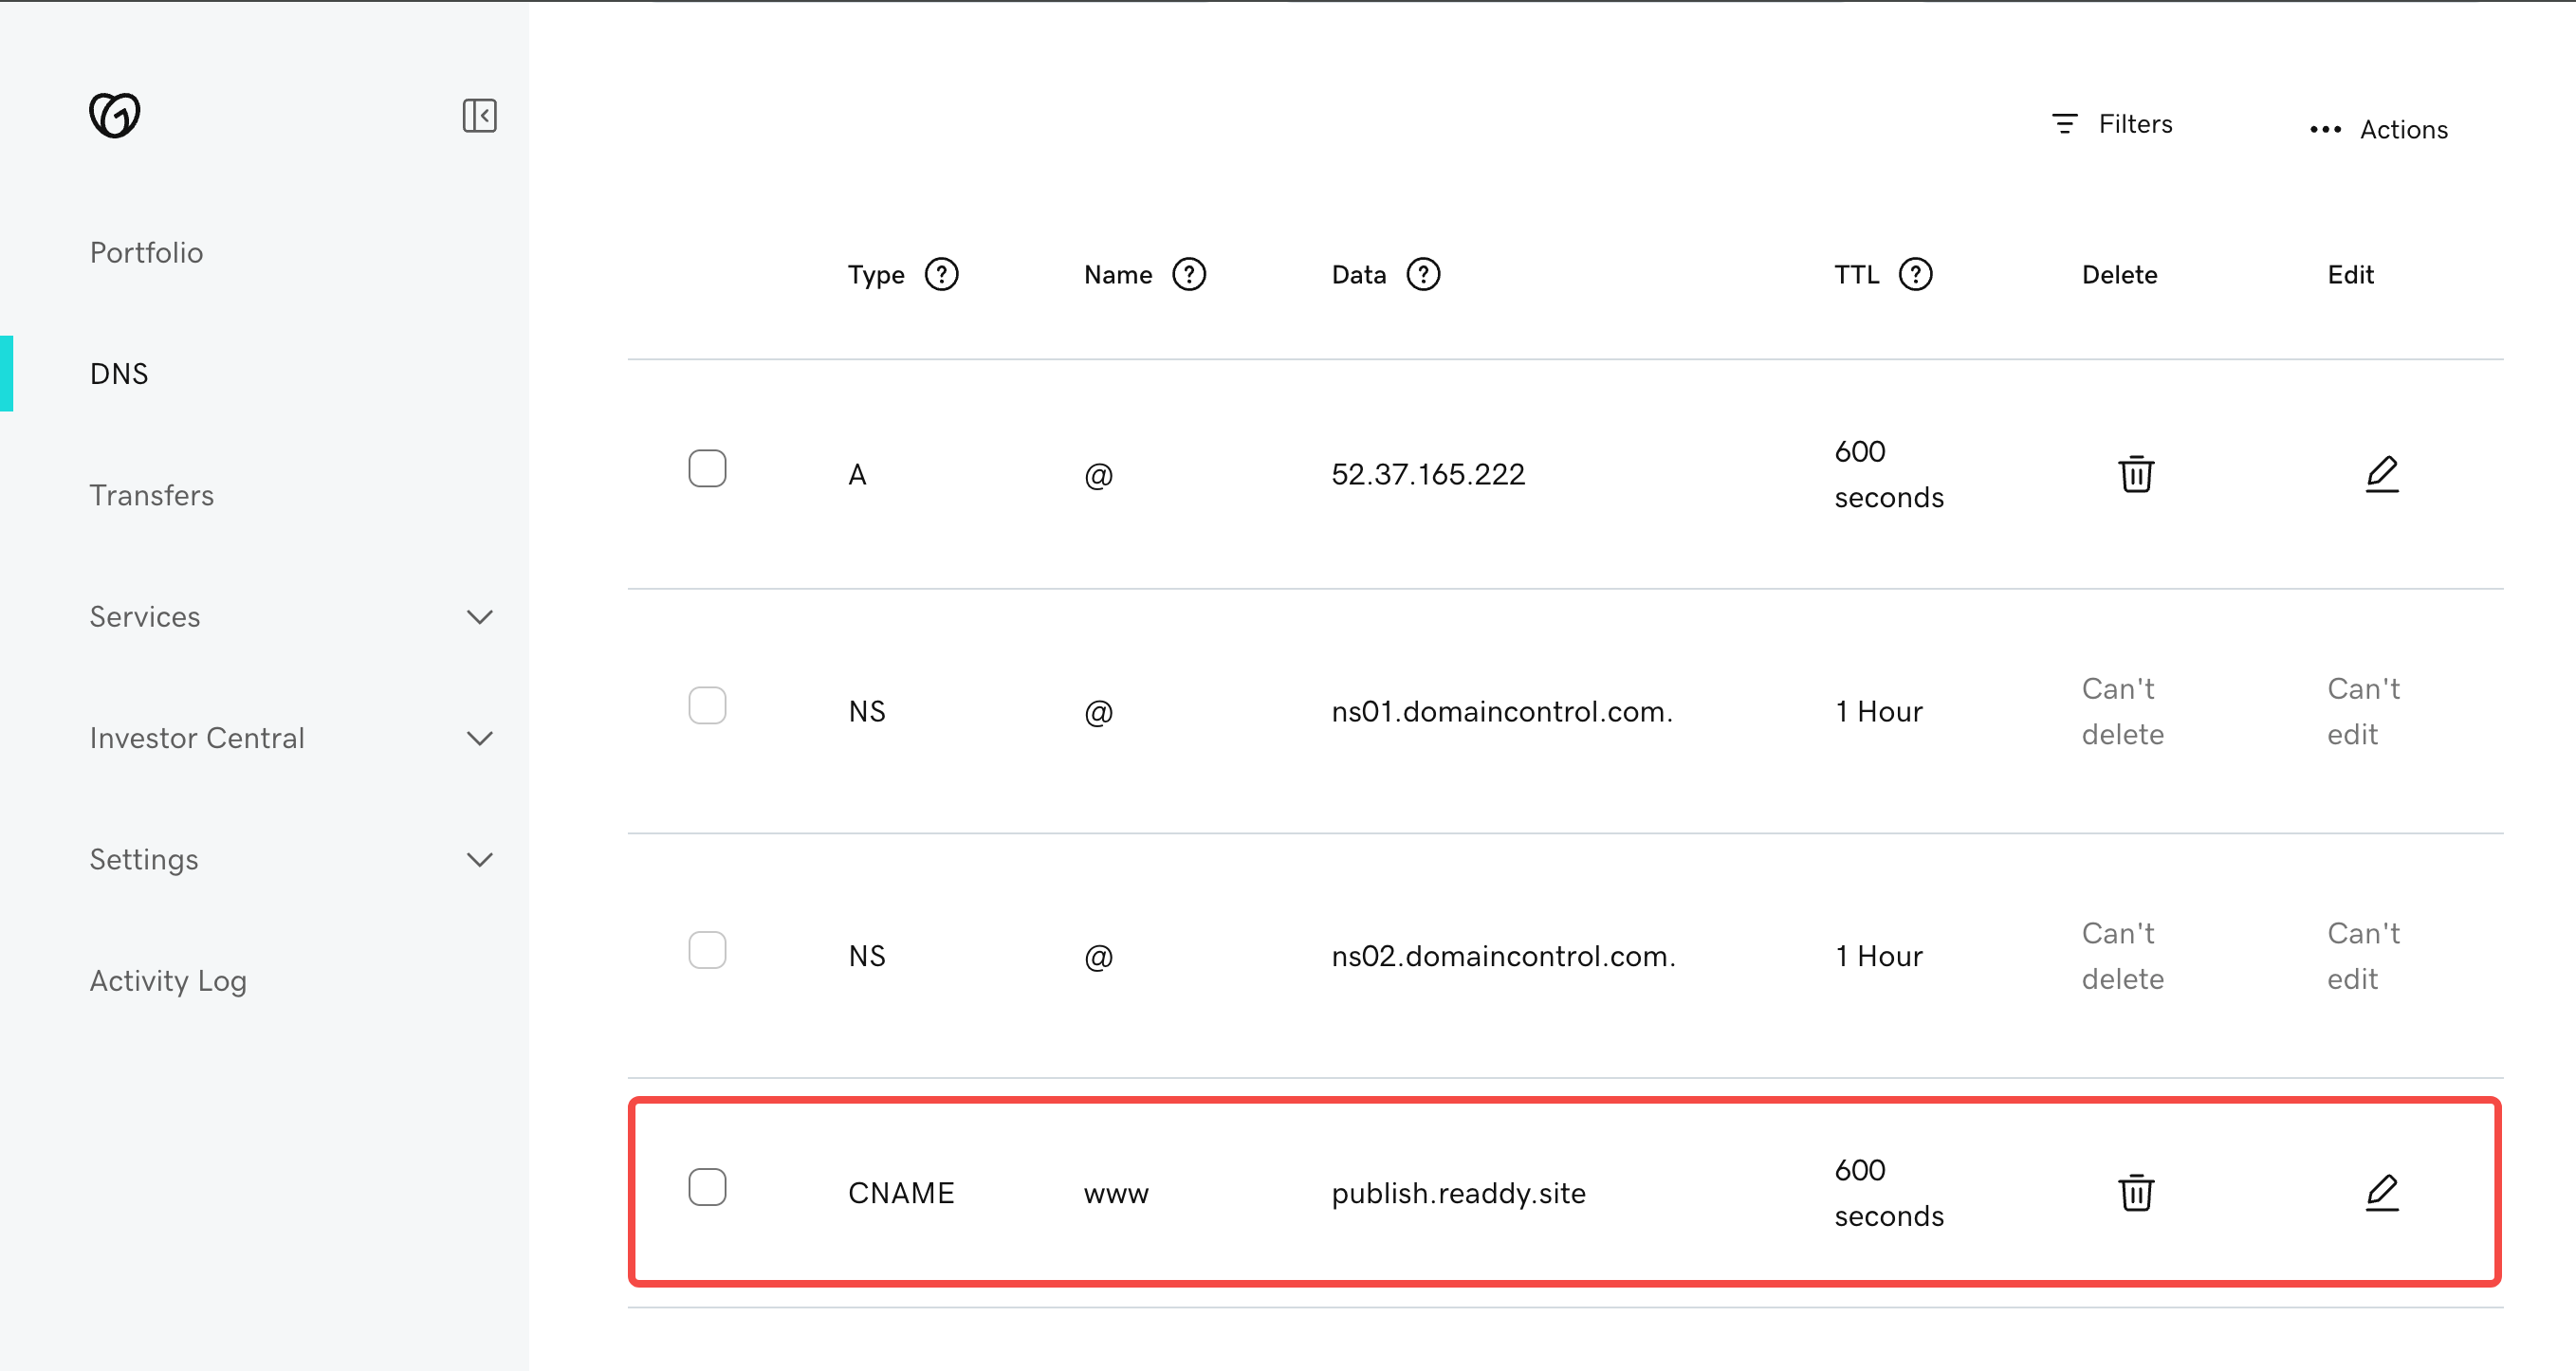 After updating all records, you will have completed the domain DNS configuration. Please return to Readdy, click **I've added the records** and continue.
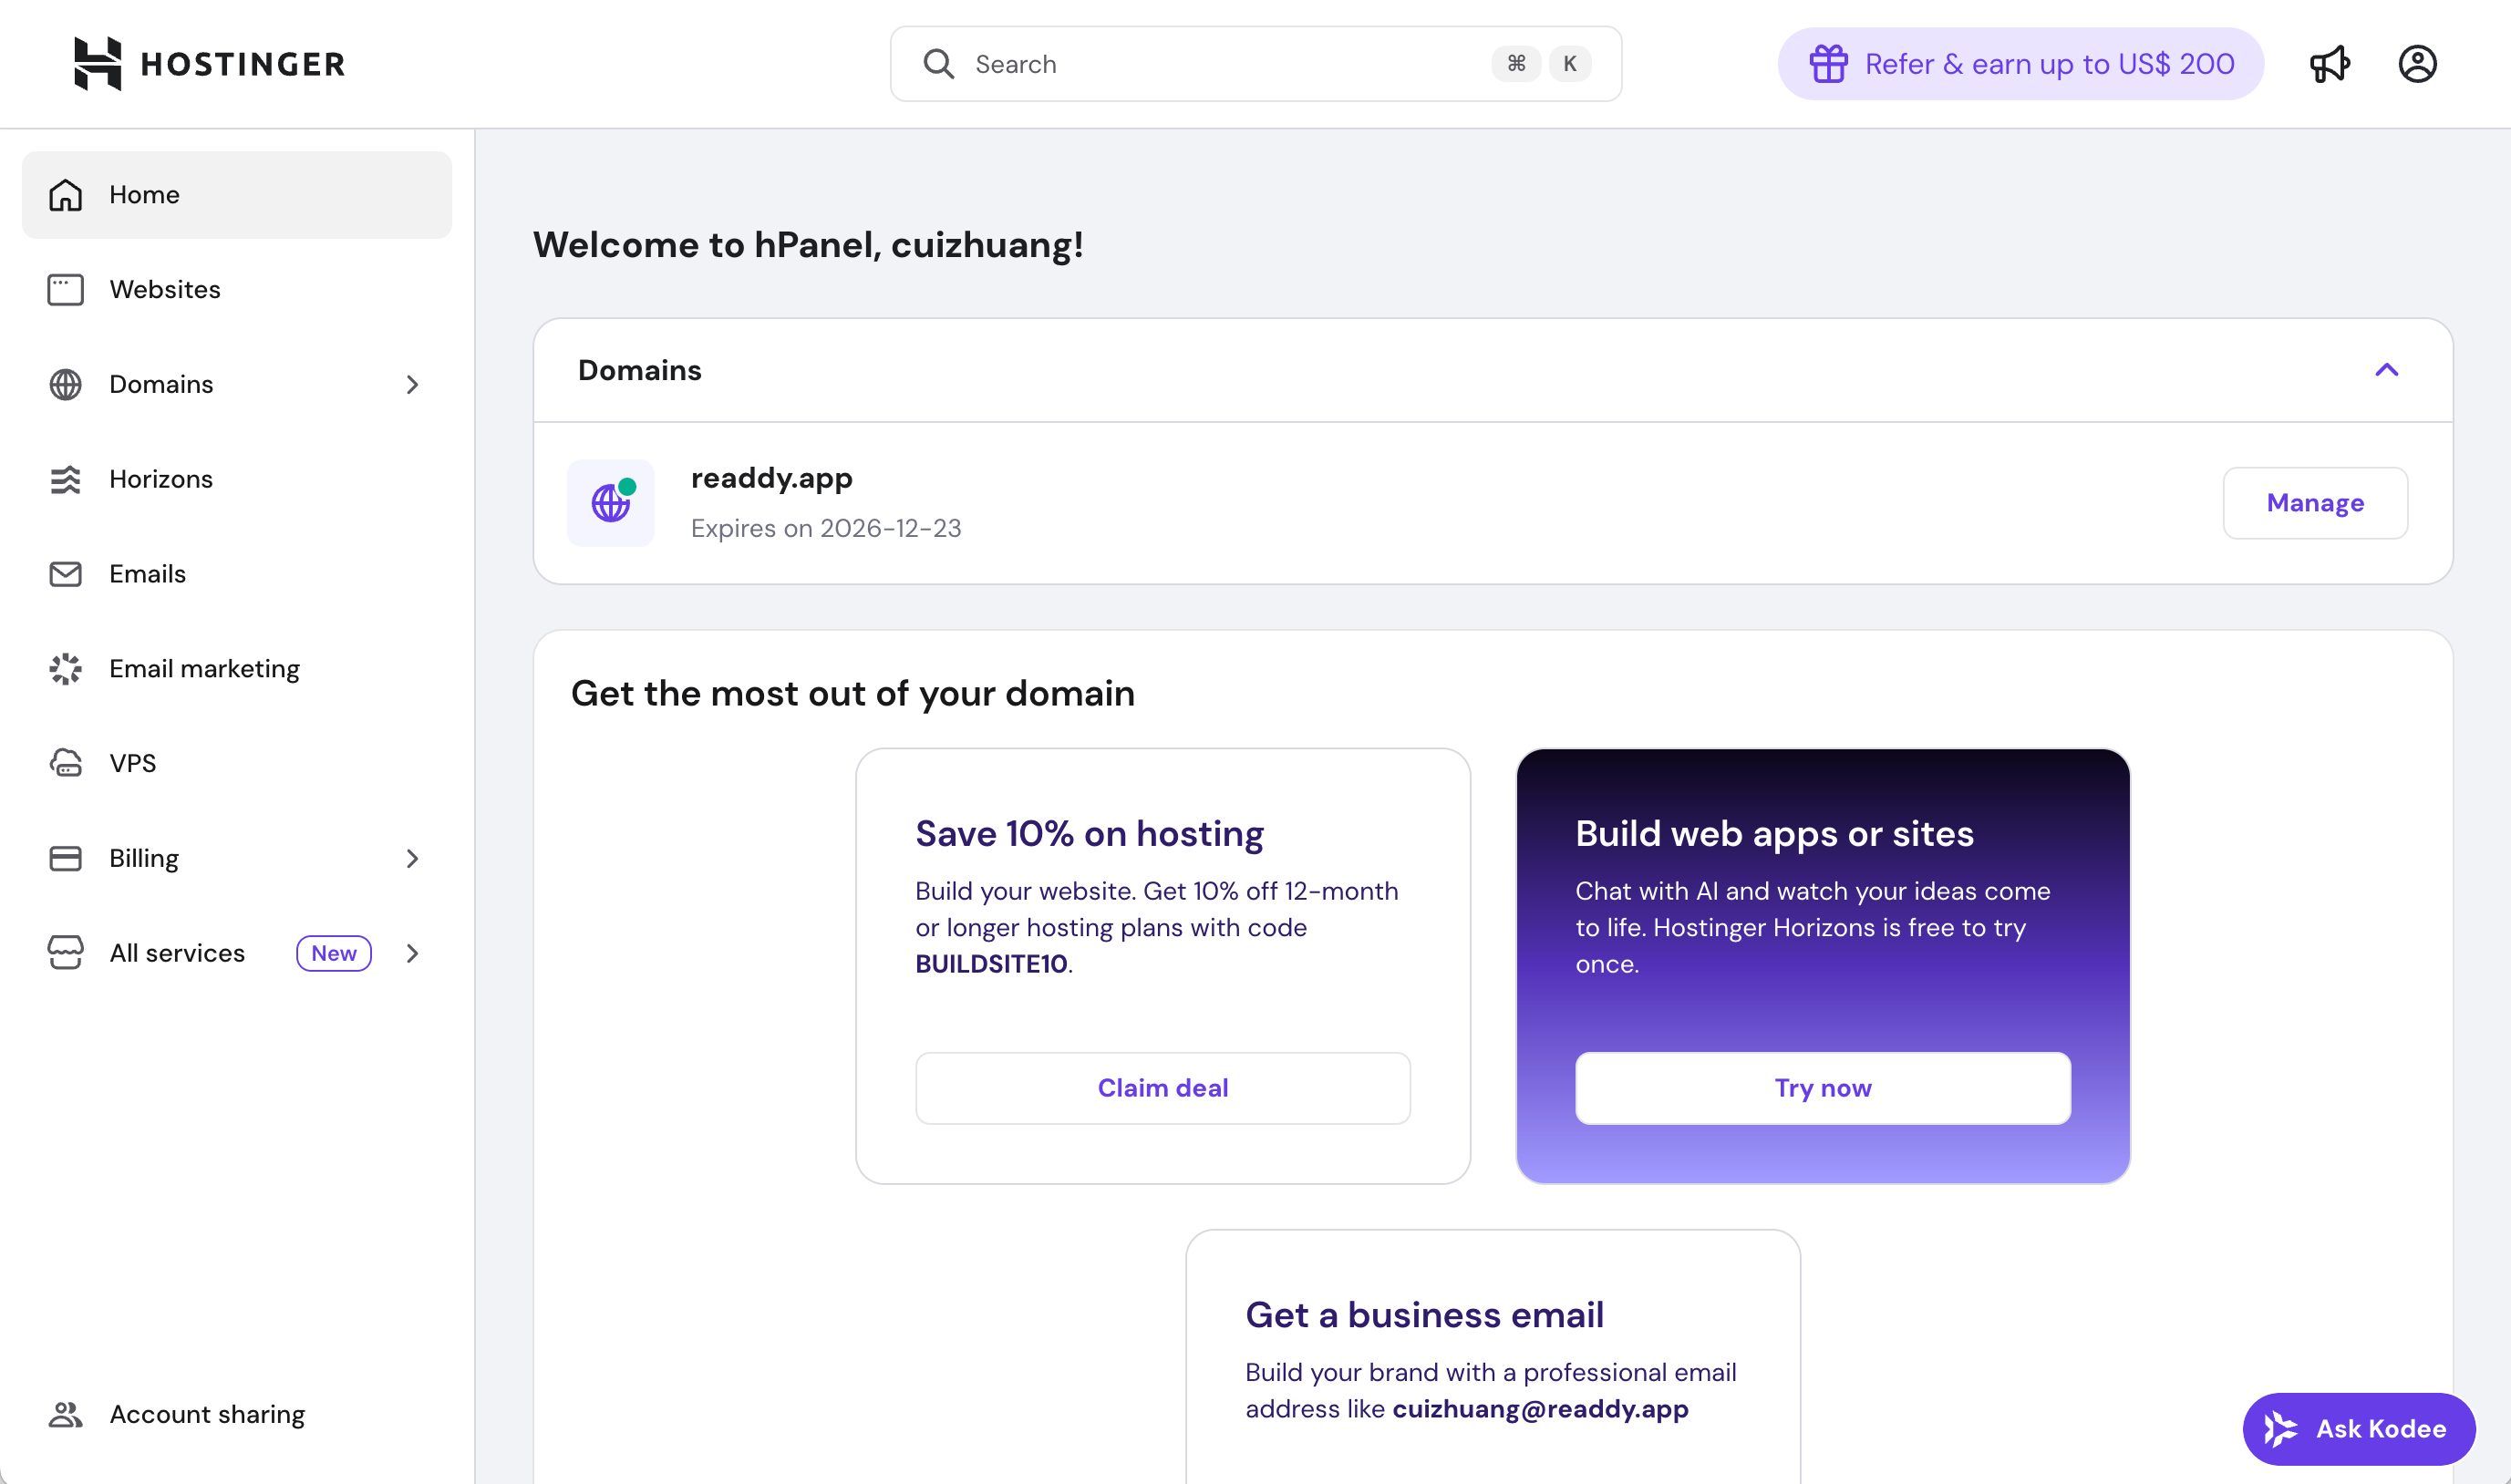
**Step 1: Log in to Hostinger**
* Open a new tab in your browser, go to [https://hpanel.hostinger.com/](https://hpanel.hostinger.com/) and log in. You will see your domain on the home page.
After updating all records, you will have completed the domain DNS configuration. Please return to Readdy, click **I've added the records** and continue.
**Step 1: Log in to Hostinger**
* Open a new tab in your browser, go to [https://hpanel.hostinger.com/](https://hpanel.hostinger.com/) and log in. You will see your domain on the home page.
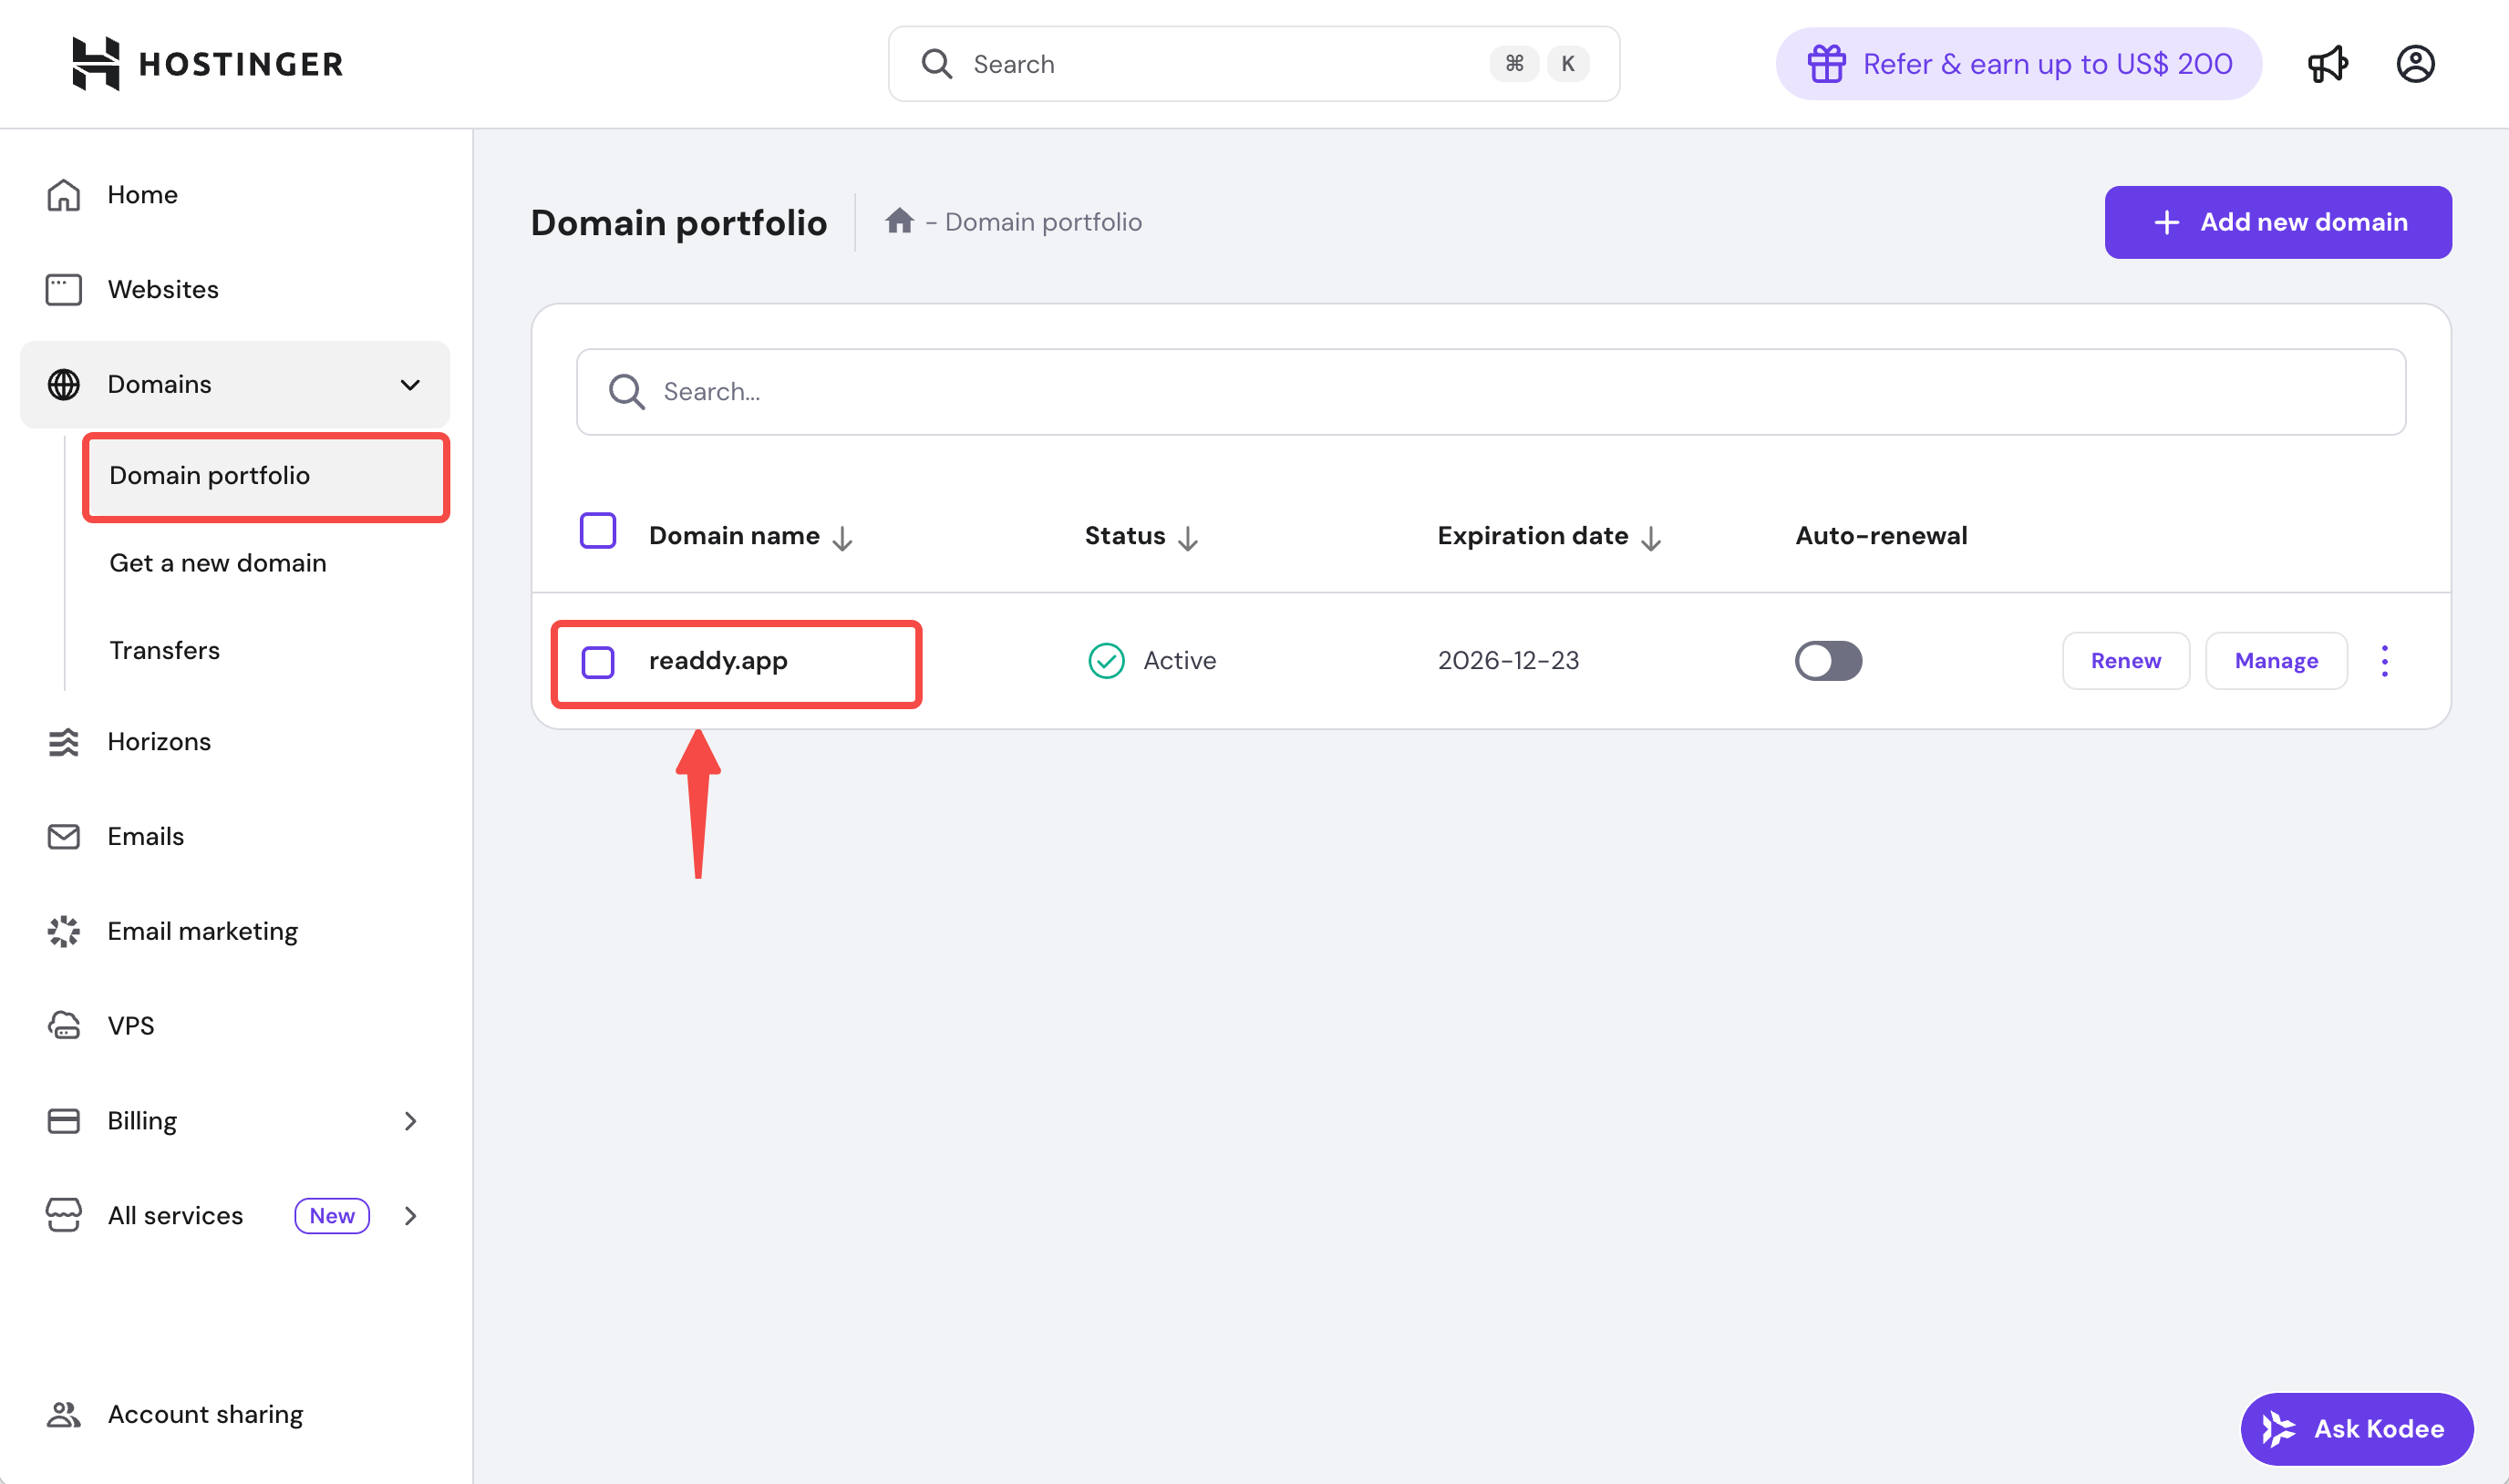
 **Step 2: Find your domain's DNS Management page**
* Go to the **Domain portfolio** page and click the domain you want to connect.
**Step 2: Find your domain's DNS Management page**
* Go to the **Domain portfolio** page and click the domain you want to connect.
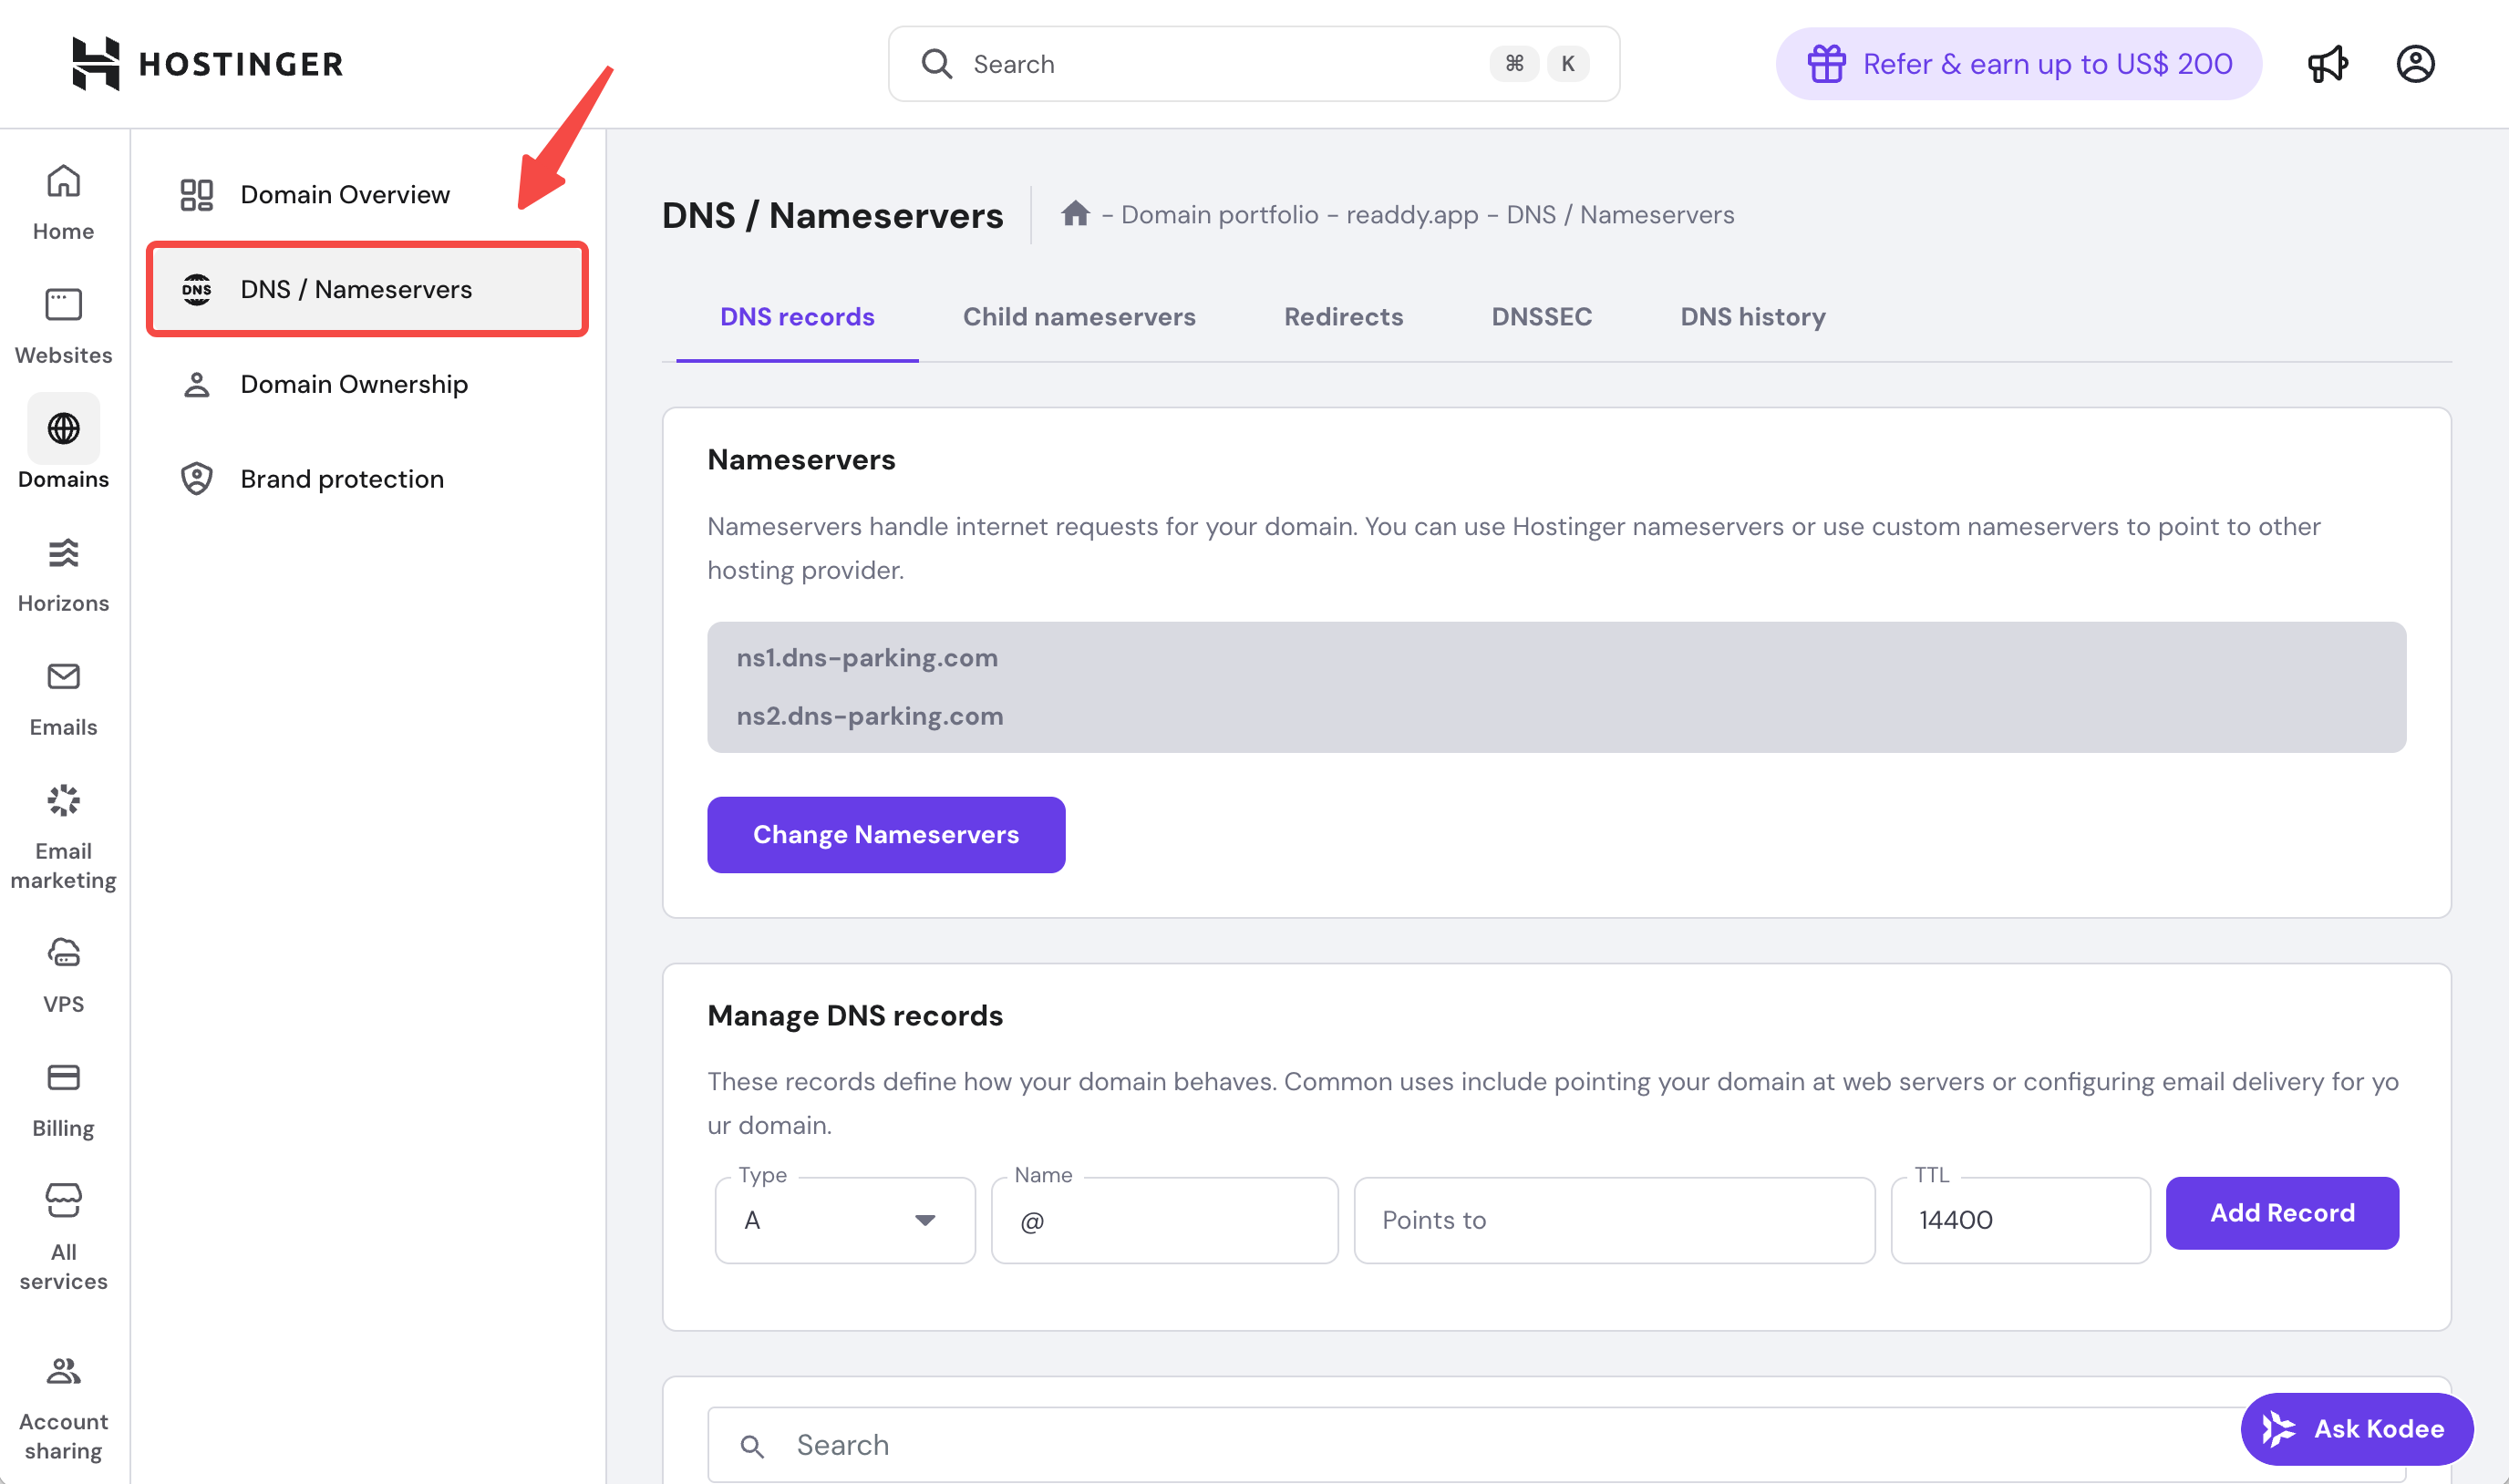
 * Navigate to **DNS / Nameservers** page where you can manage the DNS records.
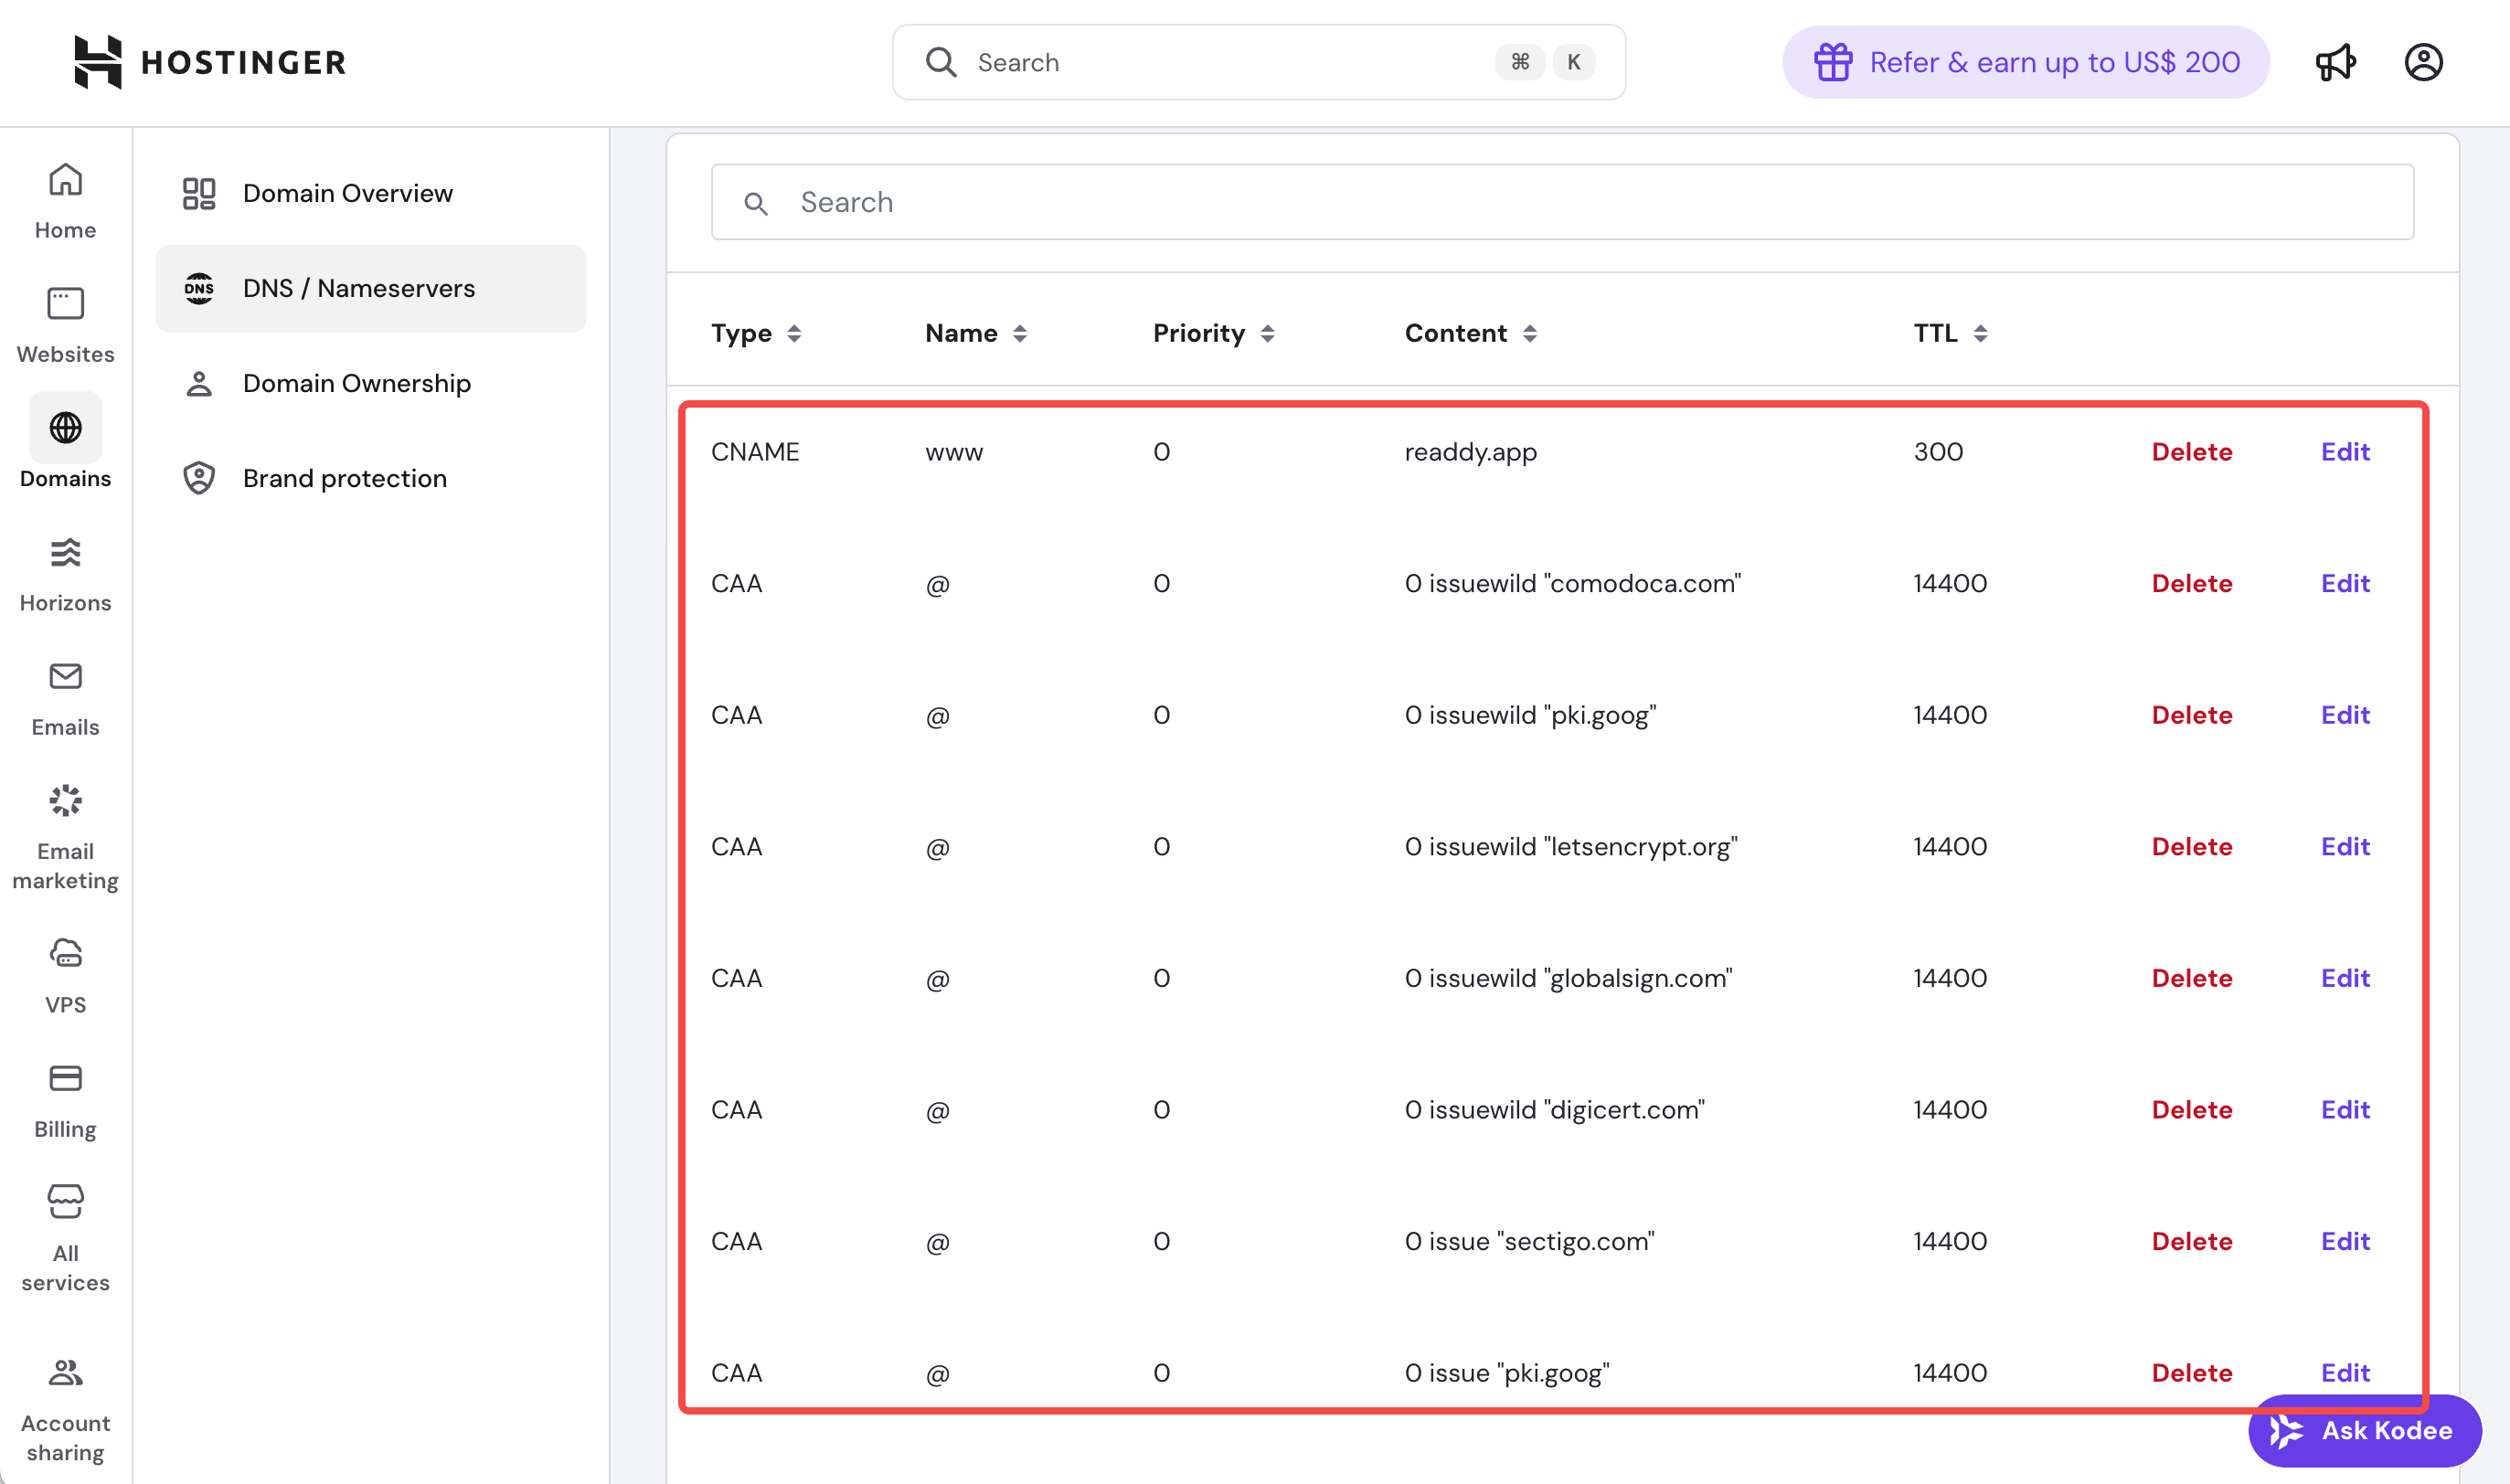
 **Step 3: Update your DNS records**
* Scroll down on the DNS / Nameservers page, and you will see all the DNS records for the current domain.
**Step 3: Update your DNS records**
* Scroll down on the DNS / Nameservers page, and you will see all the DNS records for the current domain.
 Based on your domain, you need to update these three types of DNS records: **A**, **CNAME**, **TXT** (subject to what is actually displayed on the Readdy interface).
* If you connect a root domain, such as `xxxxxx.com`,you need to update A + TXT
* If you connect a subdomain, such as `www.xxxxxx.com`,you need to update CNAME + TXT
Here we'll use an **A** record as an example; the update process for **CNAME** and **TXT** is exactly the same.
First, you need to delete the old records where **Type=A** and **Name=@** that may cause conflicts.
Based on your domain, you need to update these three types of DNS records: **A**, **CNAME**, **TXT** (subject to what is actually displayed on the Readdy interface).
* If you connect a root domain, such as `xxxxxx.com`,you need to update A + TXT
* If you connect a subdomain, such as `www.xxxxxx.com`,you need to update CNAME + TXT
Here we'll use an **A** record as an example; the update process for **CNAME** and **TXT** is exactly the same.
First, you need to delete the old records where **Type=A** and **Name=@** that may cause conflicts.
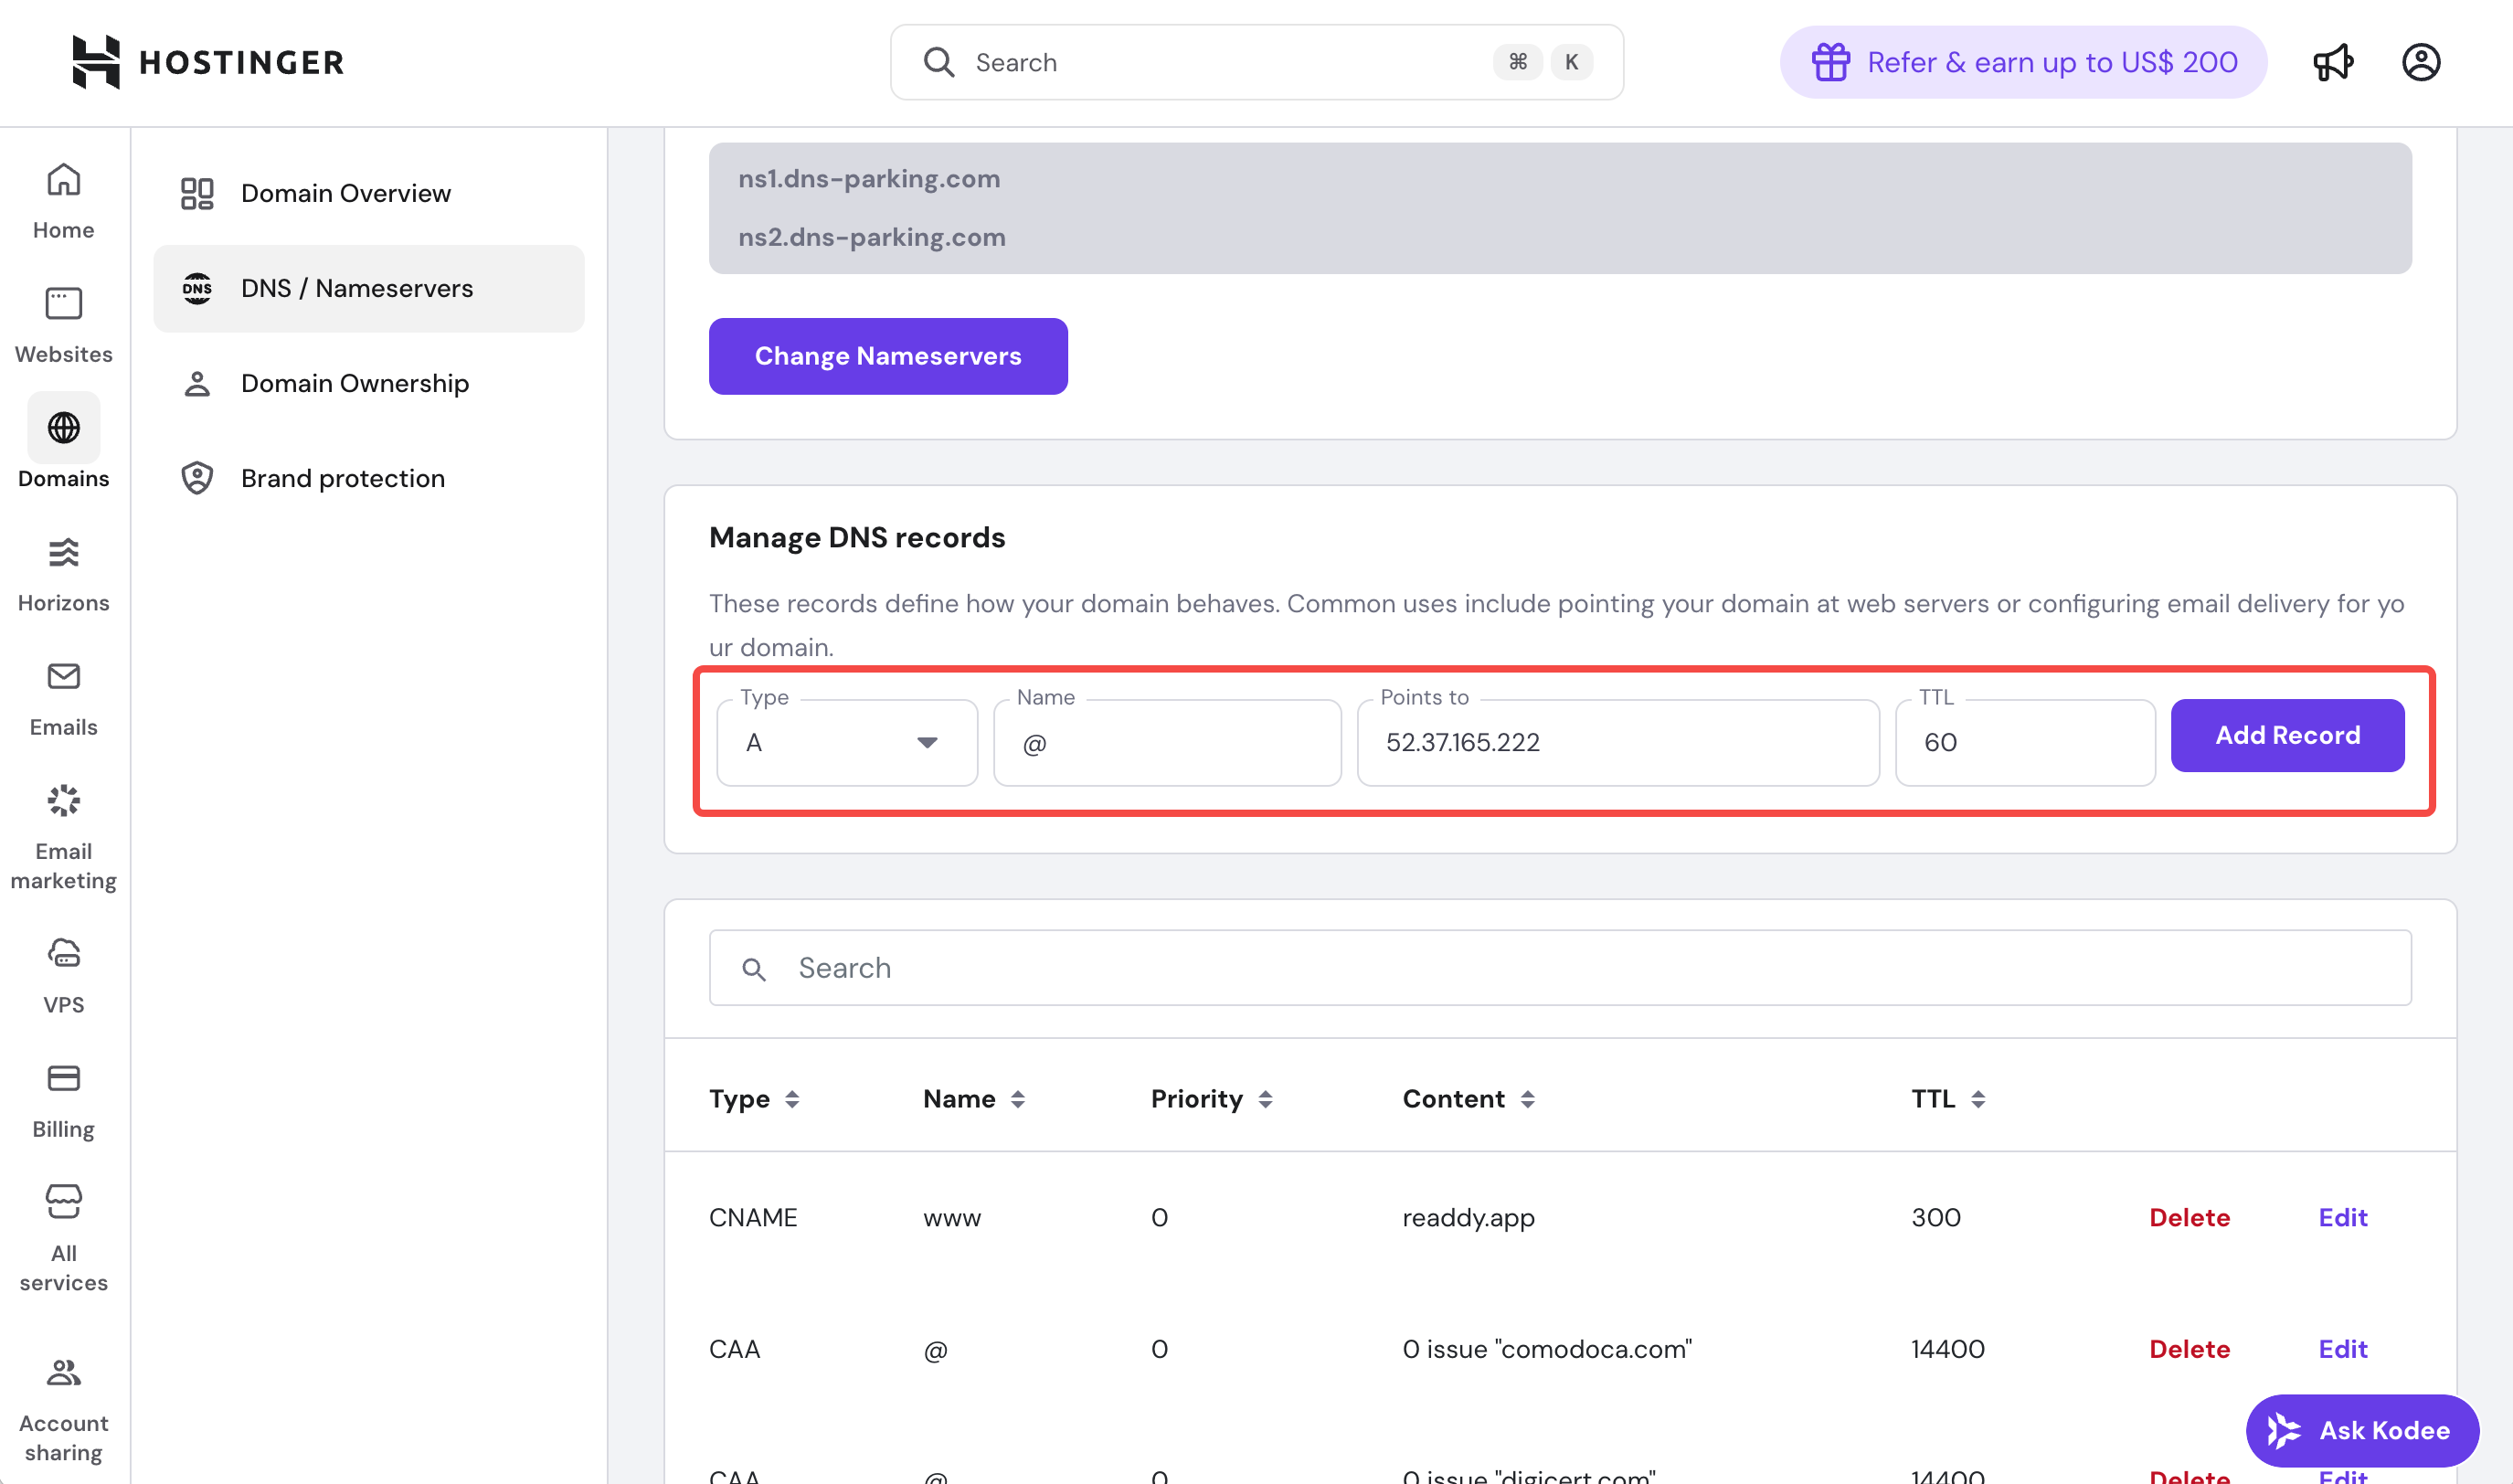
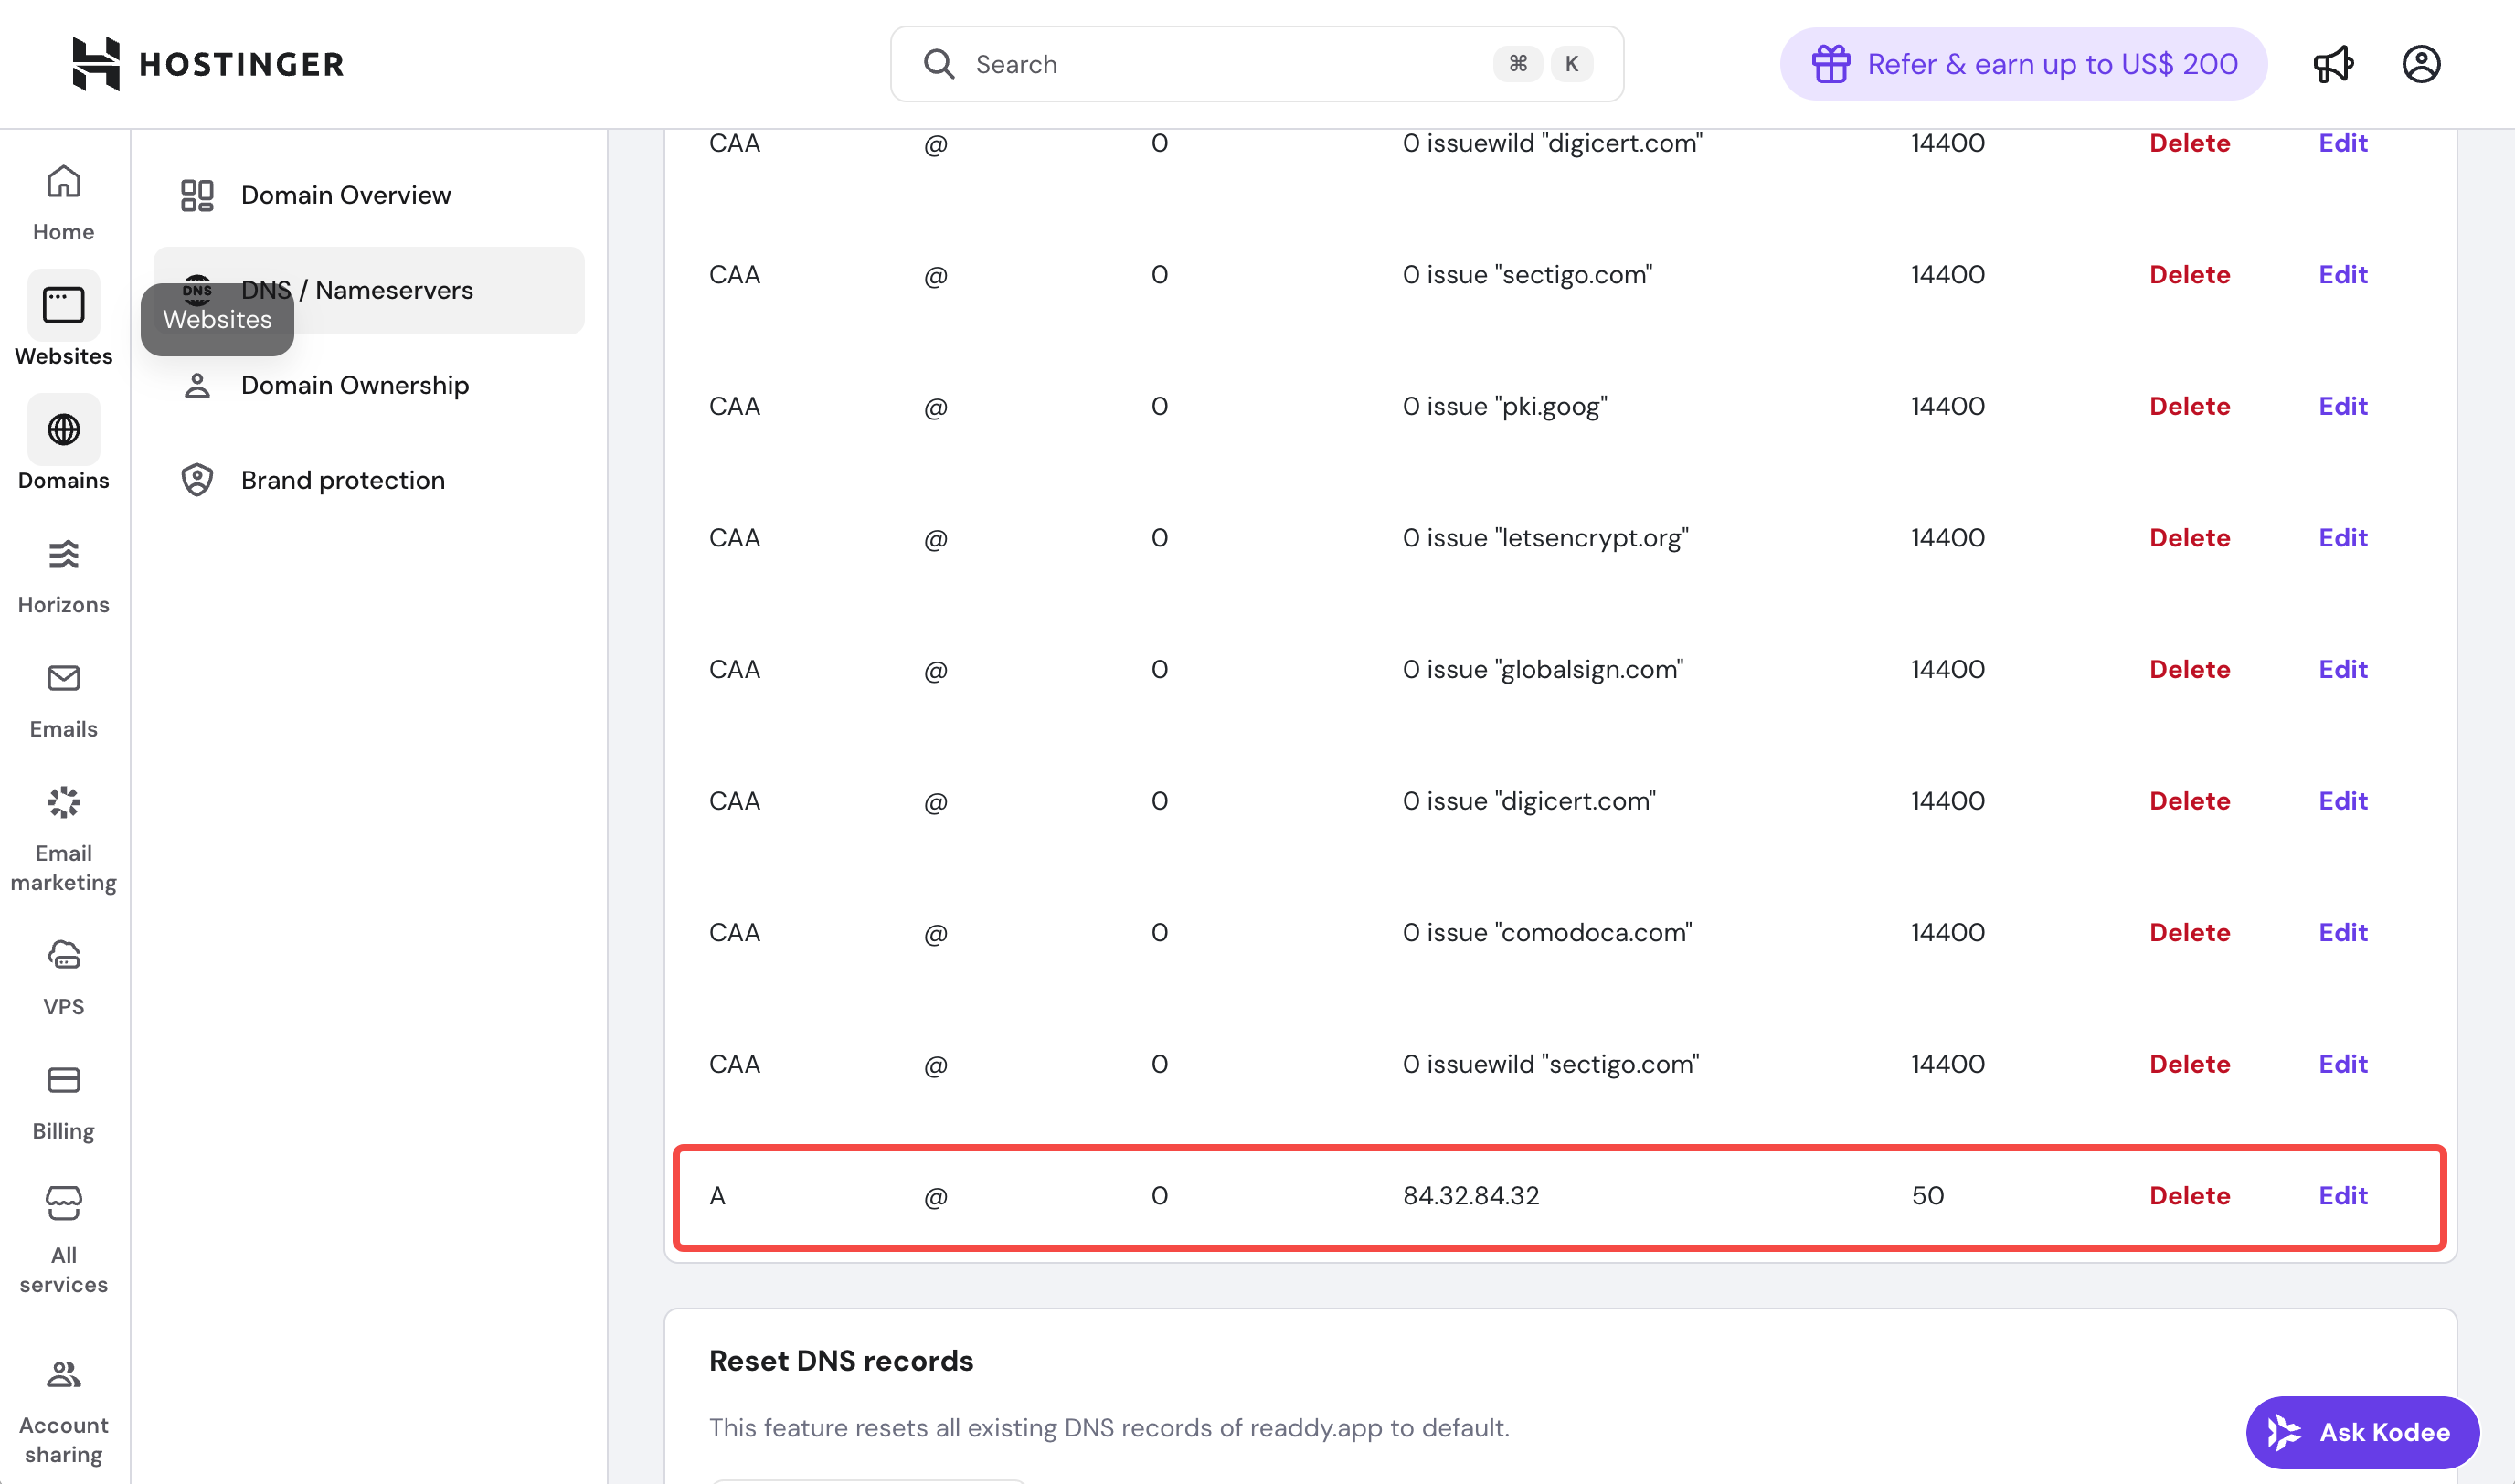 **Then add a new record:**
> Type: A\
> Name: @\
> Value: 52.37.165.222\
> TTL: 60
**Then add a new record:**
> Type: A\
> Name: @\
> Value: 52.37.165.222\
> TTL: 60
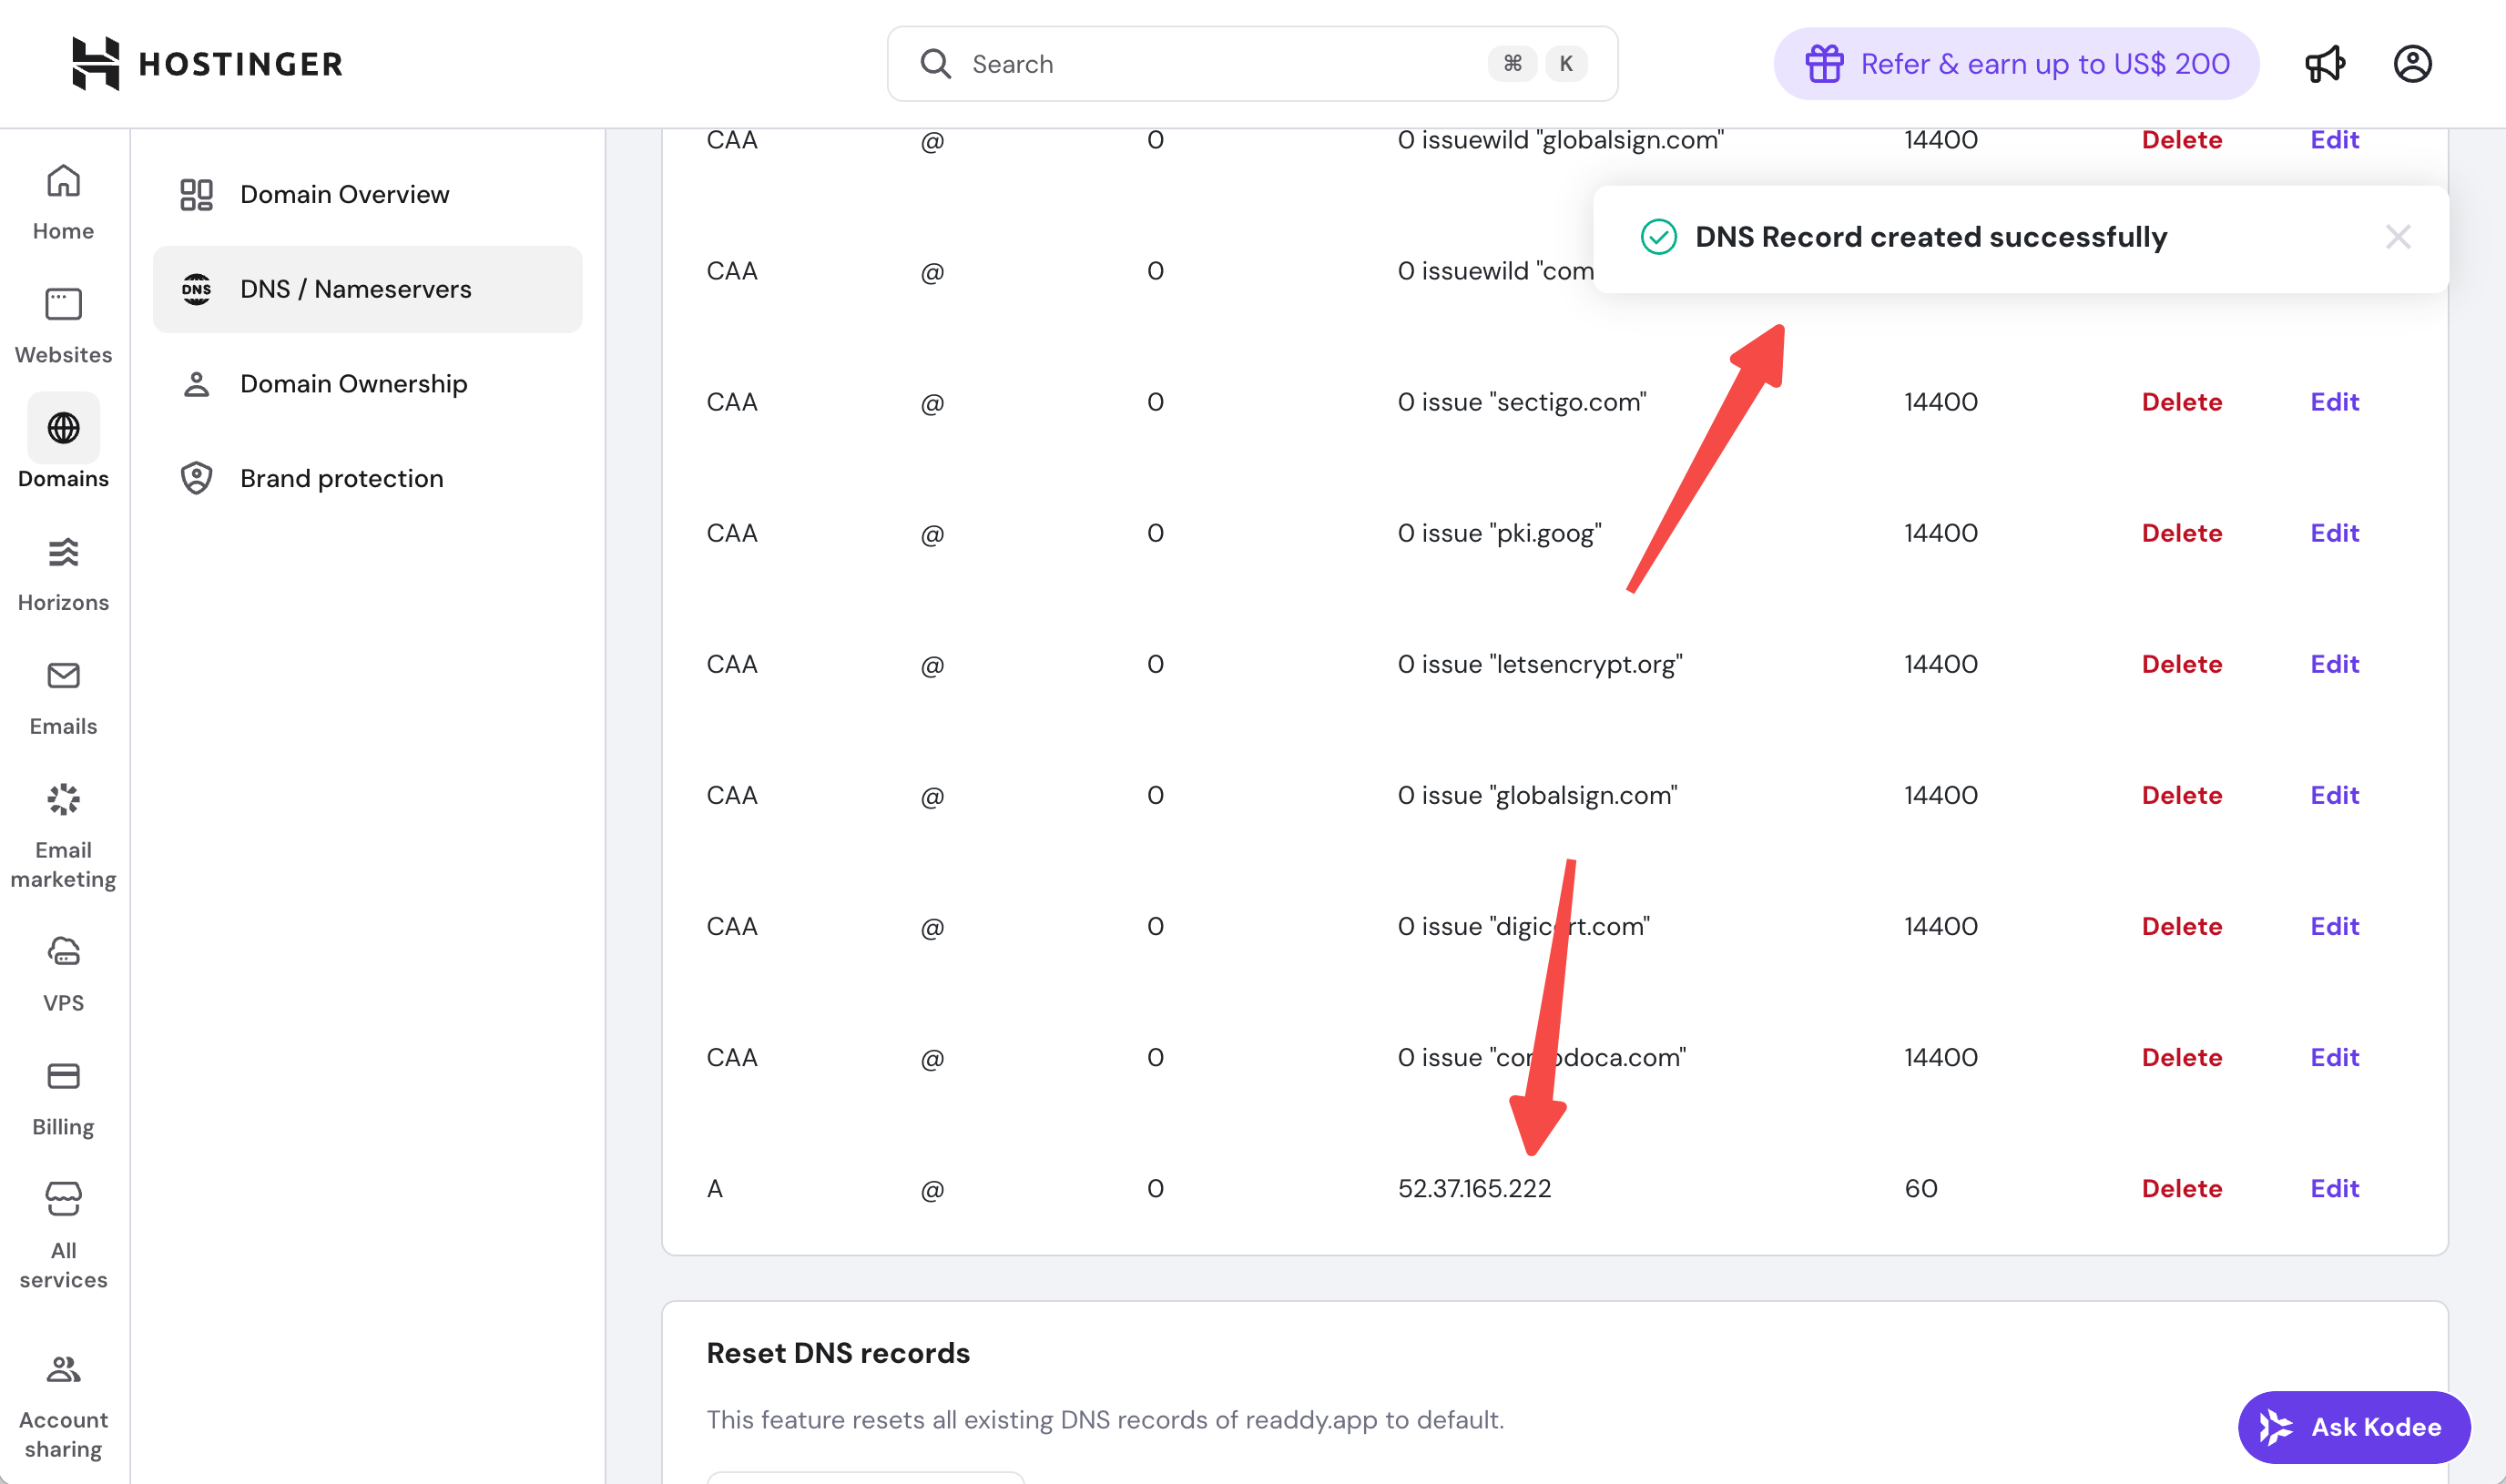 Based on the content displayed on the Readdy interface, if there are additional TXT or CNAME records that need to be updated, use the same method to update them: delete all records with the same Type and Name, and add the required records.
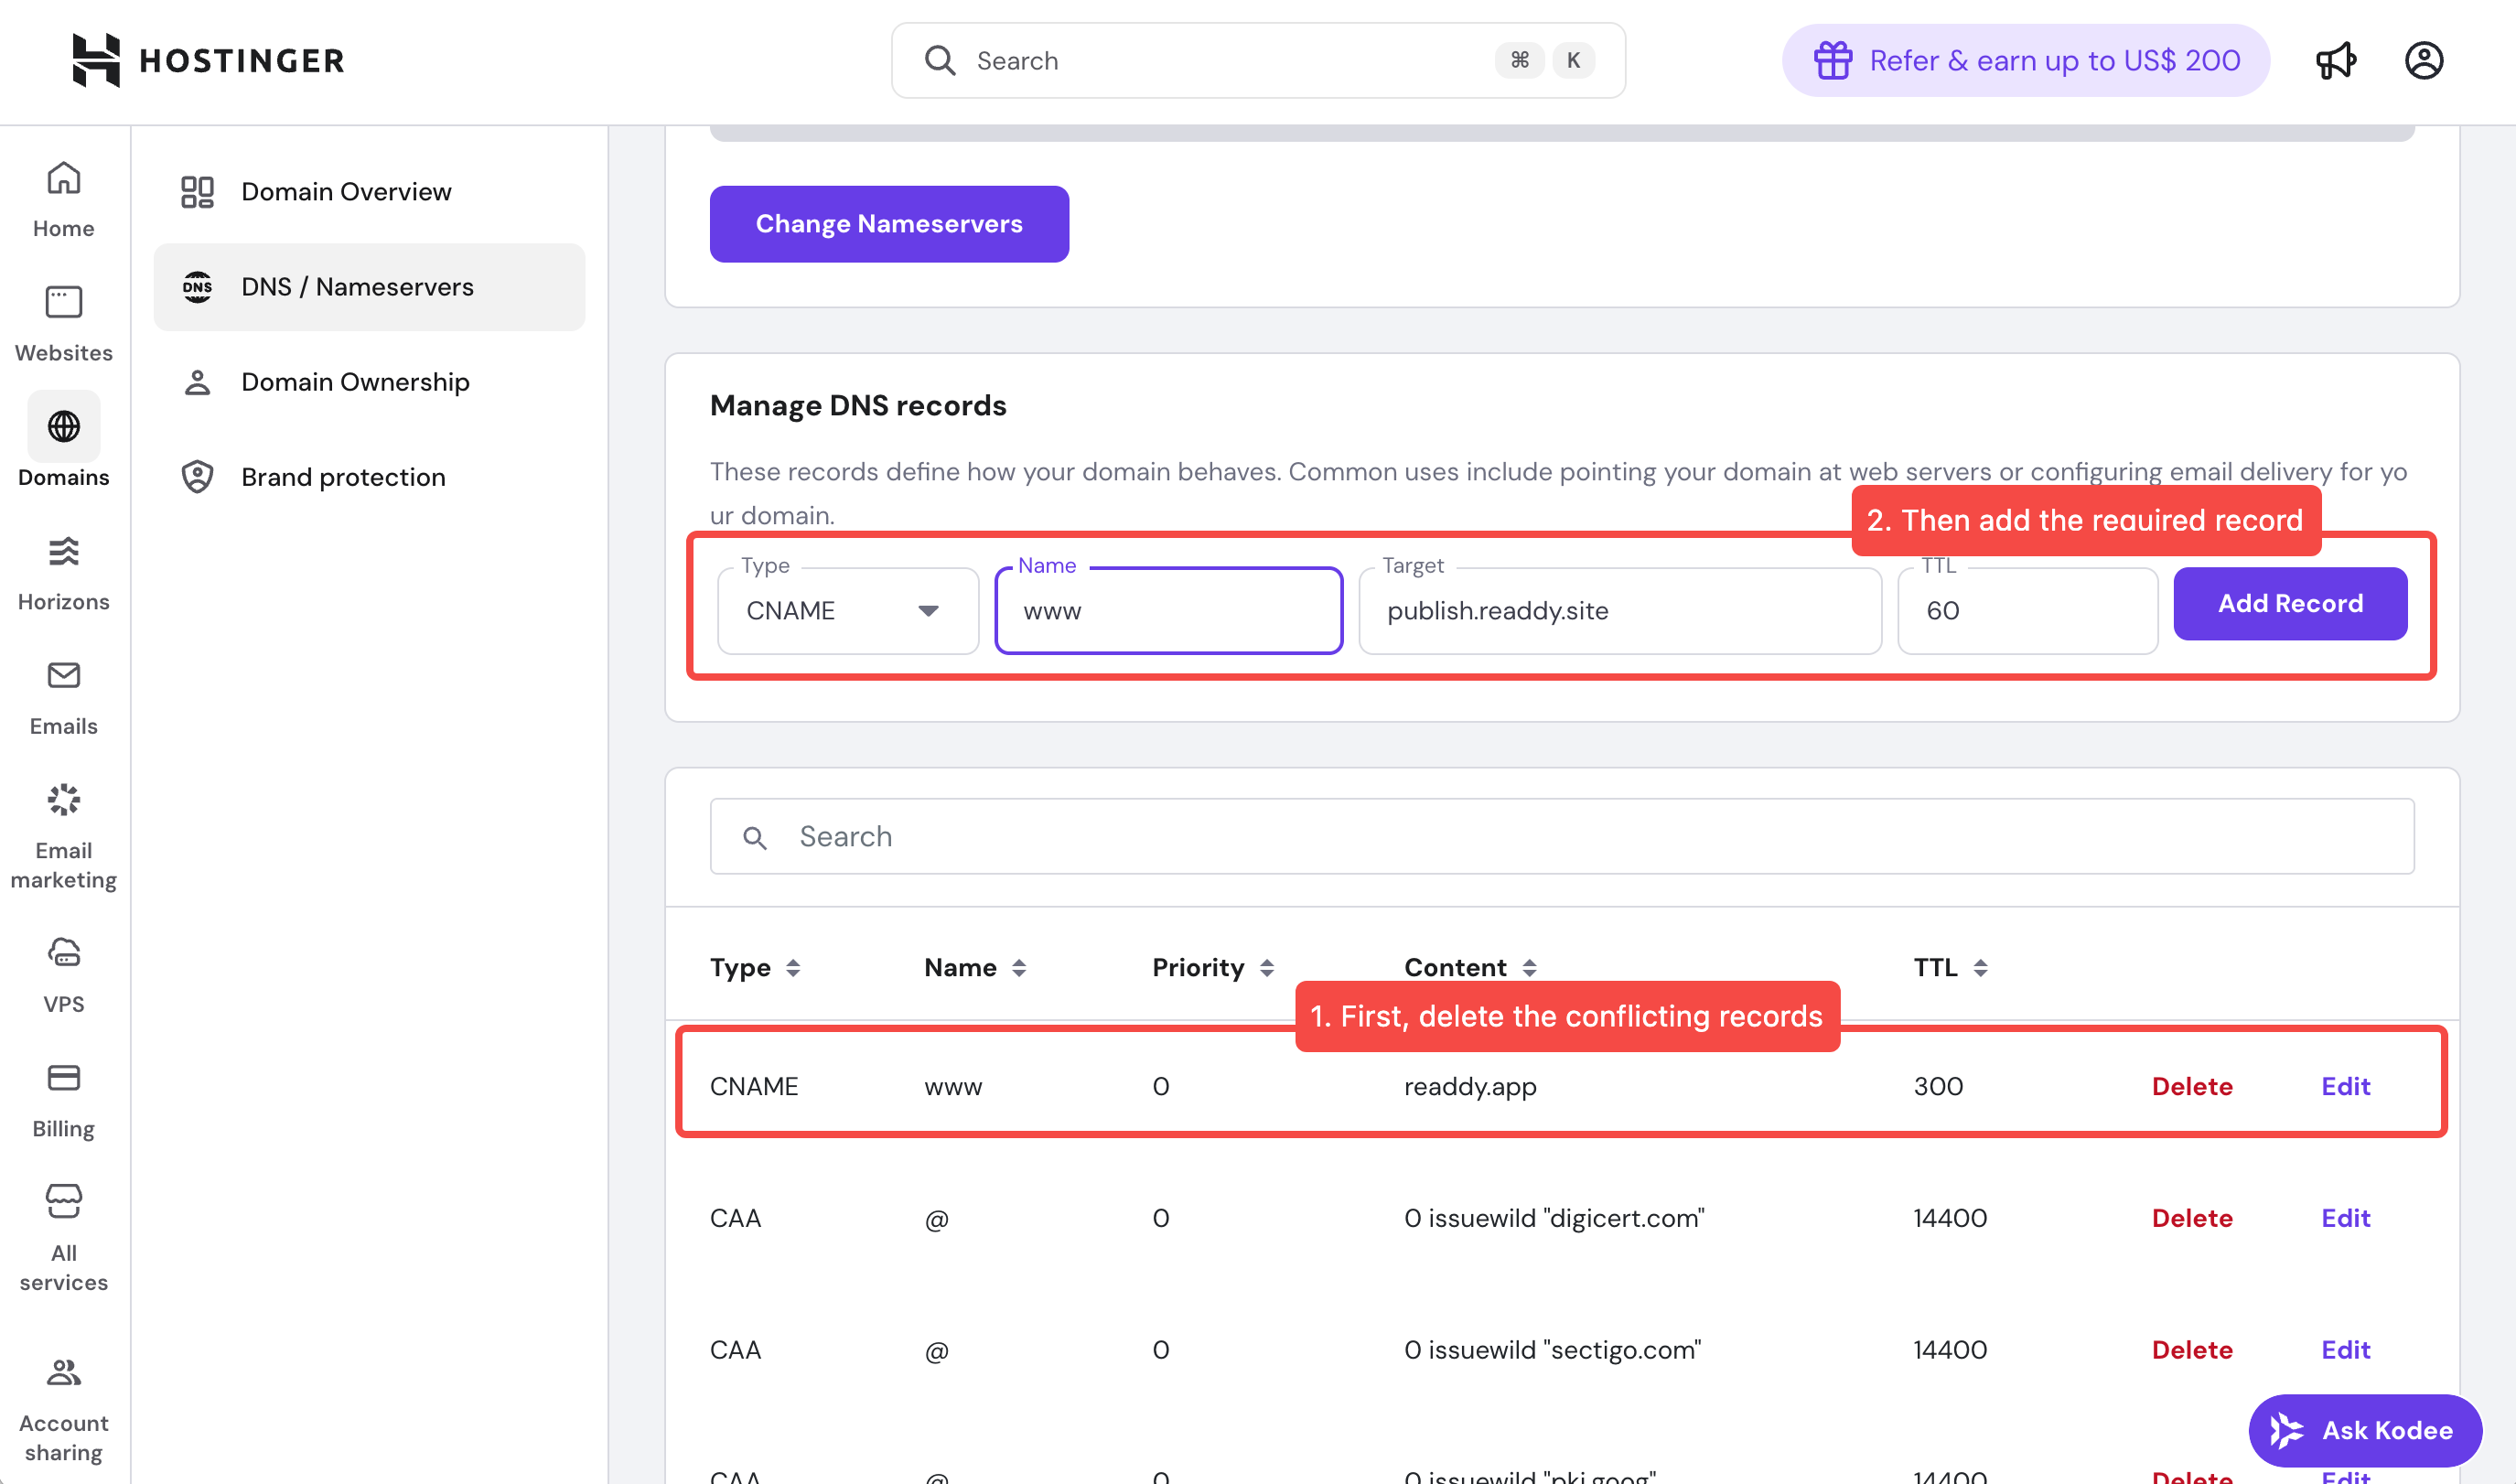 After updating all records, you will have completed the domain DNS configuration. Please return to Readdy, click **I've added the records** and continue.
**Step 1: Log in to Cloudflare**
* Open a new tab in your browser, go to [https://dash.cloudflare.com/](https://dash.cloudflare.com/) and log in. You will see your domain on the Account home page.
After updating all records, you will have completed the domain DNS configuration. Please return to Readdy, click **I've added the records** and continue.
**Step 1: Log in to Cloudflare**
* Open a new tab in your browser, go to [https://dash.cloudflare.com/](https://dash.cloudflare.com/) and log in. You will see your domain on the Account home page.
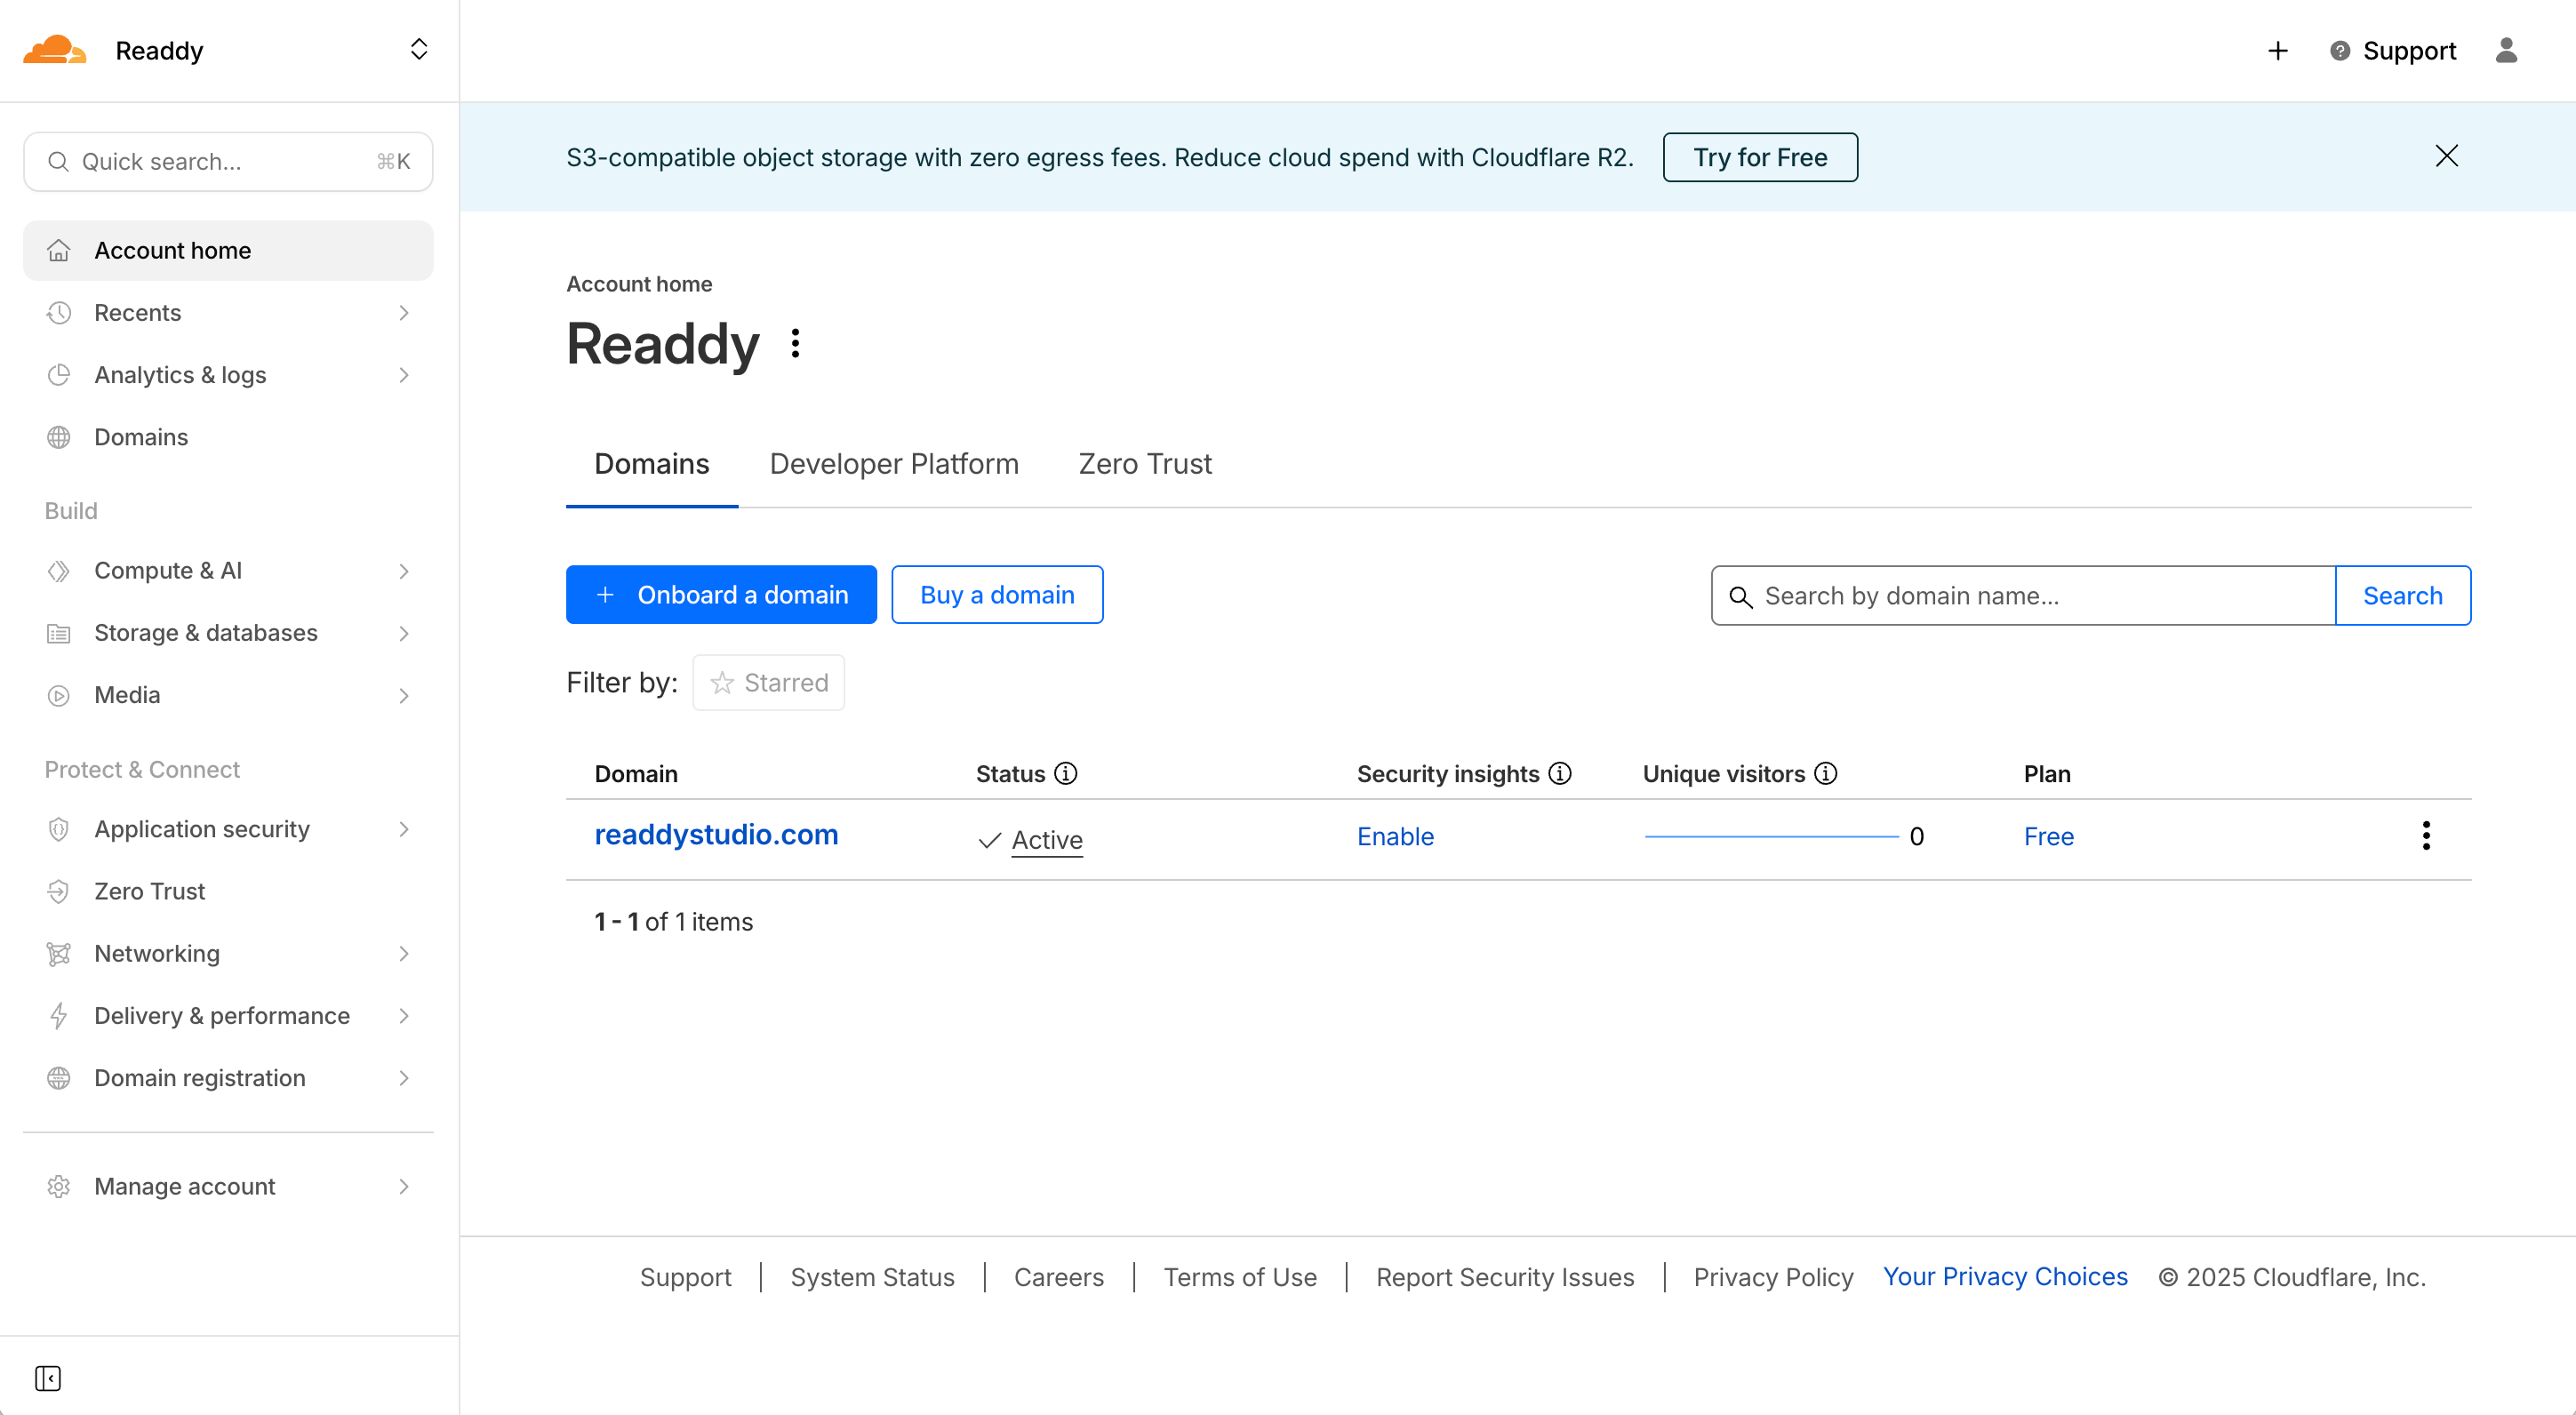 **Step 2: Find your domain's DNS Management page**
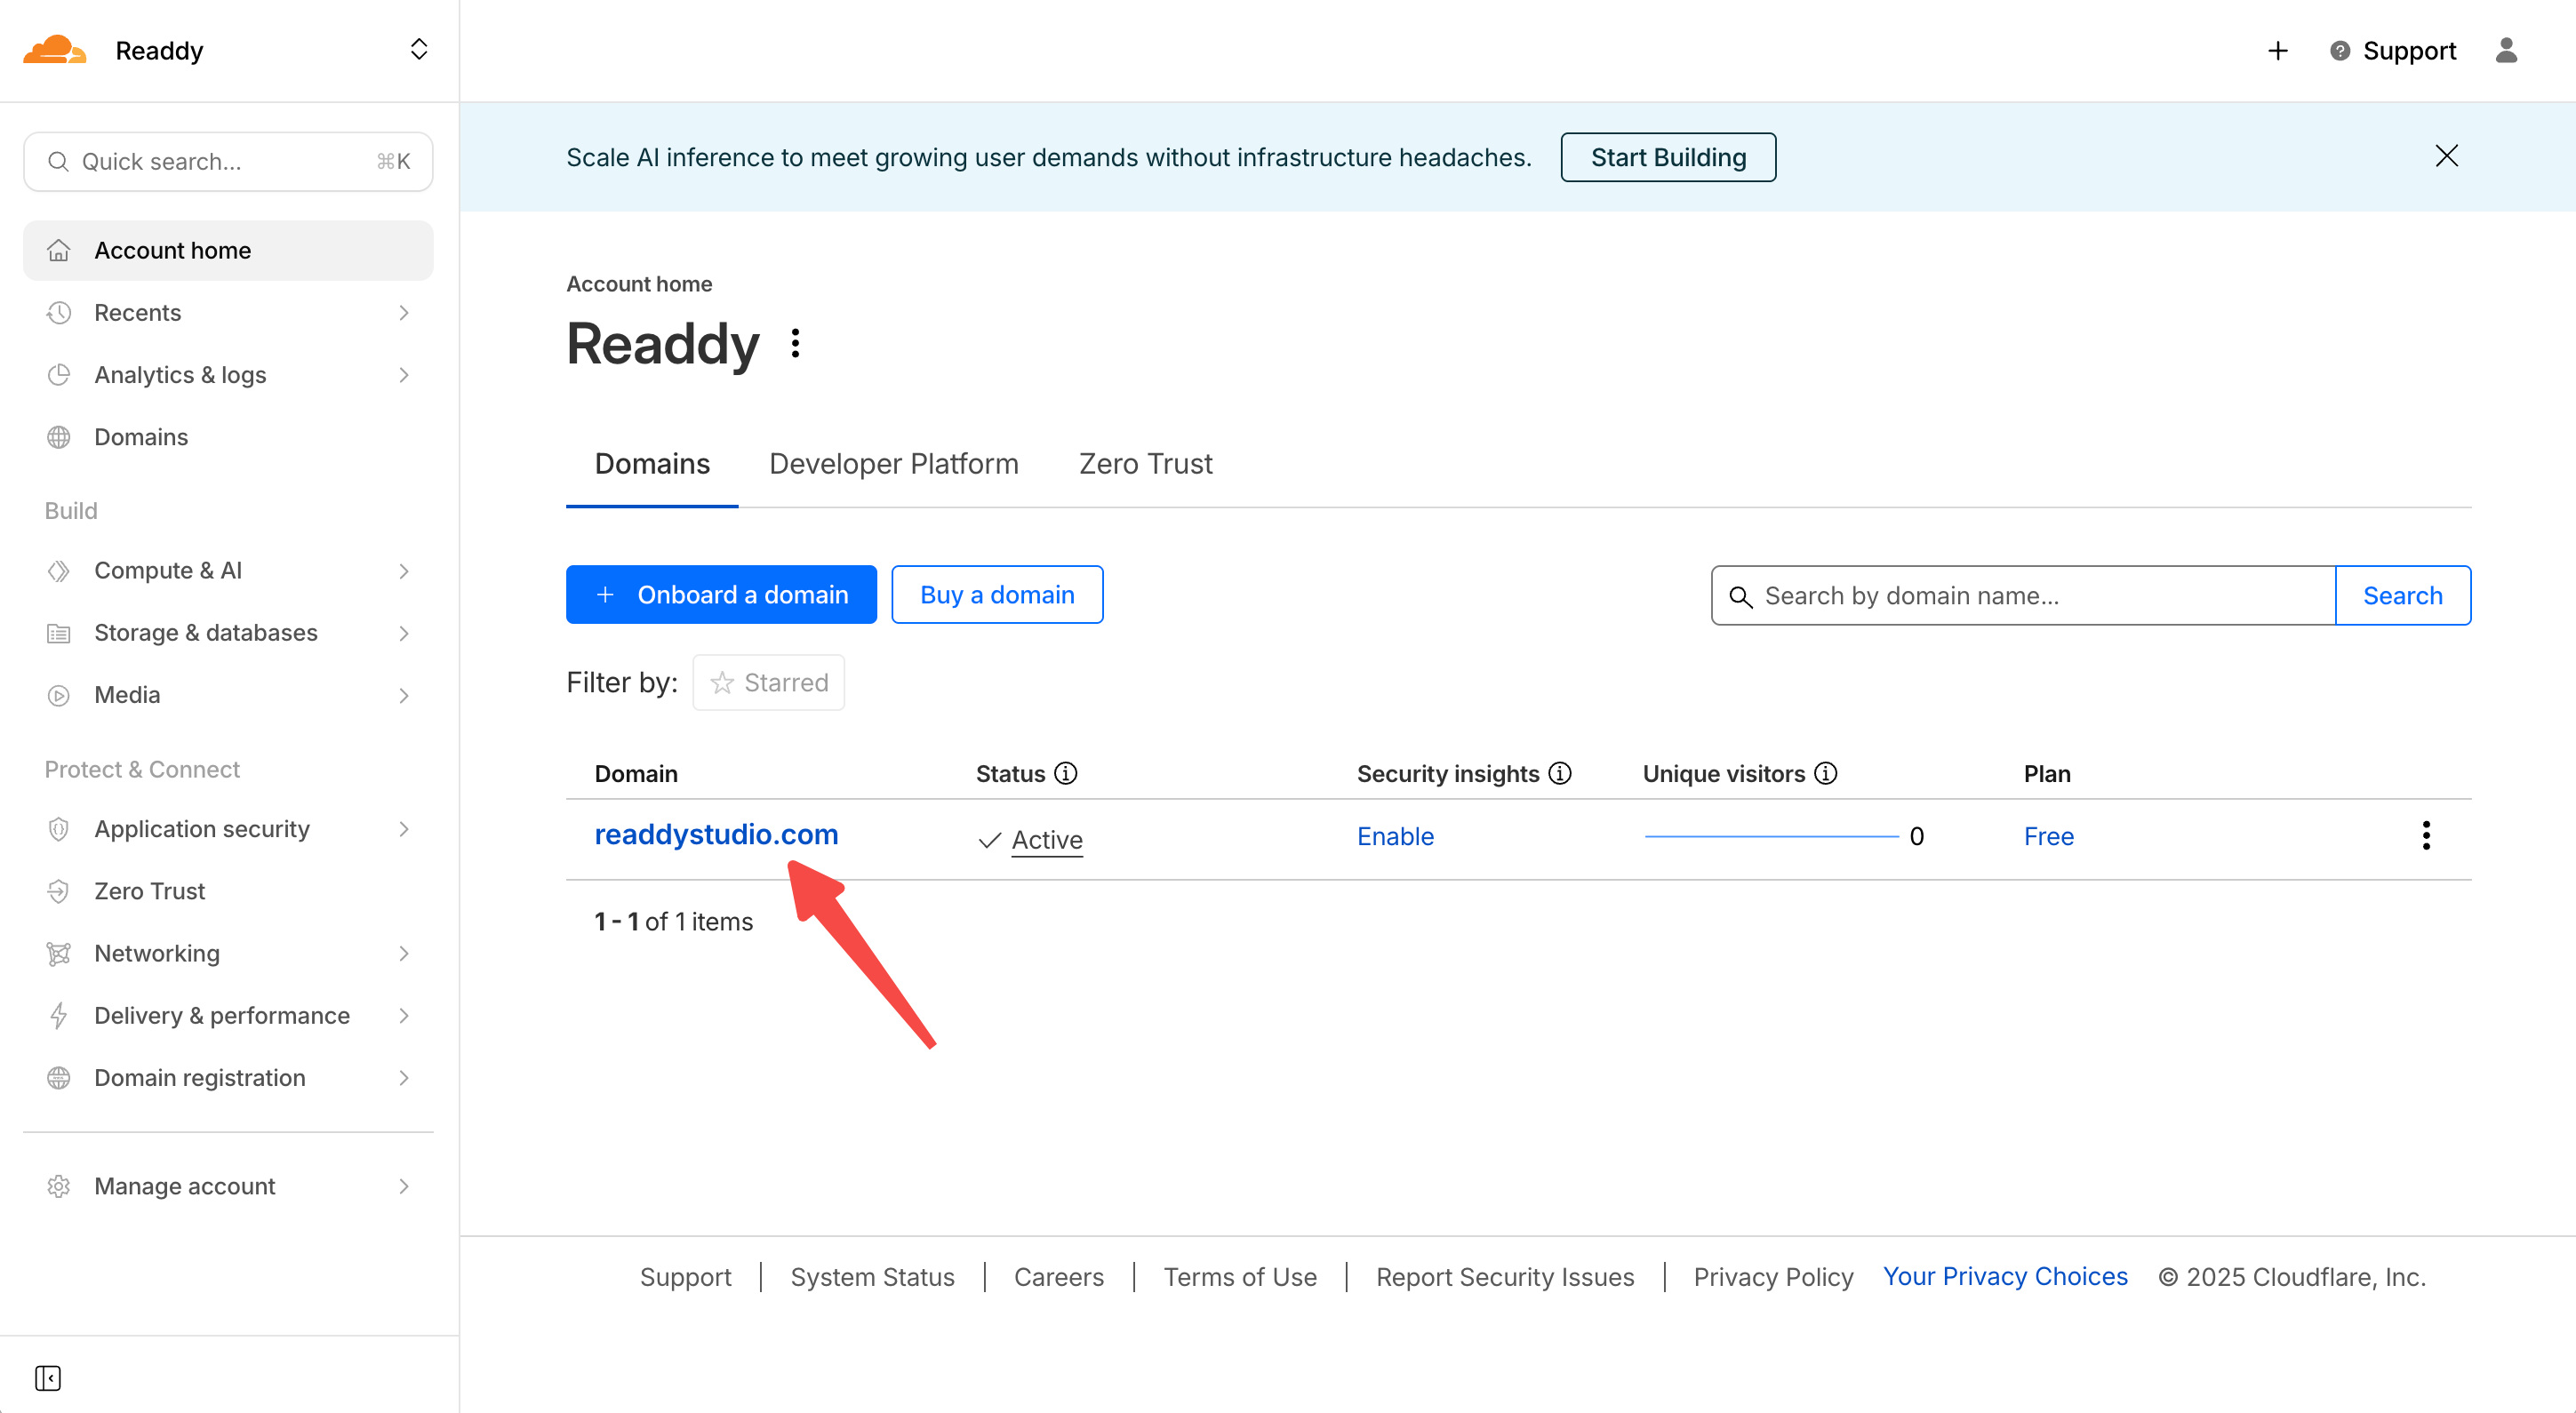
* Click the domain you want to connect.
**Step 2: Find your domain's DNS Management page**
* Click the domain you want to connect.
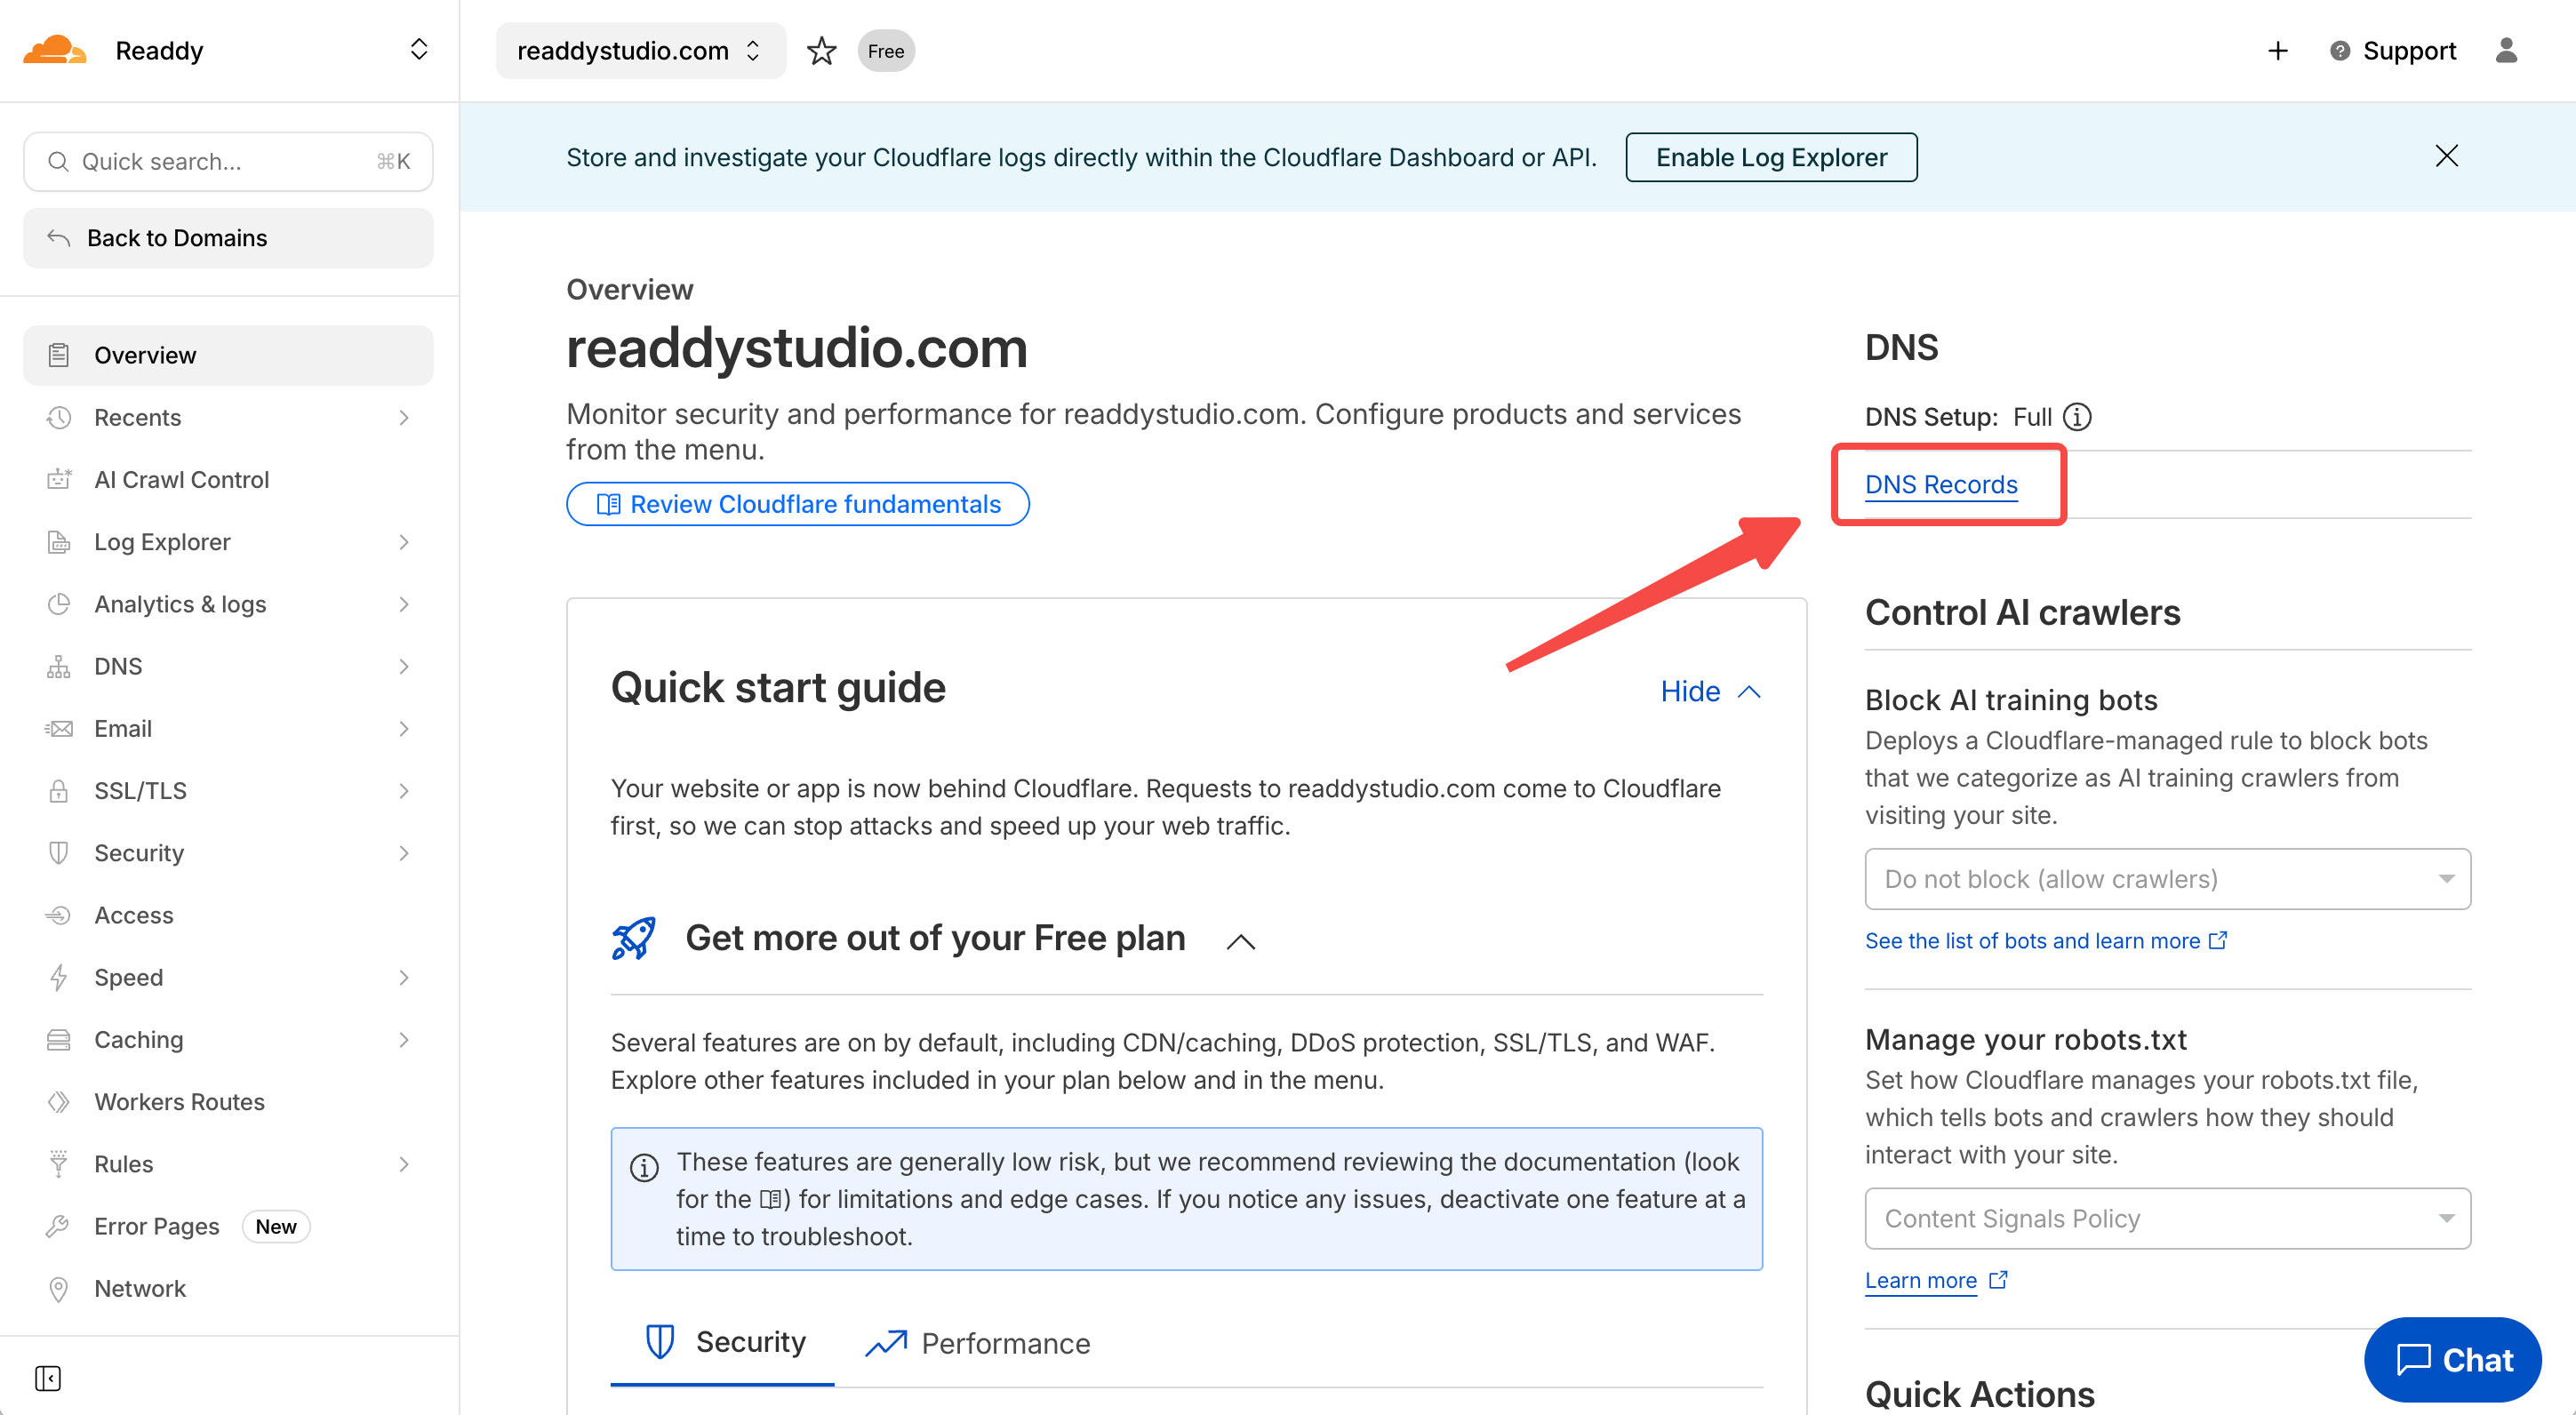
 * Click **DNS Records** to access to the DNS management page.
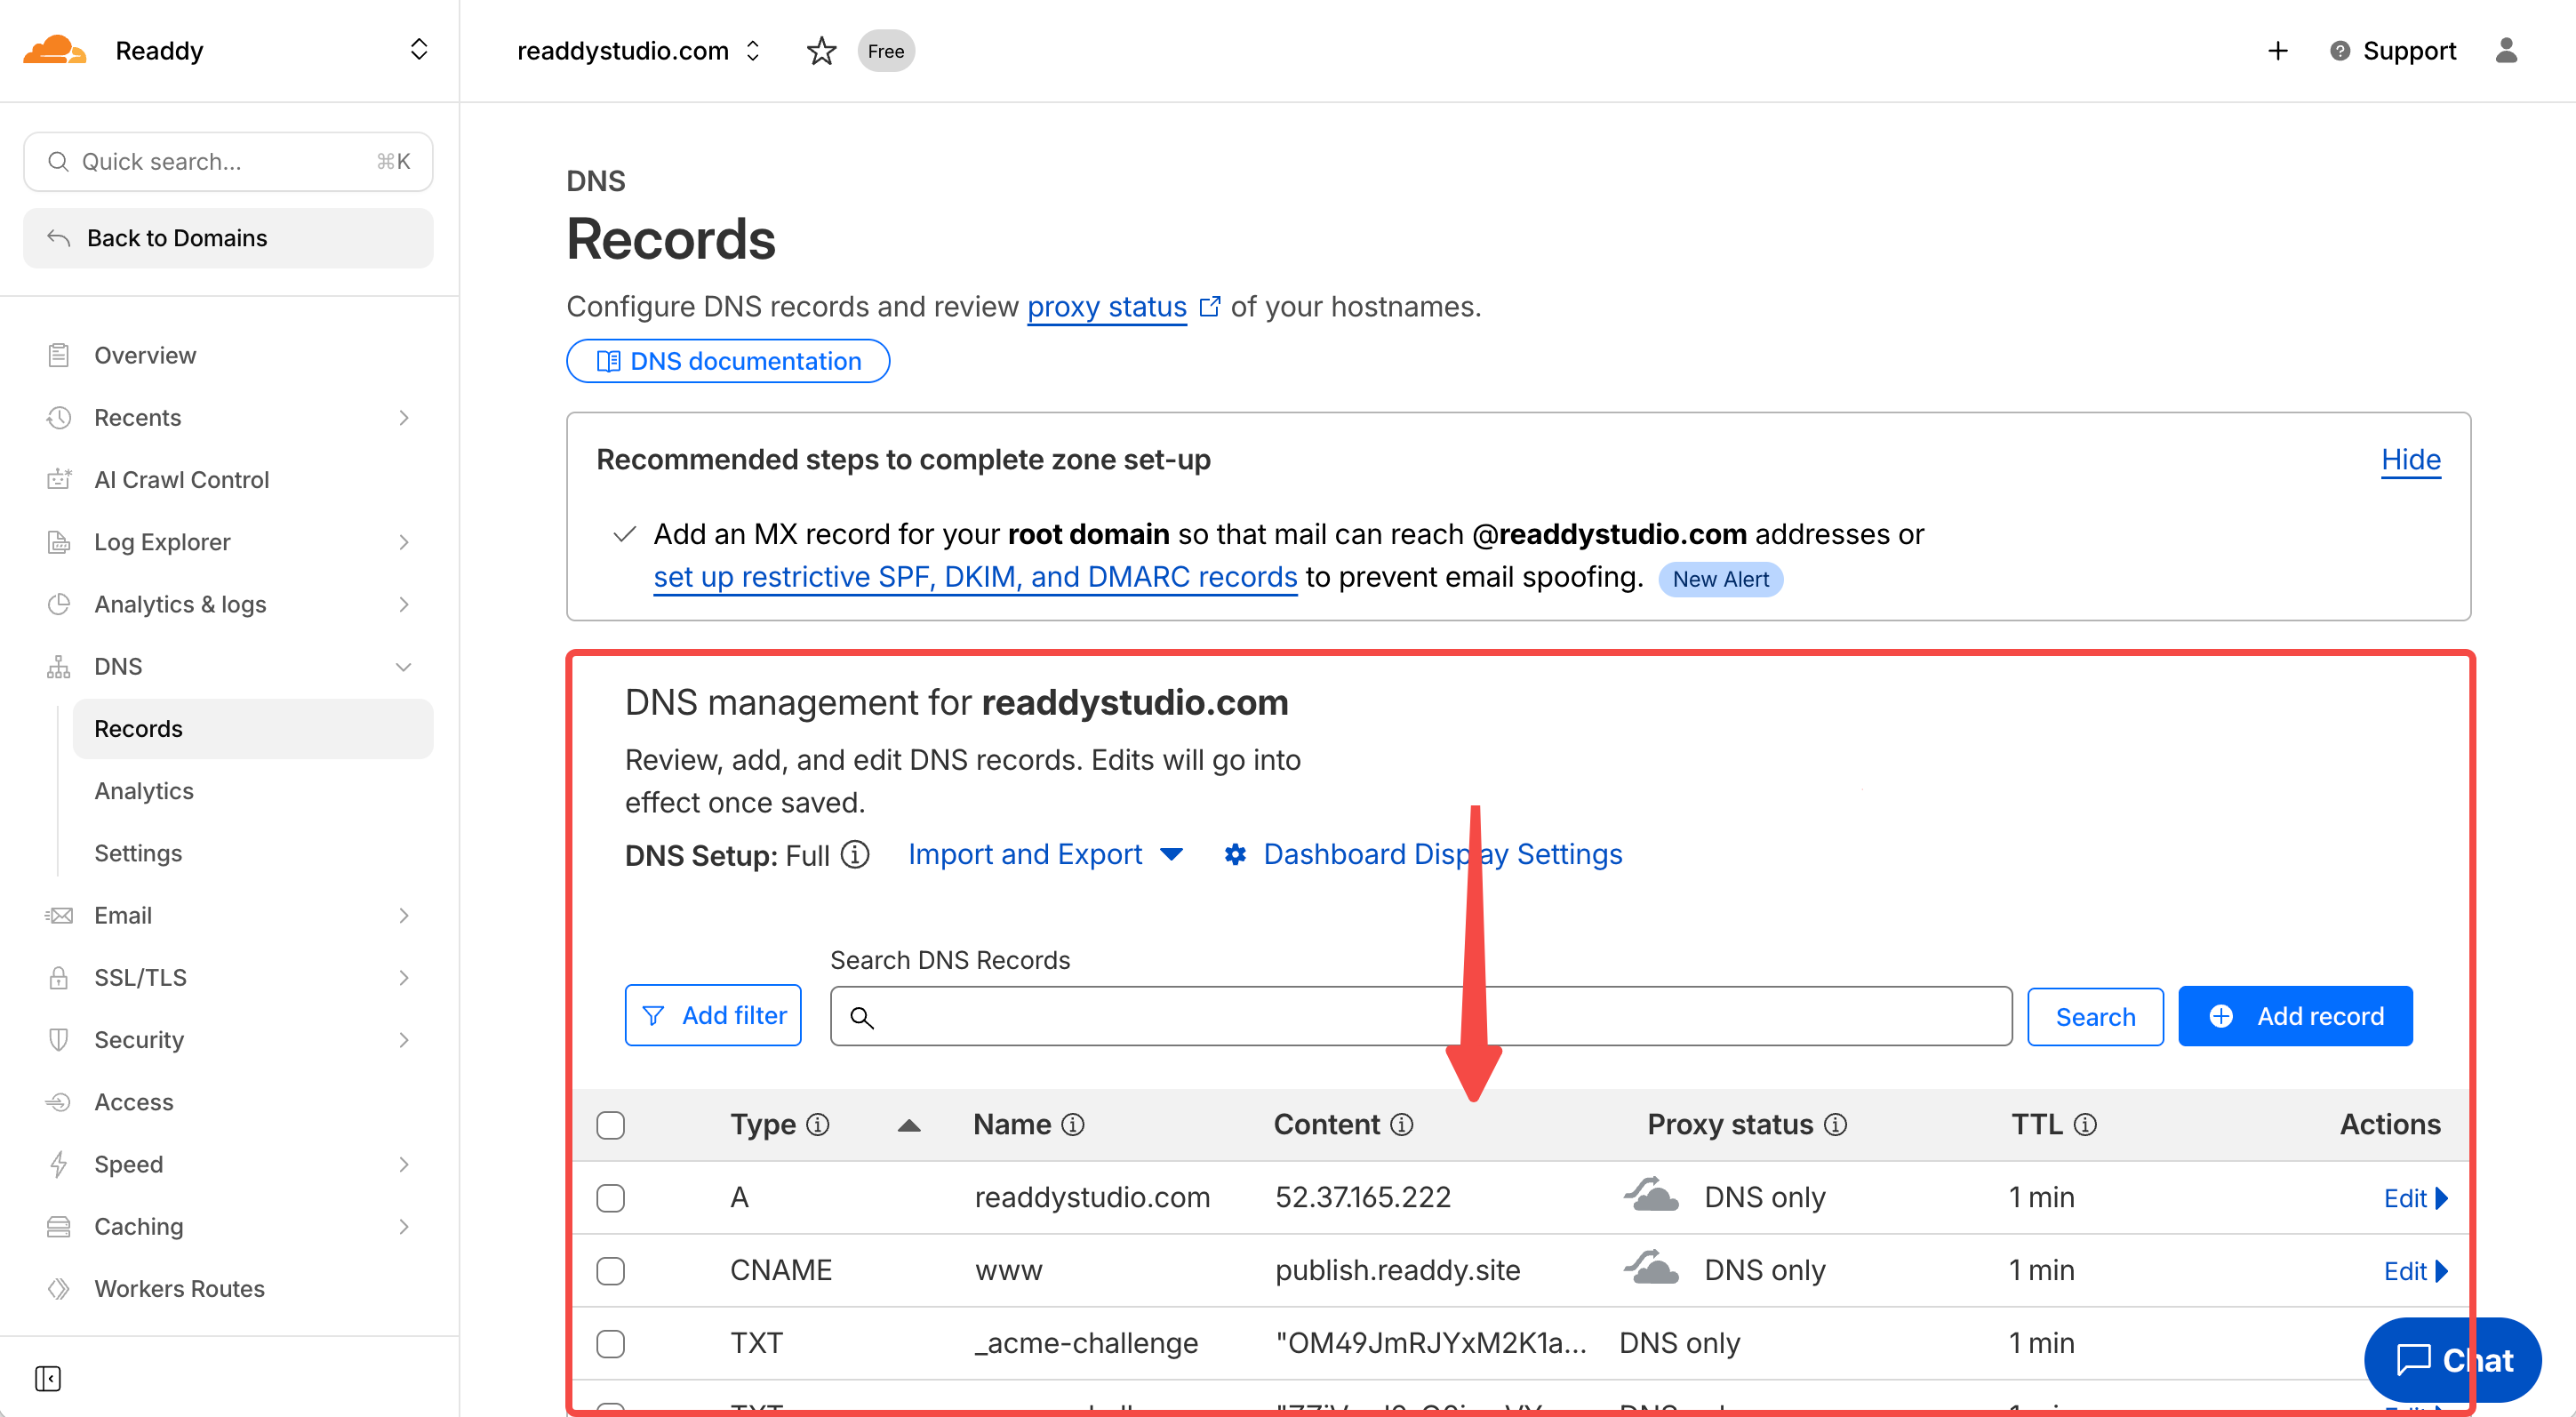 **Step 3: Update your DNS records**
Based on your domain, you need to update these three types of DNS records: **A**, **CNAME**, **TXT** (subject to what is actually displayed on the Readdy interface).
* If you connect a root domain, such as `xxxxxx.com`,you need to update A + TXT
* If you connect a subdomain, such as `www.xxxxxx.com`,you need to update CNAME + TXT
Here we'll use an **A** record as an example; the update process for **CNAME** and **TXT** is exactly the same.
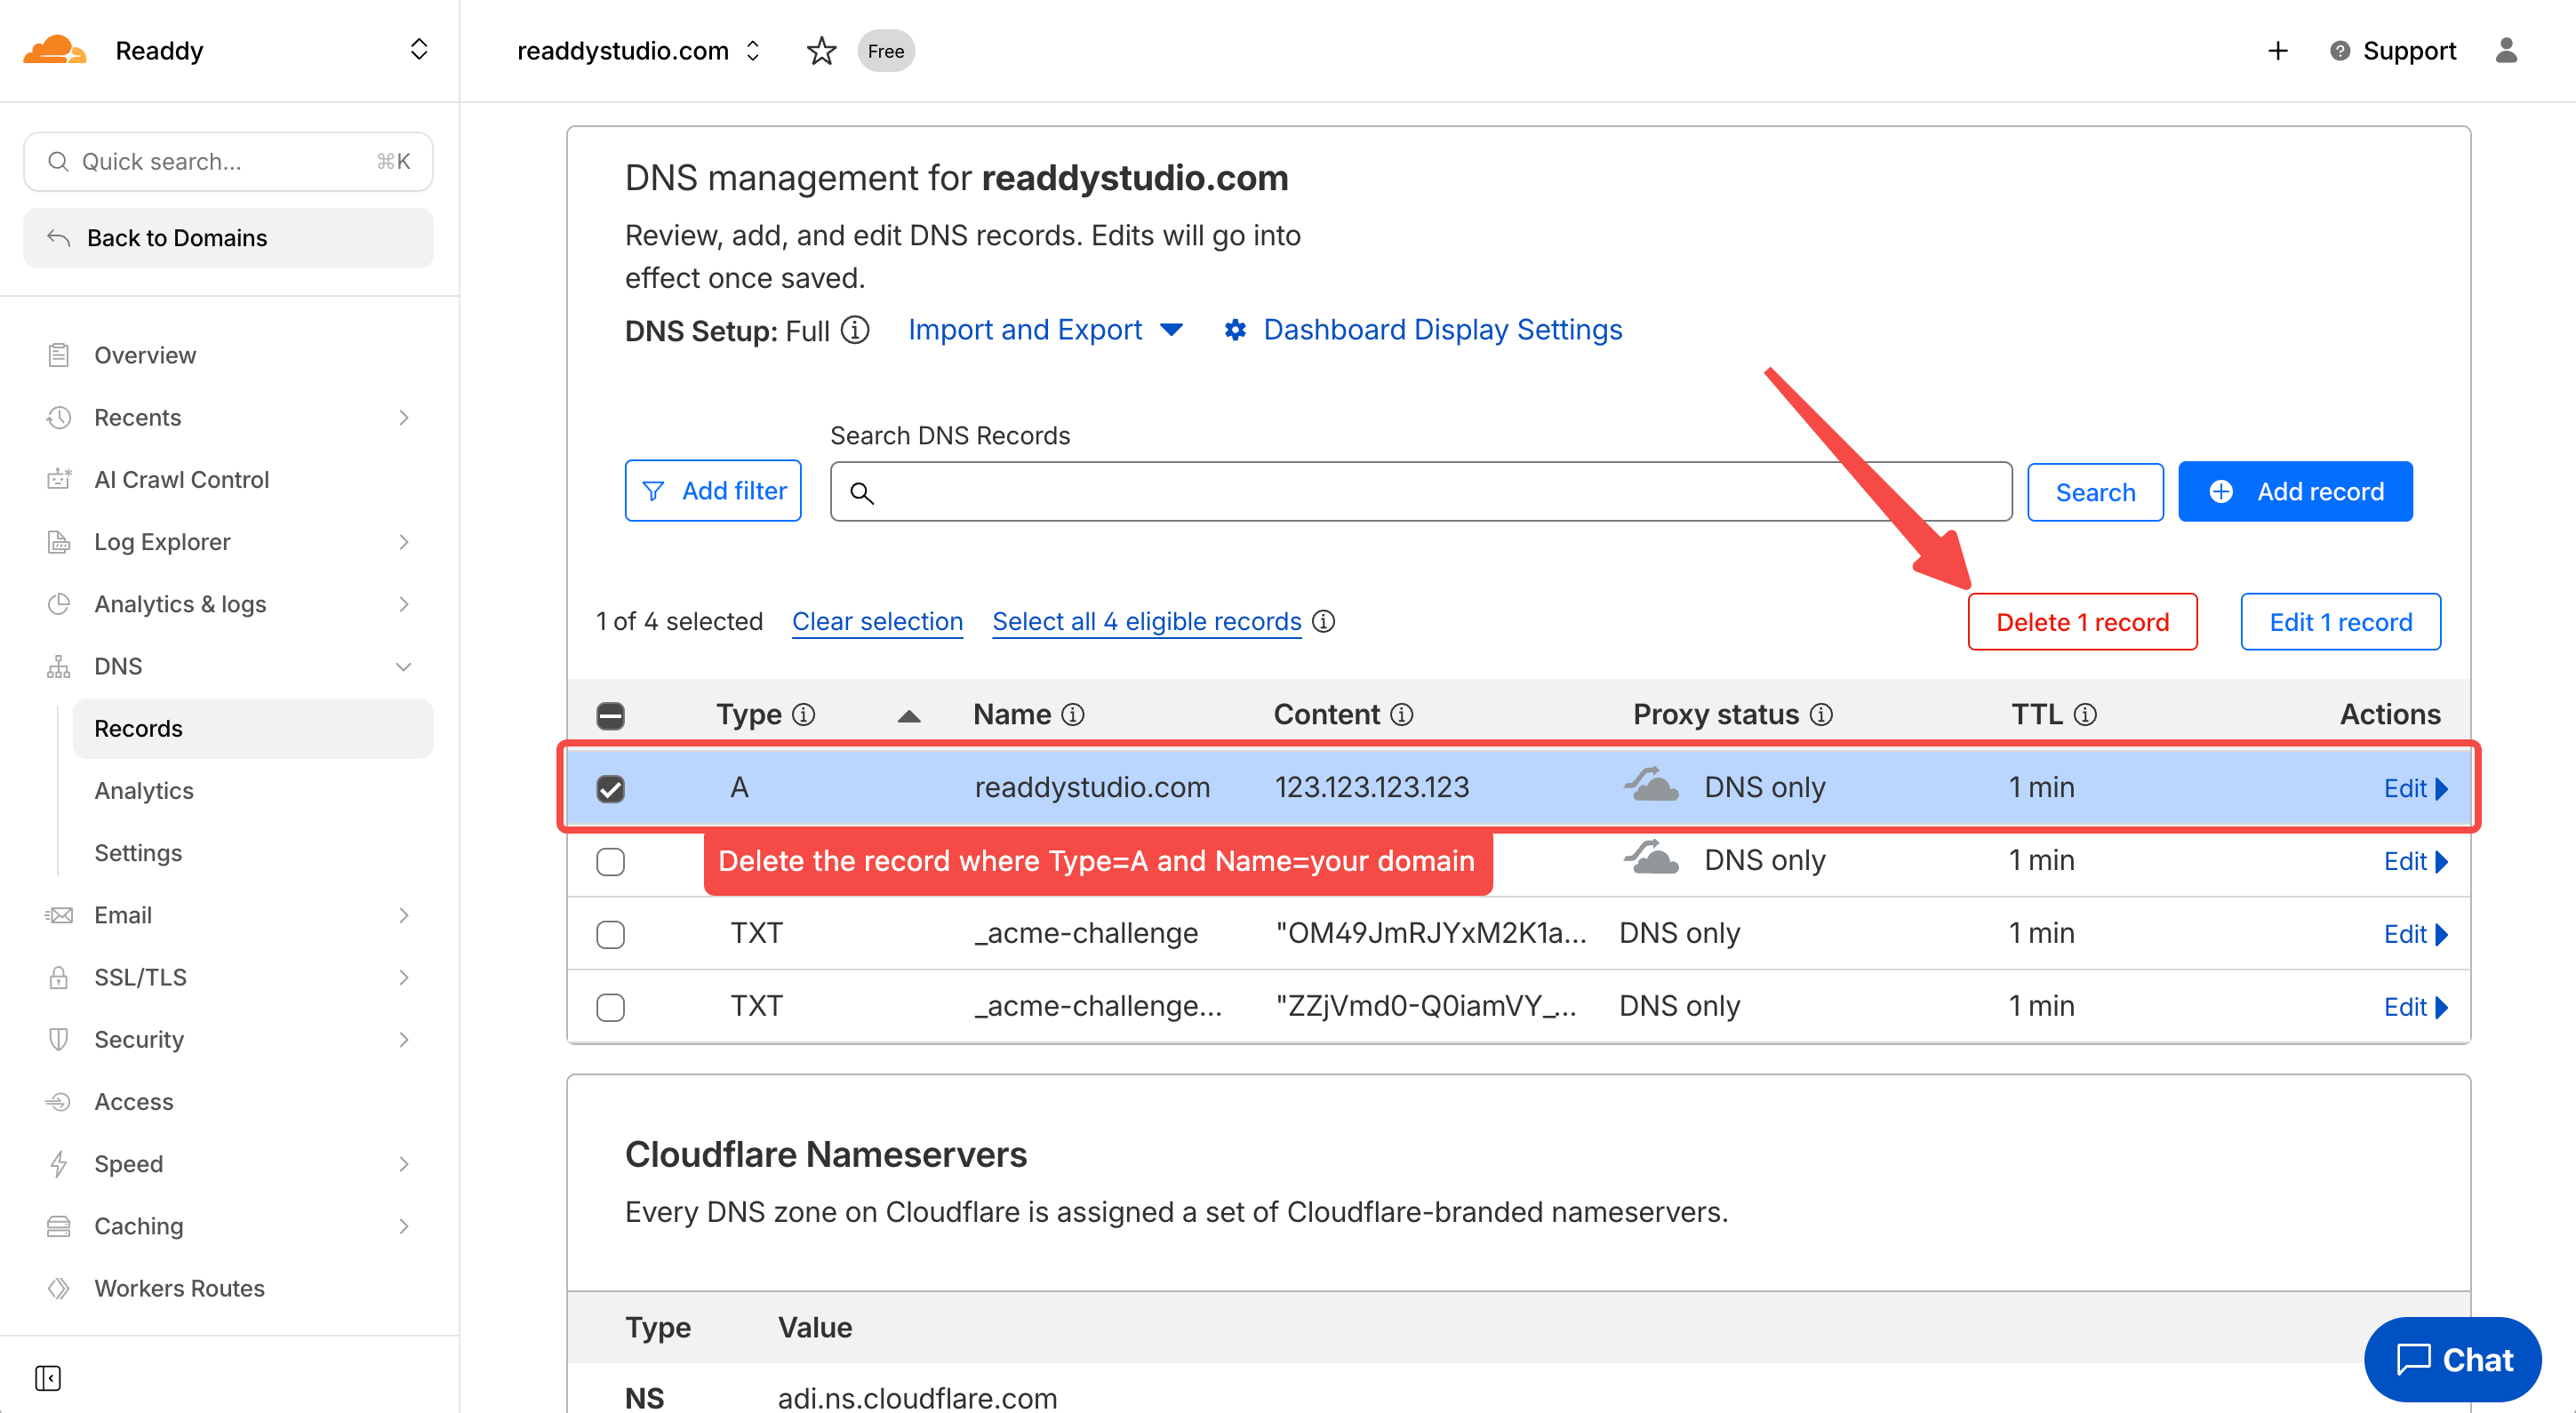
First, you need to delete the old records where **Type=A** and **Name="your domain"** that may cause conflicts.
**Step 3: Update your DNS records**
Based on your domain, you need to update these three types of DNS records: **A**, **CNAME**, **TXT** (subject to what is actually displayed on the Readdy interface).
* If you connect a root domain, such as `xxxxxx.com`,you need to update A + TXT
* If you connect a subdomain, such as `www.xxxxxx.com`,you need to update CNAME + TXT
Here we'll use an **A** record as an example; the update process for **CNAME** and **TXT** is exactly the same.
First, you need to delete the old records where **Type=A** and **Name="your domain"** that may cause conflicts.
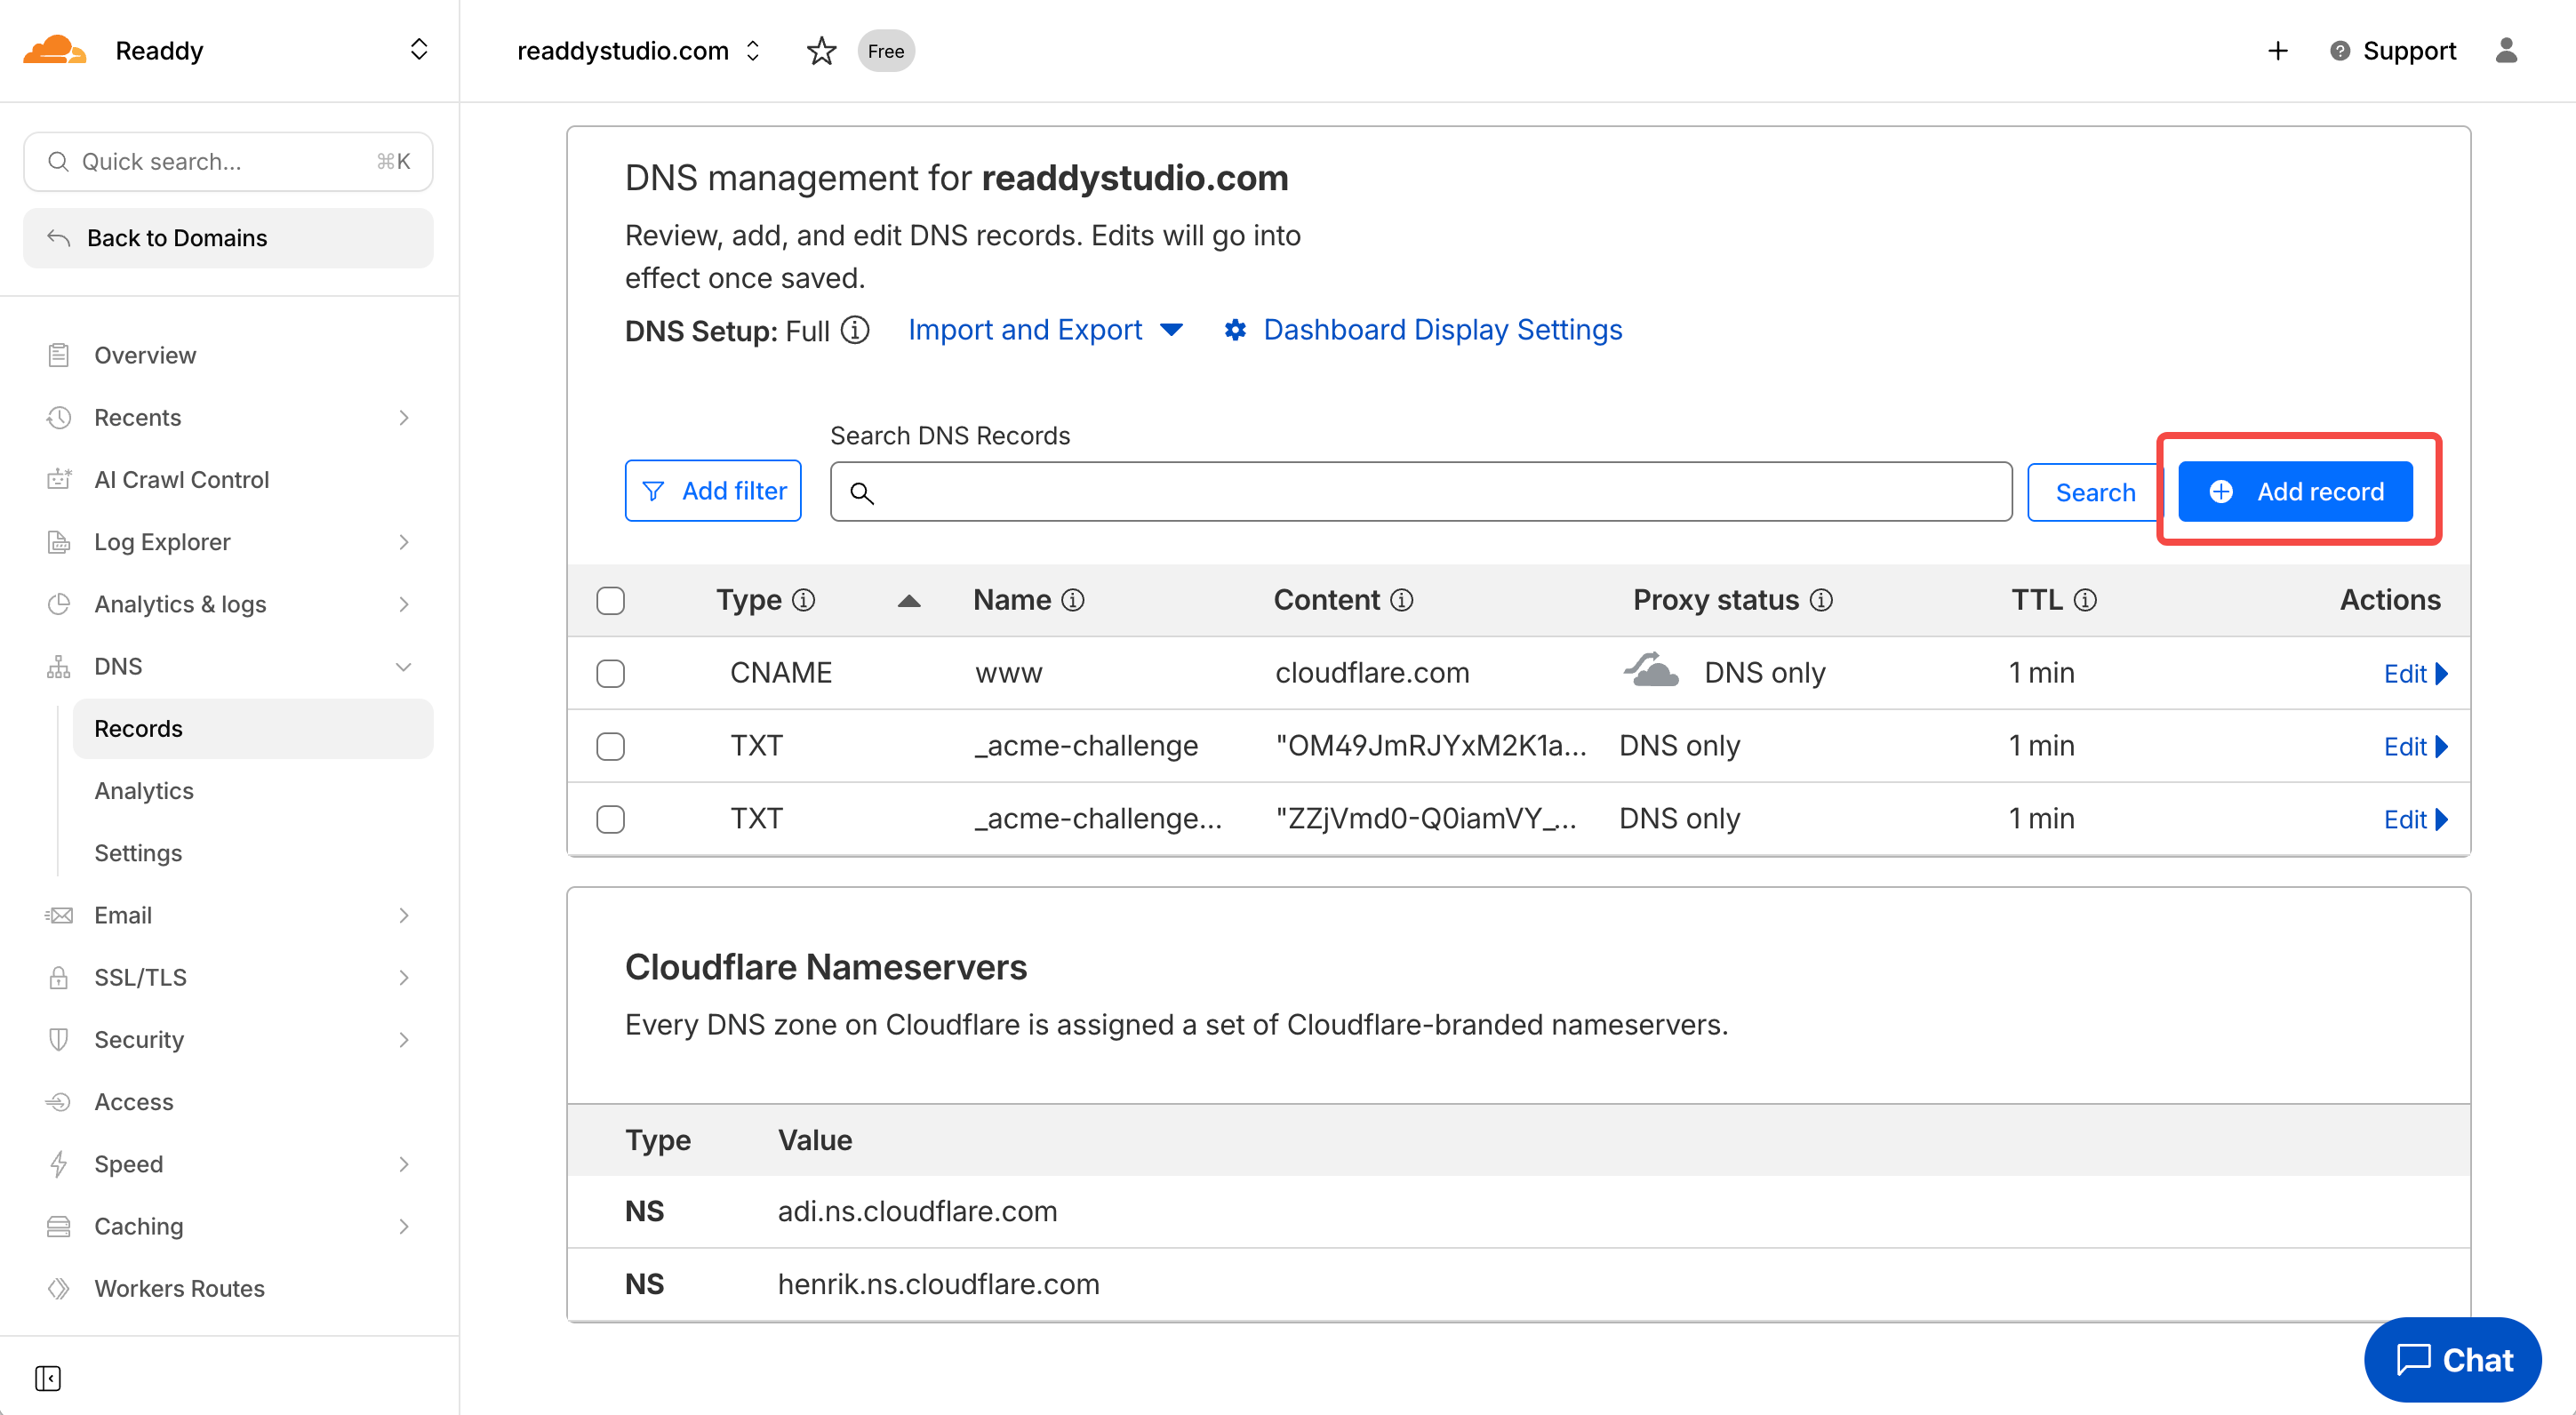
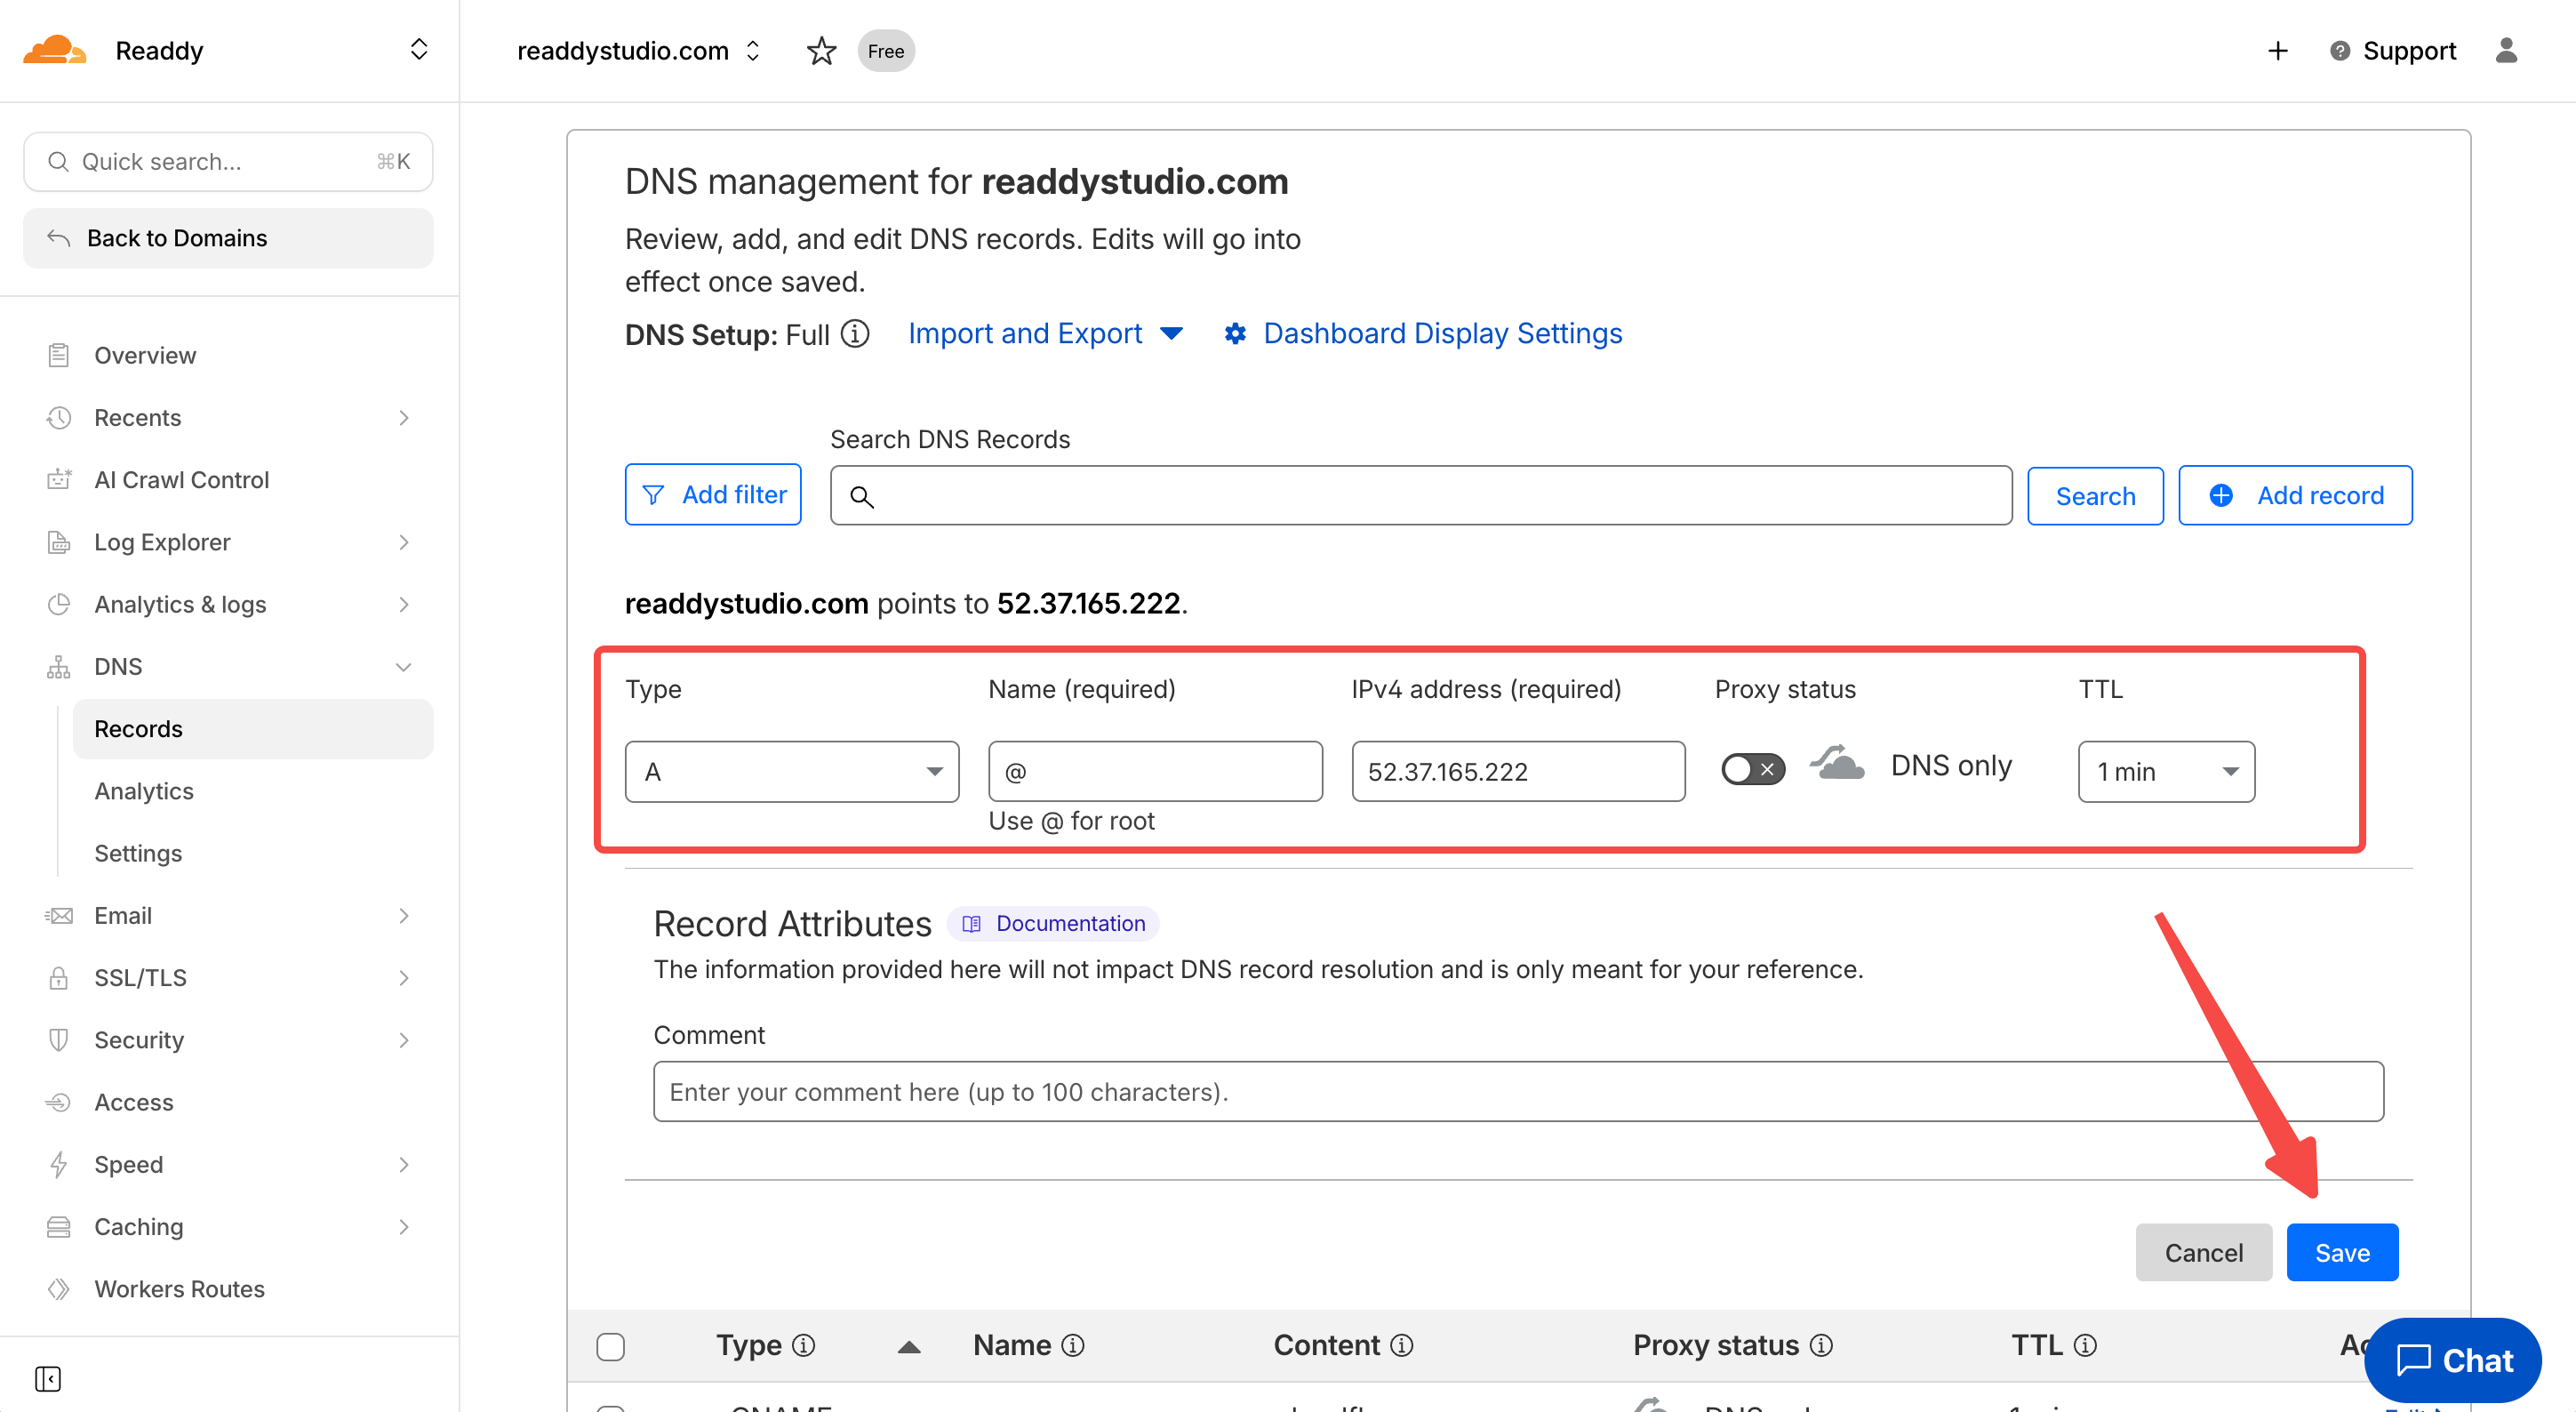
 **Then add a new record:**
> Type: A\
> Name: @\
> IPv4 address (Value): 52.37.165.222\
> TTL: 1 min\
> And very importent: switch Proxy status from Proxied to **DNS only**
**Then add a new record:**
> Type: A\
> Name: @\
> IPv4 address (Value): 52.37.165.222\
> TTL: 1 min\
> And very importent: switch Proxy status from Proxied to **DNS only**
 Based on the content displayed on the Readdy interface, if there are additional **TXT** or **CNAME** records that need to be updated, use the same method to update them: delete all records with the same Type and Name, and add the required records.
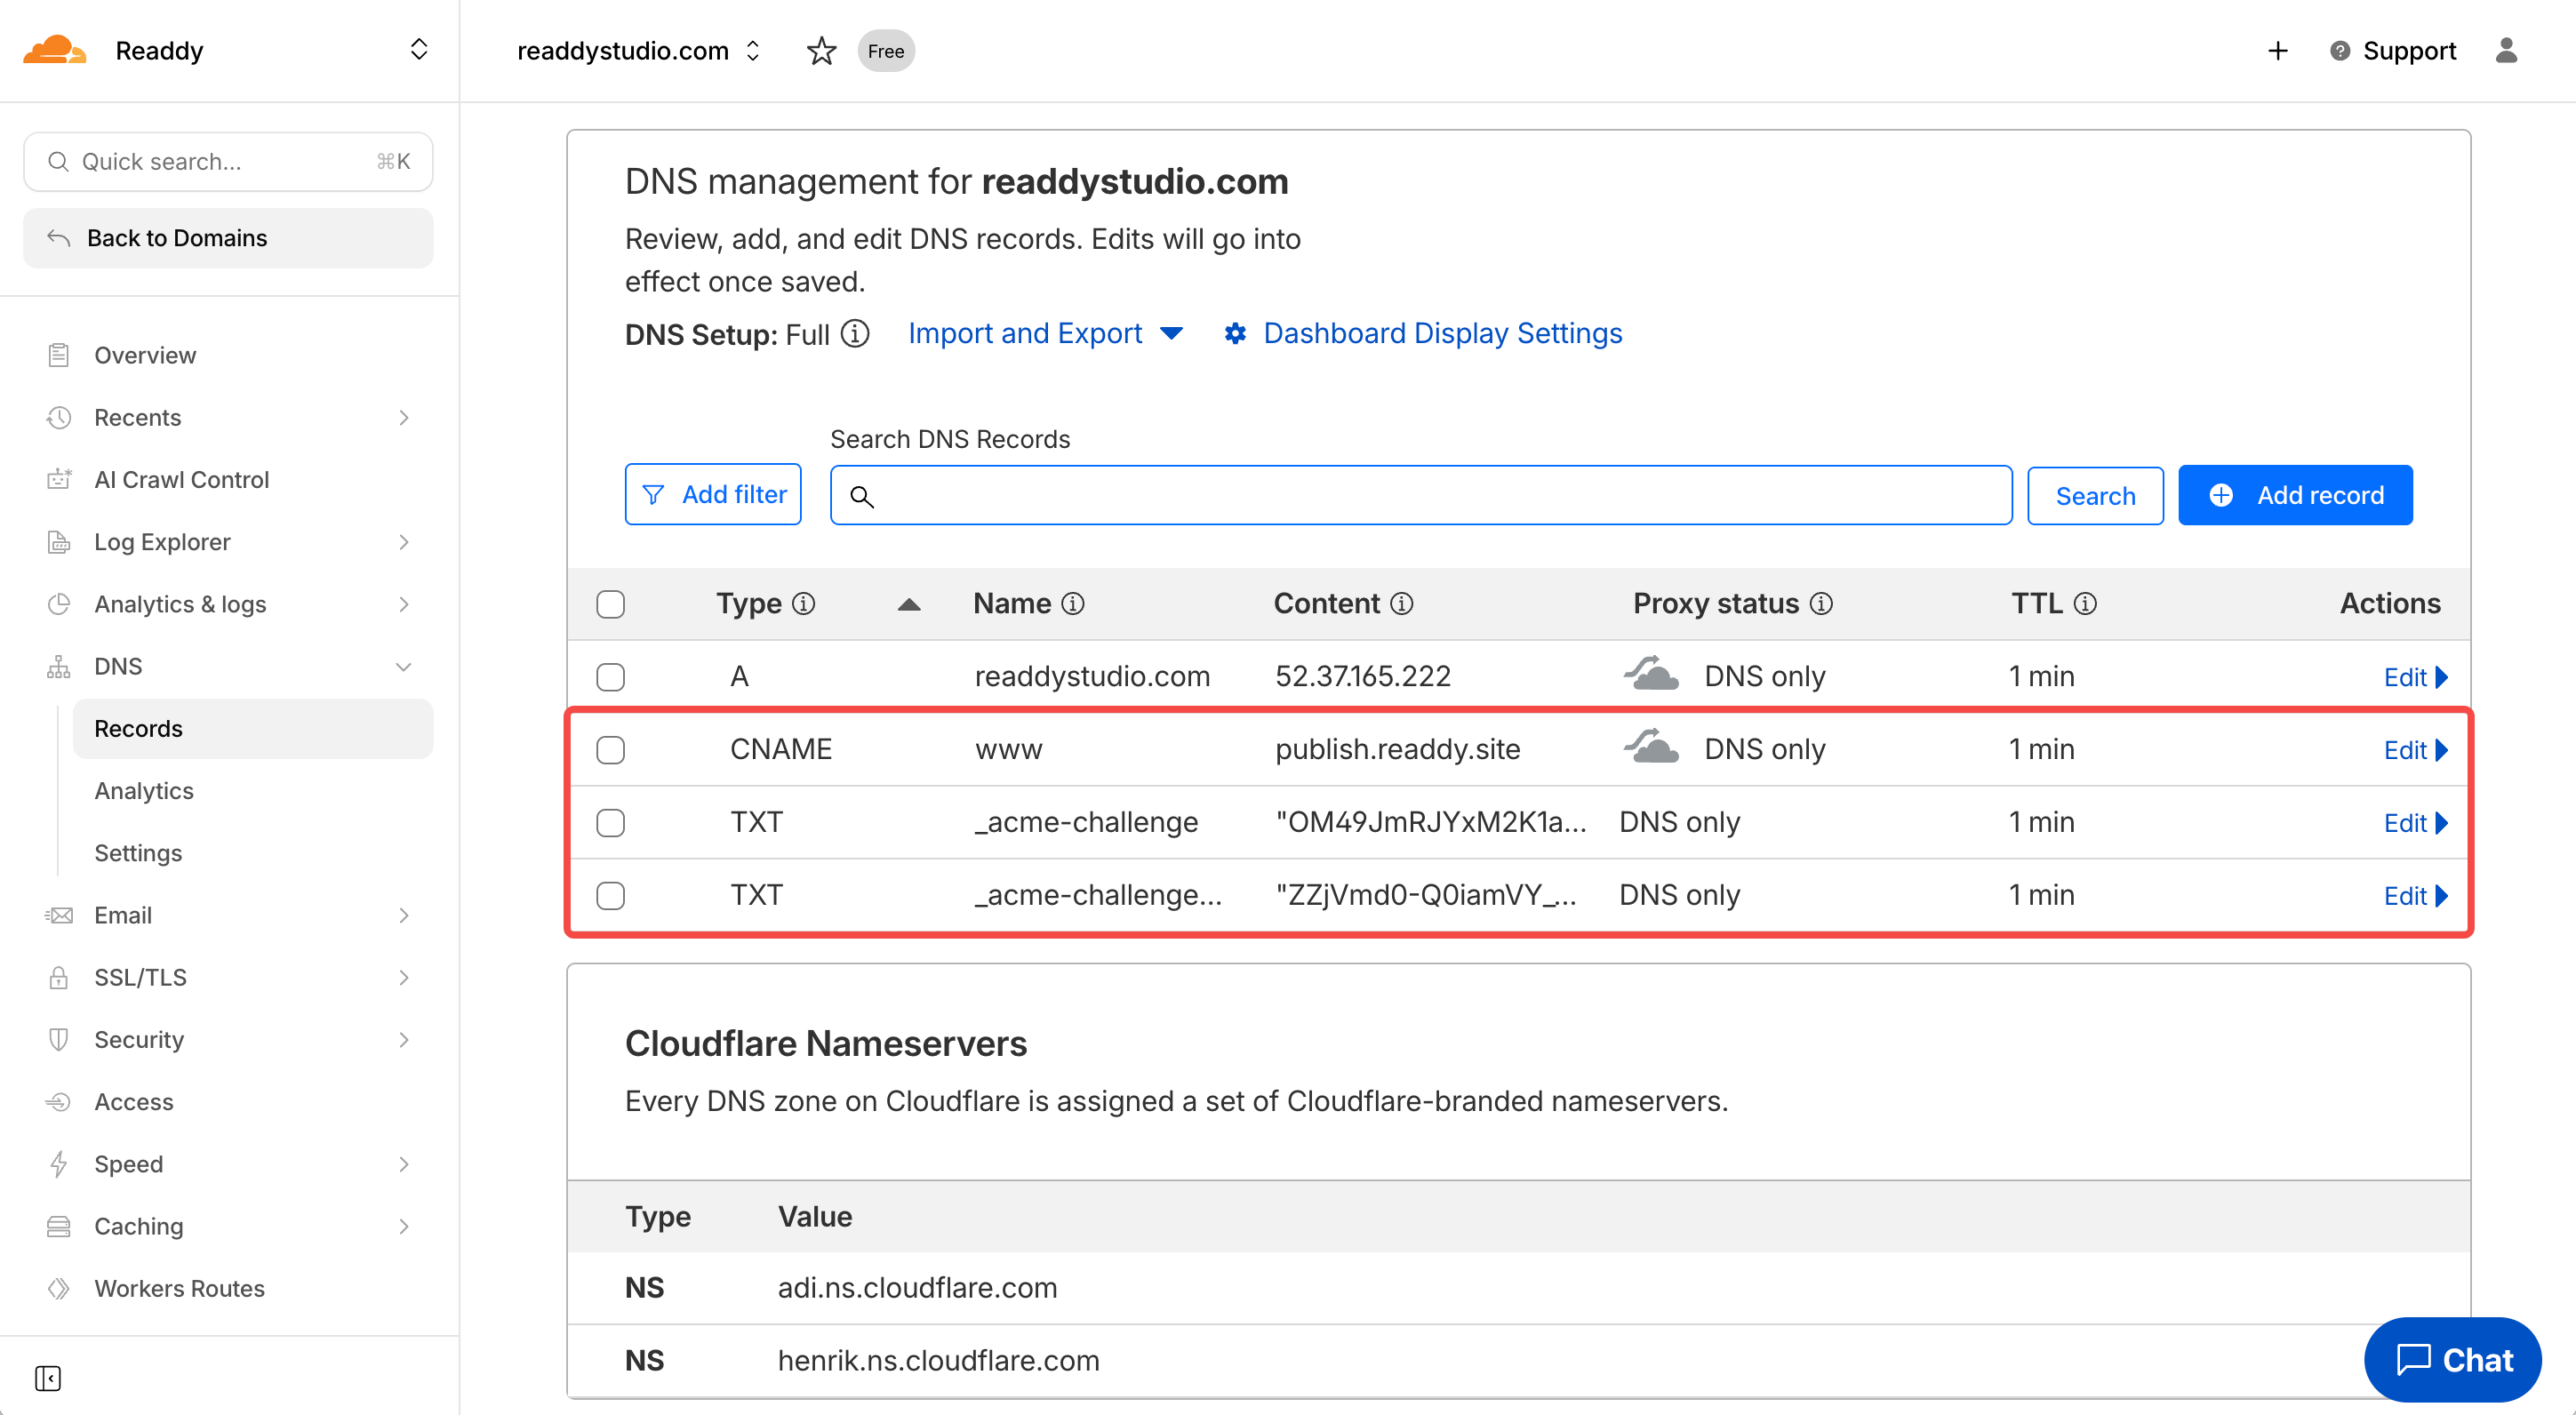 After updating all records, you will have completed the domain DNS configuration. Please return to Readdy, click **I've added the records** and continue.
**Step 1: Log in to Cloudflare**
* Open a new tab in your browser, go to [www.namecheap.com](http://www.namecheap.com) and log in. Locate Account in the top-right corner of the page, and click **Domain list**, you will see your domain.
After updating all records, you will have completed the domain DNS configuration. Please return to Readdy, click **I've added the records** and continue.
**Step 1: Log in to Cloudflare**
* Open a new tab in your browser, go to [www.namecheap.com](http://www.namecheap.com) and log in. Locate Account in the top-right corner of the page, and click **Domain list**, you will see your domain.
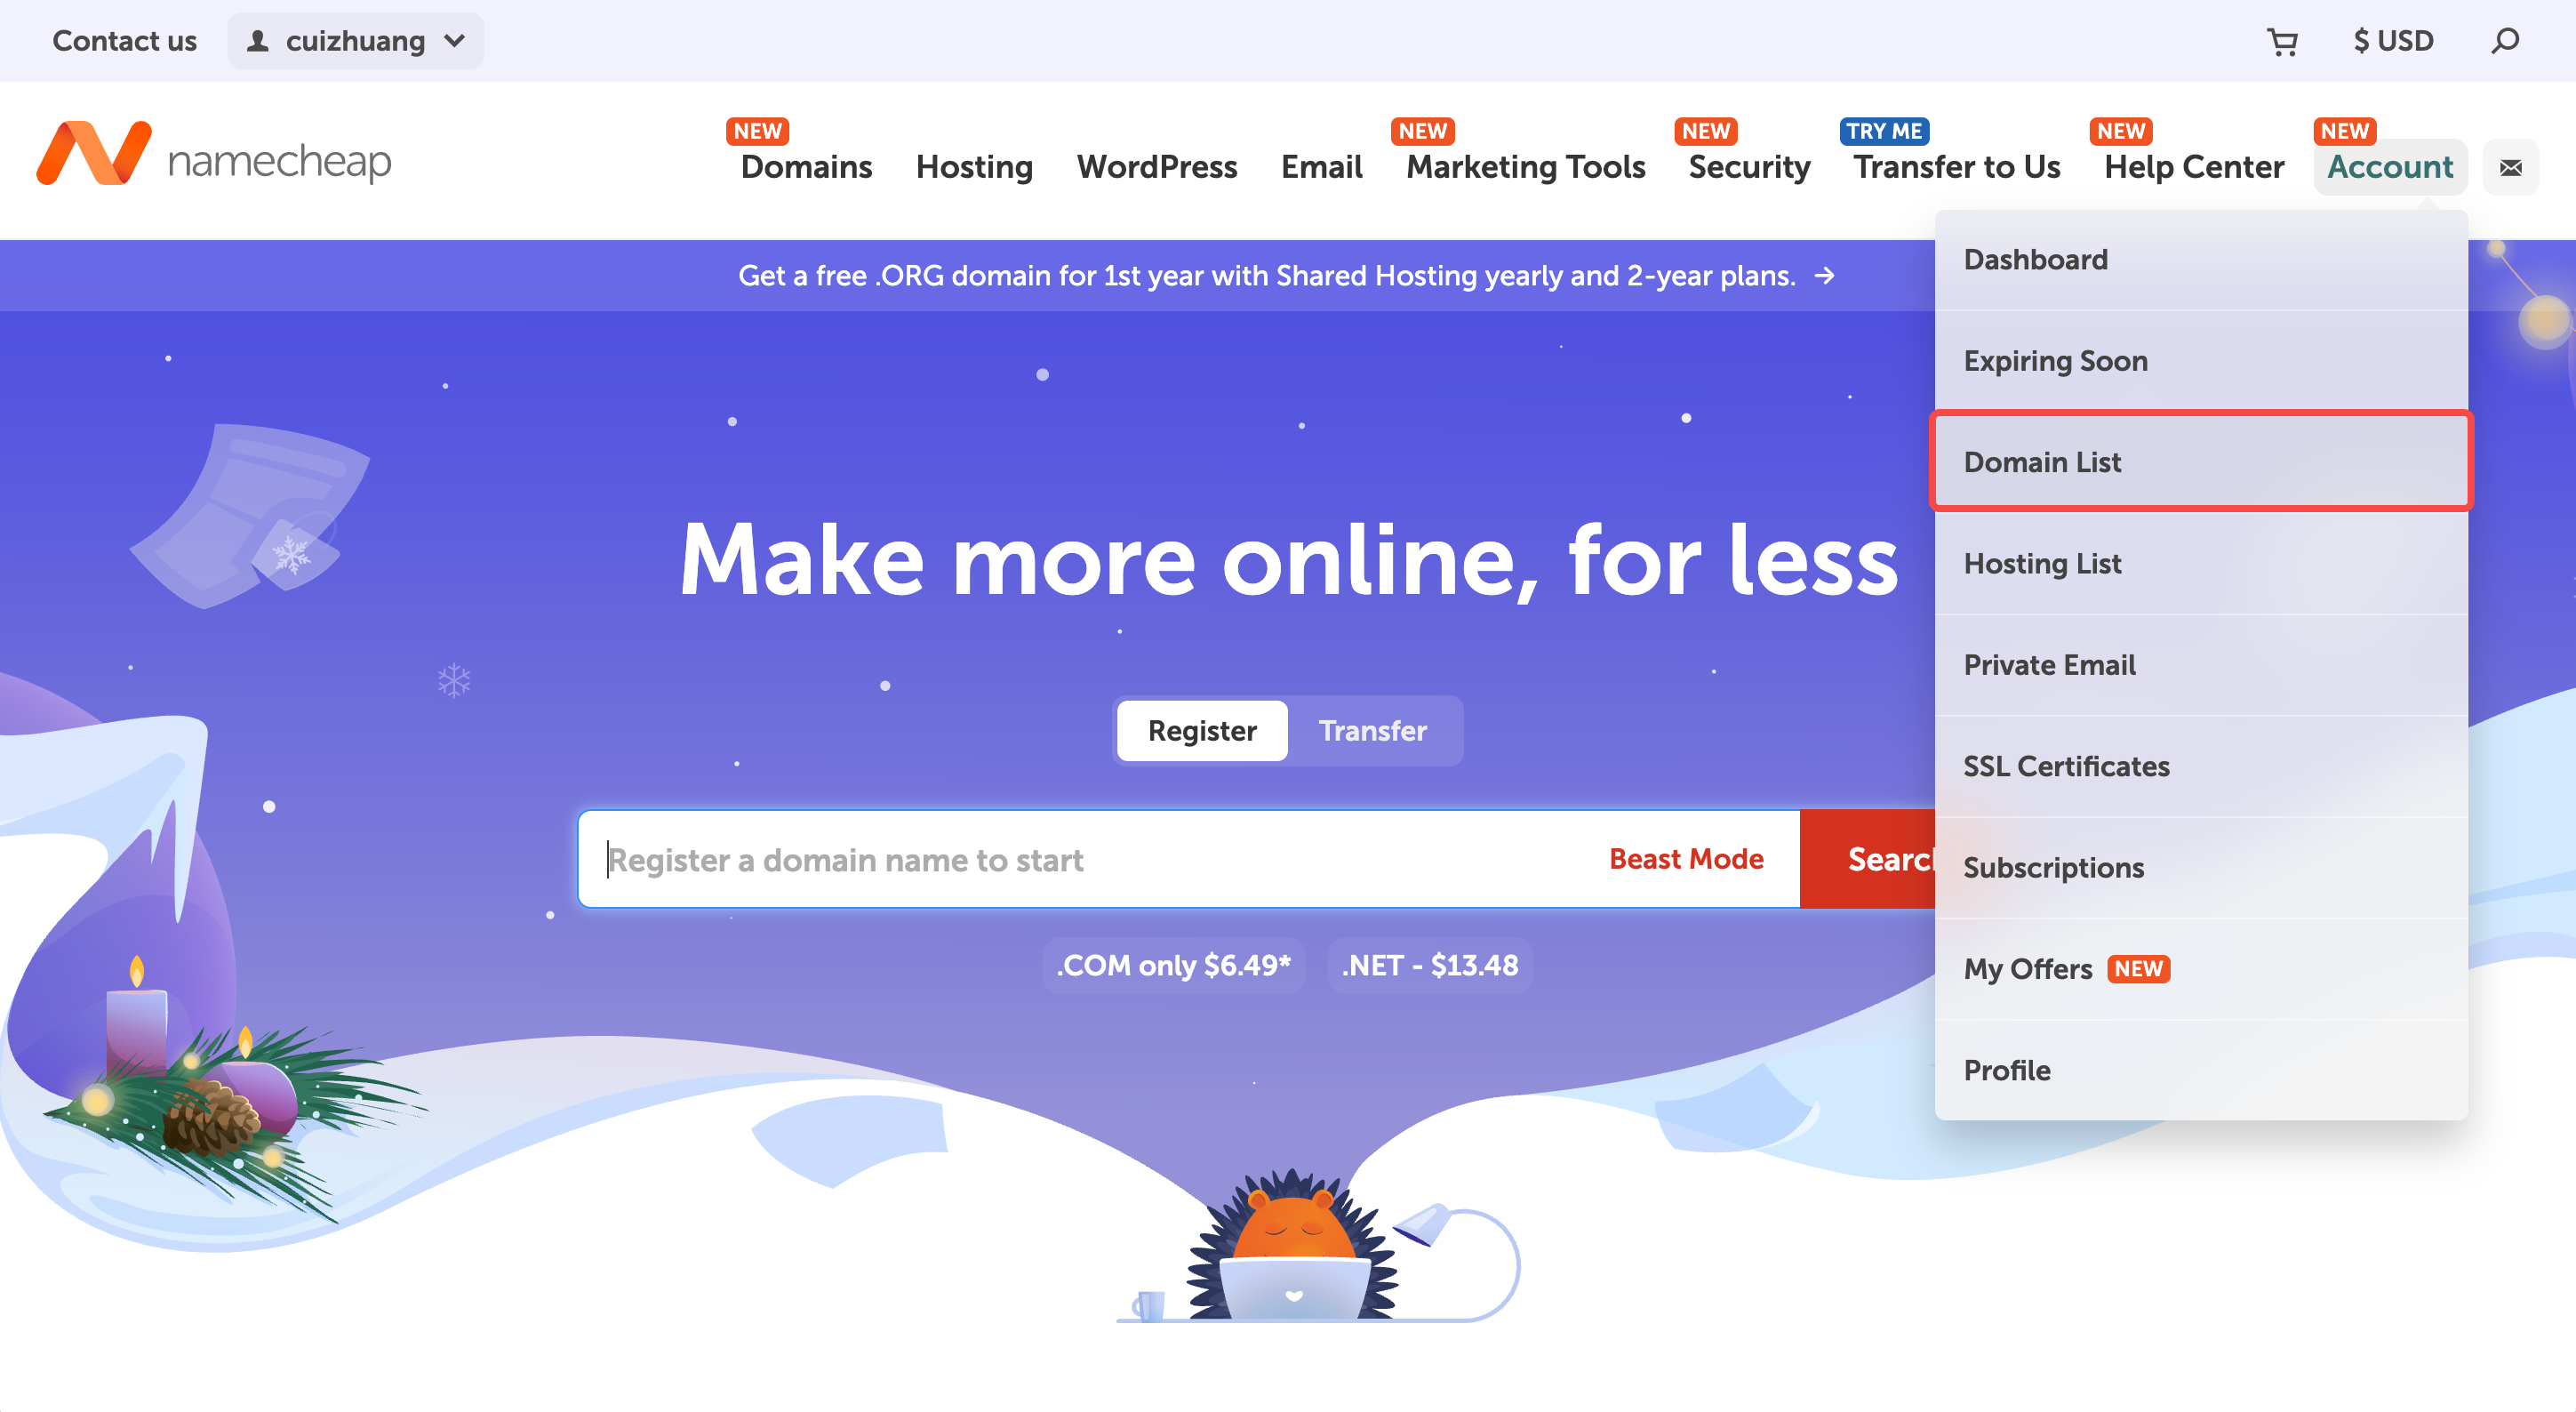 **Step 2: Find your domain's DNS Management page**
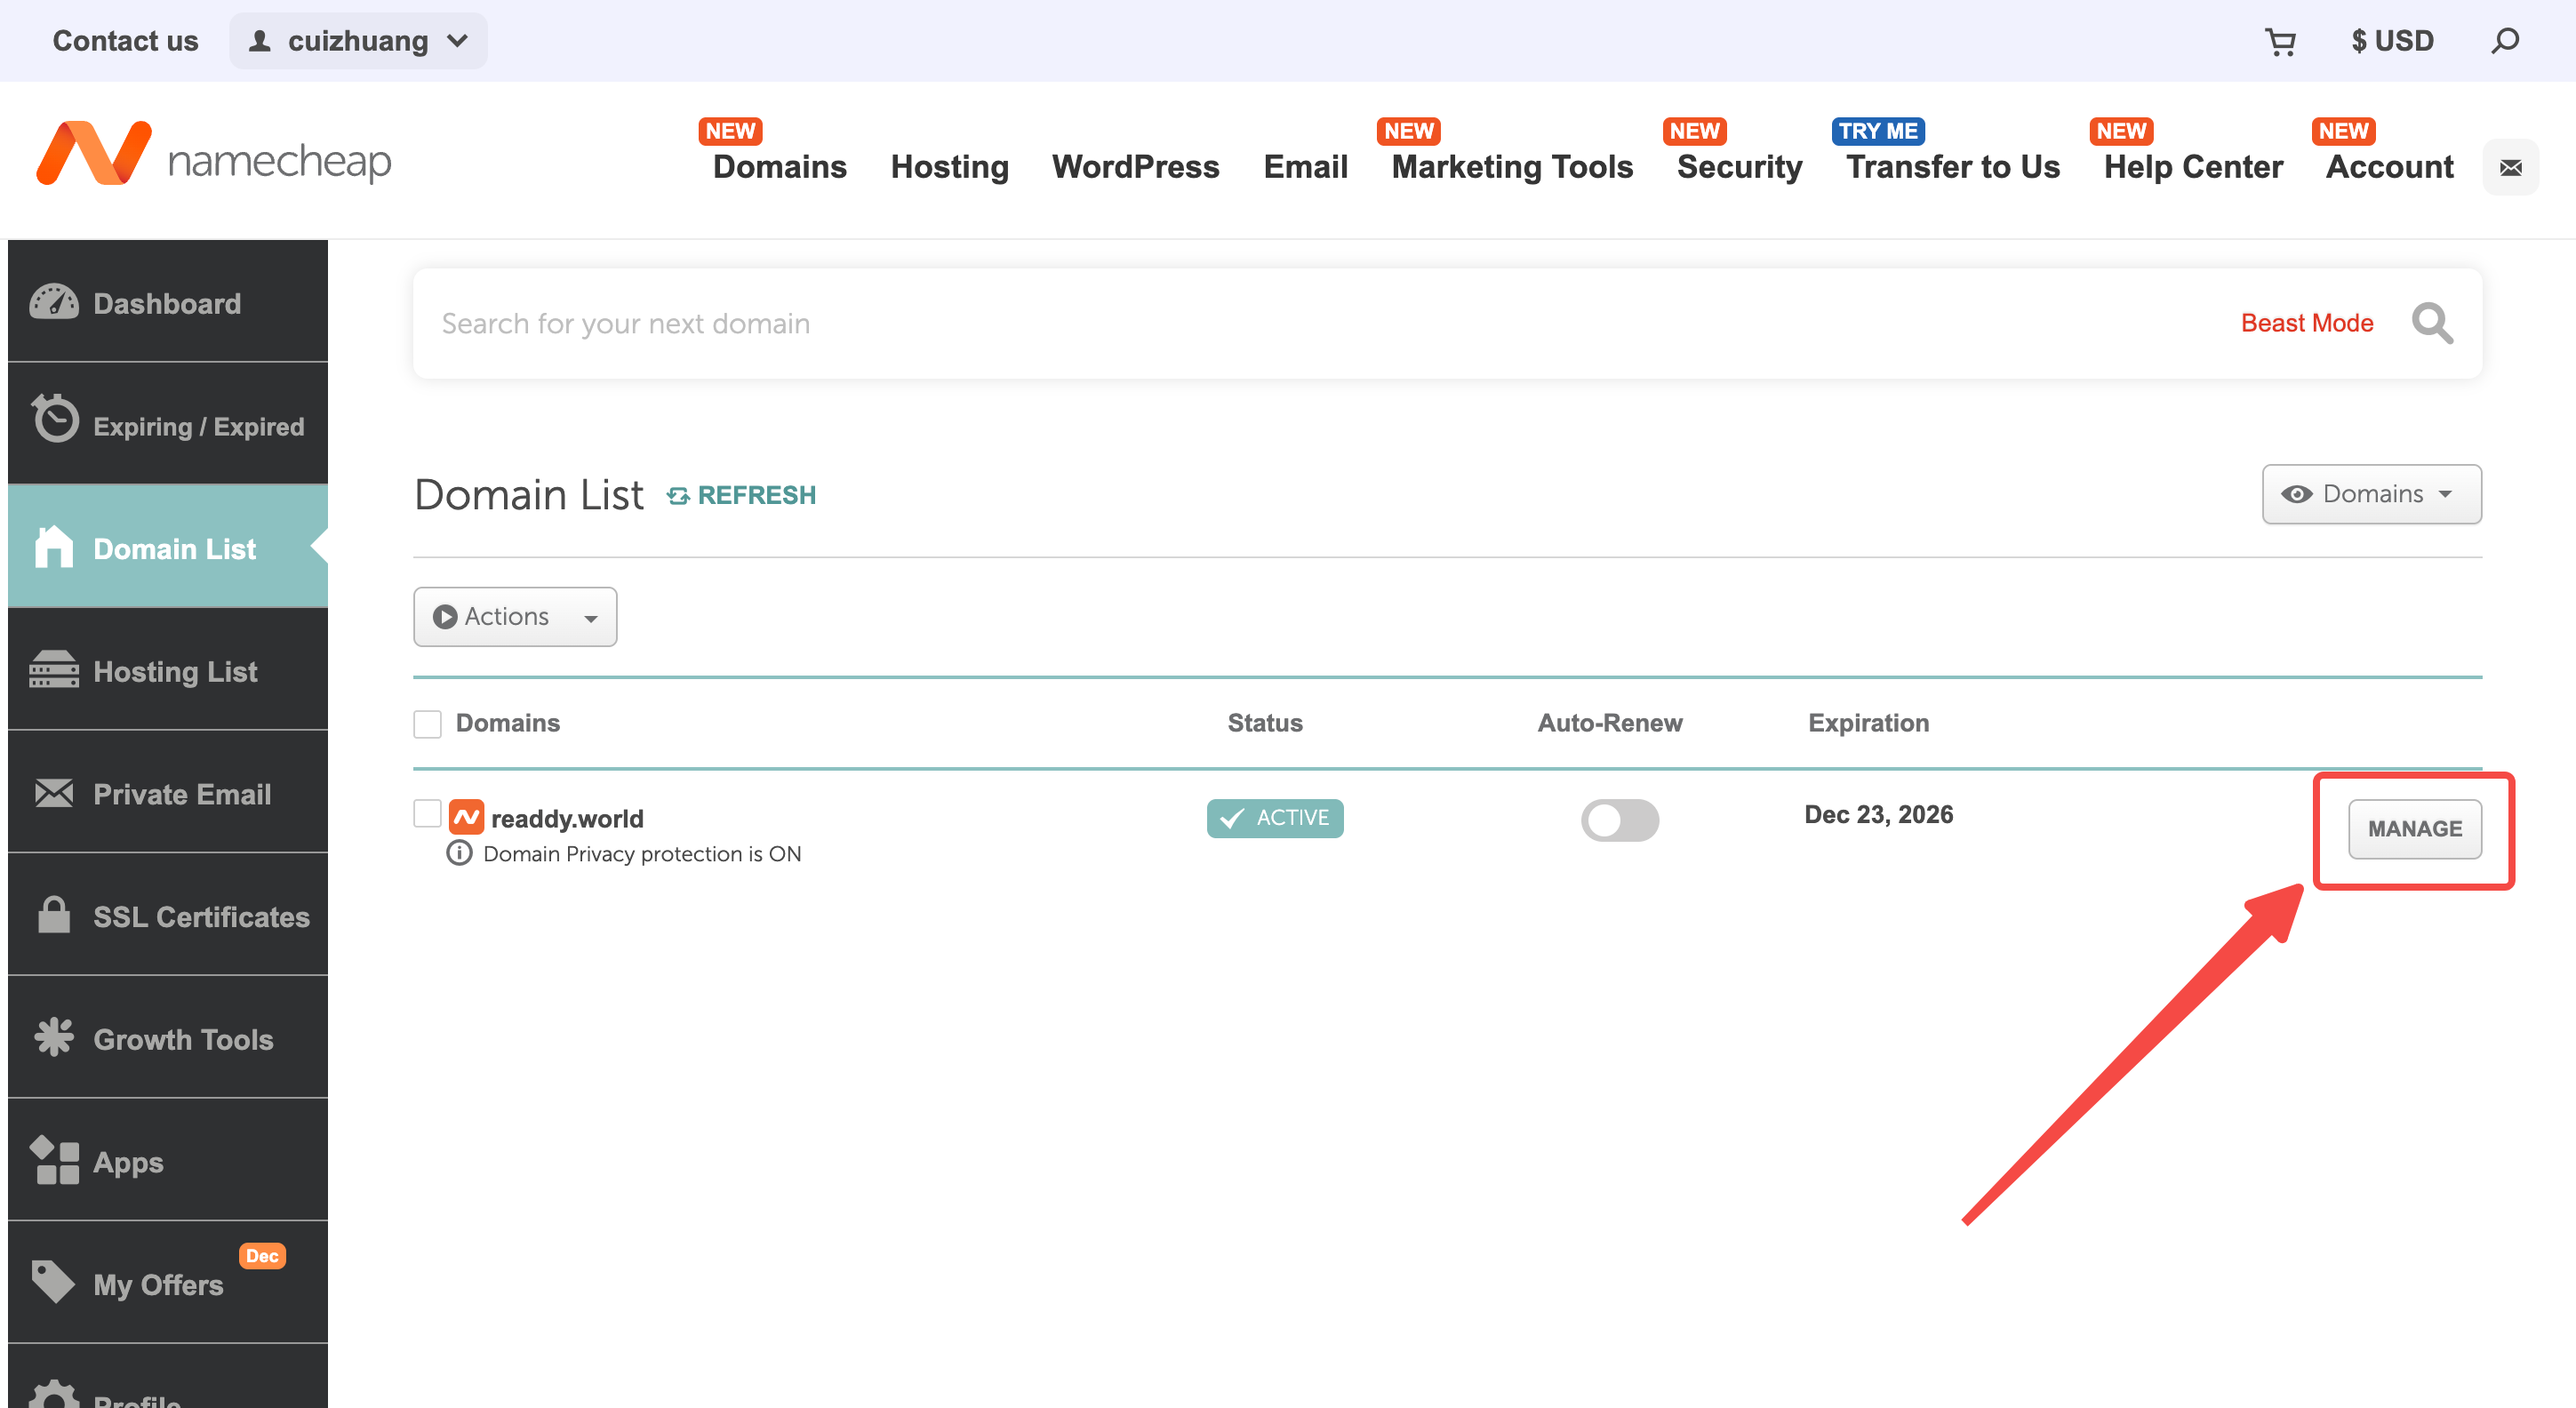
* Find the domain you want to connect and click **MANAGE**.
**Step 2: Find your domain's DNS Management page**
* Find the domain you want to connect and click **MANAGE**.
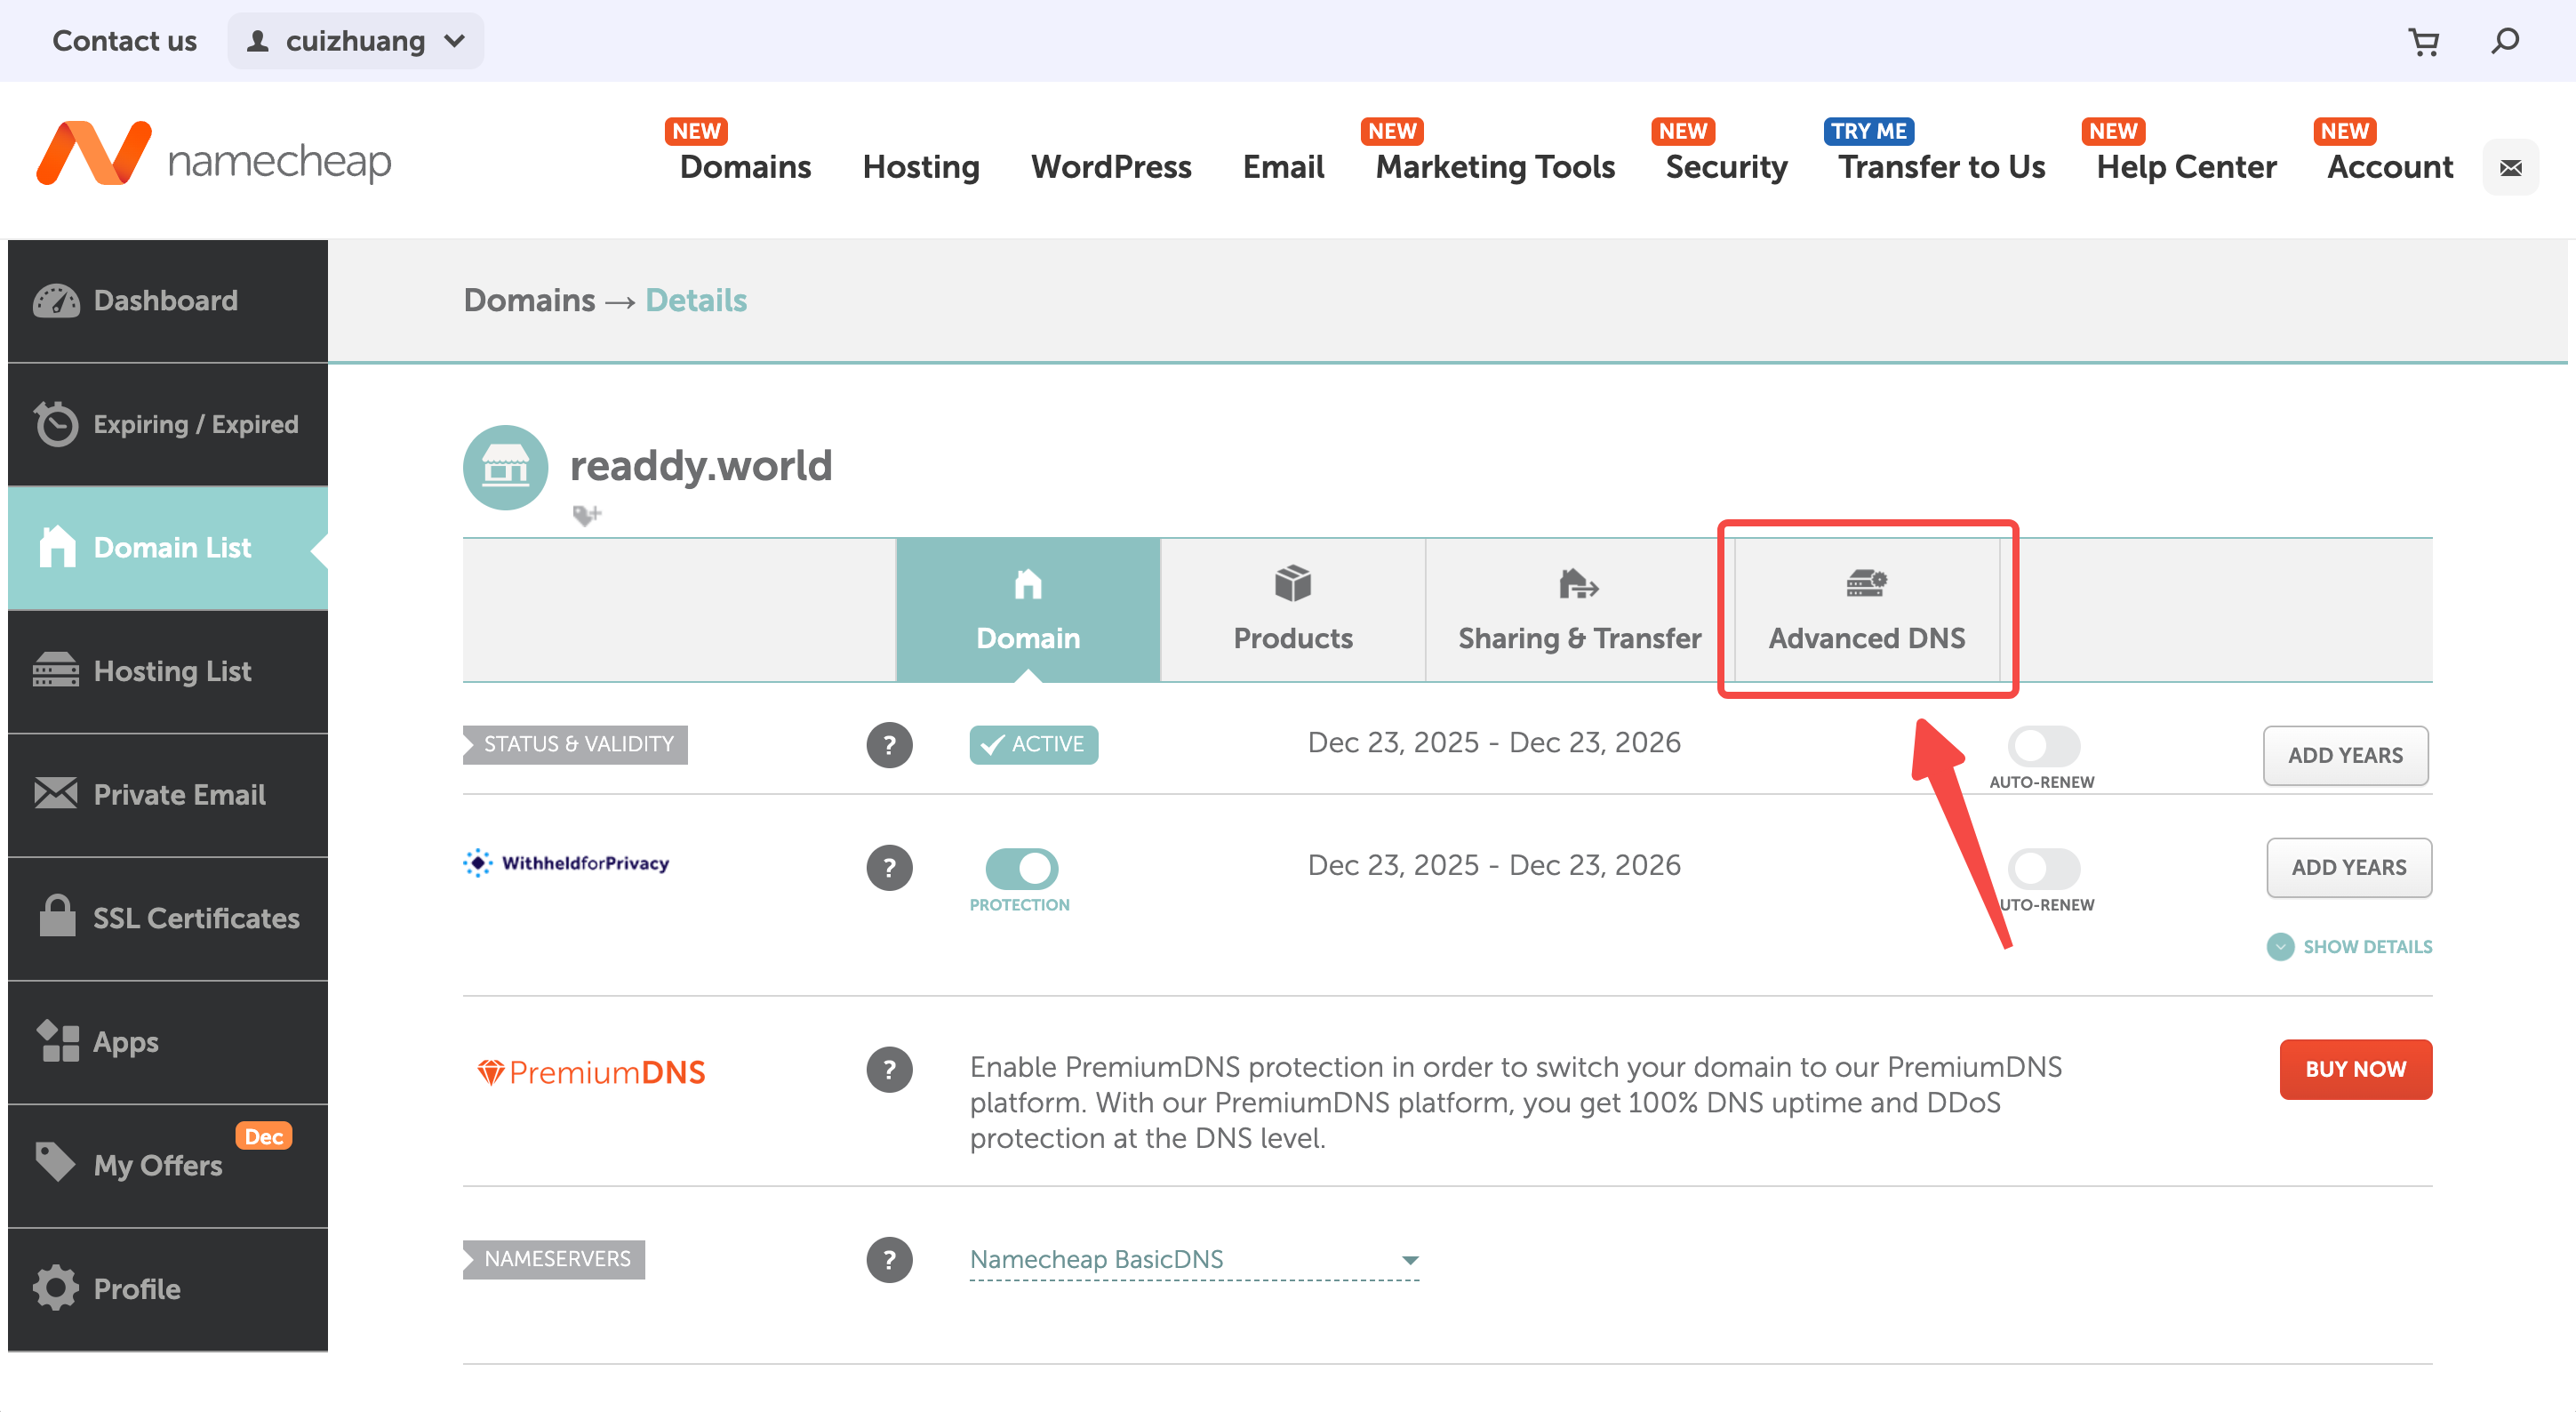
 * Click **Advanced DNS** to access to the DNS management page.
 **Step 3: Update your DNS records**
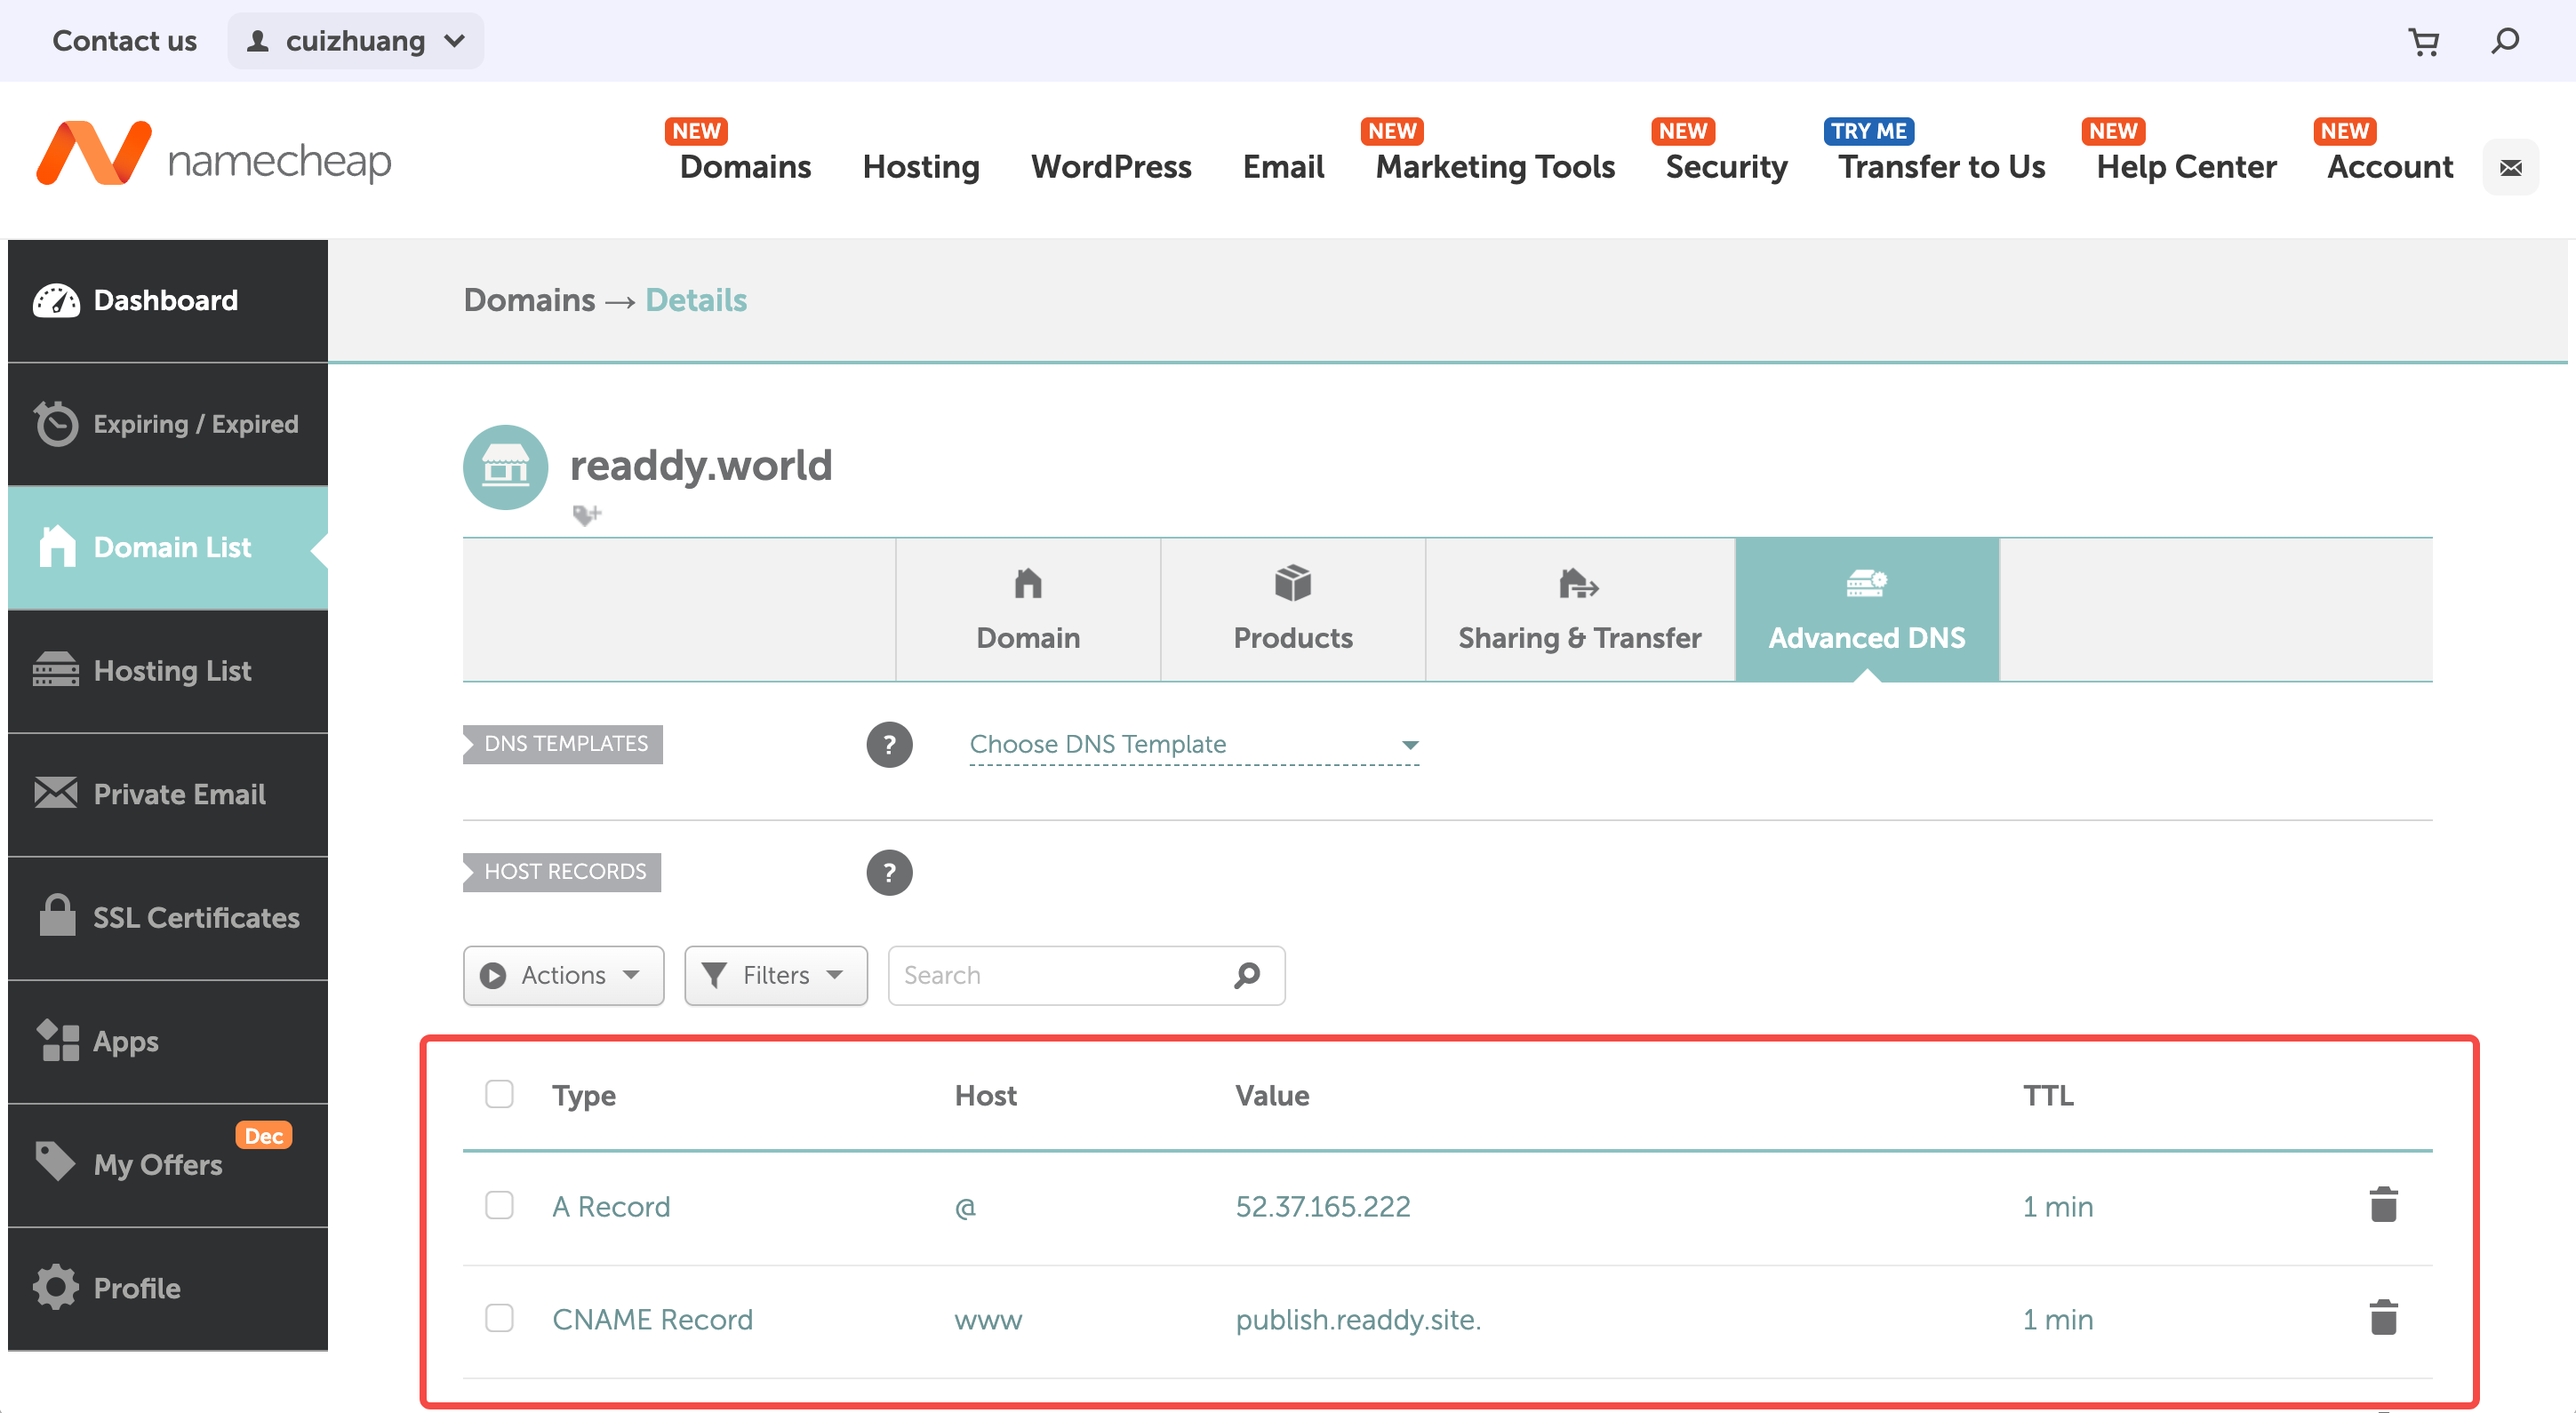
Based on your domain, you need to update these three types of DNS records: **A**, **CNAME**, **TXT** (subject to what is actually displayed on the Readdy interface).
* If you connect a root domain, such as `xxxxxx.com`,you need to update A + TXT
* If you connect a subdomain, such as `www.xxxxxx.com`,you need to update CNAME + TXT
Here we'll use an **A** record as an example; the update process for **CNAME** and **TXT** is exactly the same.
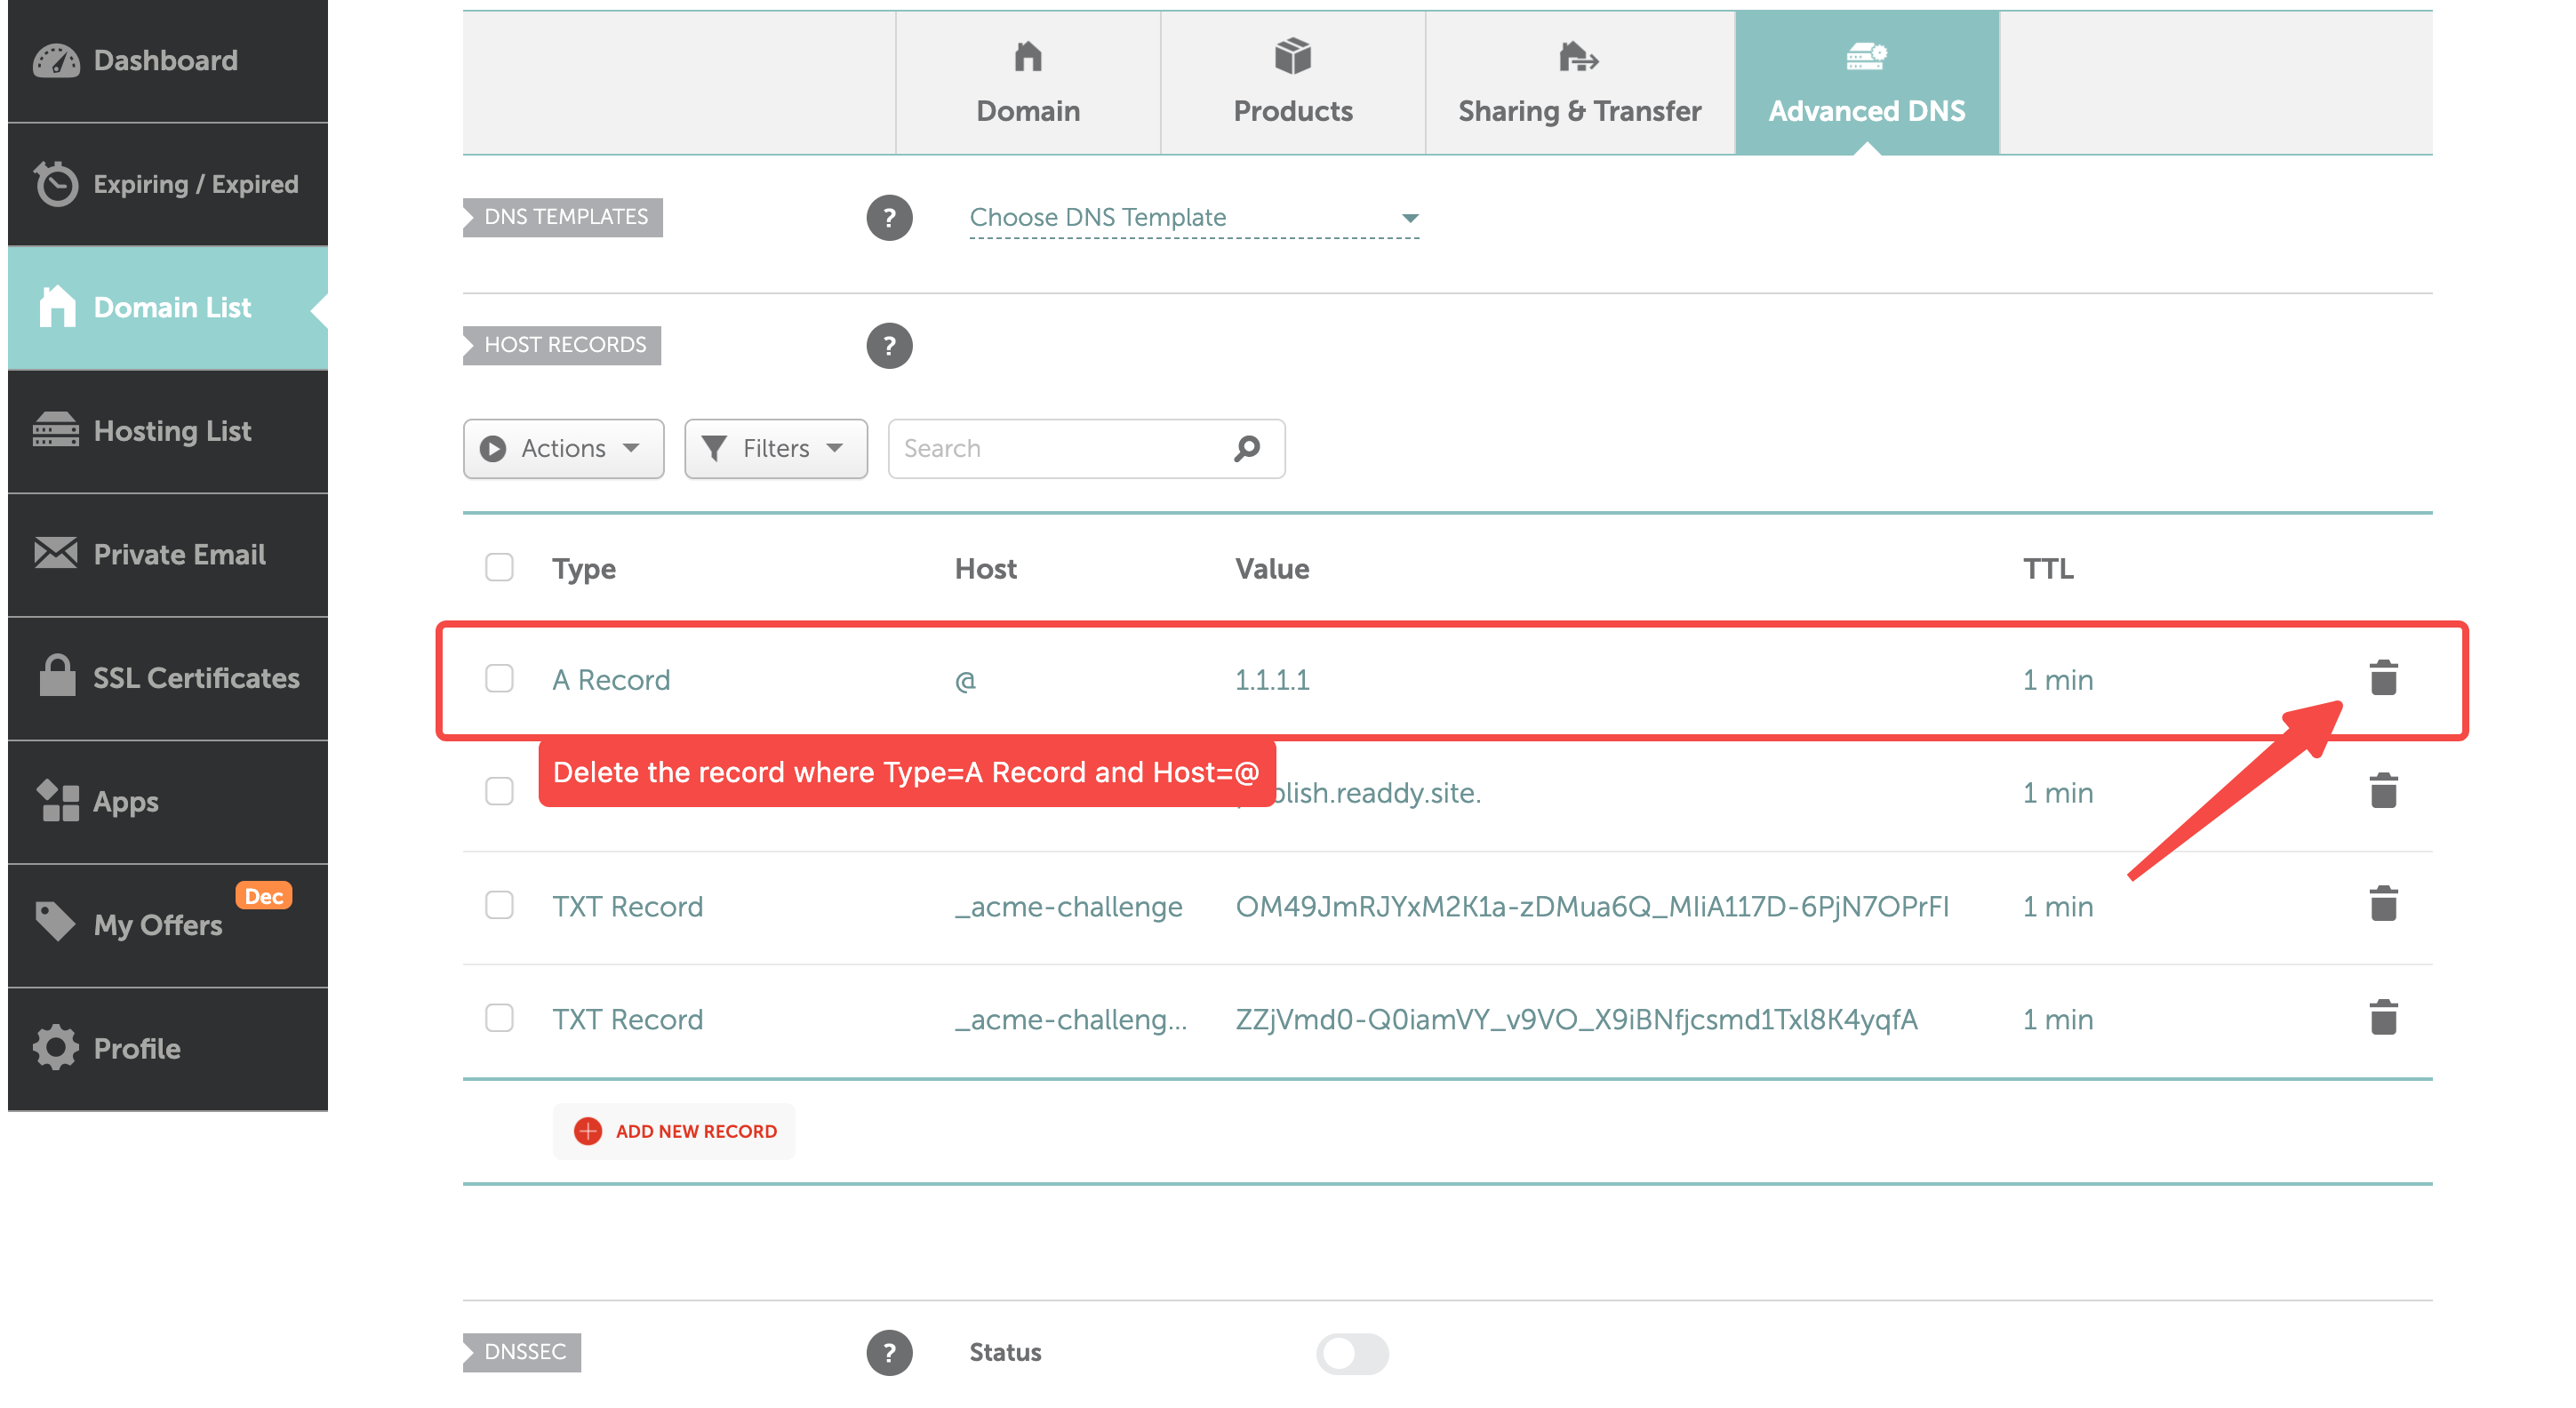
First, you need to delete the old records where **Type=A Record** and **Host=@** that may cause conflicts.
**Step 3: Update your DNS records**
Based on your domain, you need to update these three types of DNS records: **A**, **CNAME**, **TXT** (subject to what is actually displayed on the Readdy interface).
* If you connect a root domain, such as `xxxxxx.com`,you need to update A + TXT
* If you connect a subdomain, such as `www.xxxxxx.com`,you need to update CNAME + TXT
Here we'll use an **A** record as an example; the update process for **CNAME** and **TXT** is exactly the same.
First, you need to delete the old records where **Type=A Record** and **Host=@** that may cause conflicts.
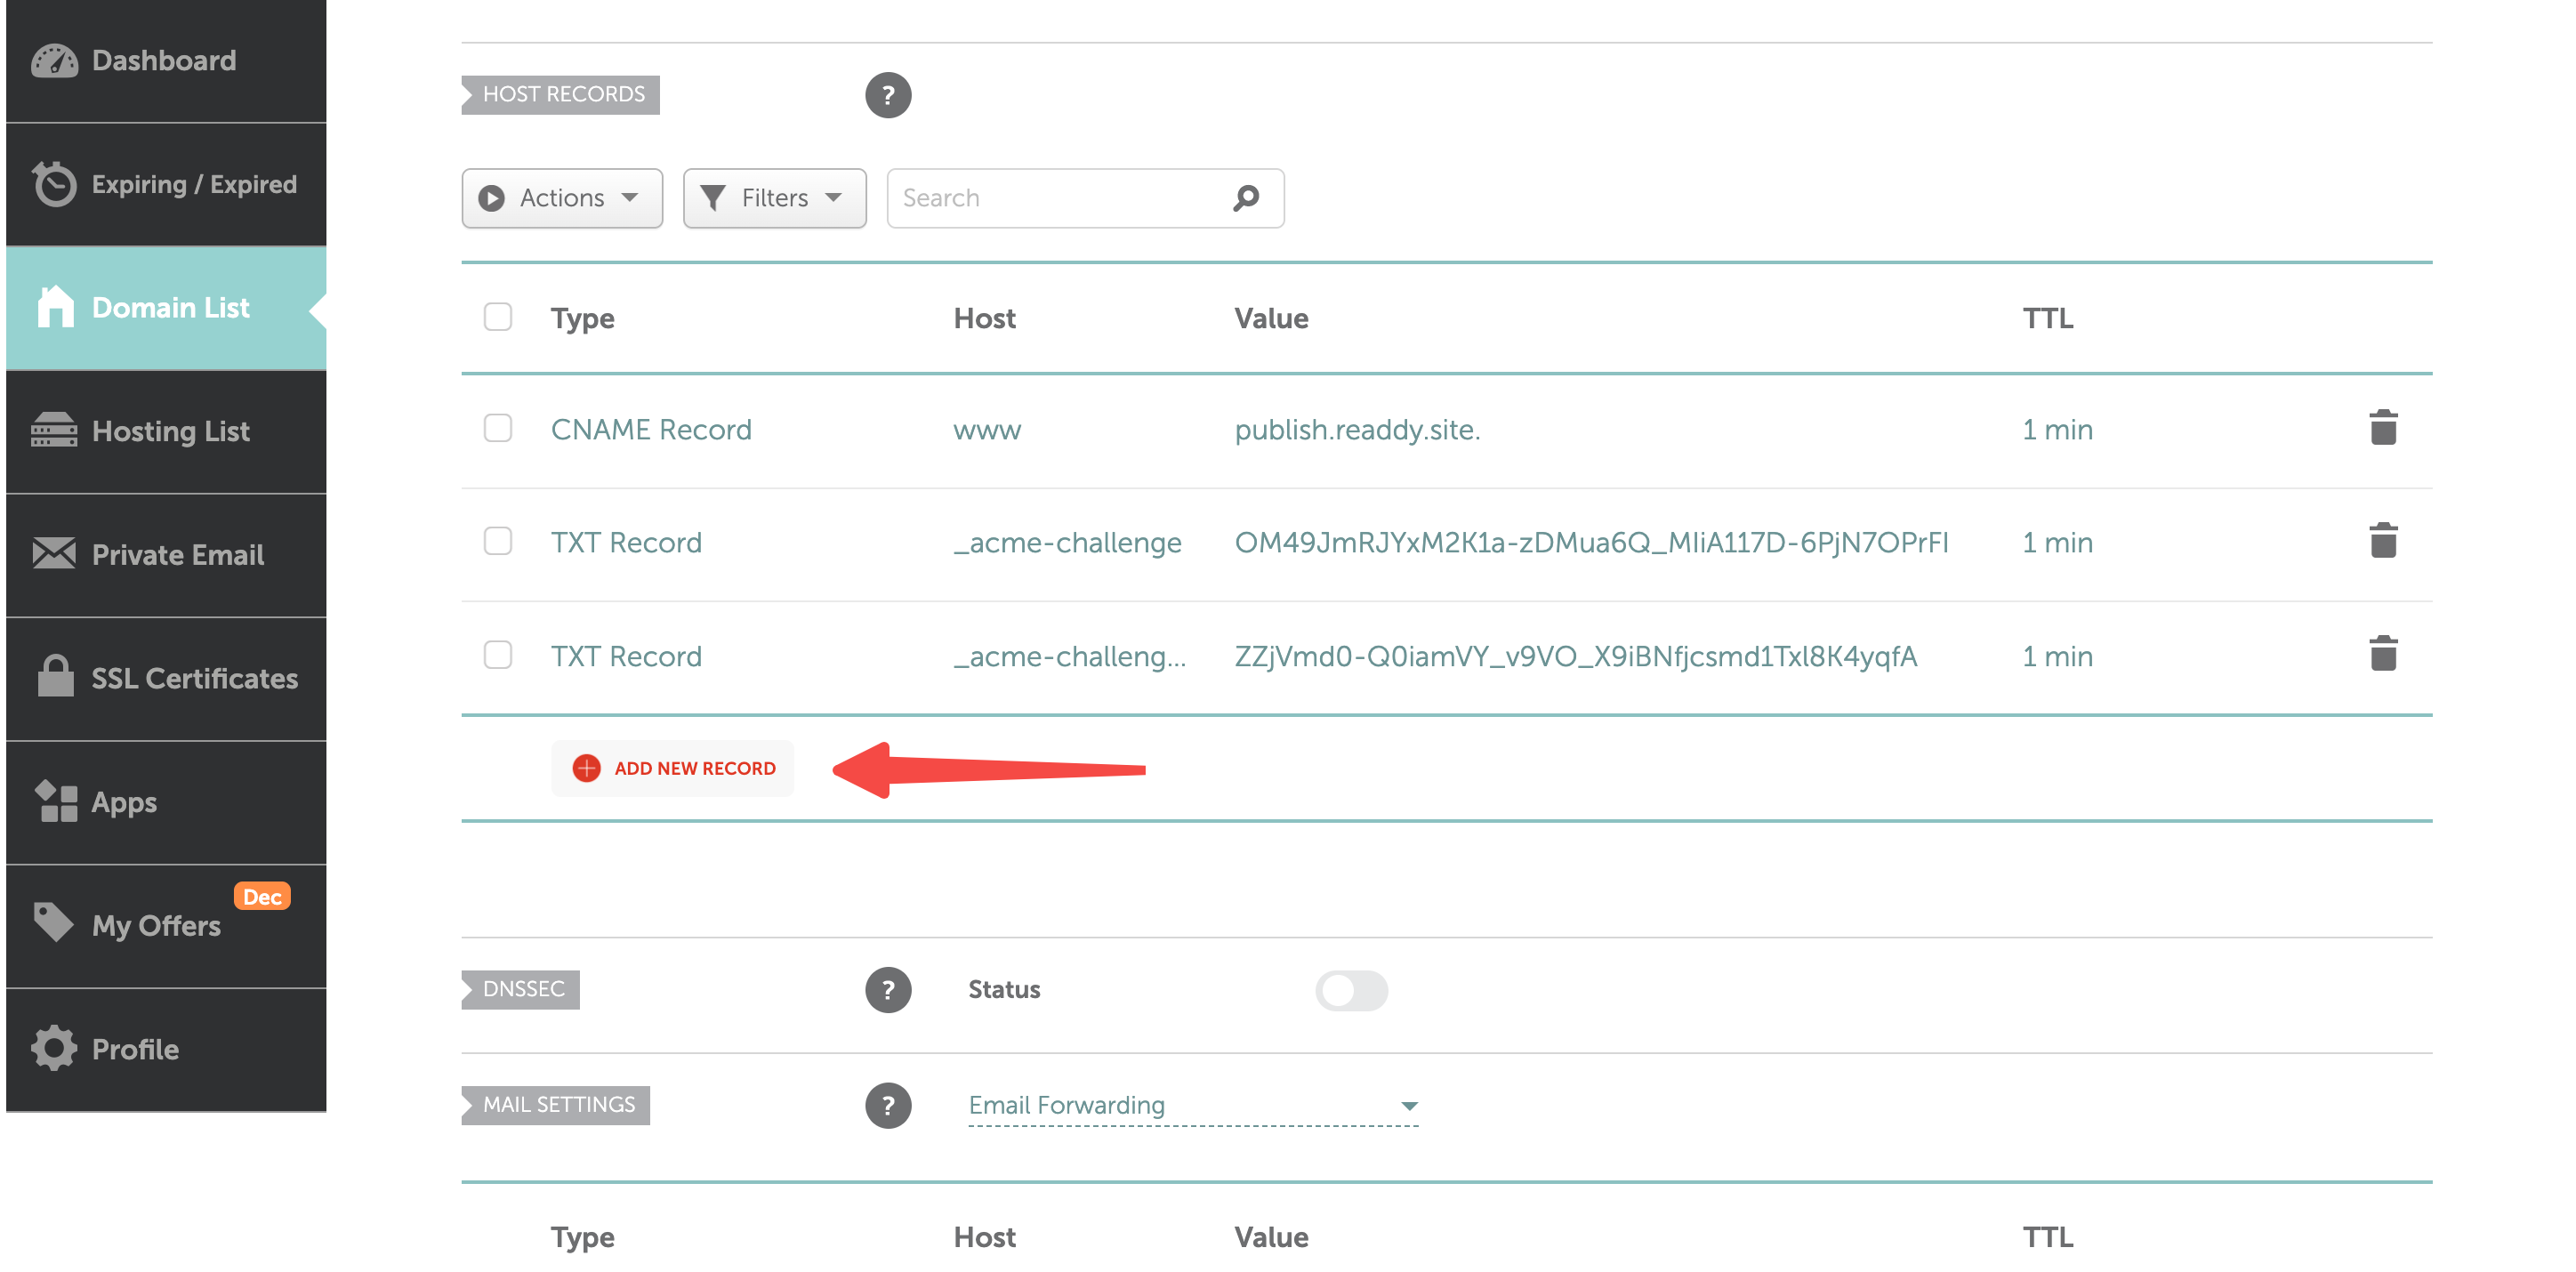
 **Then add a new record:**
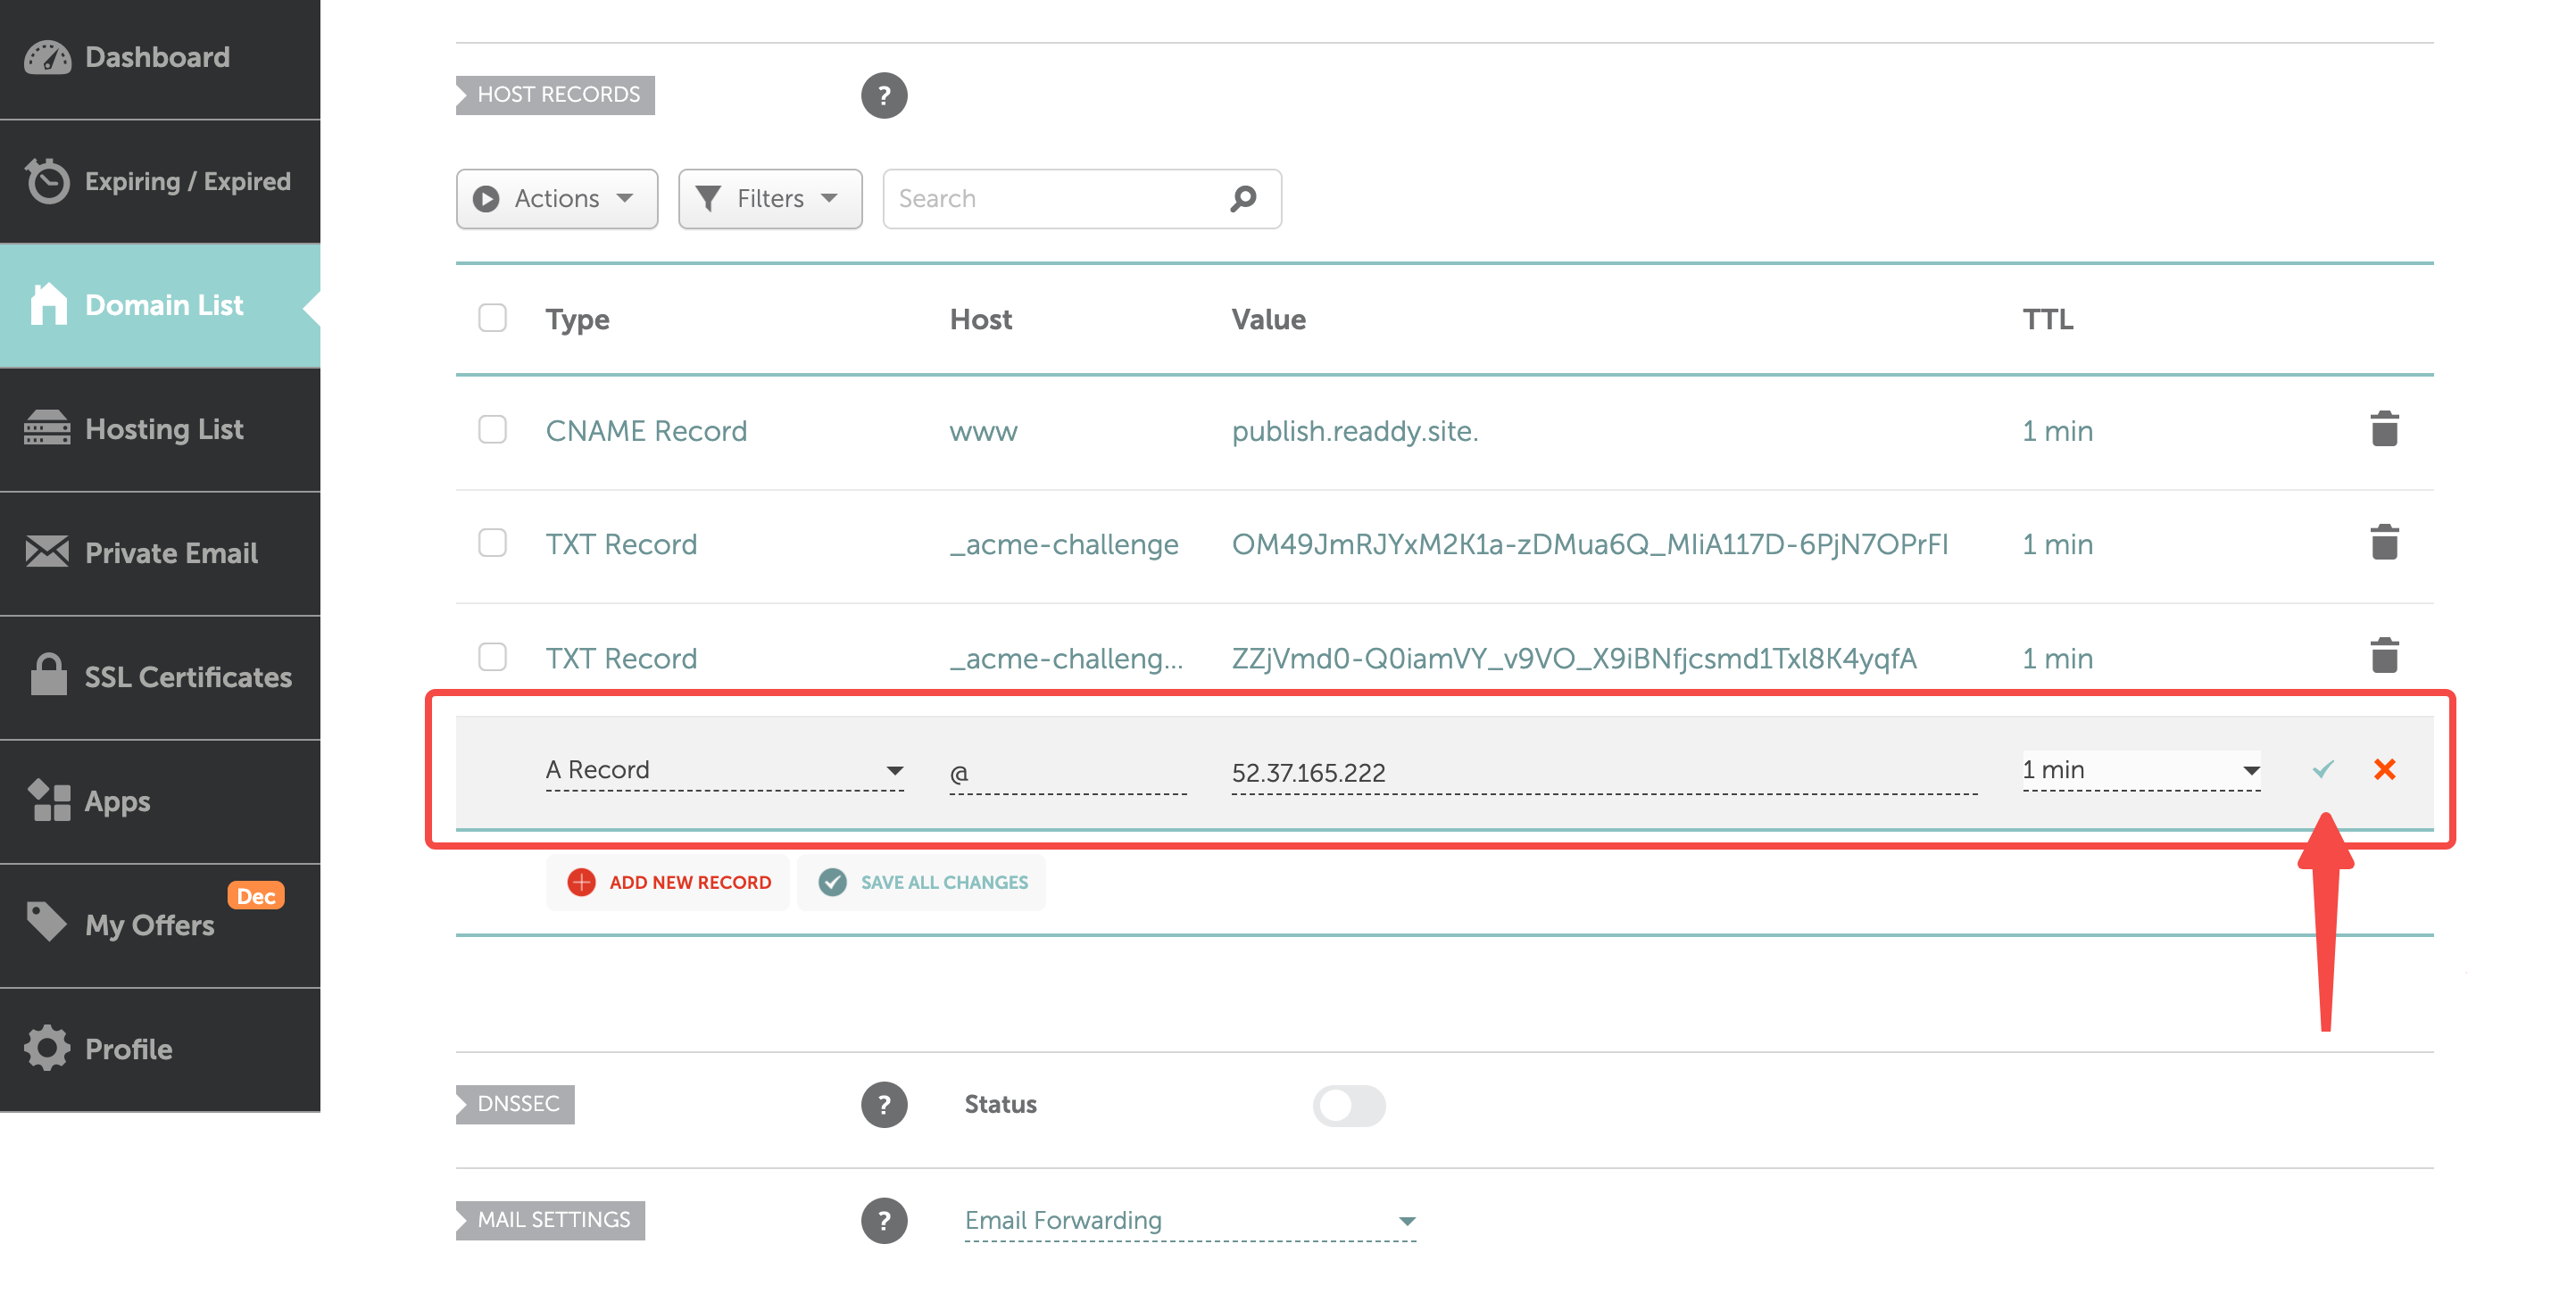
> Type: A Record\
> Host: @\
> Value: 52.37.165.222\
> TTL: 1 min
**Then add a new record:**
> Type: A Record\
> Host: @\
> Value: 52.37.165.222\
> TTL: 1 min
 Based on the content displayed on the Readdy interface, if there are additional **TXT** or **CNAME** records that need to be updated, use the same method to update them: delete all records with the same Type and Name, and add the required records.
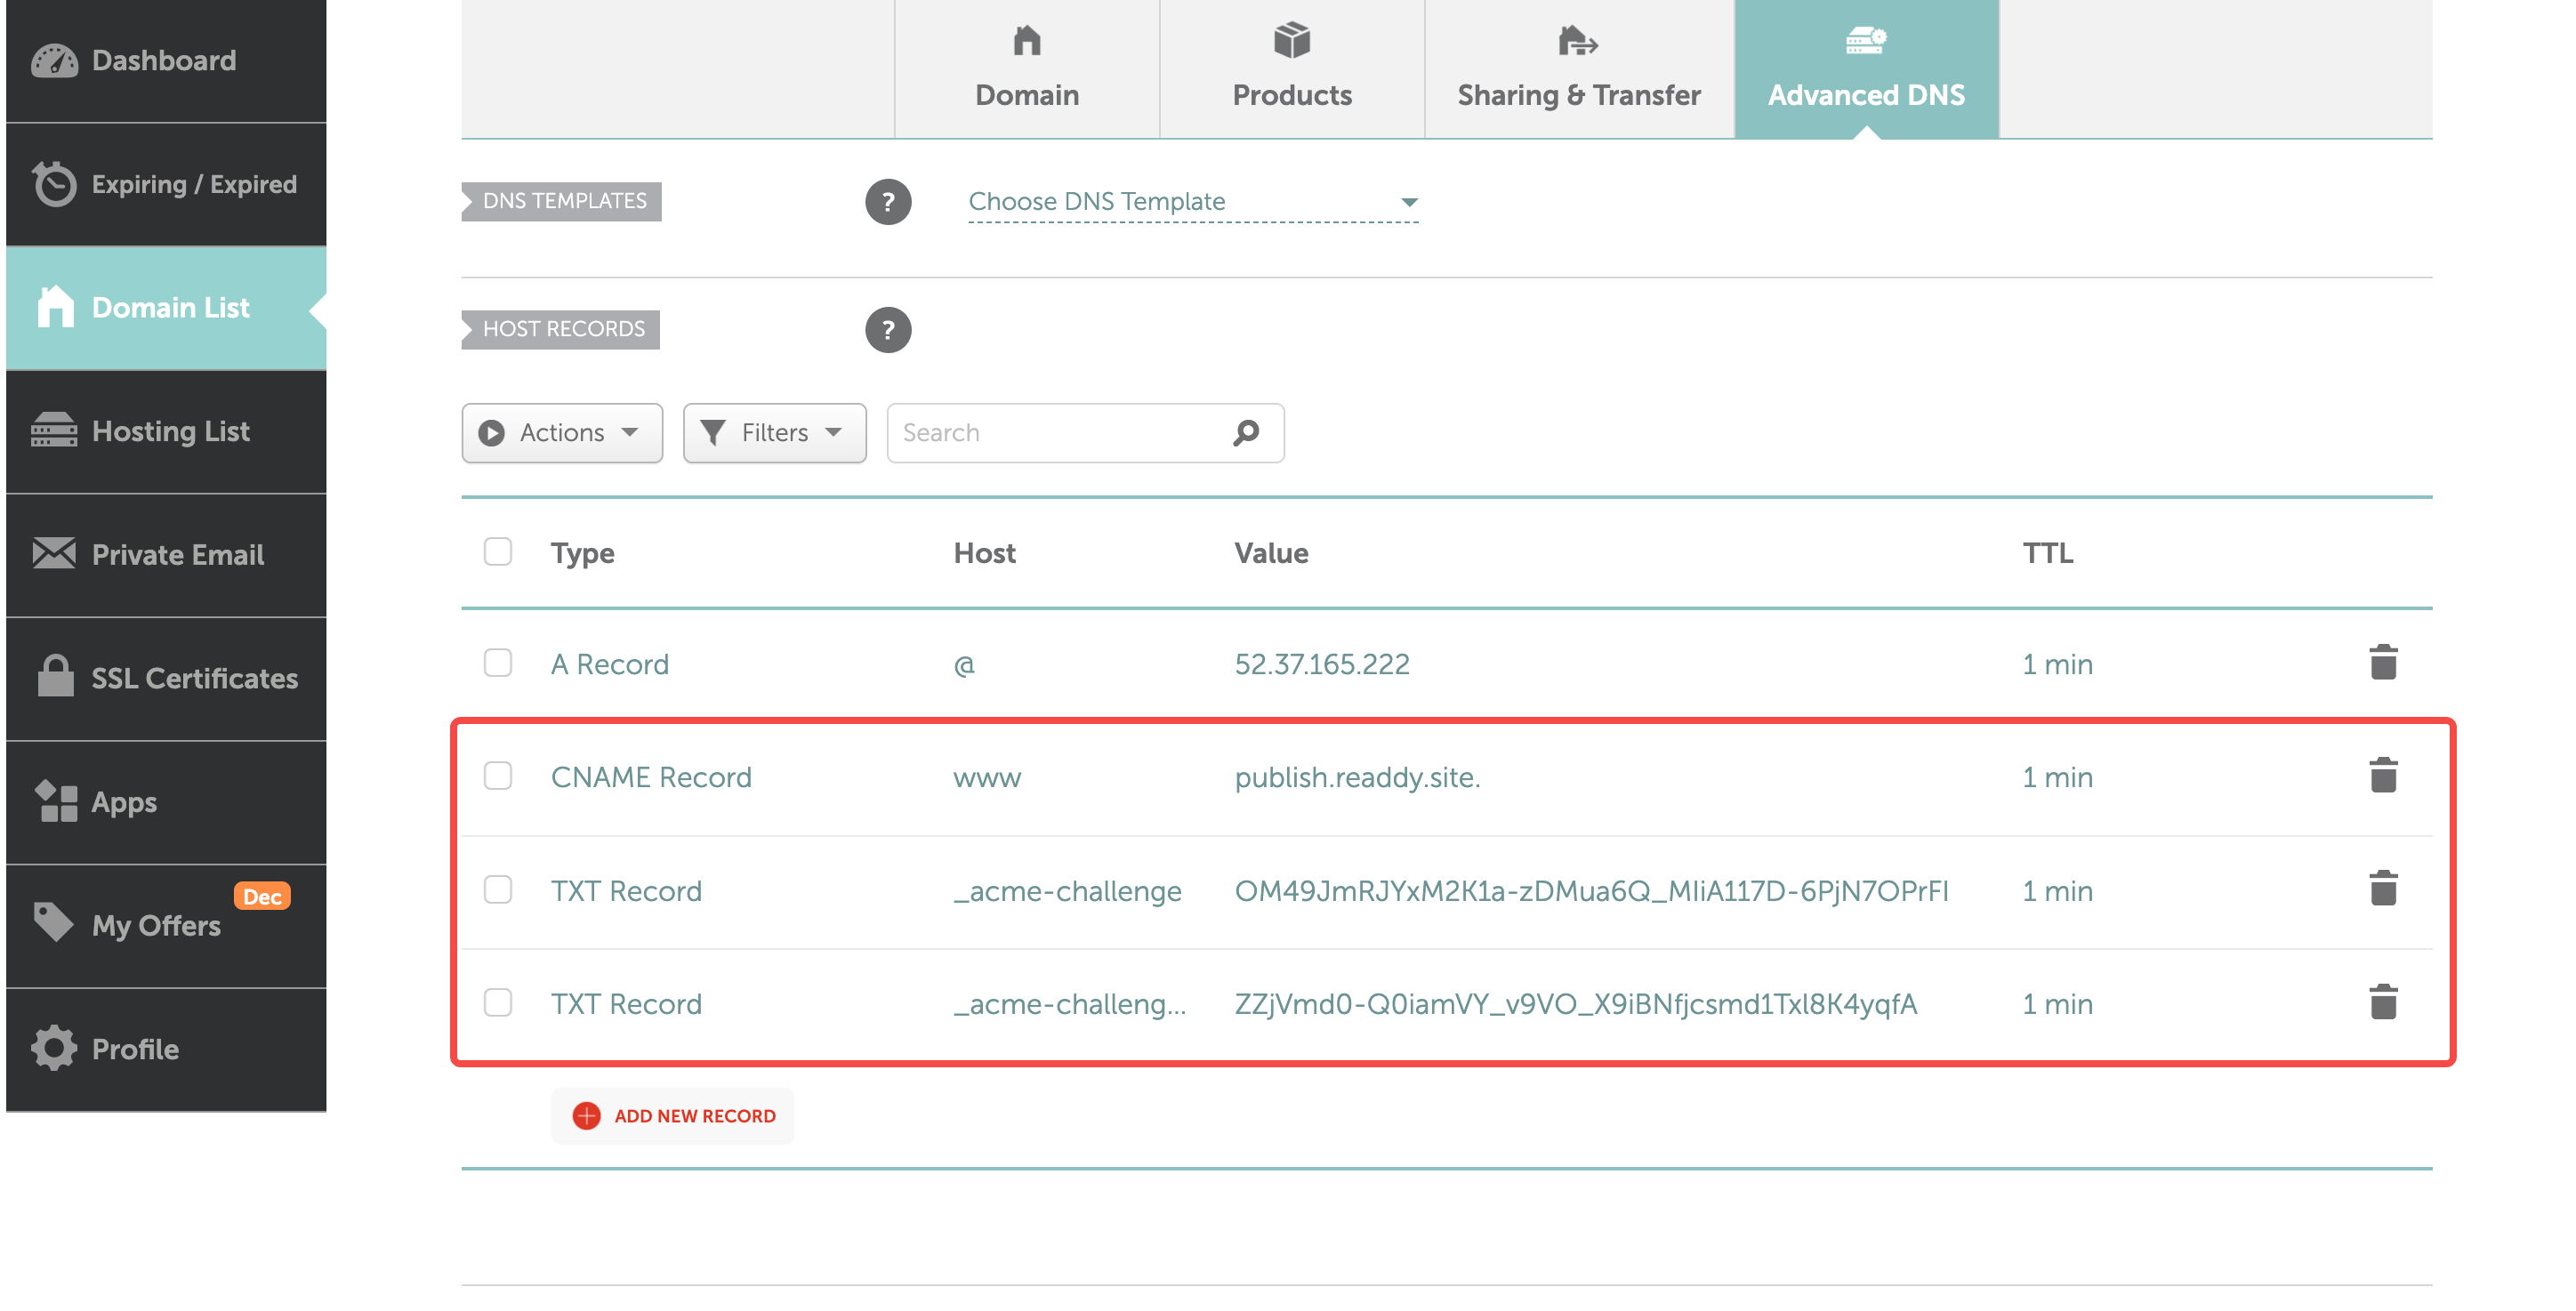 After updating all records, you will have completed the domain DNS configuration. Please return to Readdy, click **I've added the records** and continue.
We currently offer basic guides for the providers listed below. More comprehensive guides and additional providers are coming soon.
**DNS Settings Steps:**
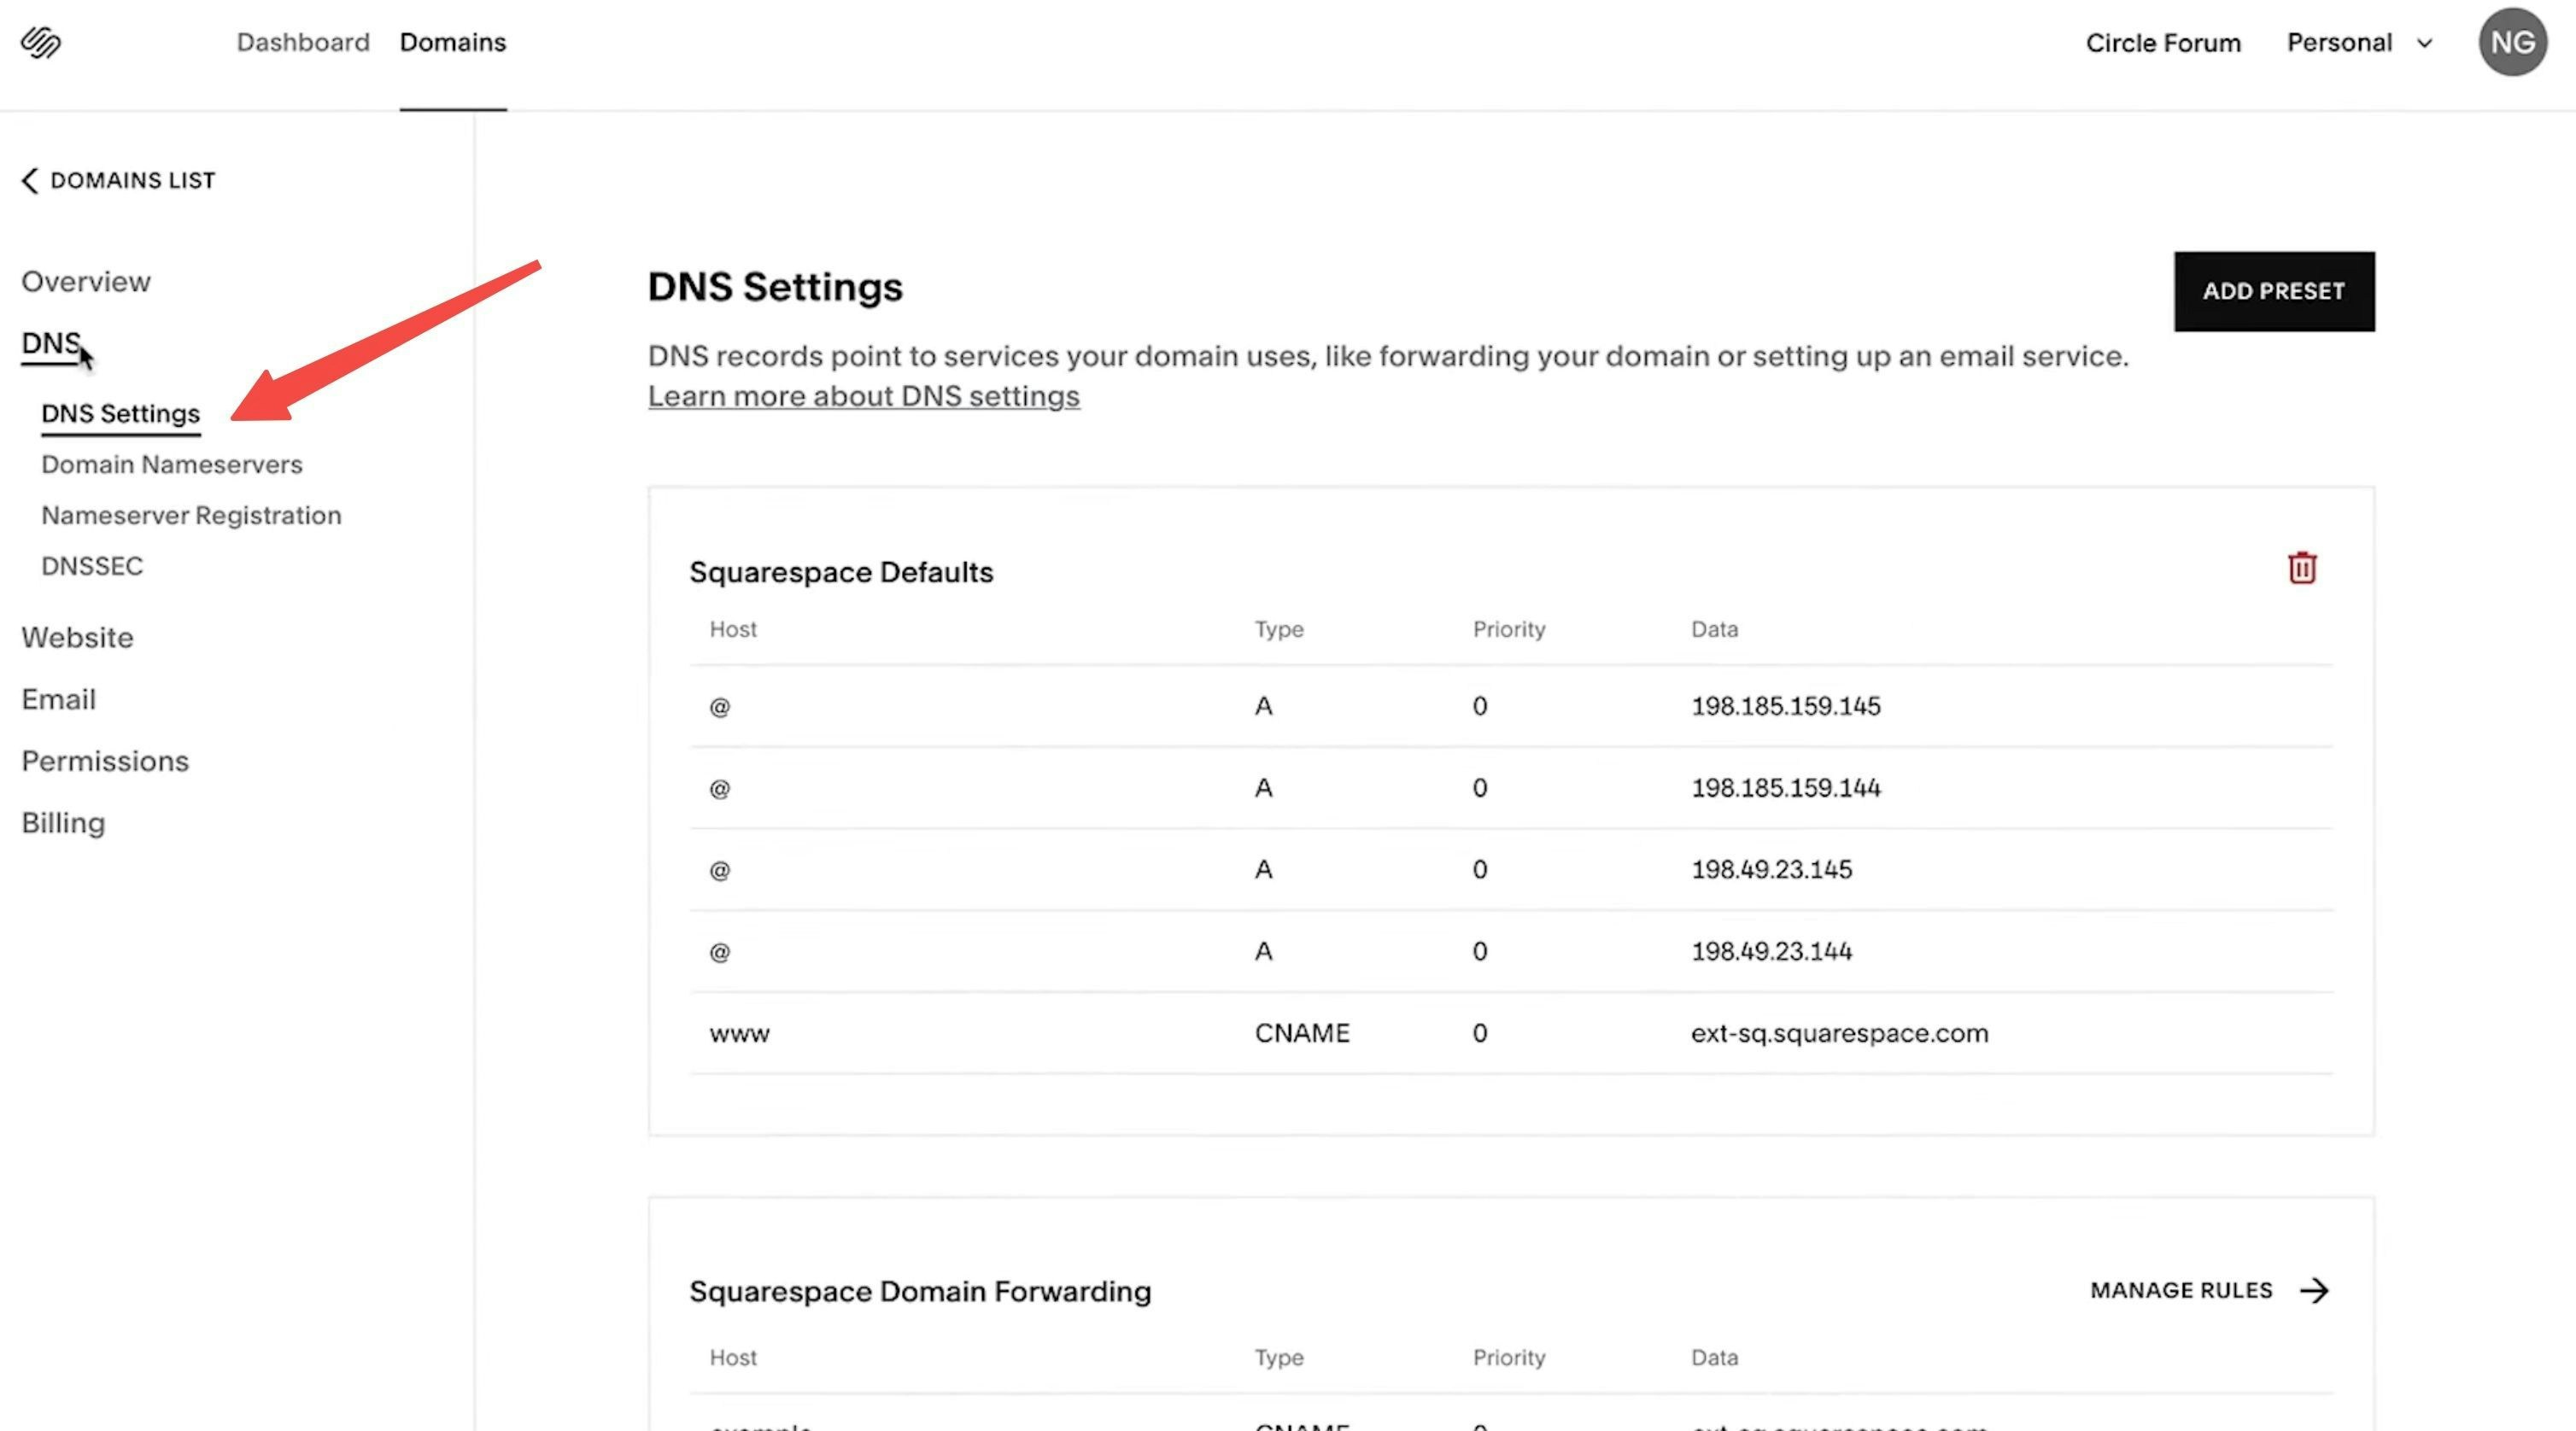
1. Click on **DNS**, then select **DNS Settings**
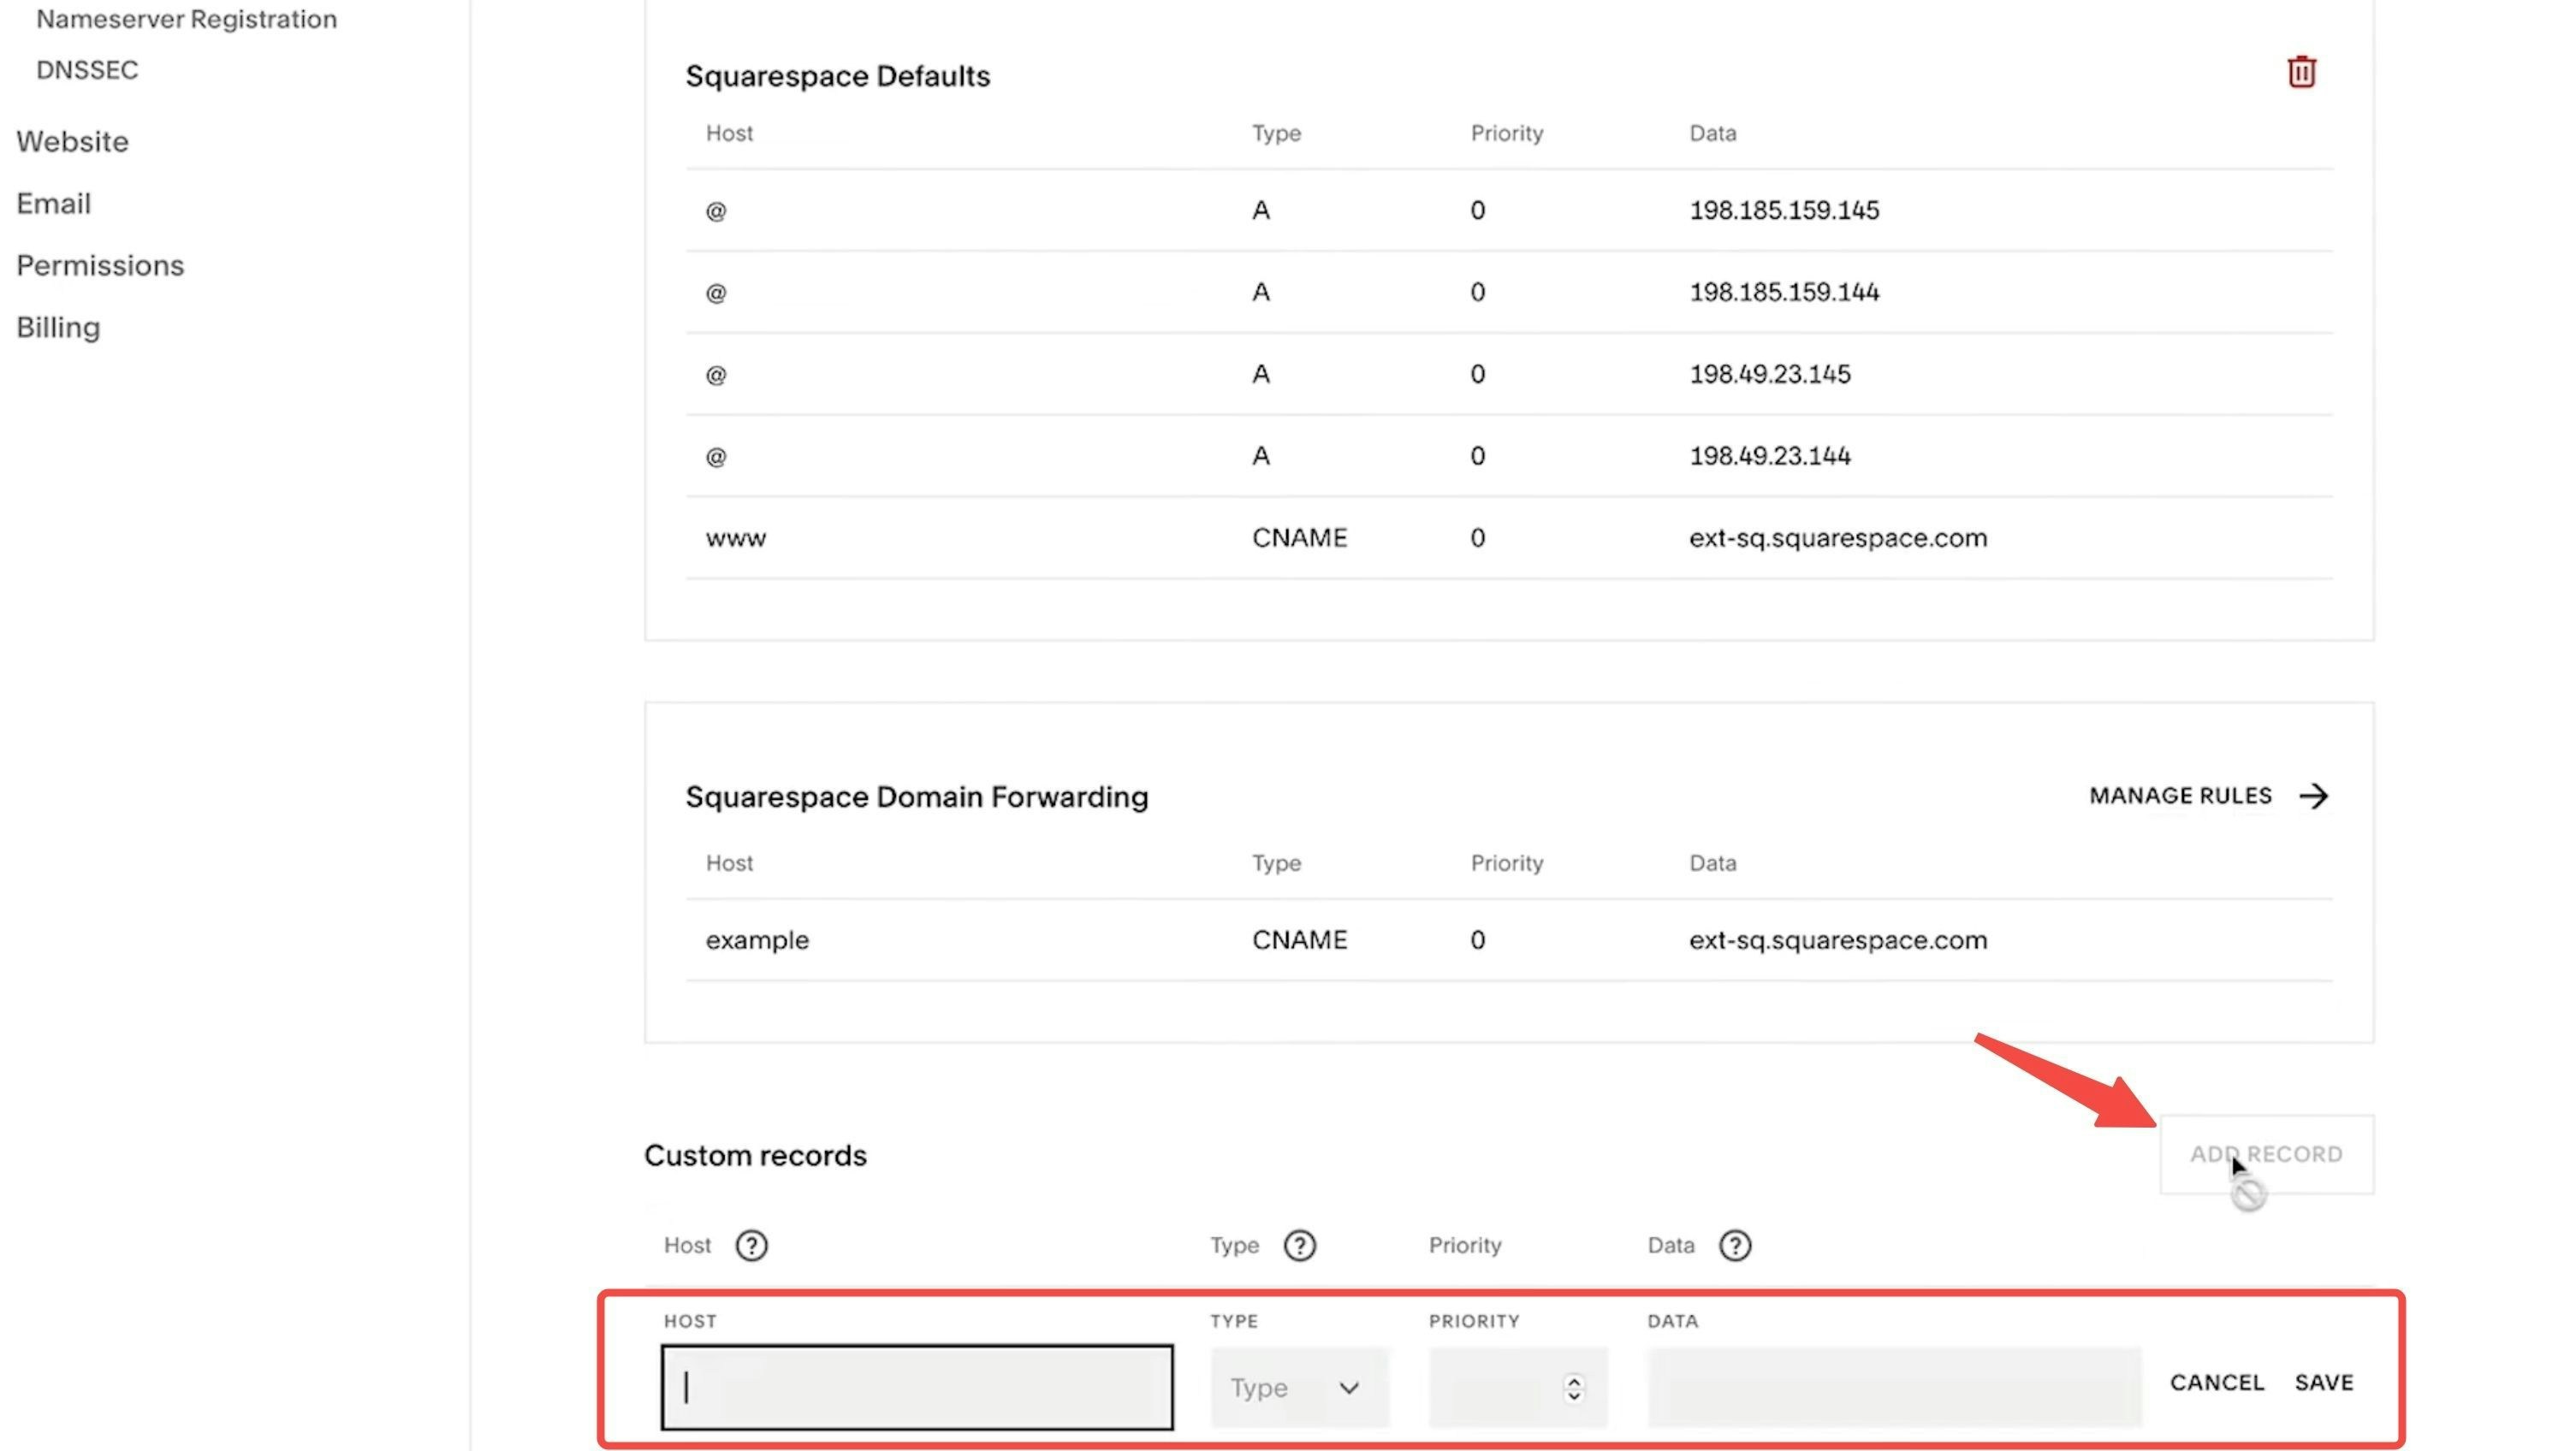
2. Scroll down to the **Custom Records** section
3. Click **Add Record** to input the DNS information provided by Readdy
After updating all records, you will have completed the domain DNS configuration. Please return to Readdy, click **I've added the records** and continue.
We currently offer basic guides for the providers listed below. More comprehensive guides and additional providers are coming soon.
**DNS Settings Steps:**
1. Click on **DNS**, then select **DNS Settings**
2. Scroll down to the **Custom Records** section
3. Click **Add Record** to input the DNS information provided by Readdy
 **DNS Settings Steps:**
1. Go to **Domains** in your Wix account
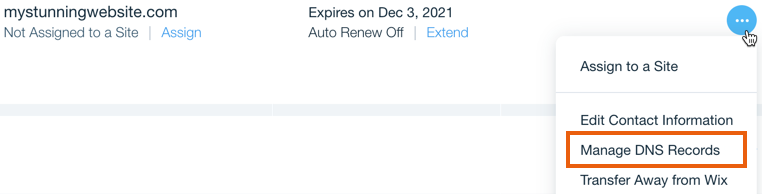
2. Click the **Domain Actions** icon next to the domain you want to connect
3. Select **Manage DNS records**
**DNS Settings Steps:**
1. Go to **Domains** in your Wix account
2. Click the **Domain Actions** icon next to the domain you want to connect
3. Select **Manage DNS records**
 4. Scroll down to the record type you need to add (e.g., A, CNAME, TXT), then click **+ Add Record**
5. Enter the DNS record values exactly as provided by Readdy
If Readdy instructs you to enter @ in the Host Name field, leave the field blank instead (Wix treats a blank host name as @).
6. Click **Save**
7. In the pop-up message, click **Save Changes** to confirm
**DNS Settings Steps:**
1. Visit your site's dashboard
2. Navigate to **Upgrades** → **Domains** (or **Hosting** → **Domains** if you're using WP Admin) to view all the domains associated with your site
3. Click on the domain you want to configure
4. Select **DNS records** and click the **Manage** button
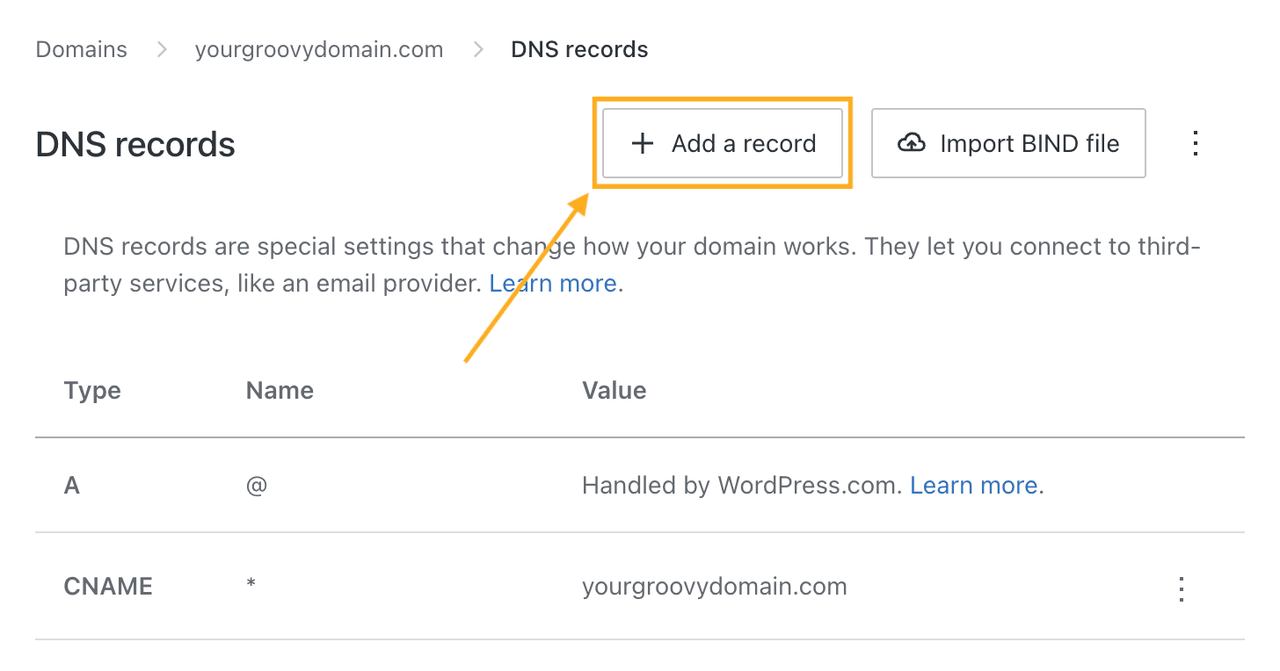
5. In the top-right corner, click **Add a record**
4. Scroll down to the record type you need to add (e.g., A, CNAME, TXT), then click **+ Add Record**
5. Enter the DNS record values exactly as provided by Readdy
If Readdy instructs you to enter @ in the Host Name field, leave the field blank instead (Wix treats a blank host name as @).
6. Click **Save**
7. In the pop-up message, click **Save Changes** to confirm
**DNS Settings Steps:**
1. Visit your site's dashboard
2. Navigate to **Upgrades** → **Domains** (or **Hosting** → **Domains** if you're using WP Admin) to view all the domains associated with your site
3. Click on the domain you want to configure
4. Select **DNS records** and click the **Manage** button
5. In the top-right corner, click **Add a record**
 6. In the **Type** dropdown, choose the type of DNS record you need to add (e.g., A, CNAME, TXT, etc.)
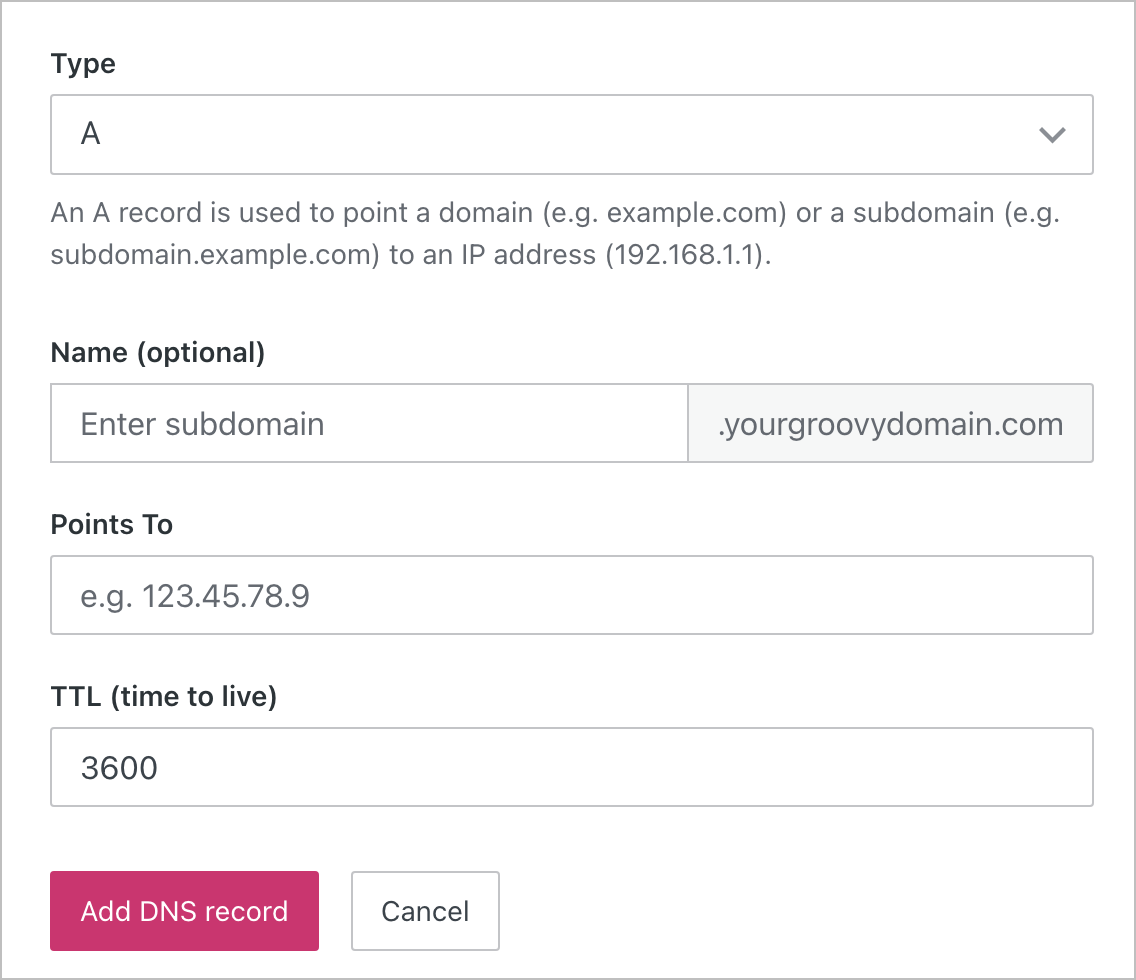 7. Enter the DNS record information exactly as provided by Readdy
8. Save your changes to complete the update
**DNS Settings Steps:**
1. Log in to your Bluehost Account Manager
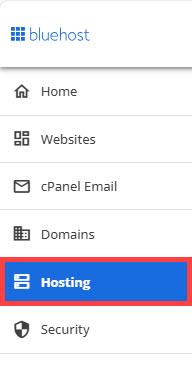
2. From the left navigation menu, click **Hosting**
If you have multiple hosting packages, be sure to select the correct one and tap **MANAGE**.
7. Enter the DNS record information exactly as provided by Readdy
8. Save your changes to complete the update
**DNS Settings Steps:**
1. Log in to your Bluehost Account Manager
2. From the left navigation menu, click **Hosting**
If you have multiple hosting packages, be sure to select the correct one and tap **MANAGE**.
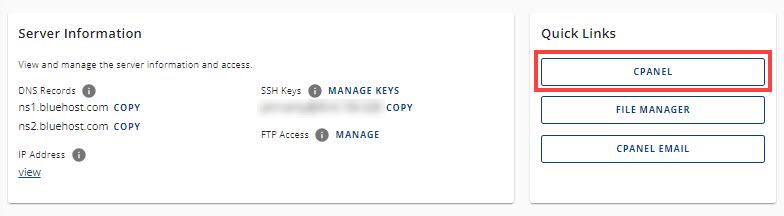
 3. Scroll down to Quick Links and tap **CPANEL**
 4. On the cPanel dashboard, scroll to the **Domains** section and click **Zone Editor**
5. In the Zone Editor, click the **+** icon next to the type of DNS record you'd like to add (e.g., A, CNAME, TXT)
6. Fill in the required fields using the DNS values provided by Readdy
4. On the cPanel dashboard, scroll to the **Domains** section and click **Zone Editor**
5. In the Zone Editor, click the **+** icon next to the type of DNS record you'd like to add (e.g., A, CNAME, TXT)
6. Fill in the required fields using the DNS values provided by Readdy
 ### Update your DNS records
First, follow the guide above ↑ to update the records displayed in the interface. Due to varying cache mechanisms across different domain providers, DNS updates may take anywhere from a few minutes to several hours to propagate. Please be patient during this process.\
We recommend **waiting at least 10 minutes after updating**, then click "I've updated records" to continue.
If the DNS records are still not detected after waiting more than 30 minutes, please carefully verify that the DNS records you added are correct. If needed, you can take a screenshot and submit it to our live chat support for assistance.
### Update your DNS records
First, follow the guide above ↑ to update the records displayed in the interface. Due to varying cache mechanisms across different domain providers, DNS updates may take anywhere from a few minutes to several hours to propagate. Please be patient during this process.\
We recommend **waiting at least 10 minutes after updating**, then click "I've updated records" to continue.
If the DNS records are still not detected after waiting more than 30 minutes, please carefully verify that the DNS records you added are correct. If needed, you can take a screenshot and submit it to our live chat support for assistance.
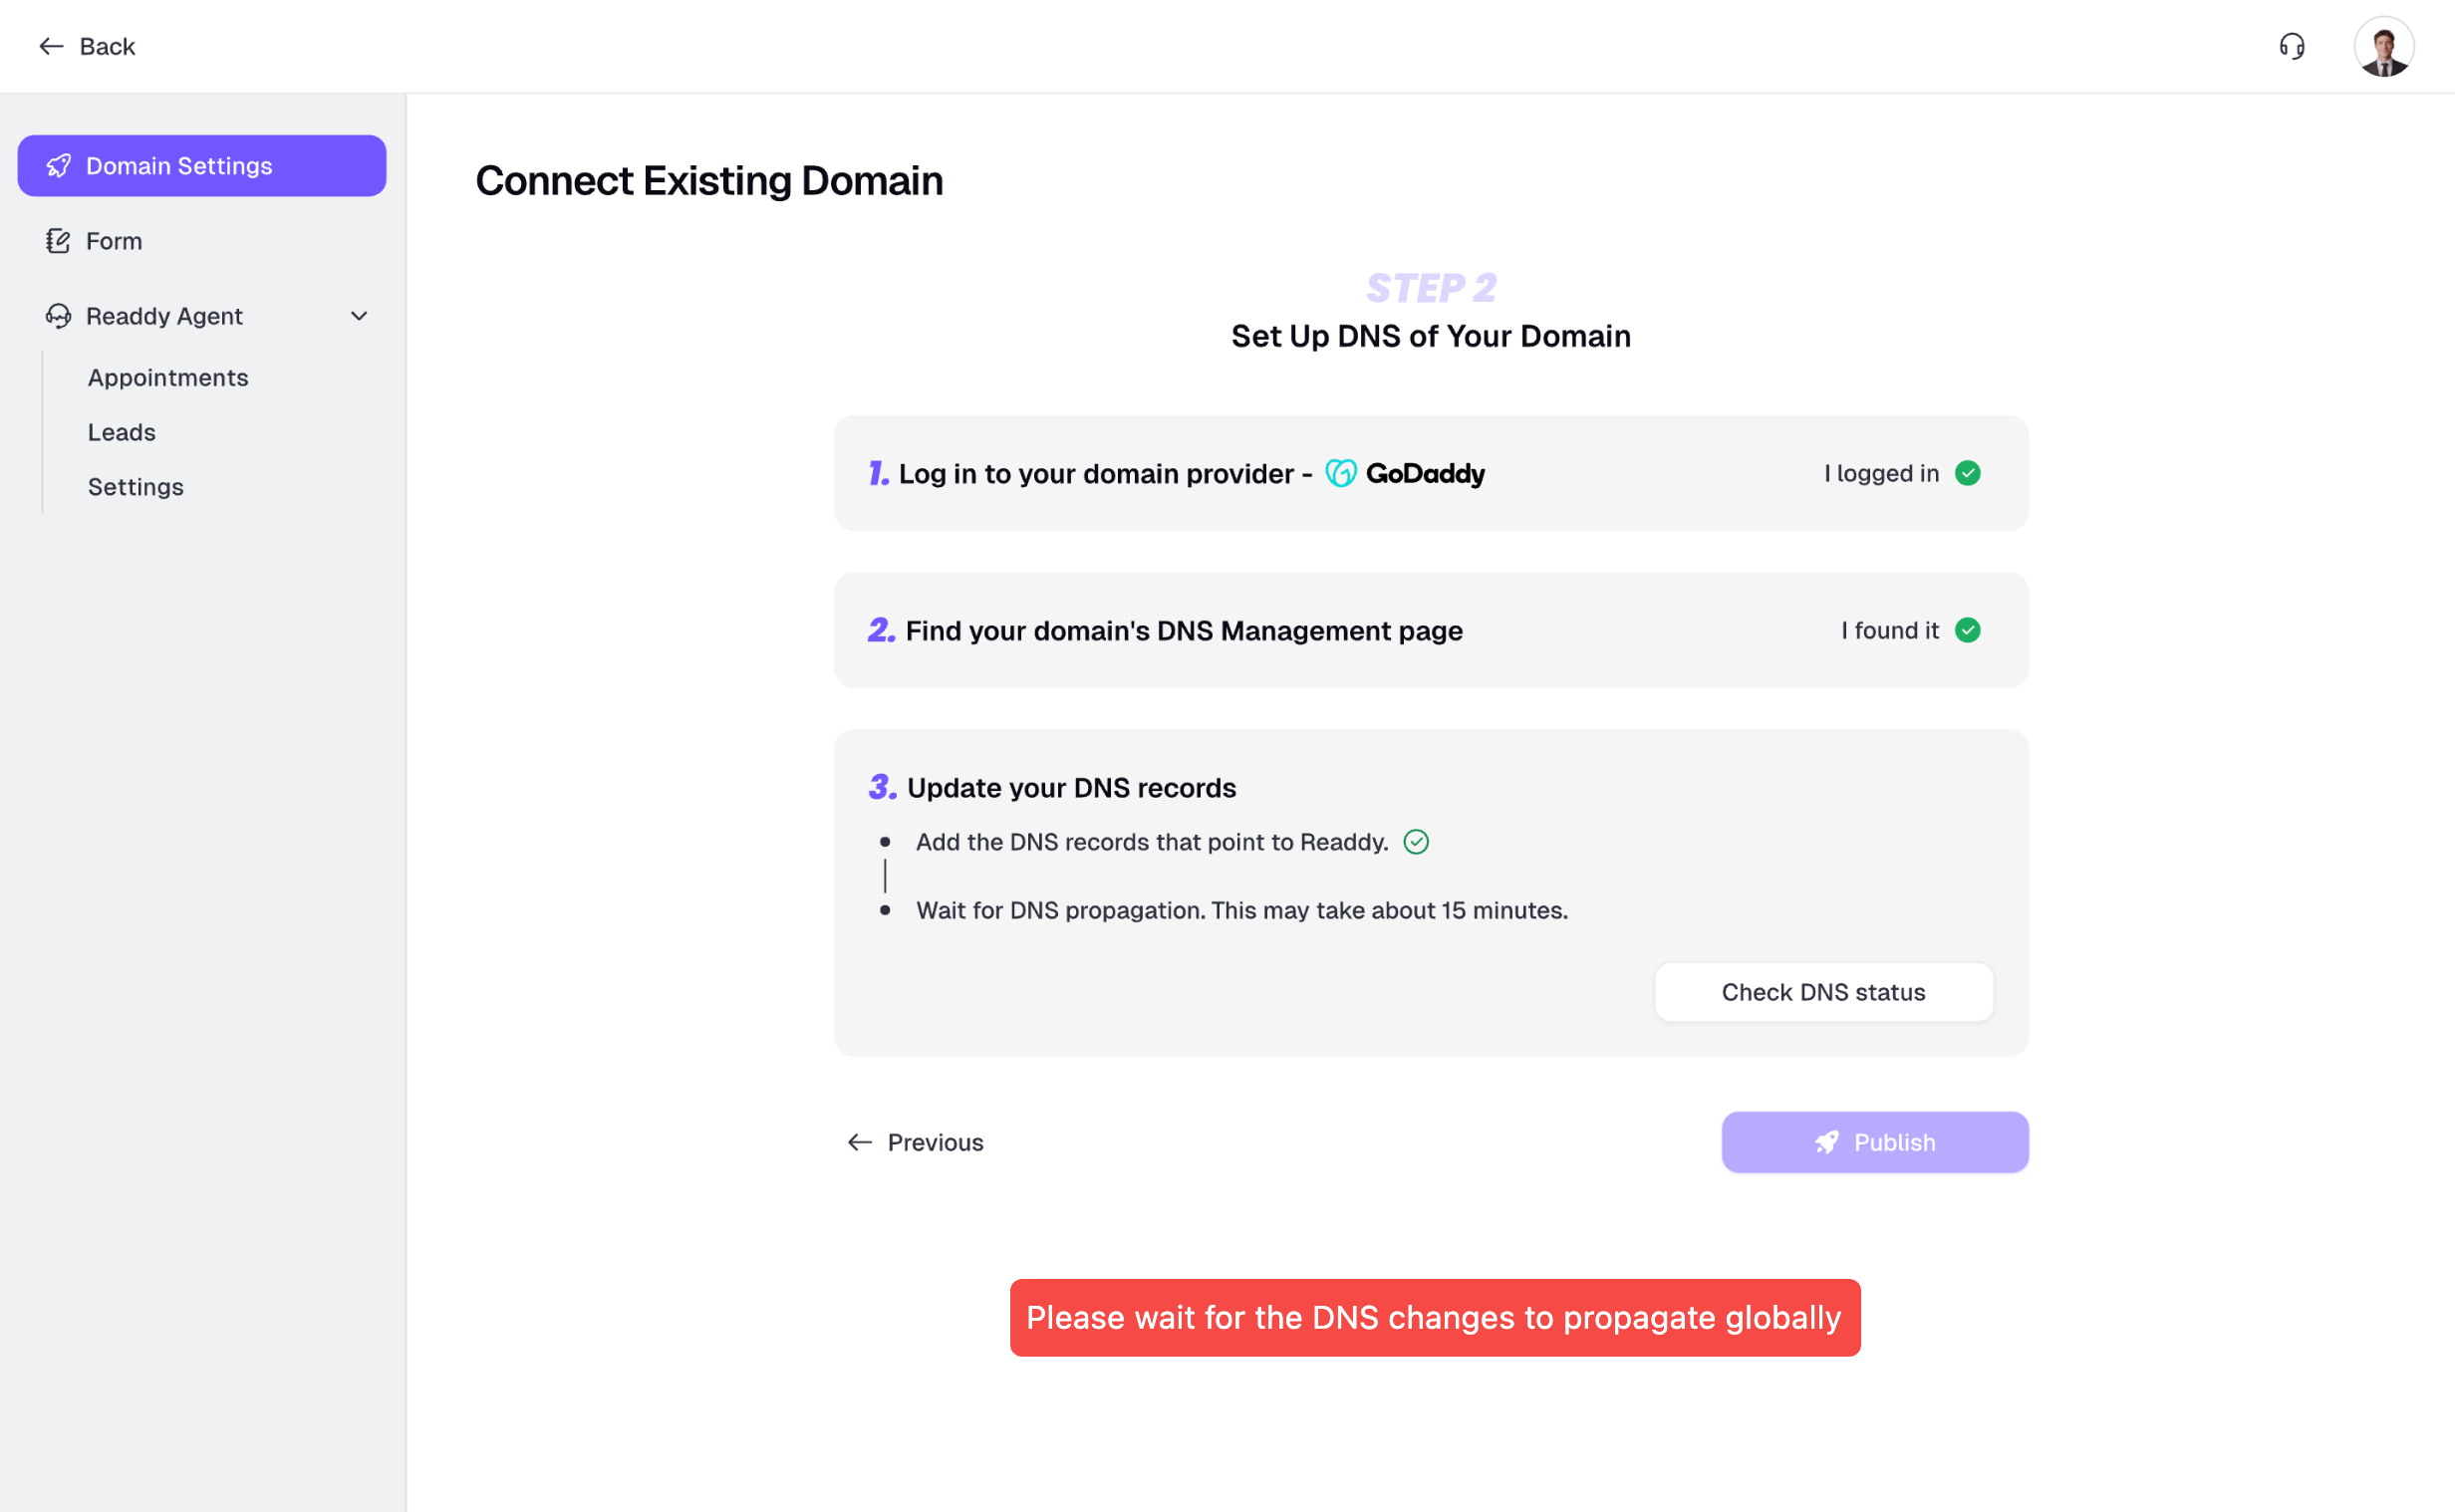
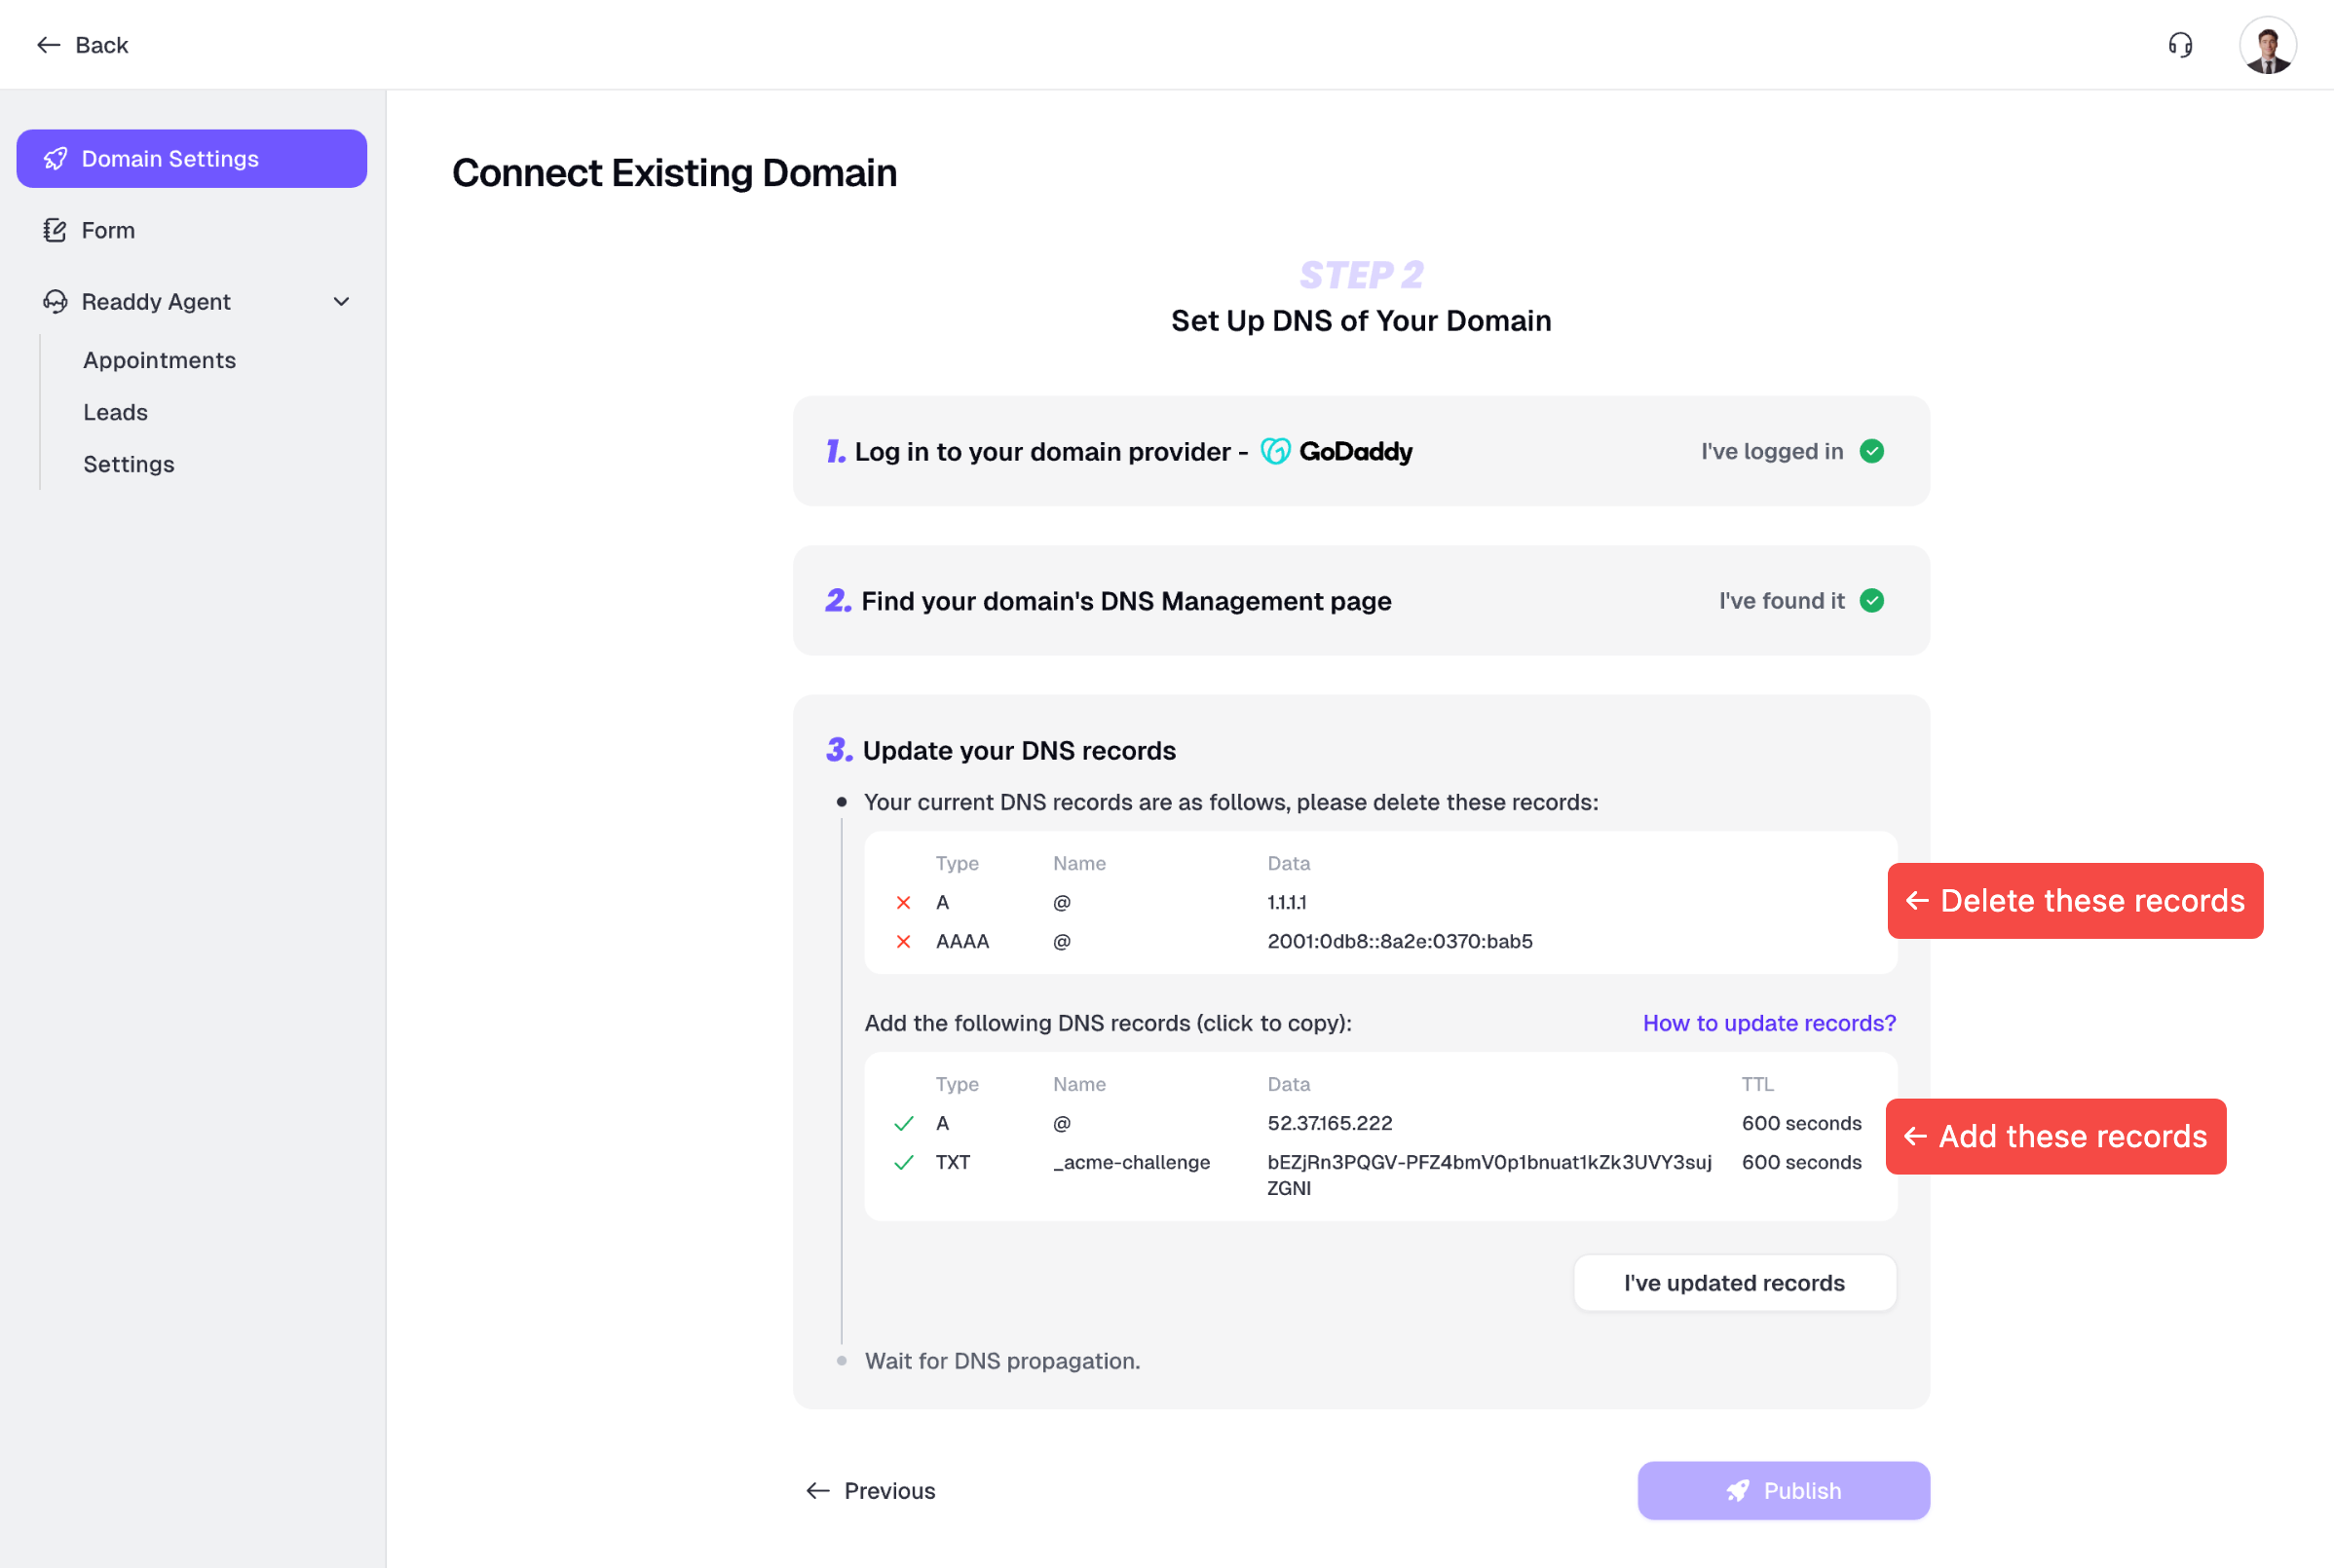 After successfully adding your DNS records, you need to wait for those changes to propagate globally (this typically takes 5-30 minutes, depending on your domain provider).
For faster propagation, set your TTL to a lower value such as 1 minute (the minimum TTL varies by DNS provider). Please wait at least 5 minutes, then click **Check DNS status** to check the DNS propagation status.
After successfully adding your DNS records, you need to wait for those changes to propagate globally (this typically takes 5-30 minutes, depending on your domain provider).
For faster propagation, set your TTL to a lower value such as 1 minute (the minimum TTL varies by DNS provider). Please wait at least 5 minutes, then click **Check DNS status** to check the DNS propagation status.
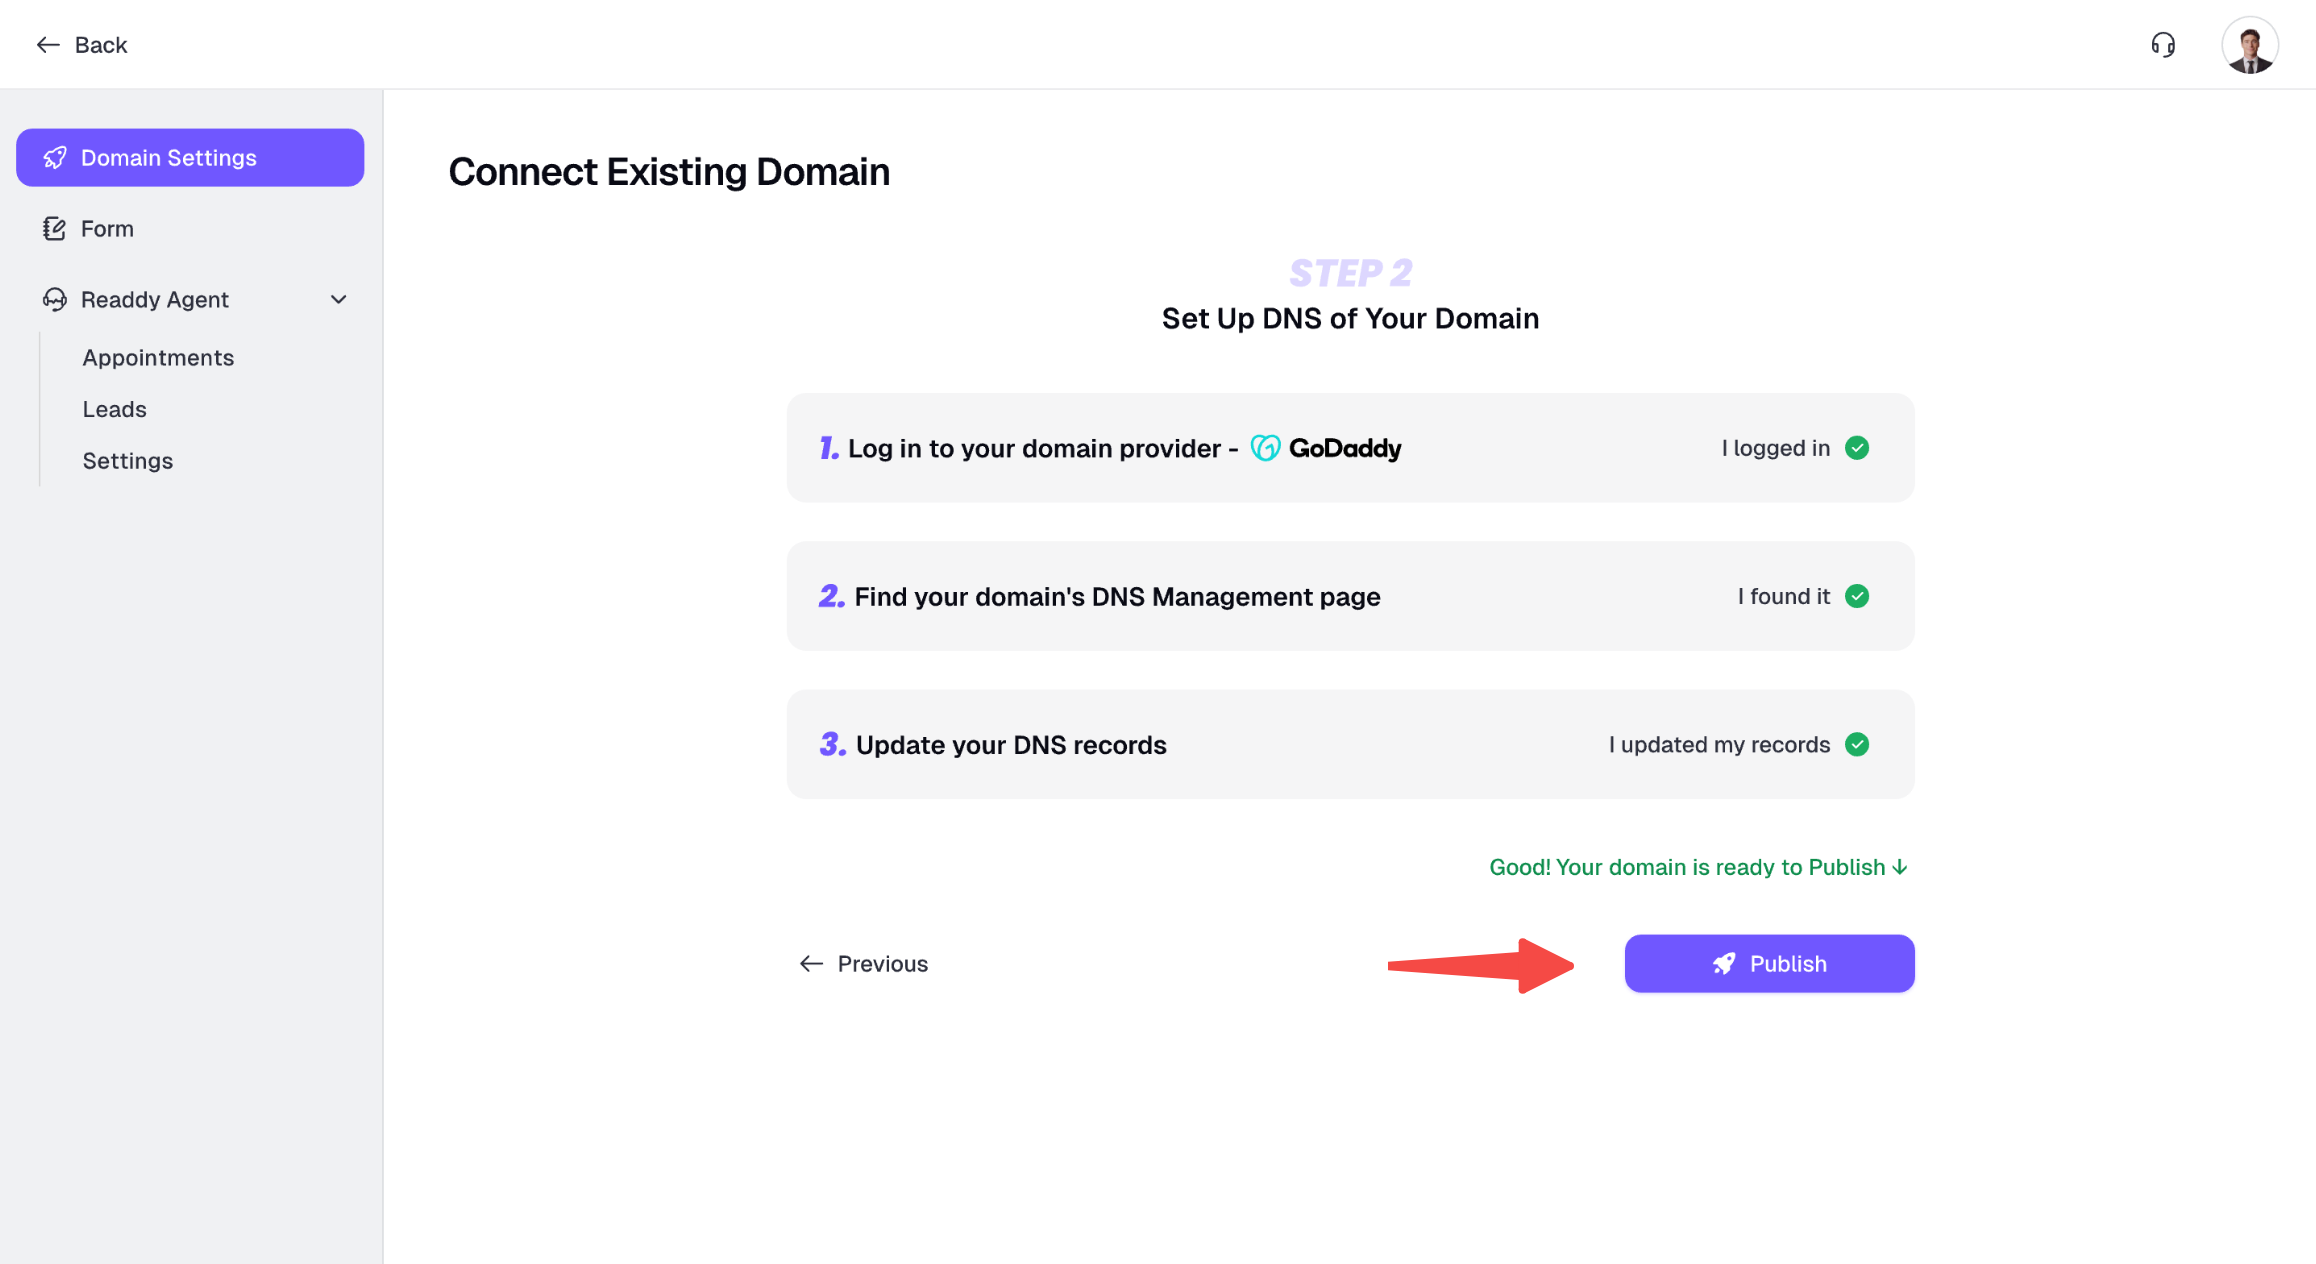
 Once the DNS records have propagated successfully, you can publish your website.
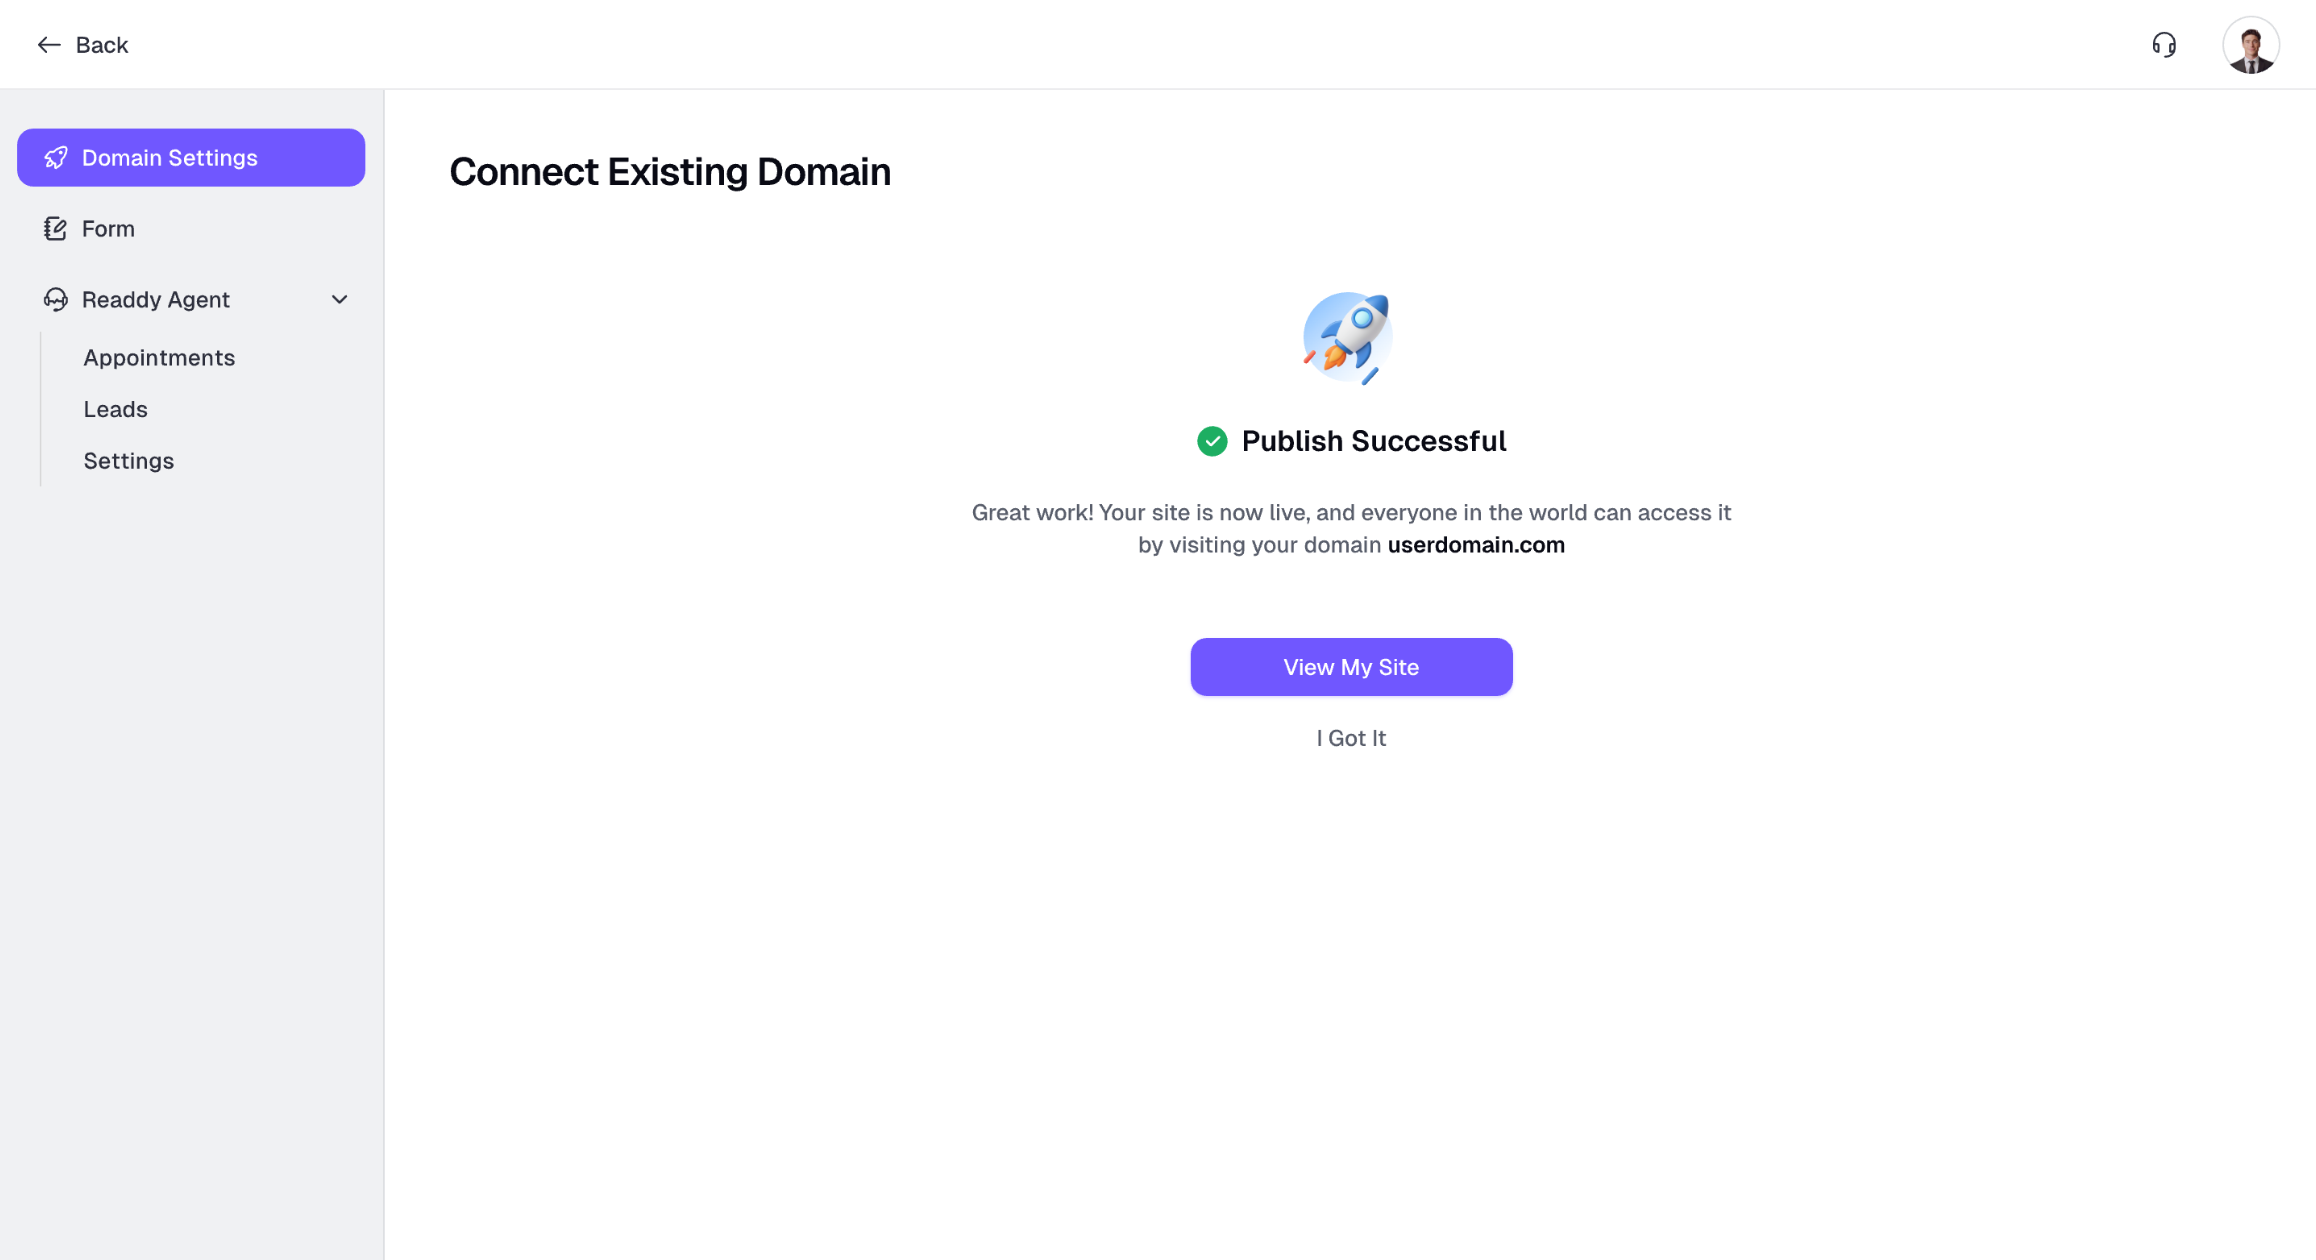
 Congratulations! Your website is now live.
 ## Update Your Website
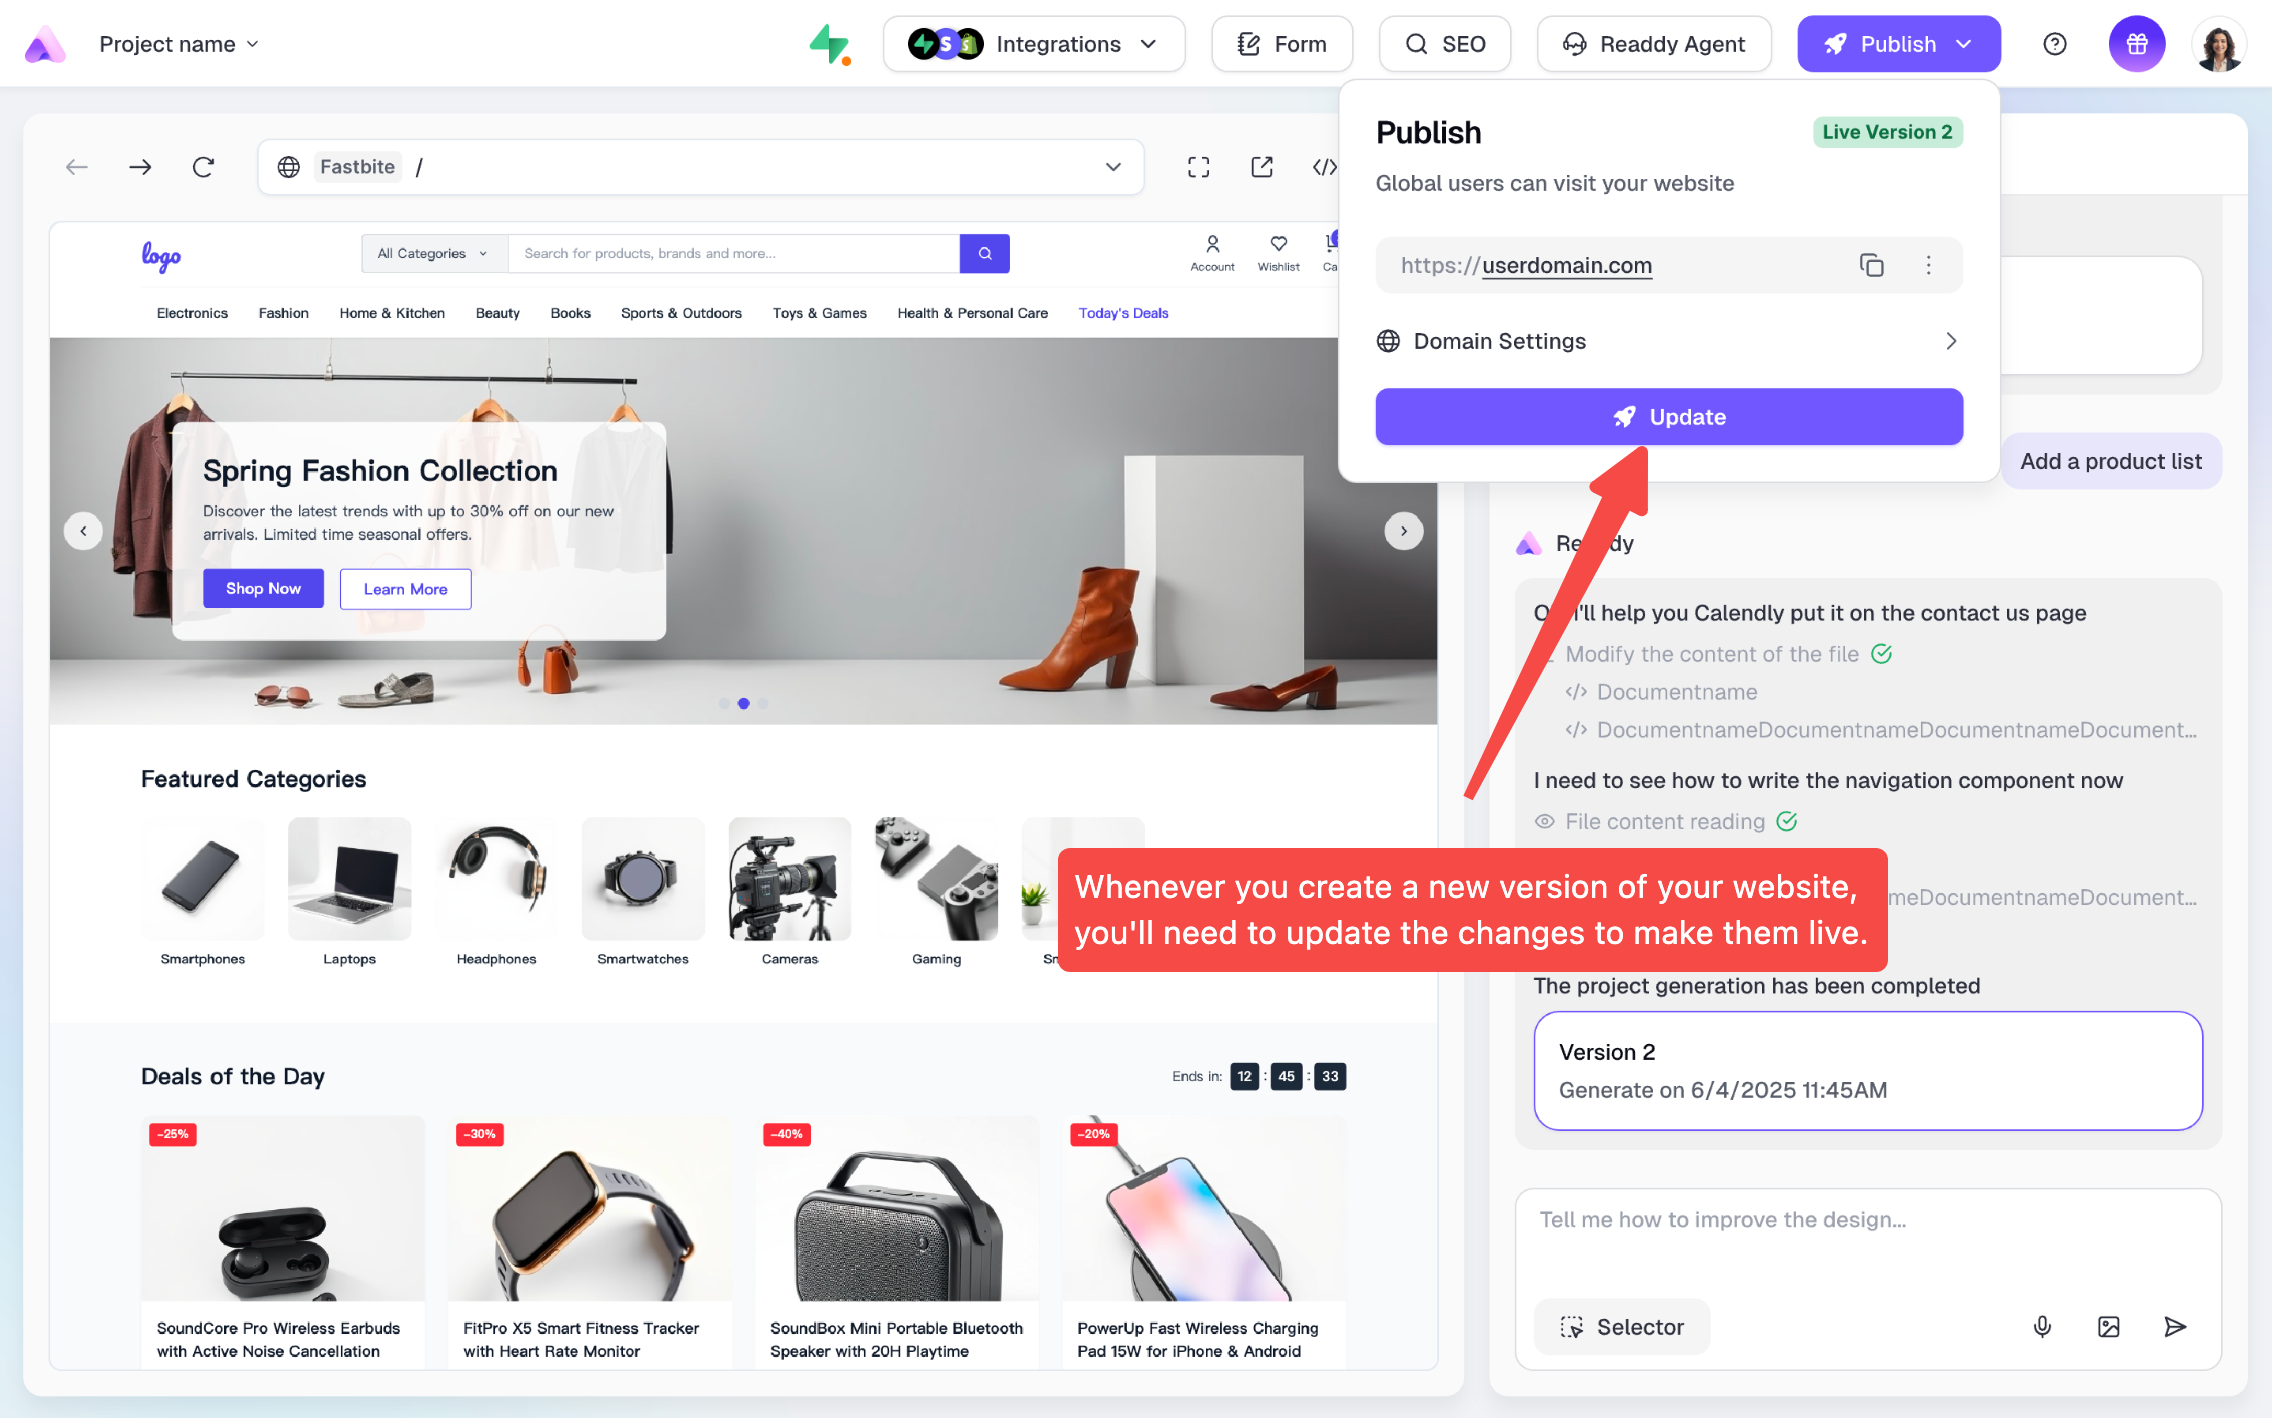
Whenever you create a new version of your website, you'll need to update the changes to make them live.
Don't worry, you won't need to set up DNS once more. Just click the **Update** button to publish the latest version of your project.
## Update Your Website
Whenever you create a new version of your website, you'll need to update the changes to make them live.
Don't worry, you won't need to set up DNS once more. Just click the **Update** button to publish the latest version of your project.
 ***
## Need Help?
If this guide doesn't resolve your issue, [submit a support ticket](https://readdy.ai/feedback). We're here to help!
***
## Need Help?
If this guide doesn't resolve your issue, [submit a support ticket](https://readdy.ai/feedback). We're here to help!