> ## Documentation Index
> Fetch the complete documentation index at: https://docs.readdy.ai/llms.txt
> Use this file to discover all available pages before exploring further.
# Integrate with Shopify
> Connect your Shopify store to your Readdy website and sell products directly on your site
## 1. What is Shopify?
Shopify is a leading global e-commerce platform that provides businesses and individuals with a complete solution for creating and managing online stores. You can connect your Shopify account to Readdy's project, enabling you to sell the Shopify products on your Readdy-generated websites.
## 2. Before You Start
You need to connect to **Supabase** before setting up Shopify integration.
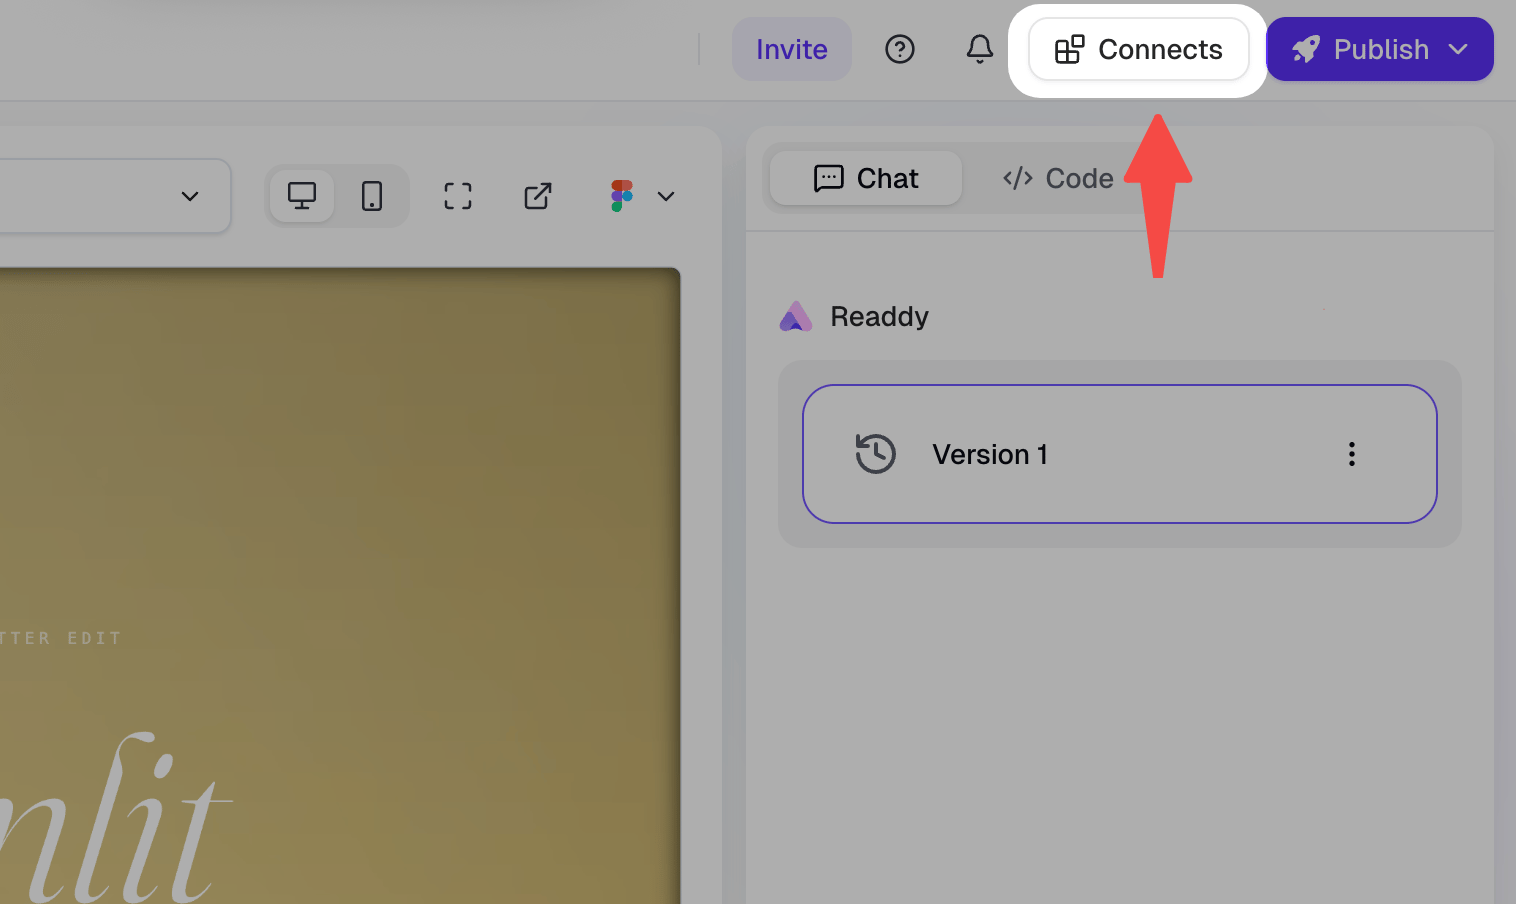
In the Readdy editor, click the **Connects** button at the top of the screen.
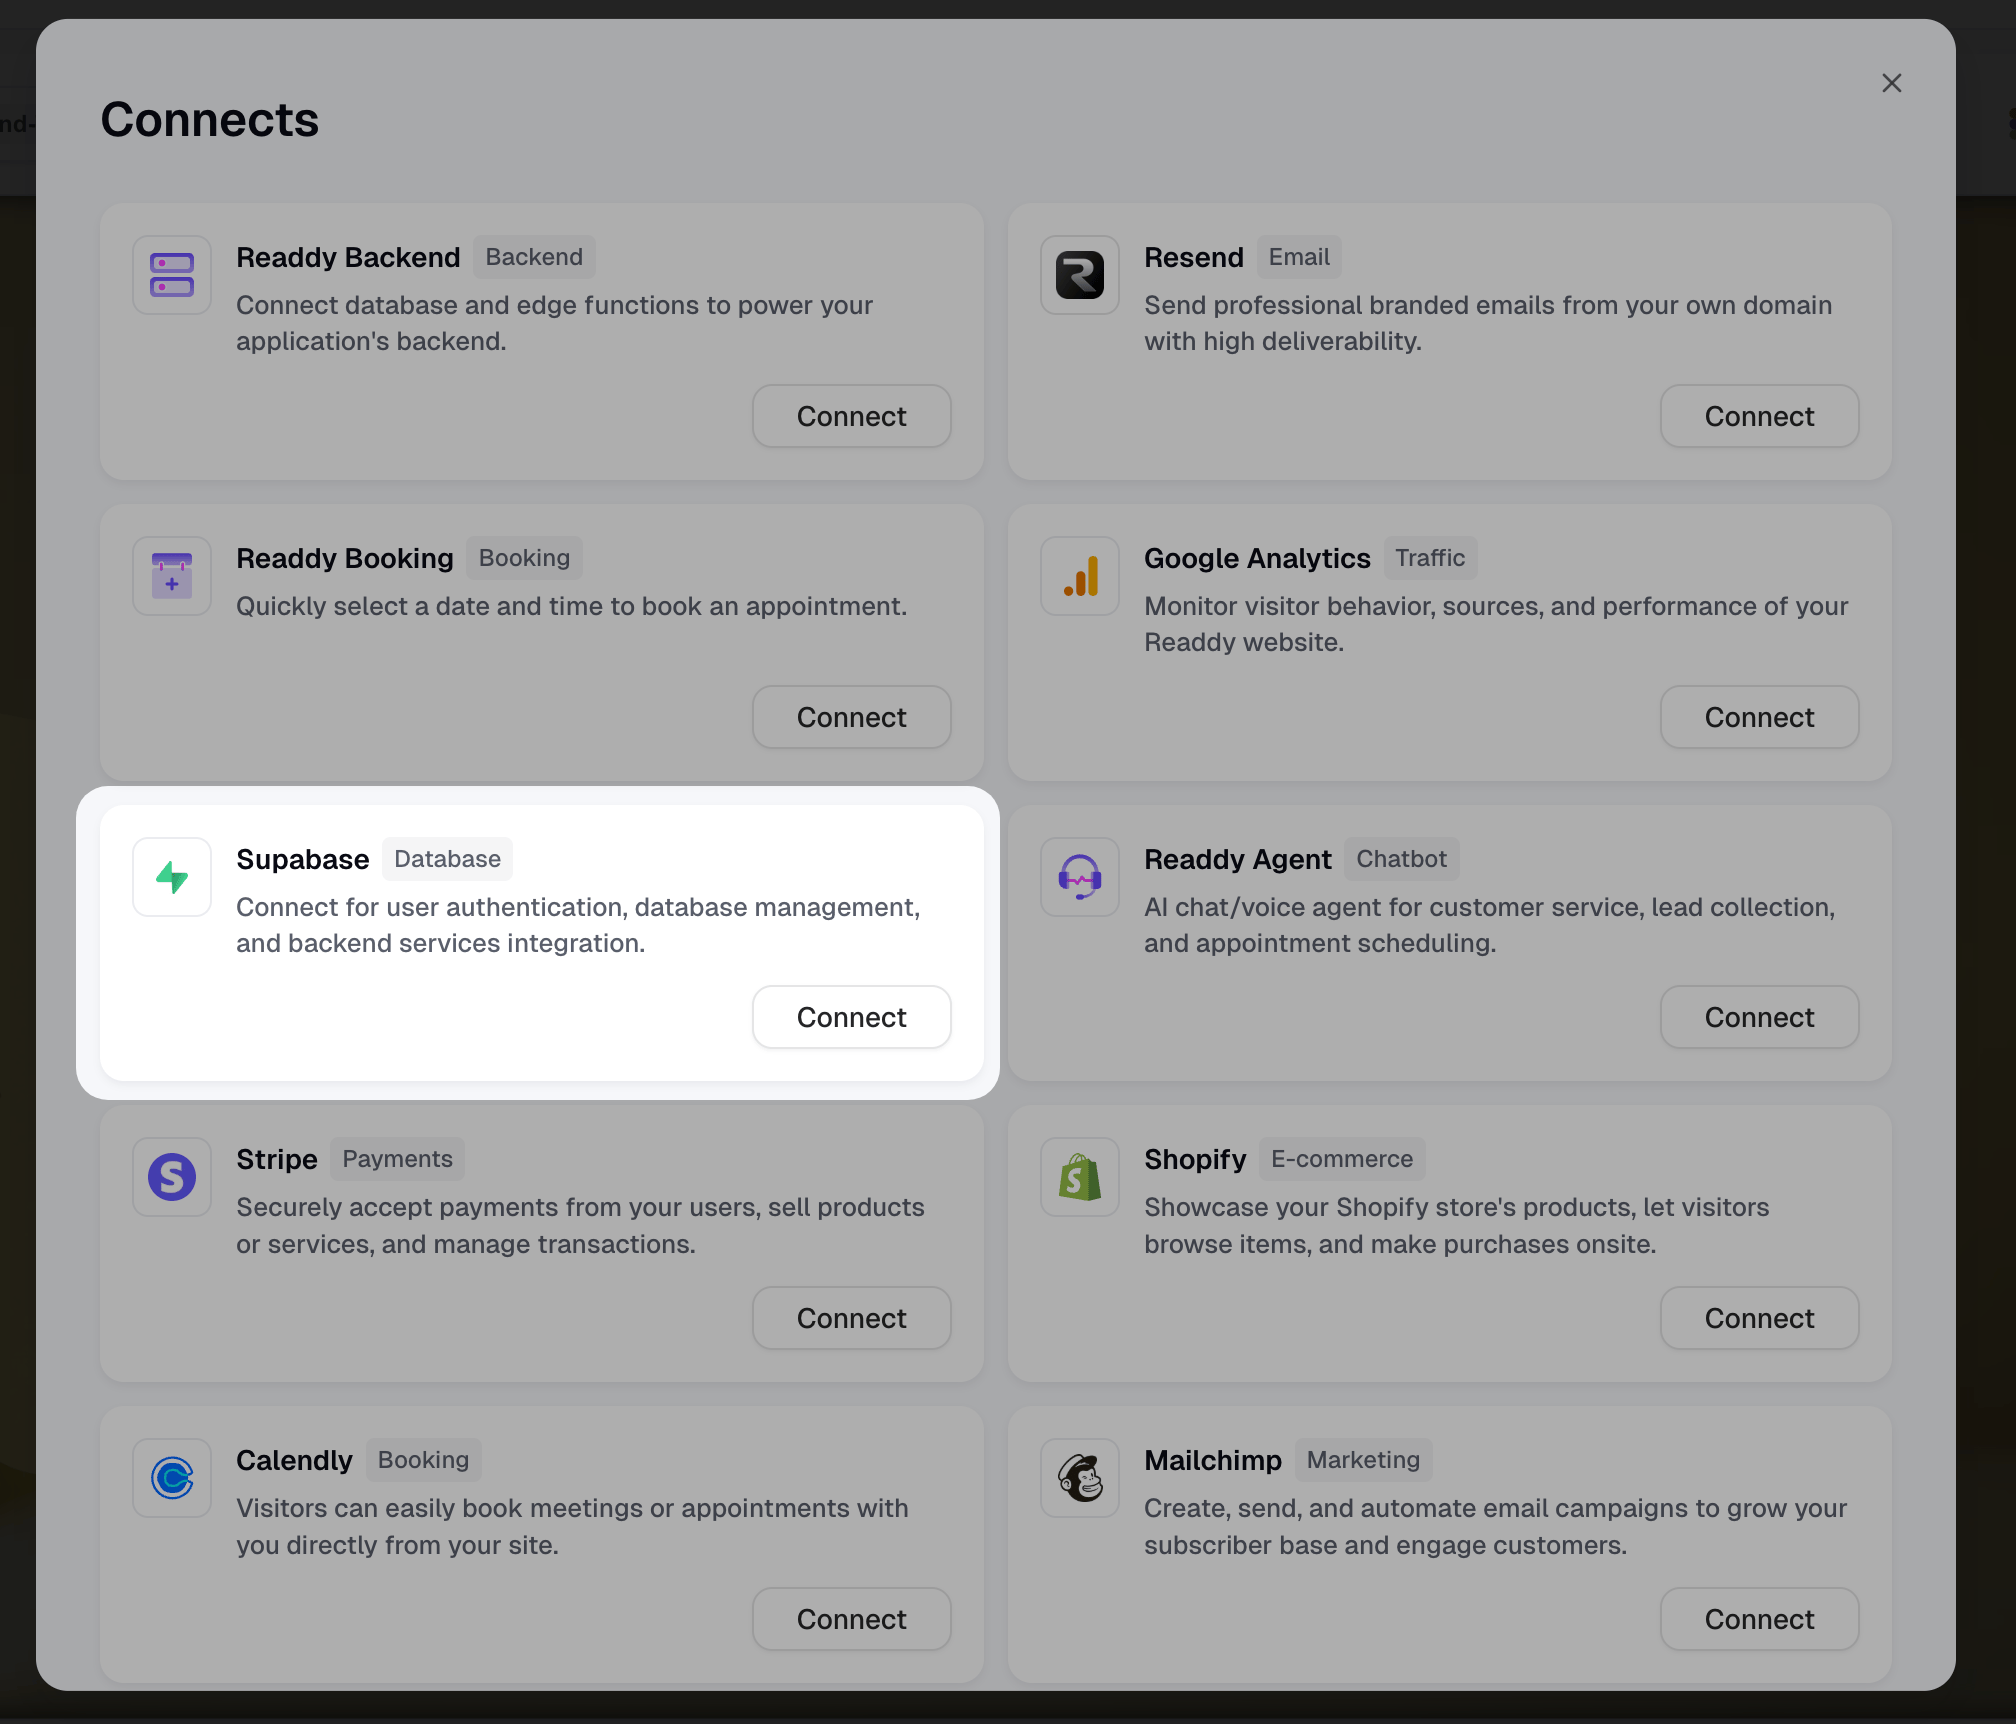
 From the Connects panel, find **Supabase** and click **Connect** to set it up first.
 For detailed instructions, see [How to connect Supabase](/integrations/supabase).
## 3. Access the Shopify Integration
Once Supabase is connected, open **Connects** again and select **Shopify**.
For detailed instructions, see [How to connect Supabase](/integrations/supabase).
## 3. Access the Shopify Integration
Once Supabase is connected, open **Connects** again and select **Shopify**.
 After opening the Shopify panel, you'll see three fields to fill in: **Store Domain**, **Client ID**, and **Secret Key**.
> Store connection is a one-time setup — you won't need to enter these credentials again for future use of this feature.
After opening the Shopify panel, you'll see three fields to fill in: **Store Domain**, **Client ID**, and **Secret Key**.
> Store connection is a one-time setup — you won't need to enter these credentials again for future use of this feature.
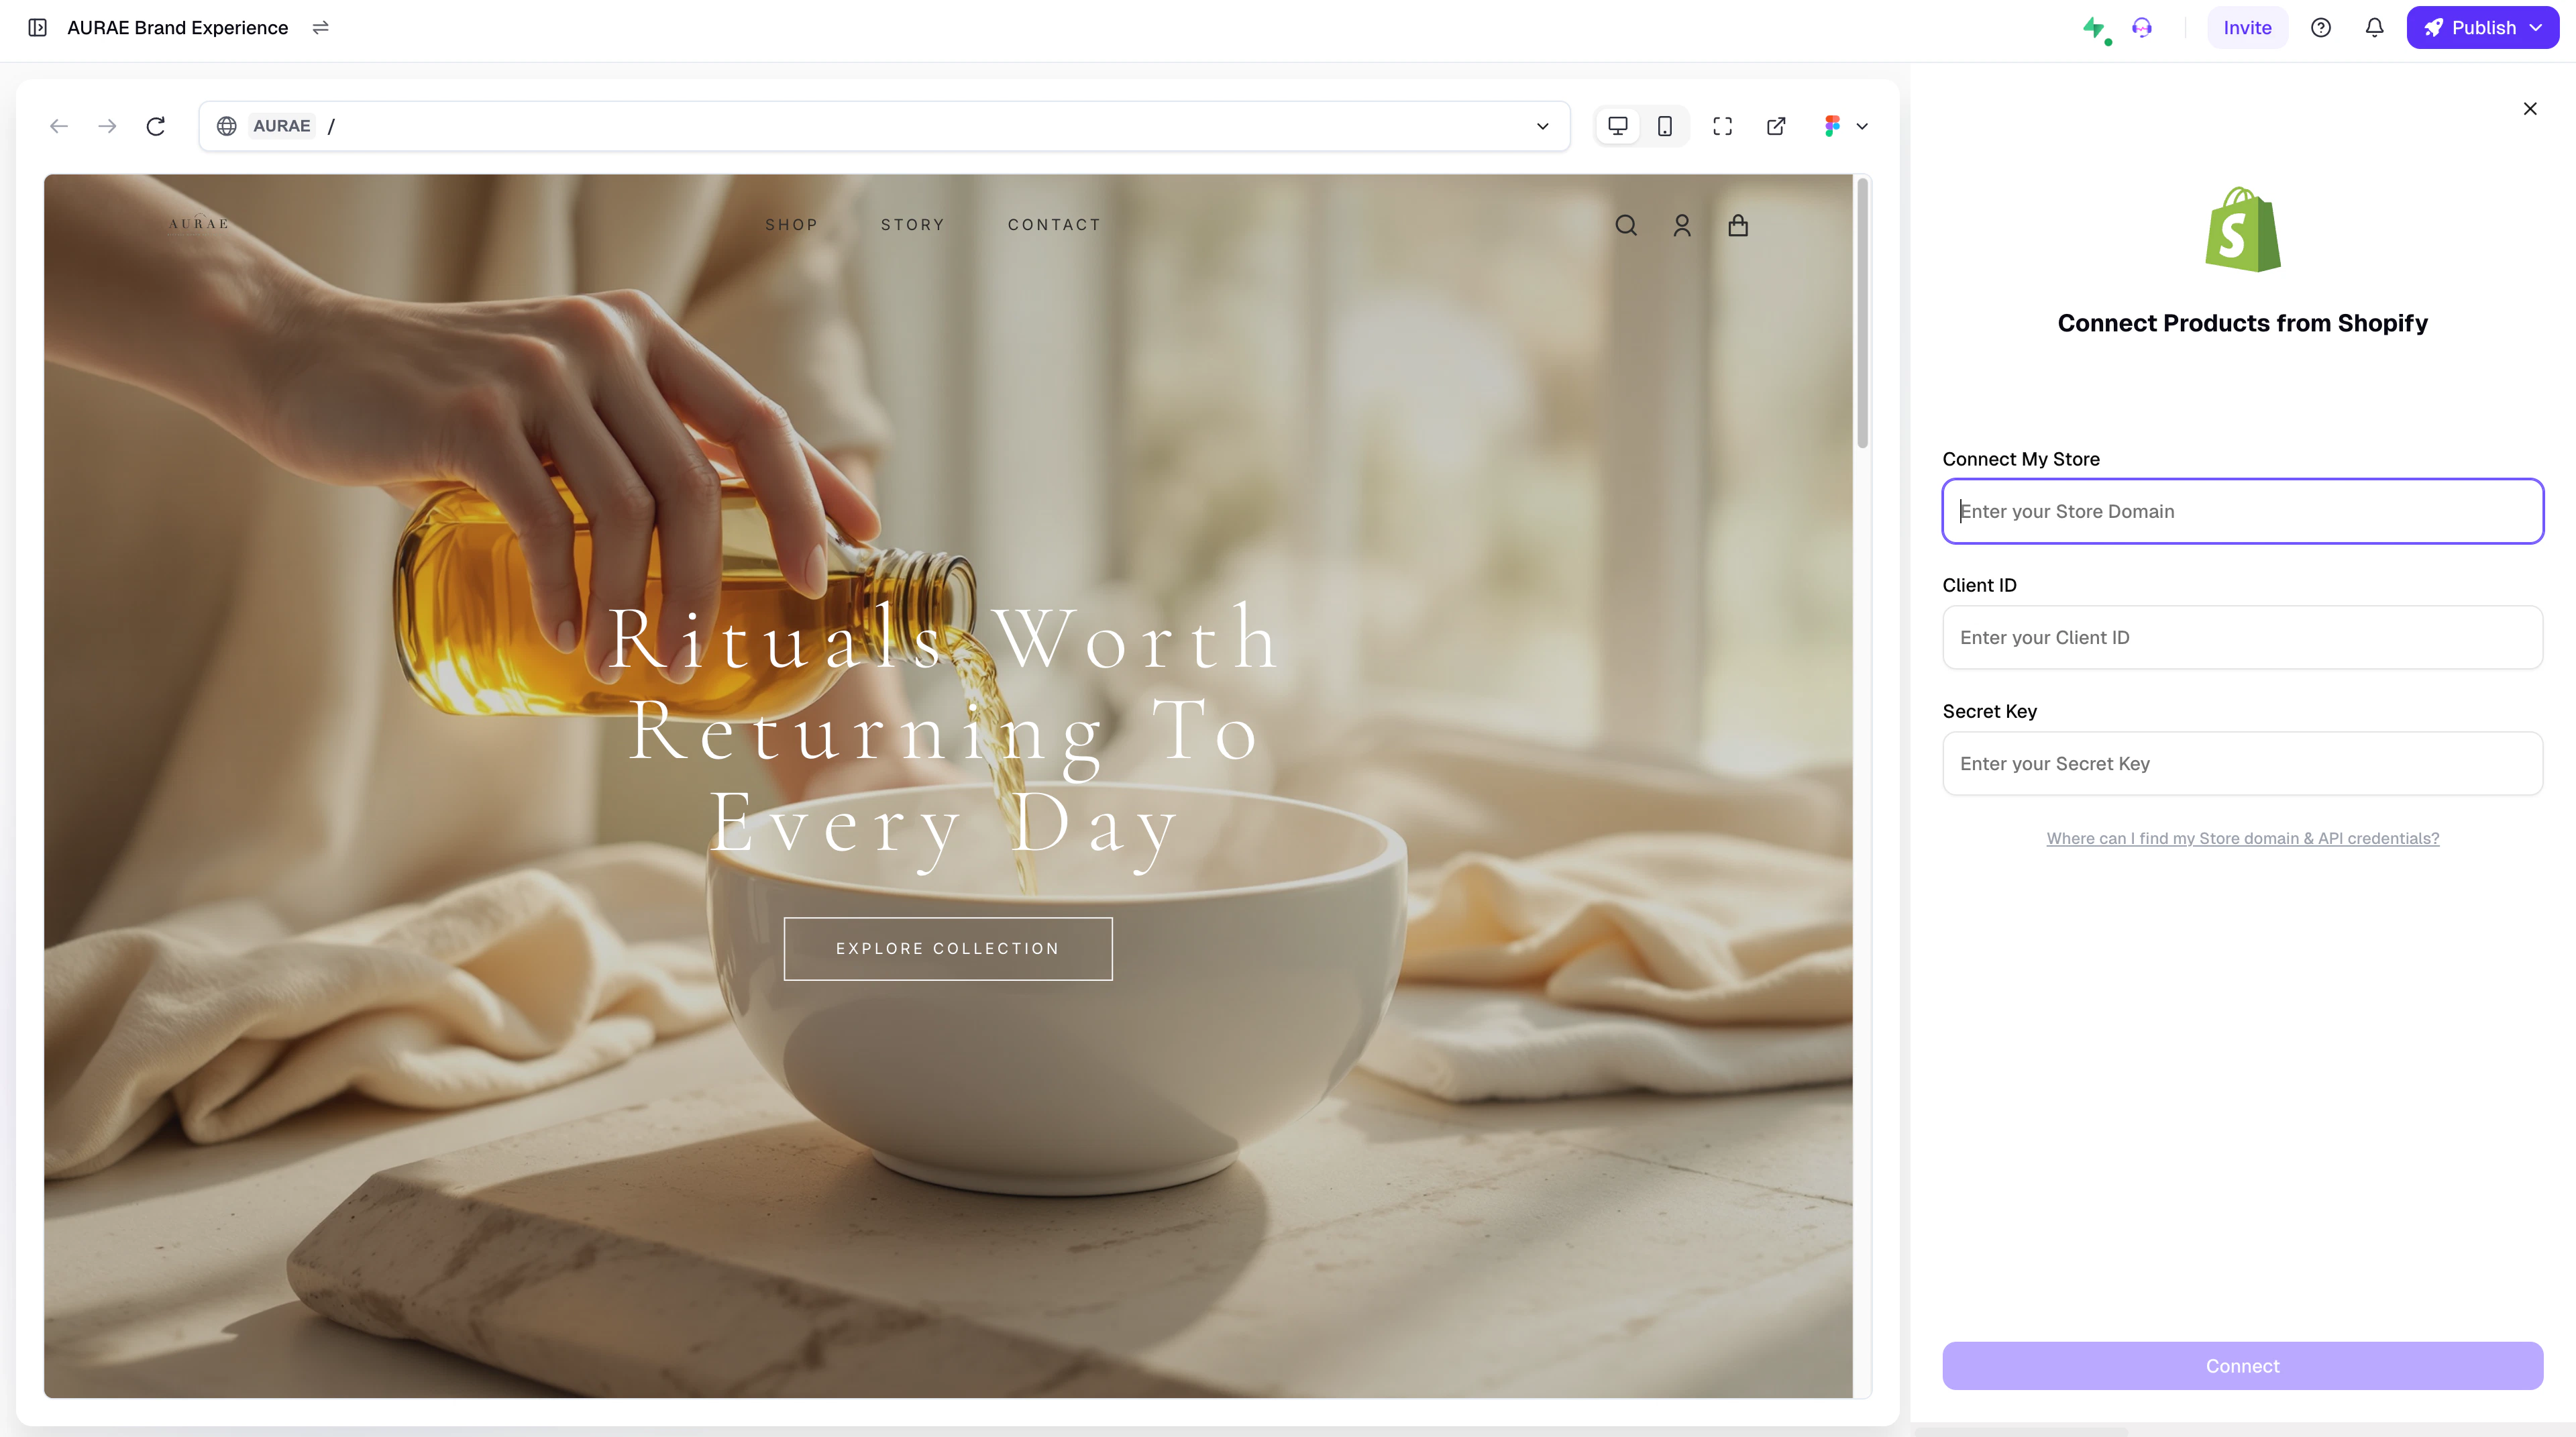 The following steps will guide you through obtaining each of these three values from your Shopify account.
## 4. Get Your Store Domain
Visit [https://www.shopify.com/](https://www.shopify.com/), log in to your Shopify account, and switch to the store you want to connect.
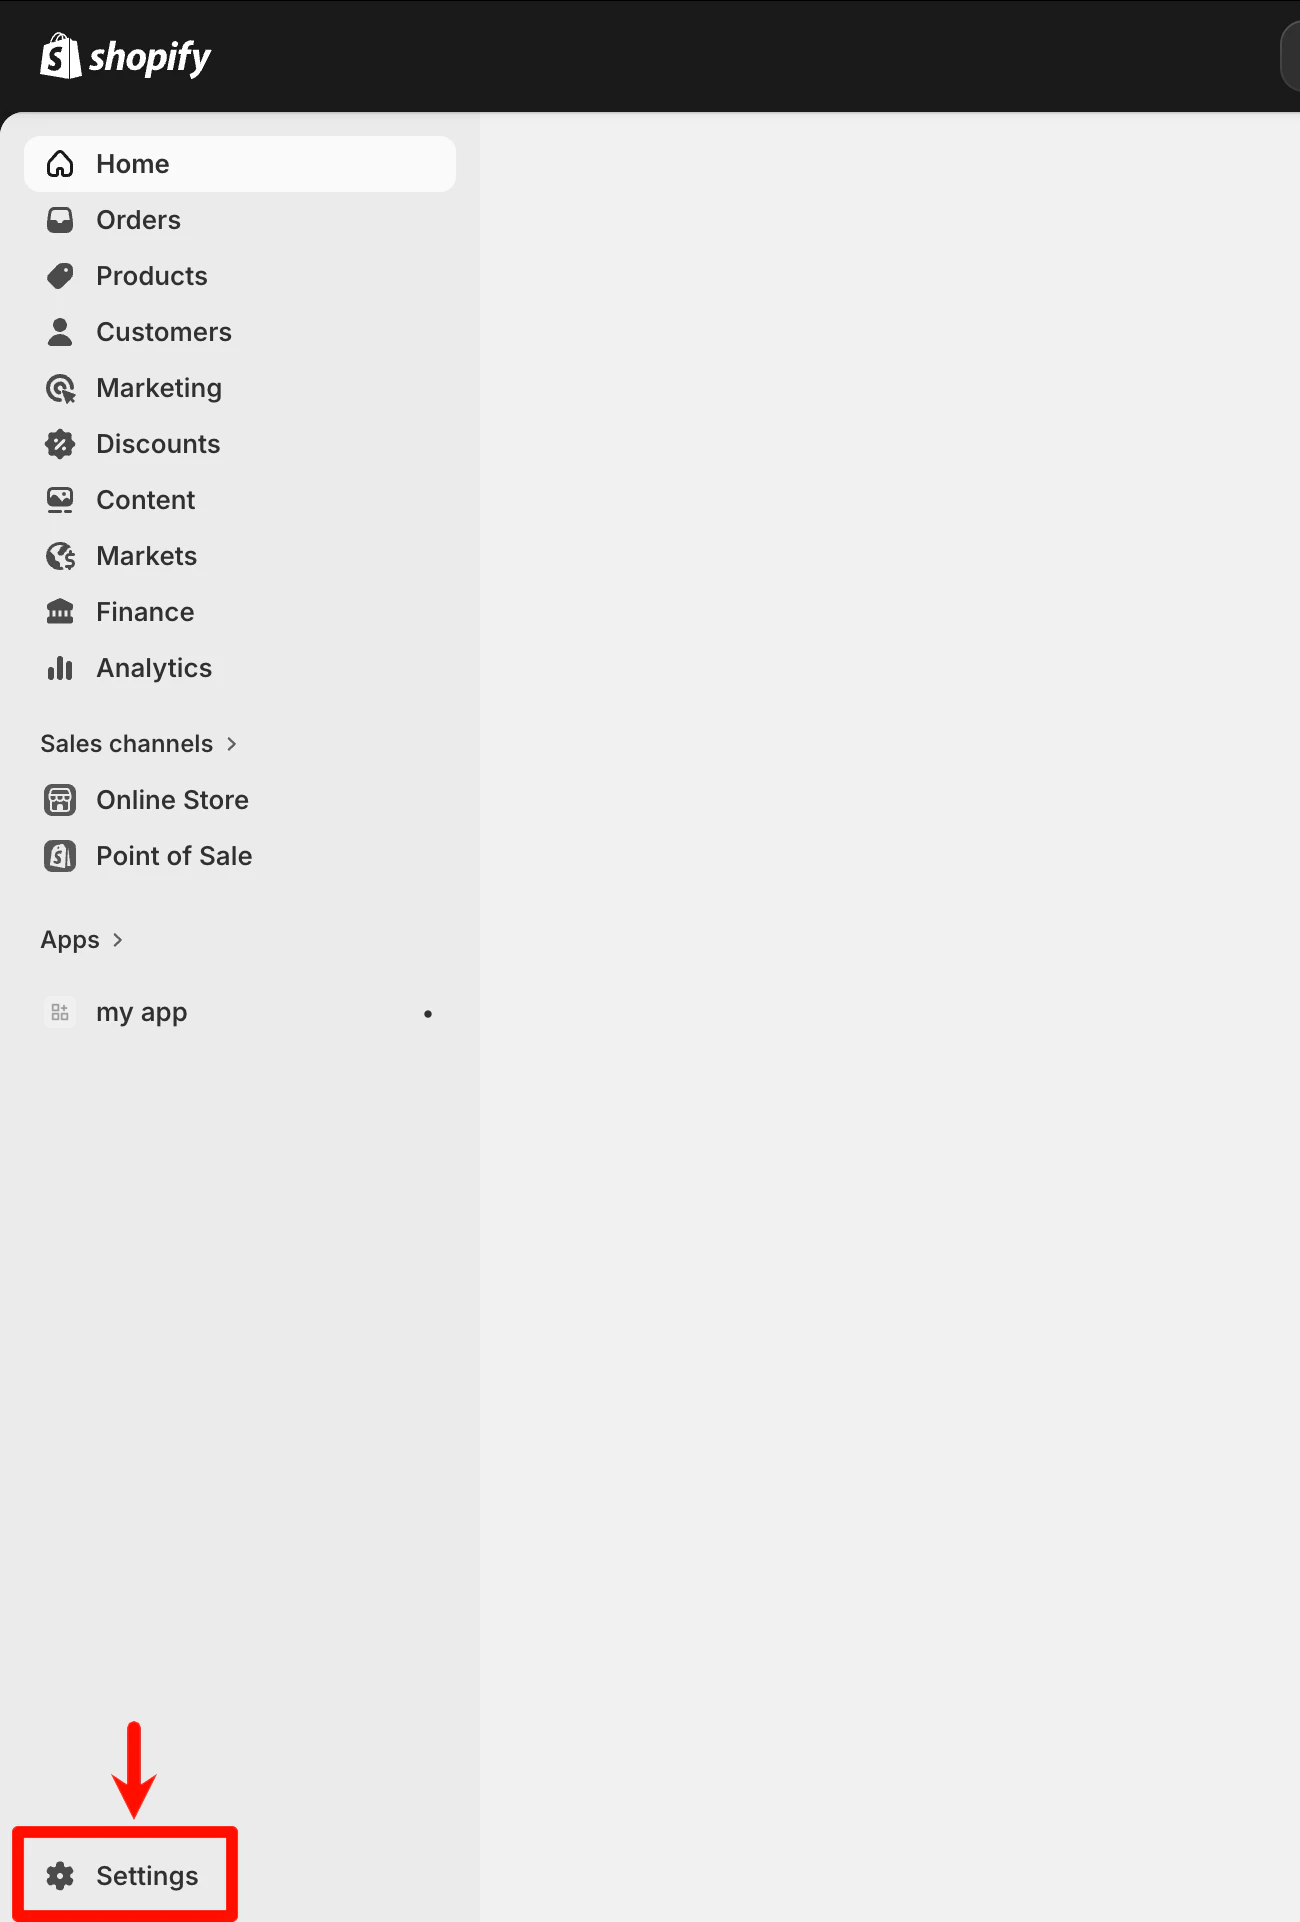
Click "**Settings**" in the bottom-left corner of the page.
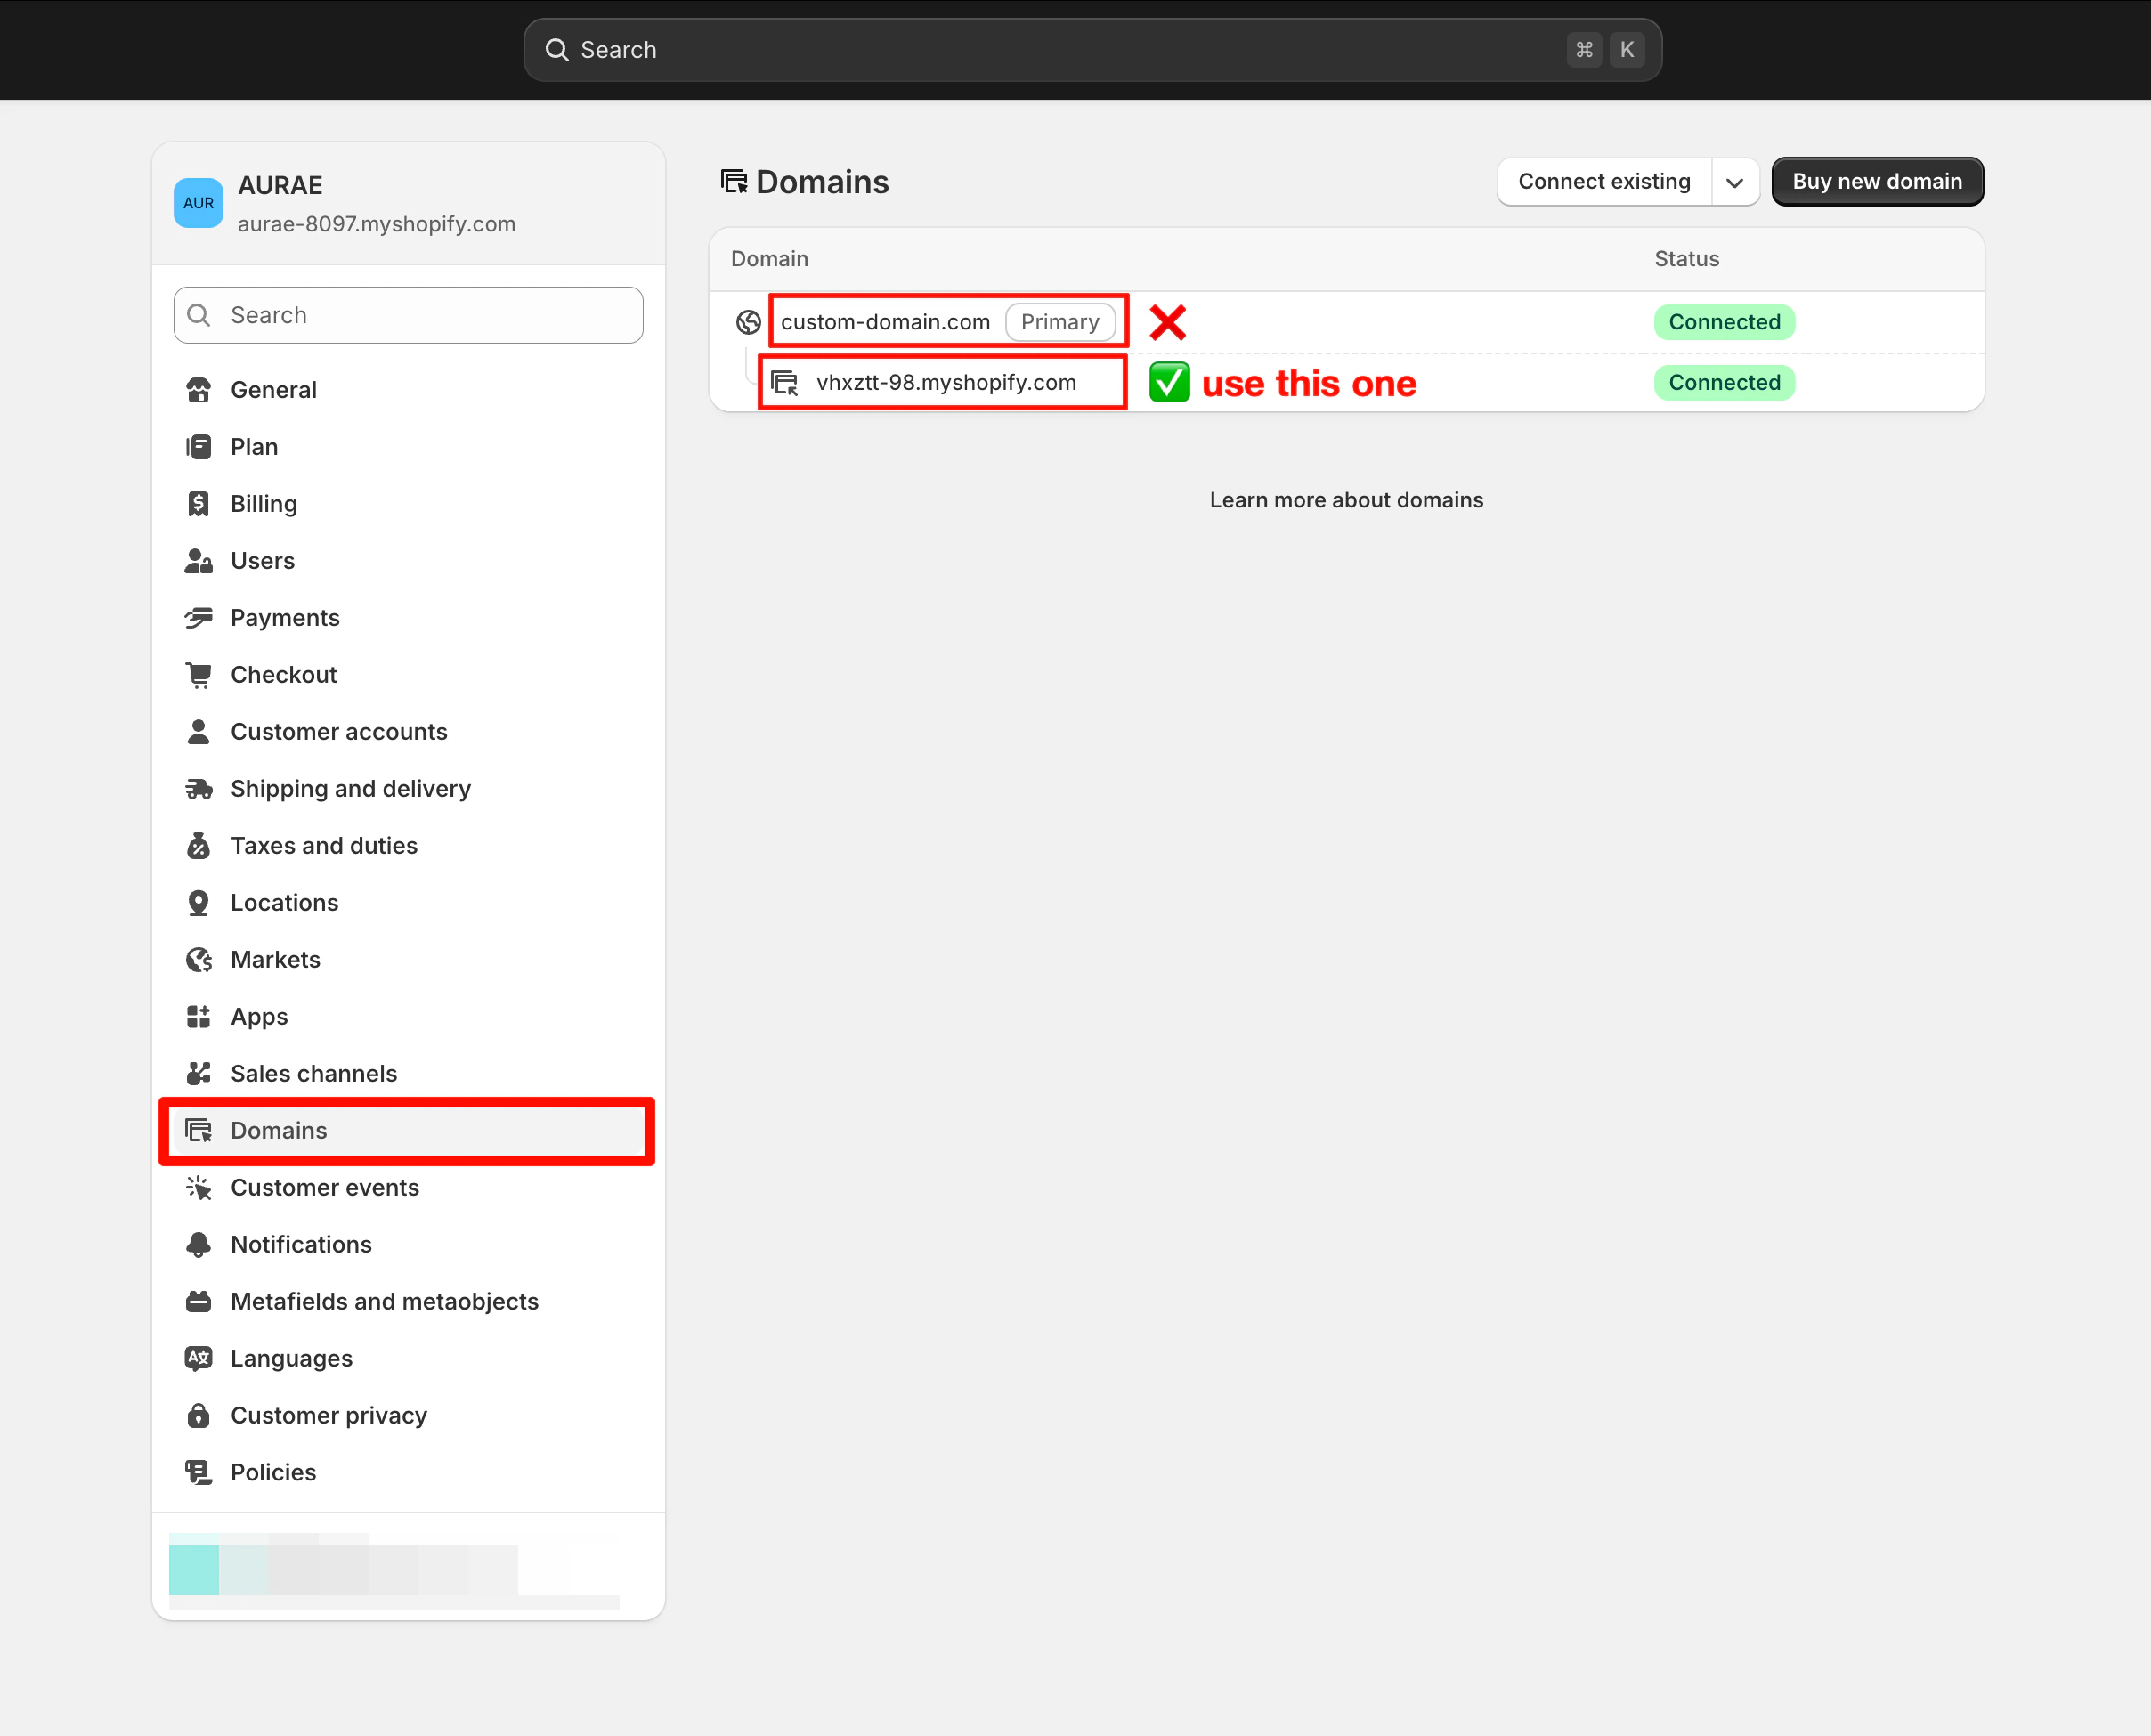
Click "**Domains**" in the left sidebar. On the right side, you'll see your store's domain.
* Copy and save the **default Shopify domain** (the one ending in `.myshopify.com`).
* Do **not** use your own custom domain.
The following steps will guide you through obtaining each of these three values from your Shopify account.
## 4. Get Your Store Domain
Visit [https://www.shopify.com/](https://www.shopify.com/), log in to your Shopify account, and switch to the store you want to connect.
Click "**Settings**" in the bottom-left corner of the page.
Click "**Domains**" in the left sidebar. On the right side, you'll see your store's domain.
* Copy and save the **default Shopify domain** (the one ending in `.myshopify.com`).
* Do **not** use your own custom domain.
 > Save the domain for later — you'll enter it in Readdy at the final step.
## 5. Create a Shopify App
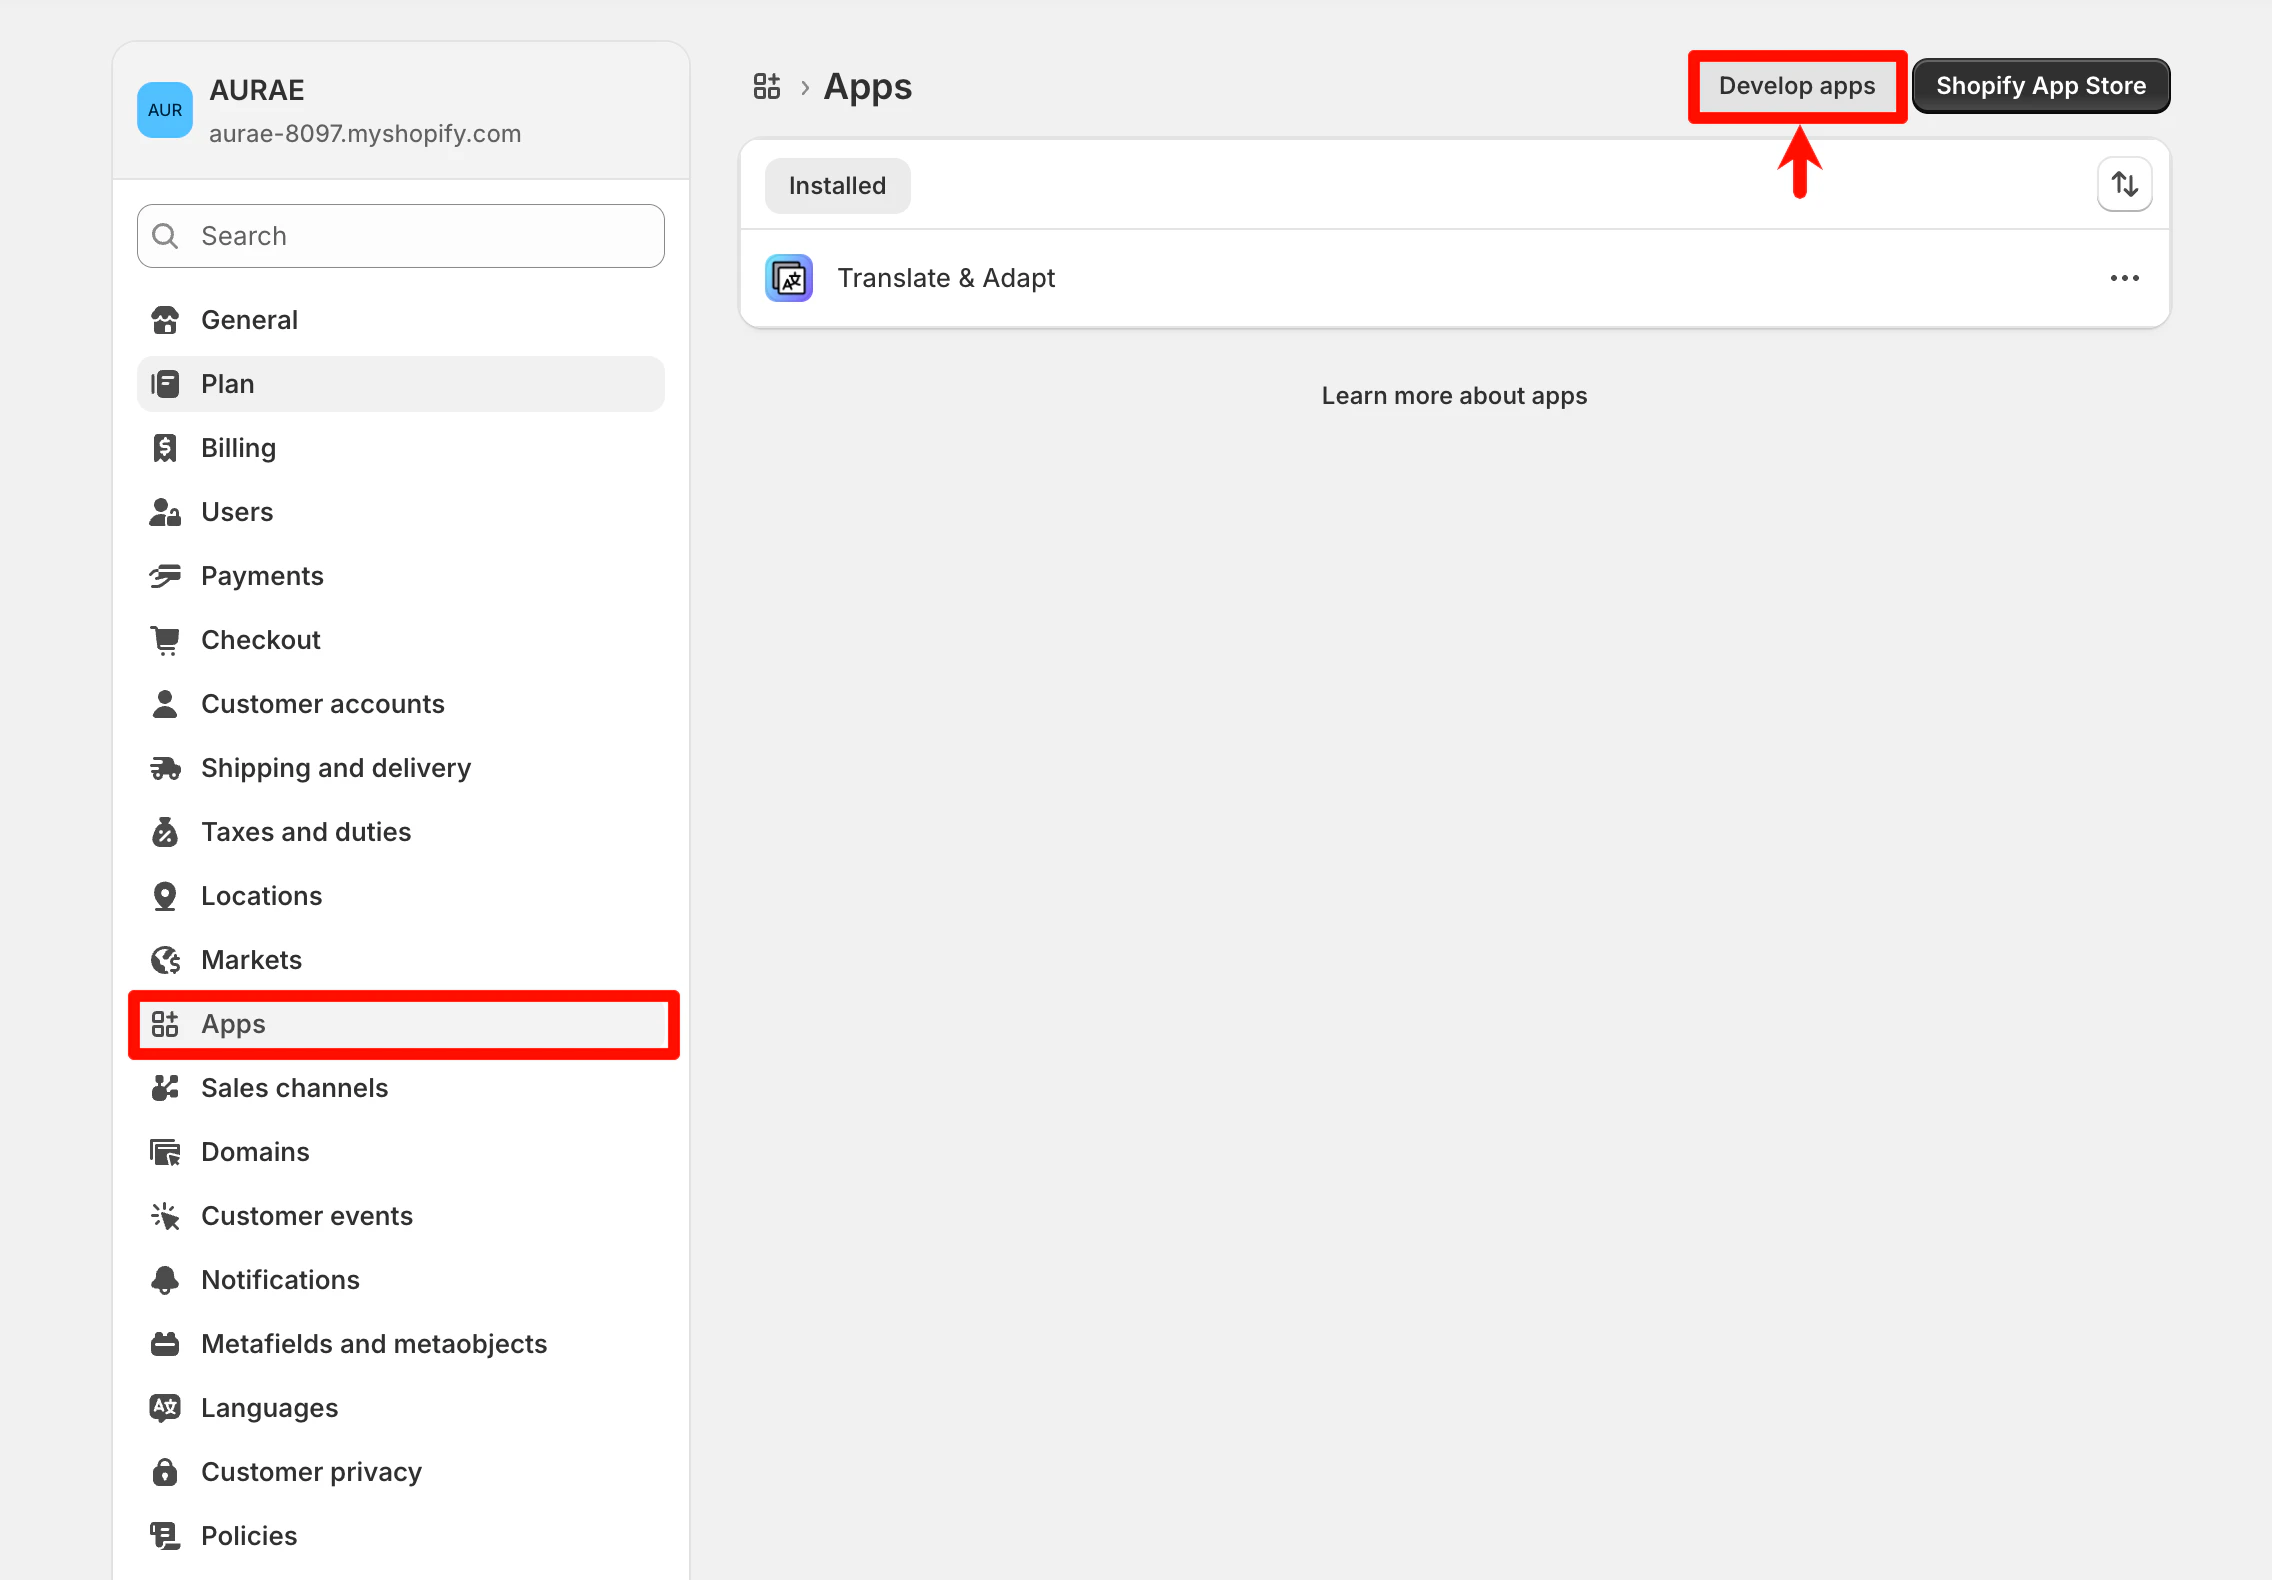
Click "**Apps**" in the left sidebar, then click "**Develop apps**".
> Save the domain for later — you'll enter it in Readdy at the final step.
## 5. Create a Shopify App
Click "**Apps**" in the left sidebar, then click "**Develop apps**".
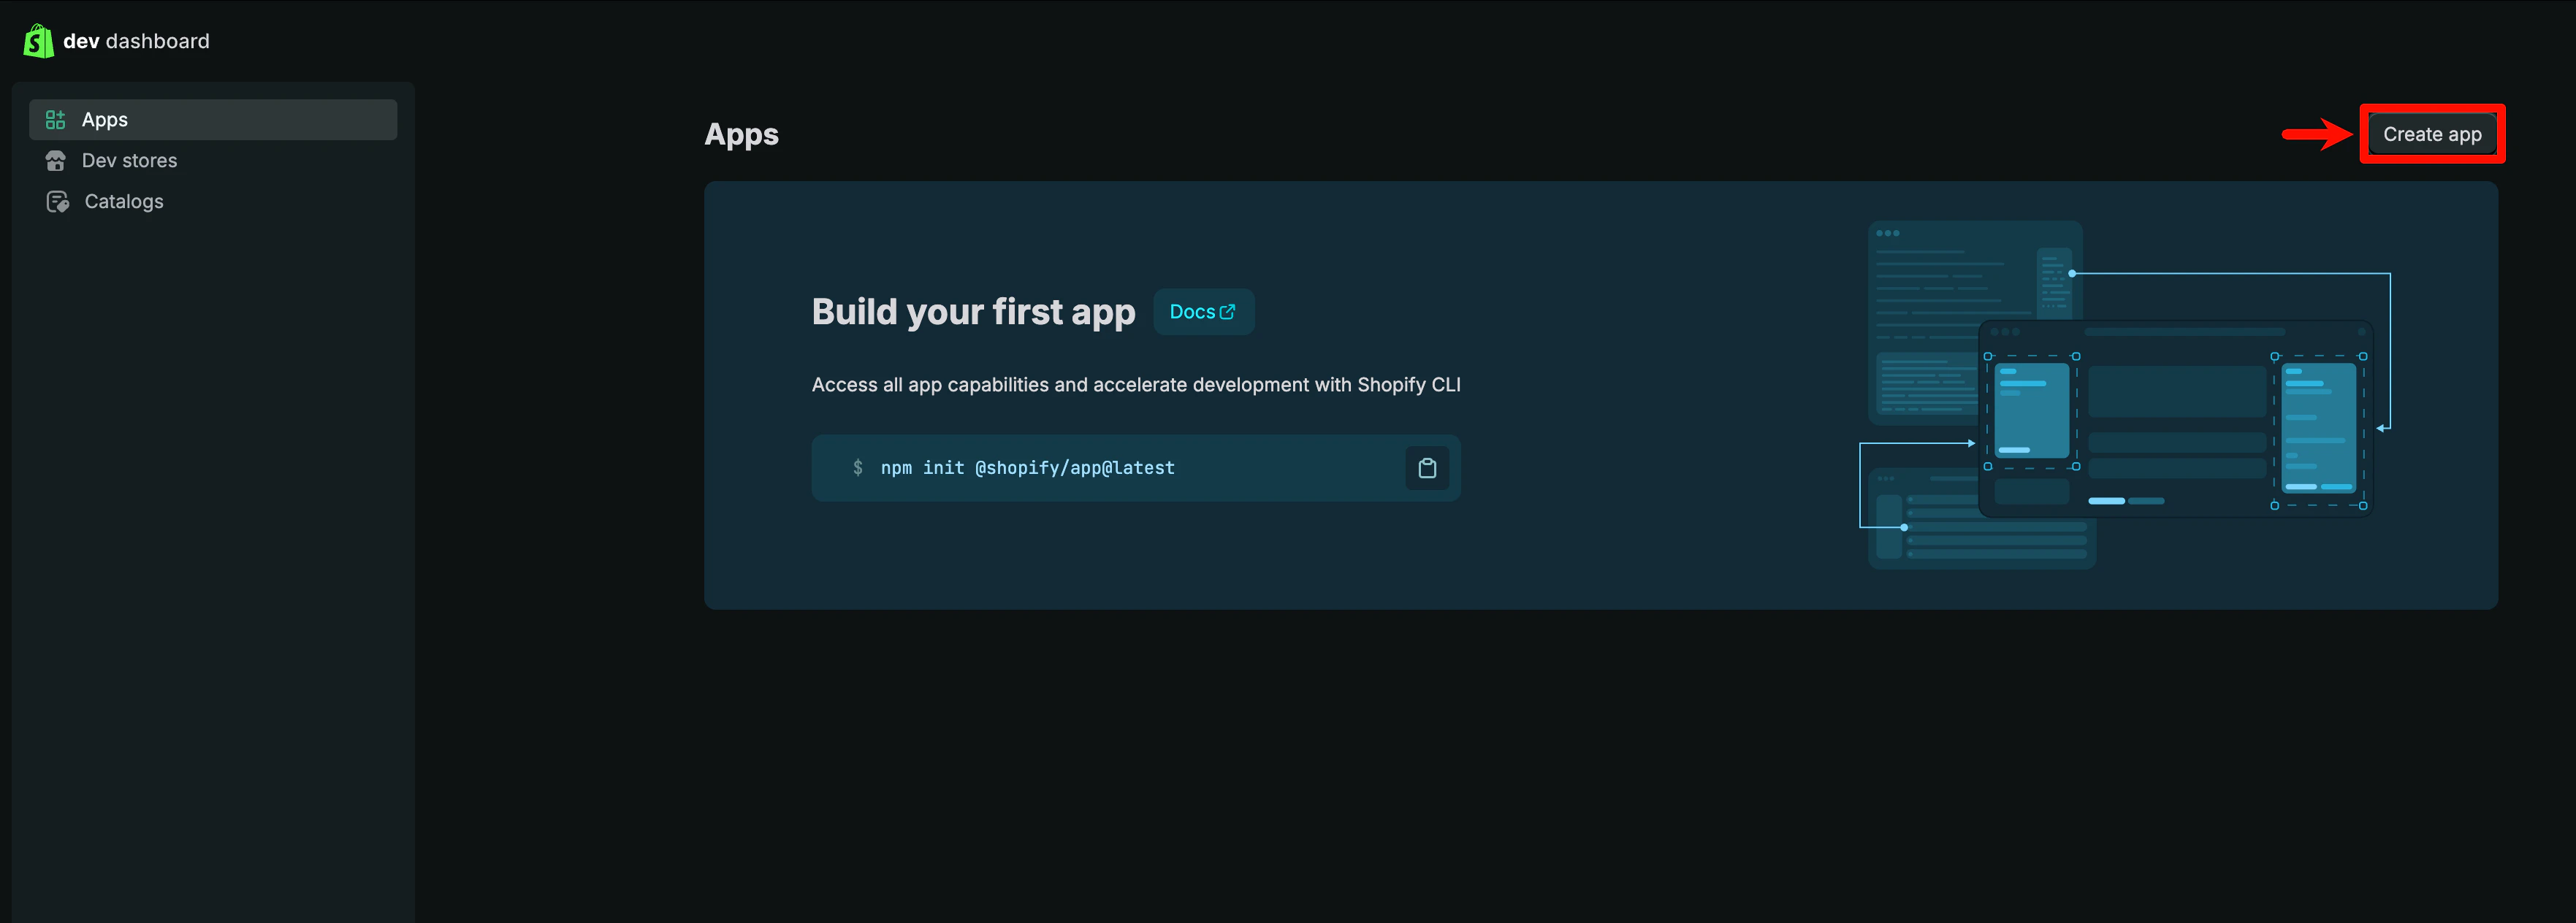
 Click the black button shown below to navigate to the **Shopify Developer Dashboard**.
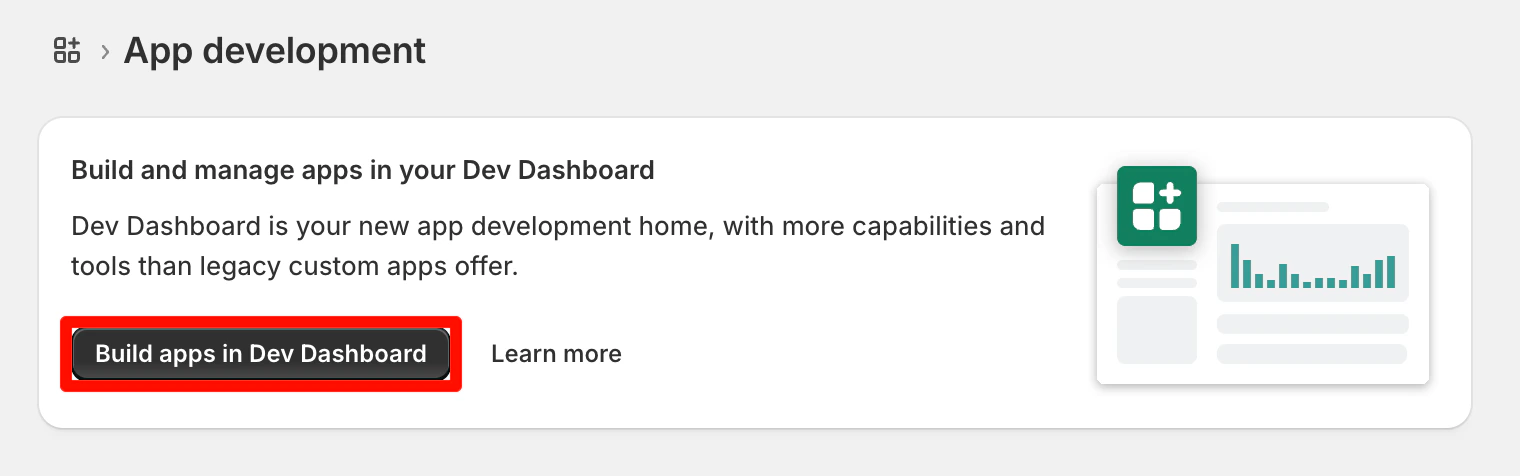 Then click "**Create app**" in the Developer Dashboard.
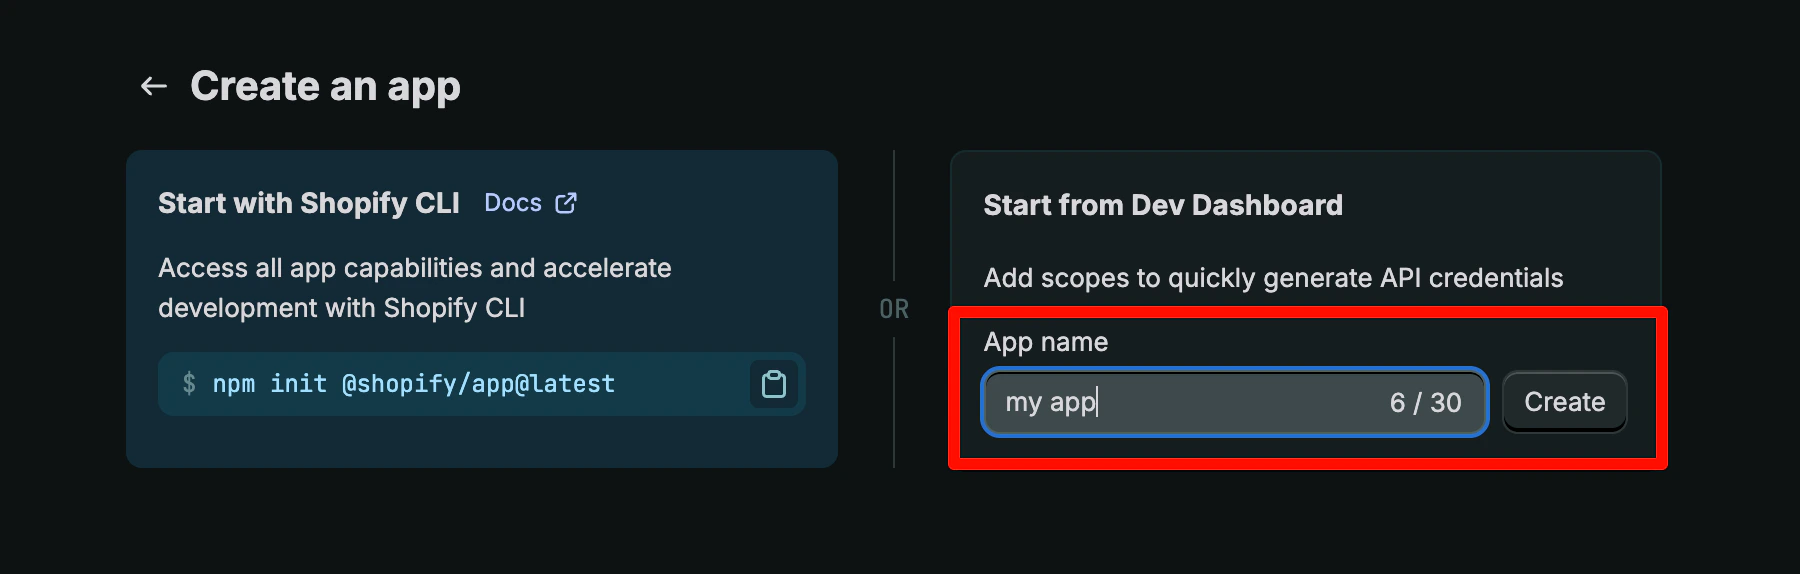
 Enter a name for your app, then click "**Create**".
> The name can be anything you prefer — just choose something you'll recognize easily.
Enter a name for your app, then click "**Create**".
> The name can be anything you prefer — just choose something you'll recognize easily.
 ## 6. Configure API Scopes
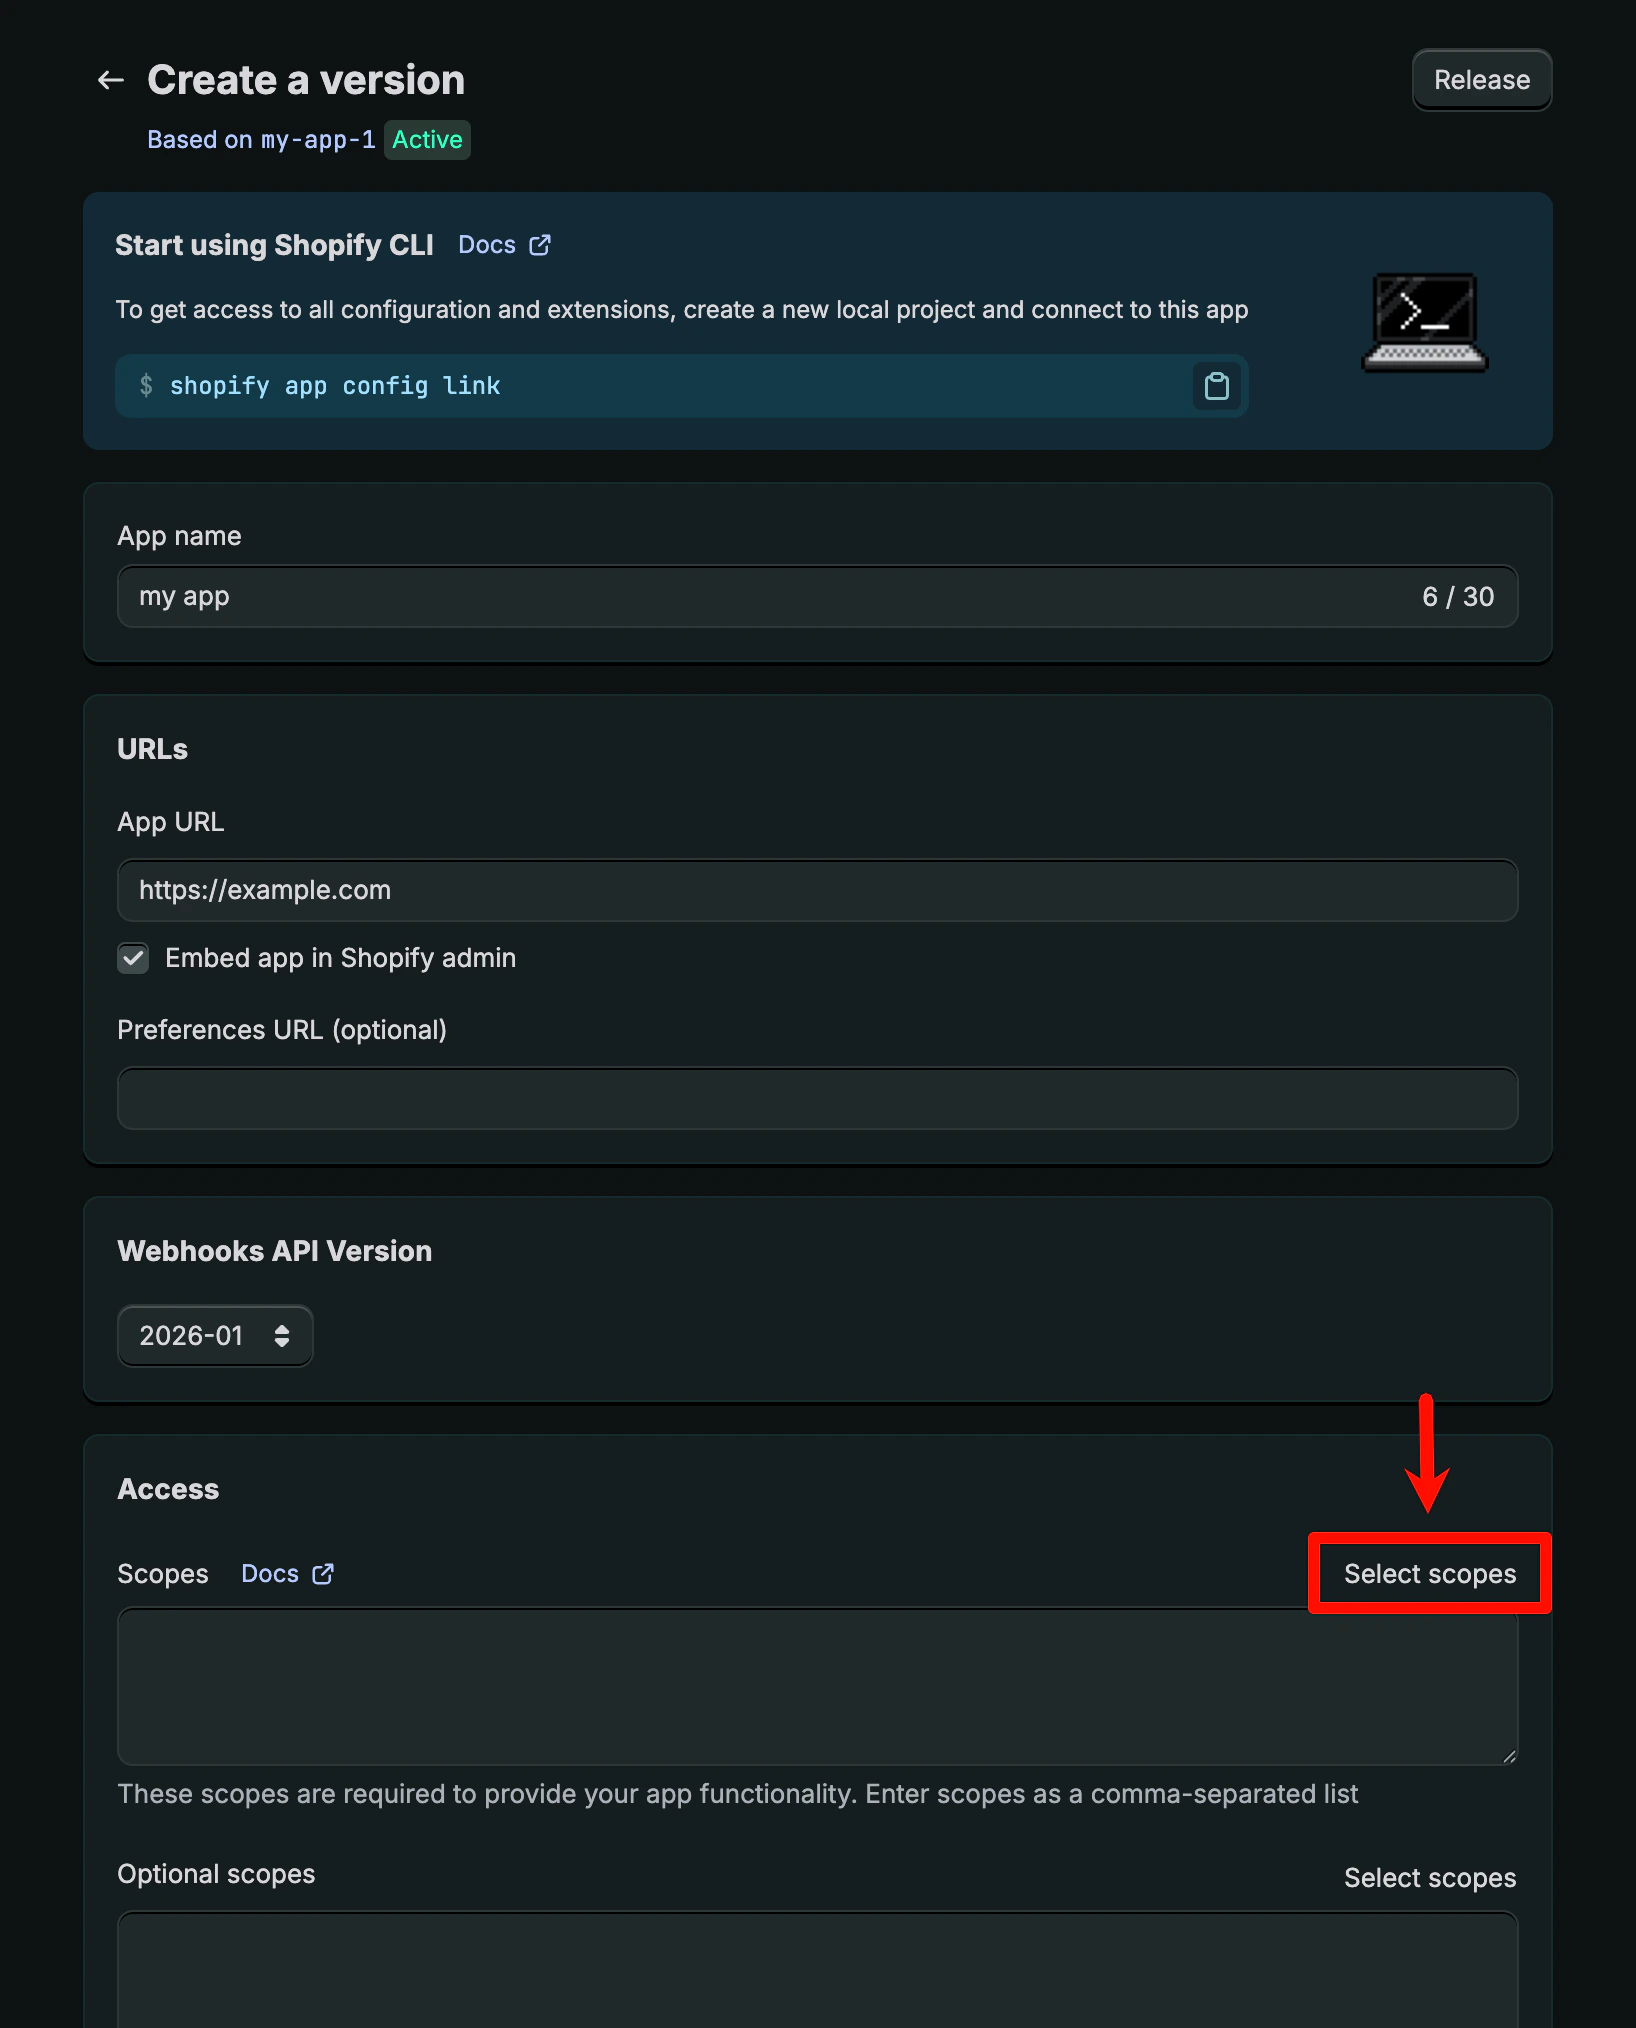
After the app is created, click "**Select scopes**" to configure the API permissions.
In the scopes selection popup, search for and enable the following **Storefront API** permissions (do not select Admin API):
**Search "checkout"** and select:
* `unauthenticated_white_checkouts`
## 6. Configure API Scopes
After the app is created, click "**Select scopes**" to configure the API permissions.
In the scopes selection popup, search for and enable the following **Storefront API** permissions (do not select Admin API):
**Search "checkout"** and select:
* `unauthenticated_white_checkouts`
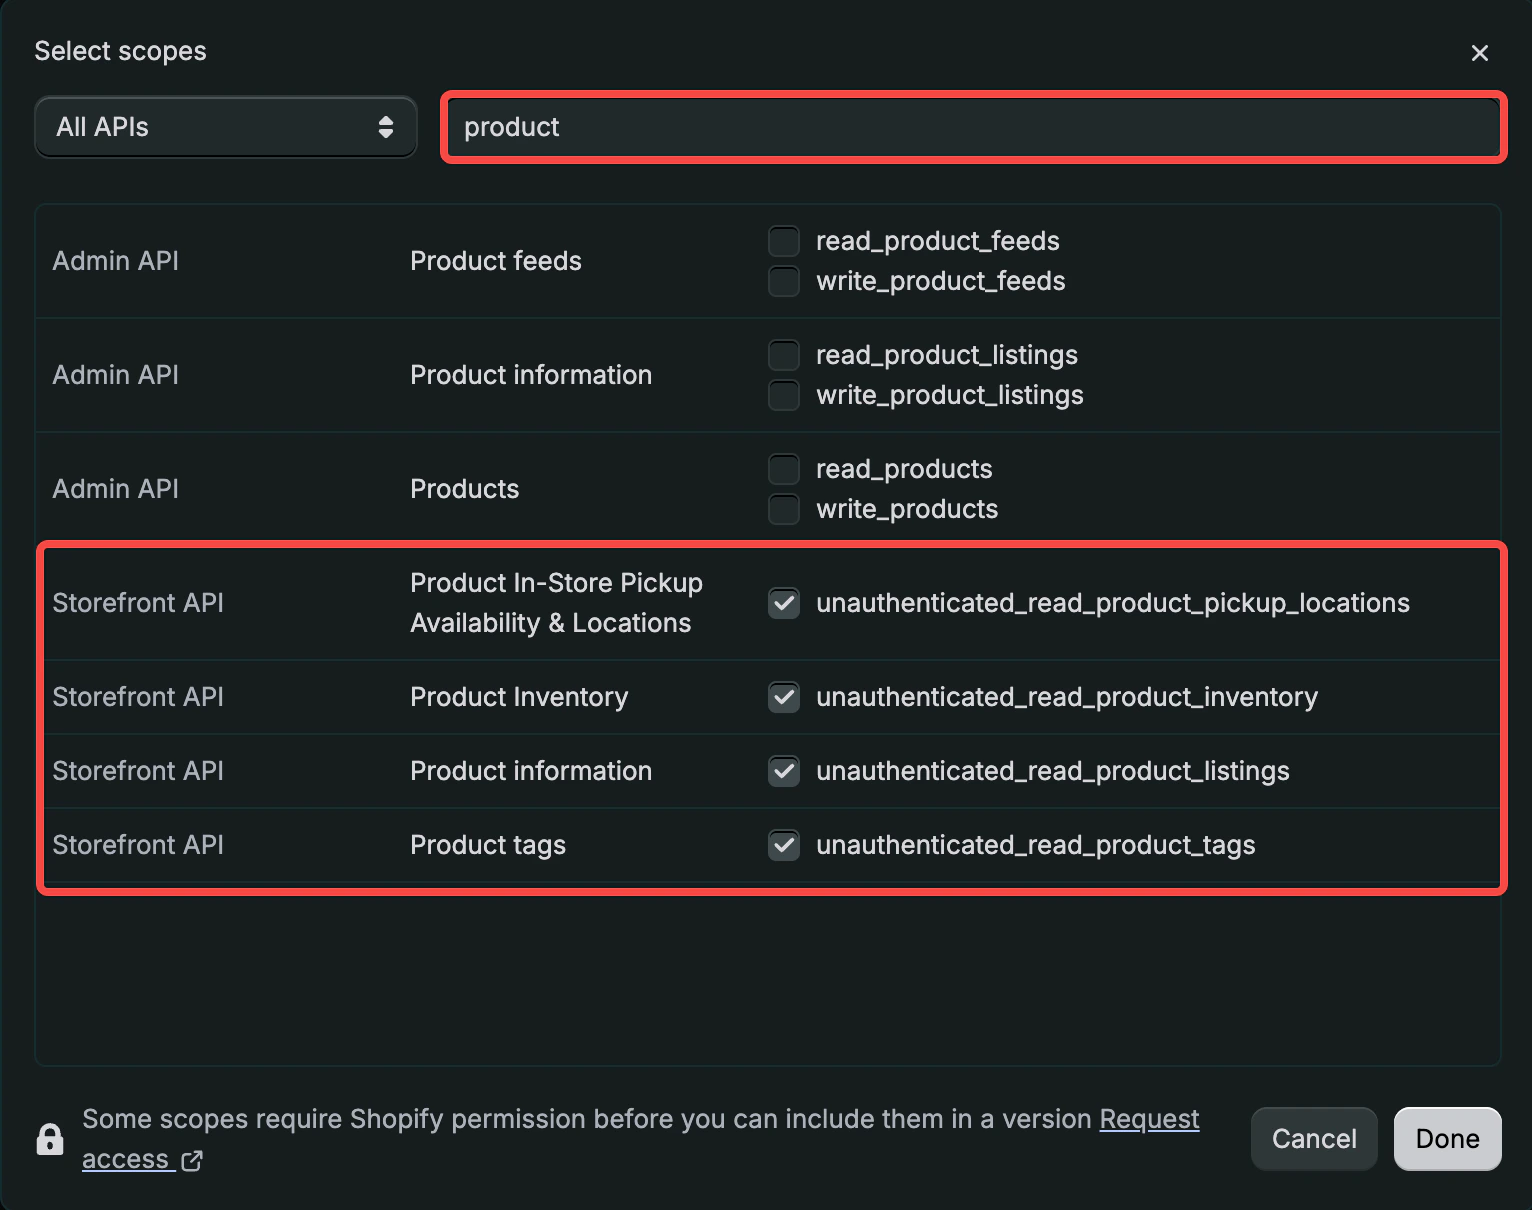
 **Search "product"** and select:
* `unauthenticated_read_product_pickup_locations`
* `unauthenticated_read_product_inventory`
* `unauthenticated_read_product_listings`
* `unauthenticated_read_product_tags`
**Search "product"** and select:
* `unauthenticated_read_product_pickup_locations`
* `unauthenticated_read_product_inventory`
* `unauthenticated_read_product_listings`
* `unauthenticated_read_product_tags`
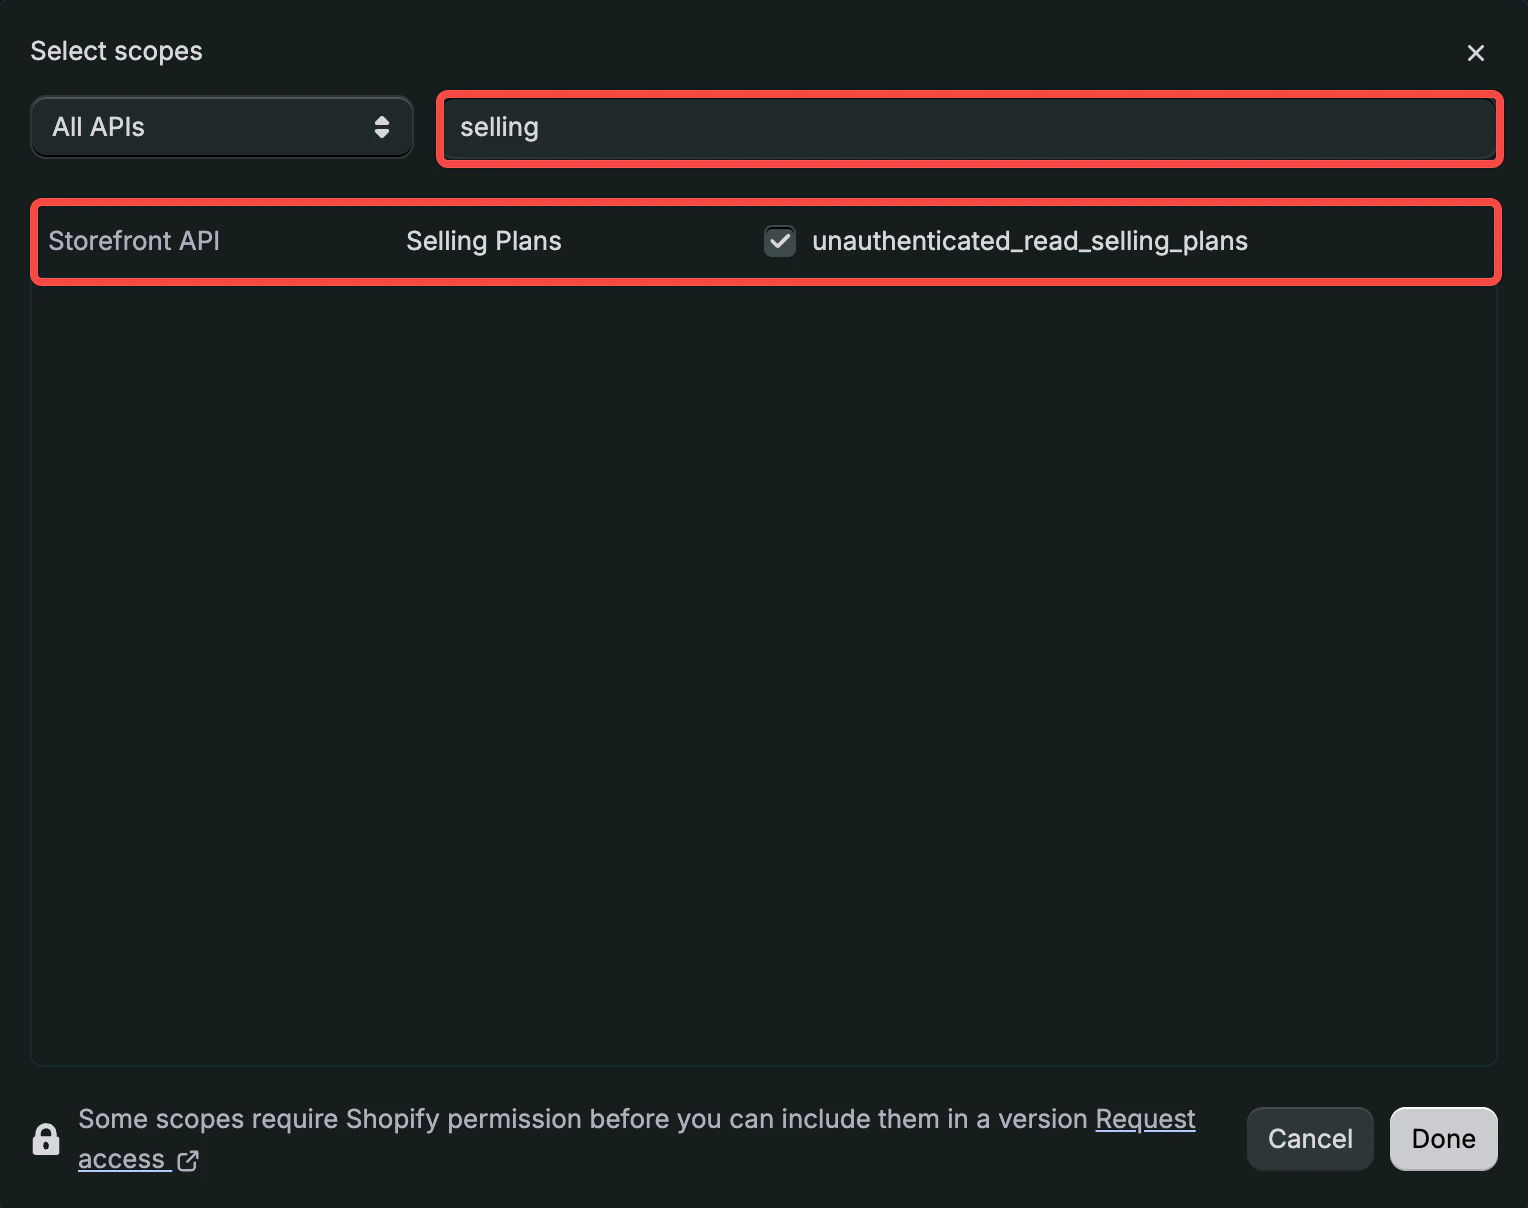
 **Search "selling"** and select:
* `unauthenticated_read_selling_plans`
**Search "selling"** and select:
* `unauthenticated_read_selling_plans`
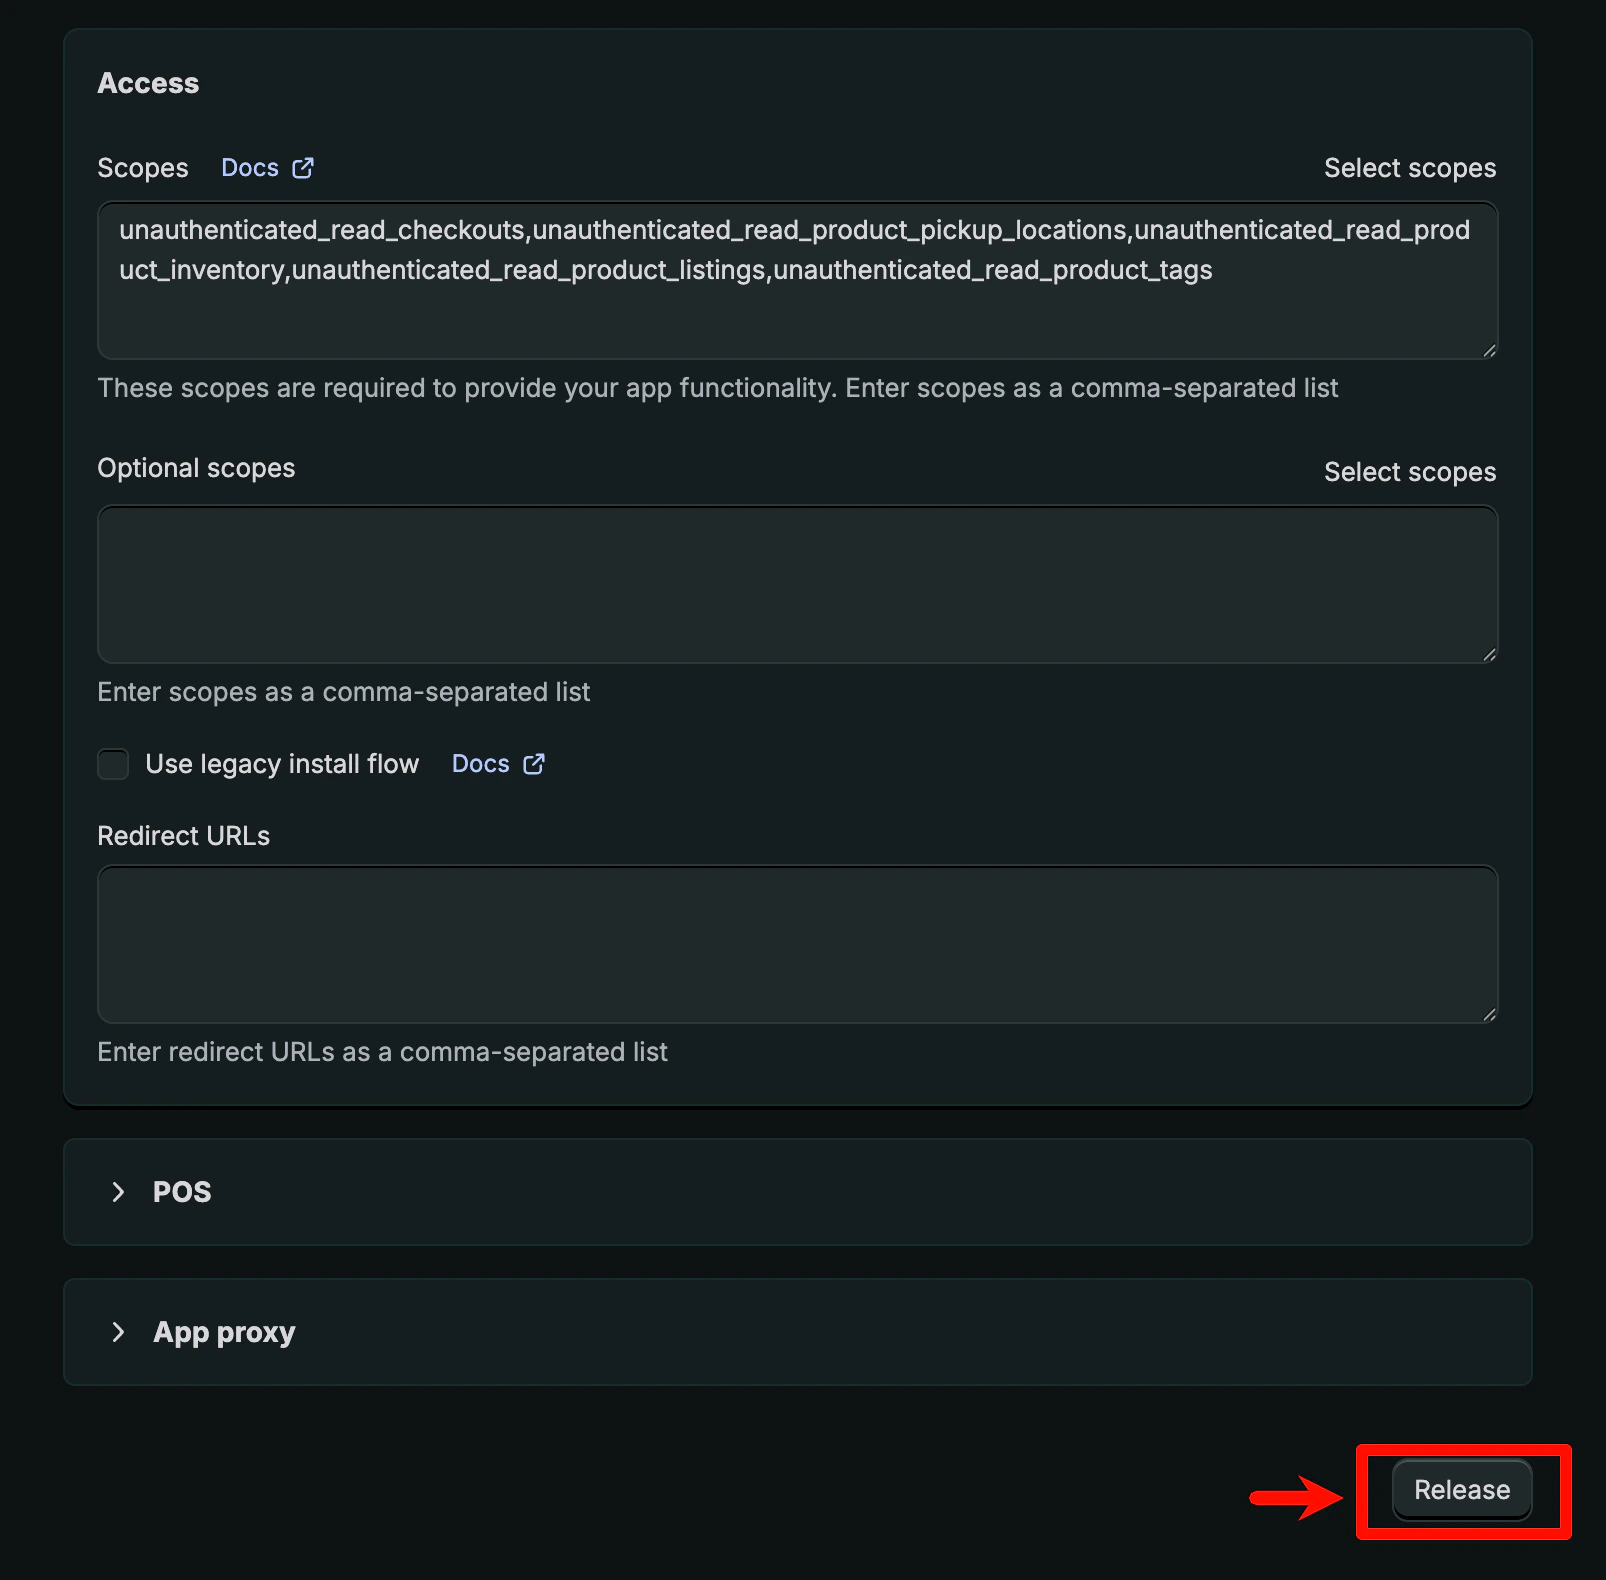
 Click "**Done**" to save the scopes.
Next, you need to release a version of your app. Click "**Release**".
Click "**Done**" to save the scopes.
Next, you need to release a version of your app. Click "**Release**".
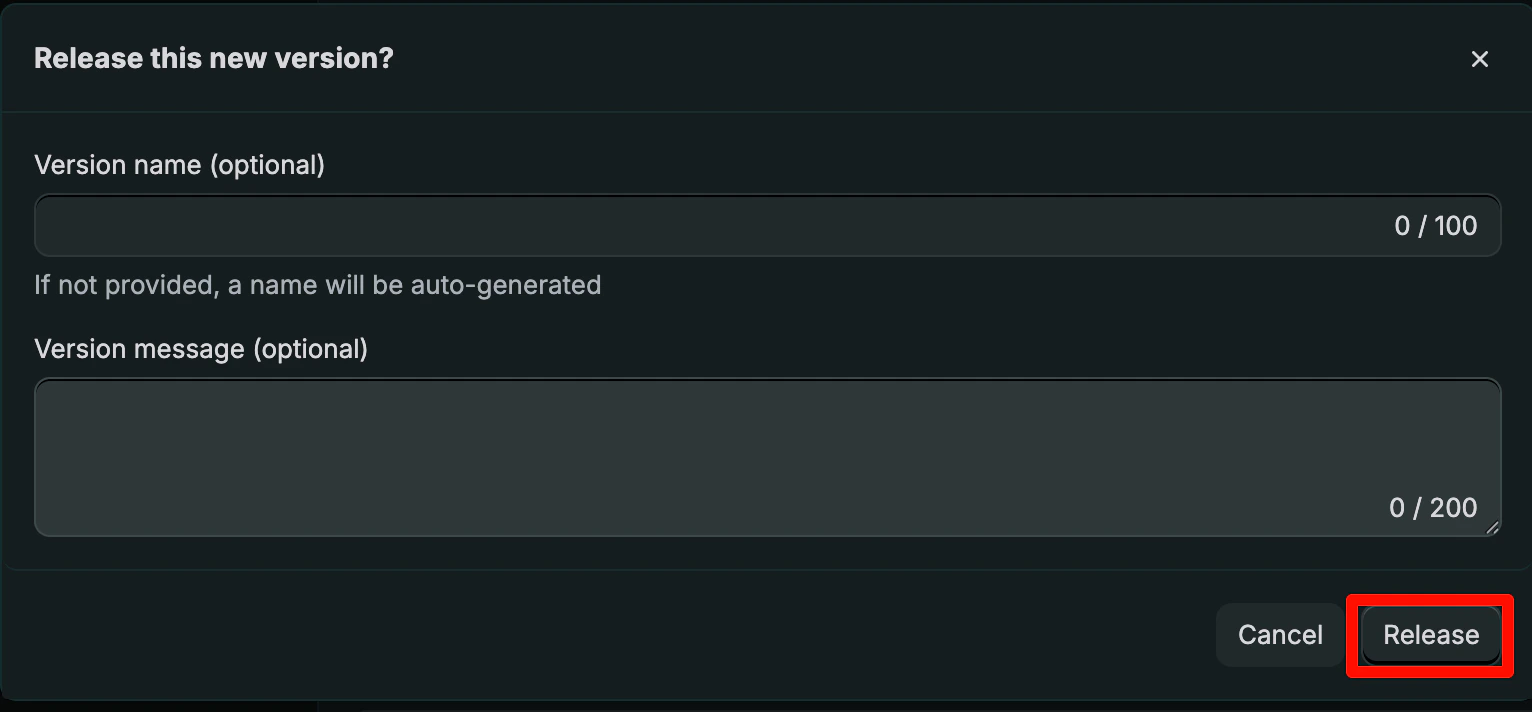
 Confirm the release in the popup.
 ## 7. Get Client ID and Secret
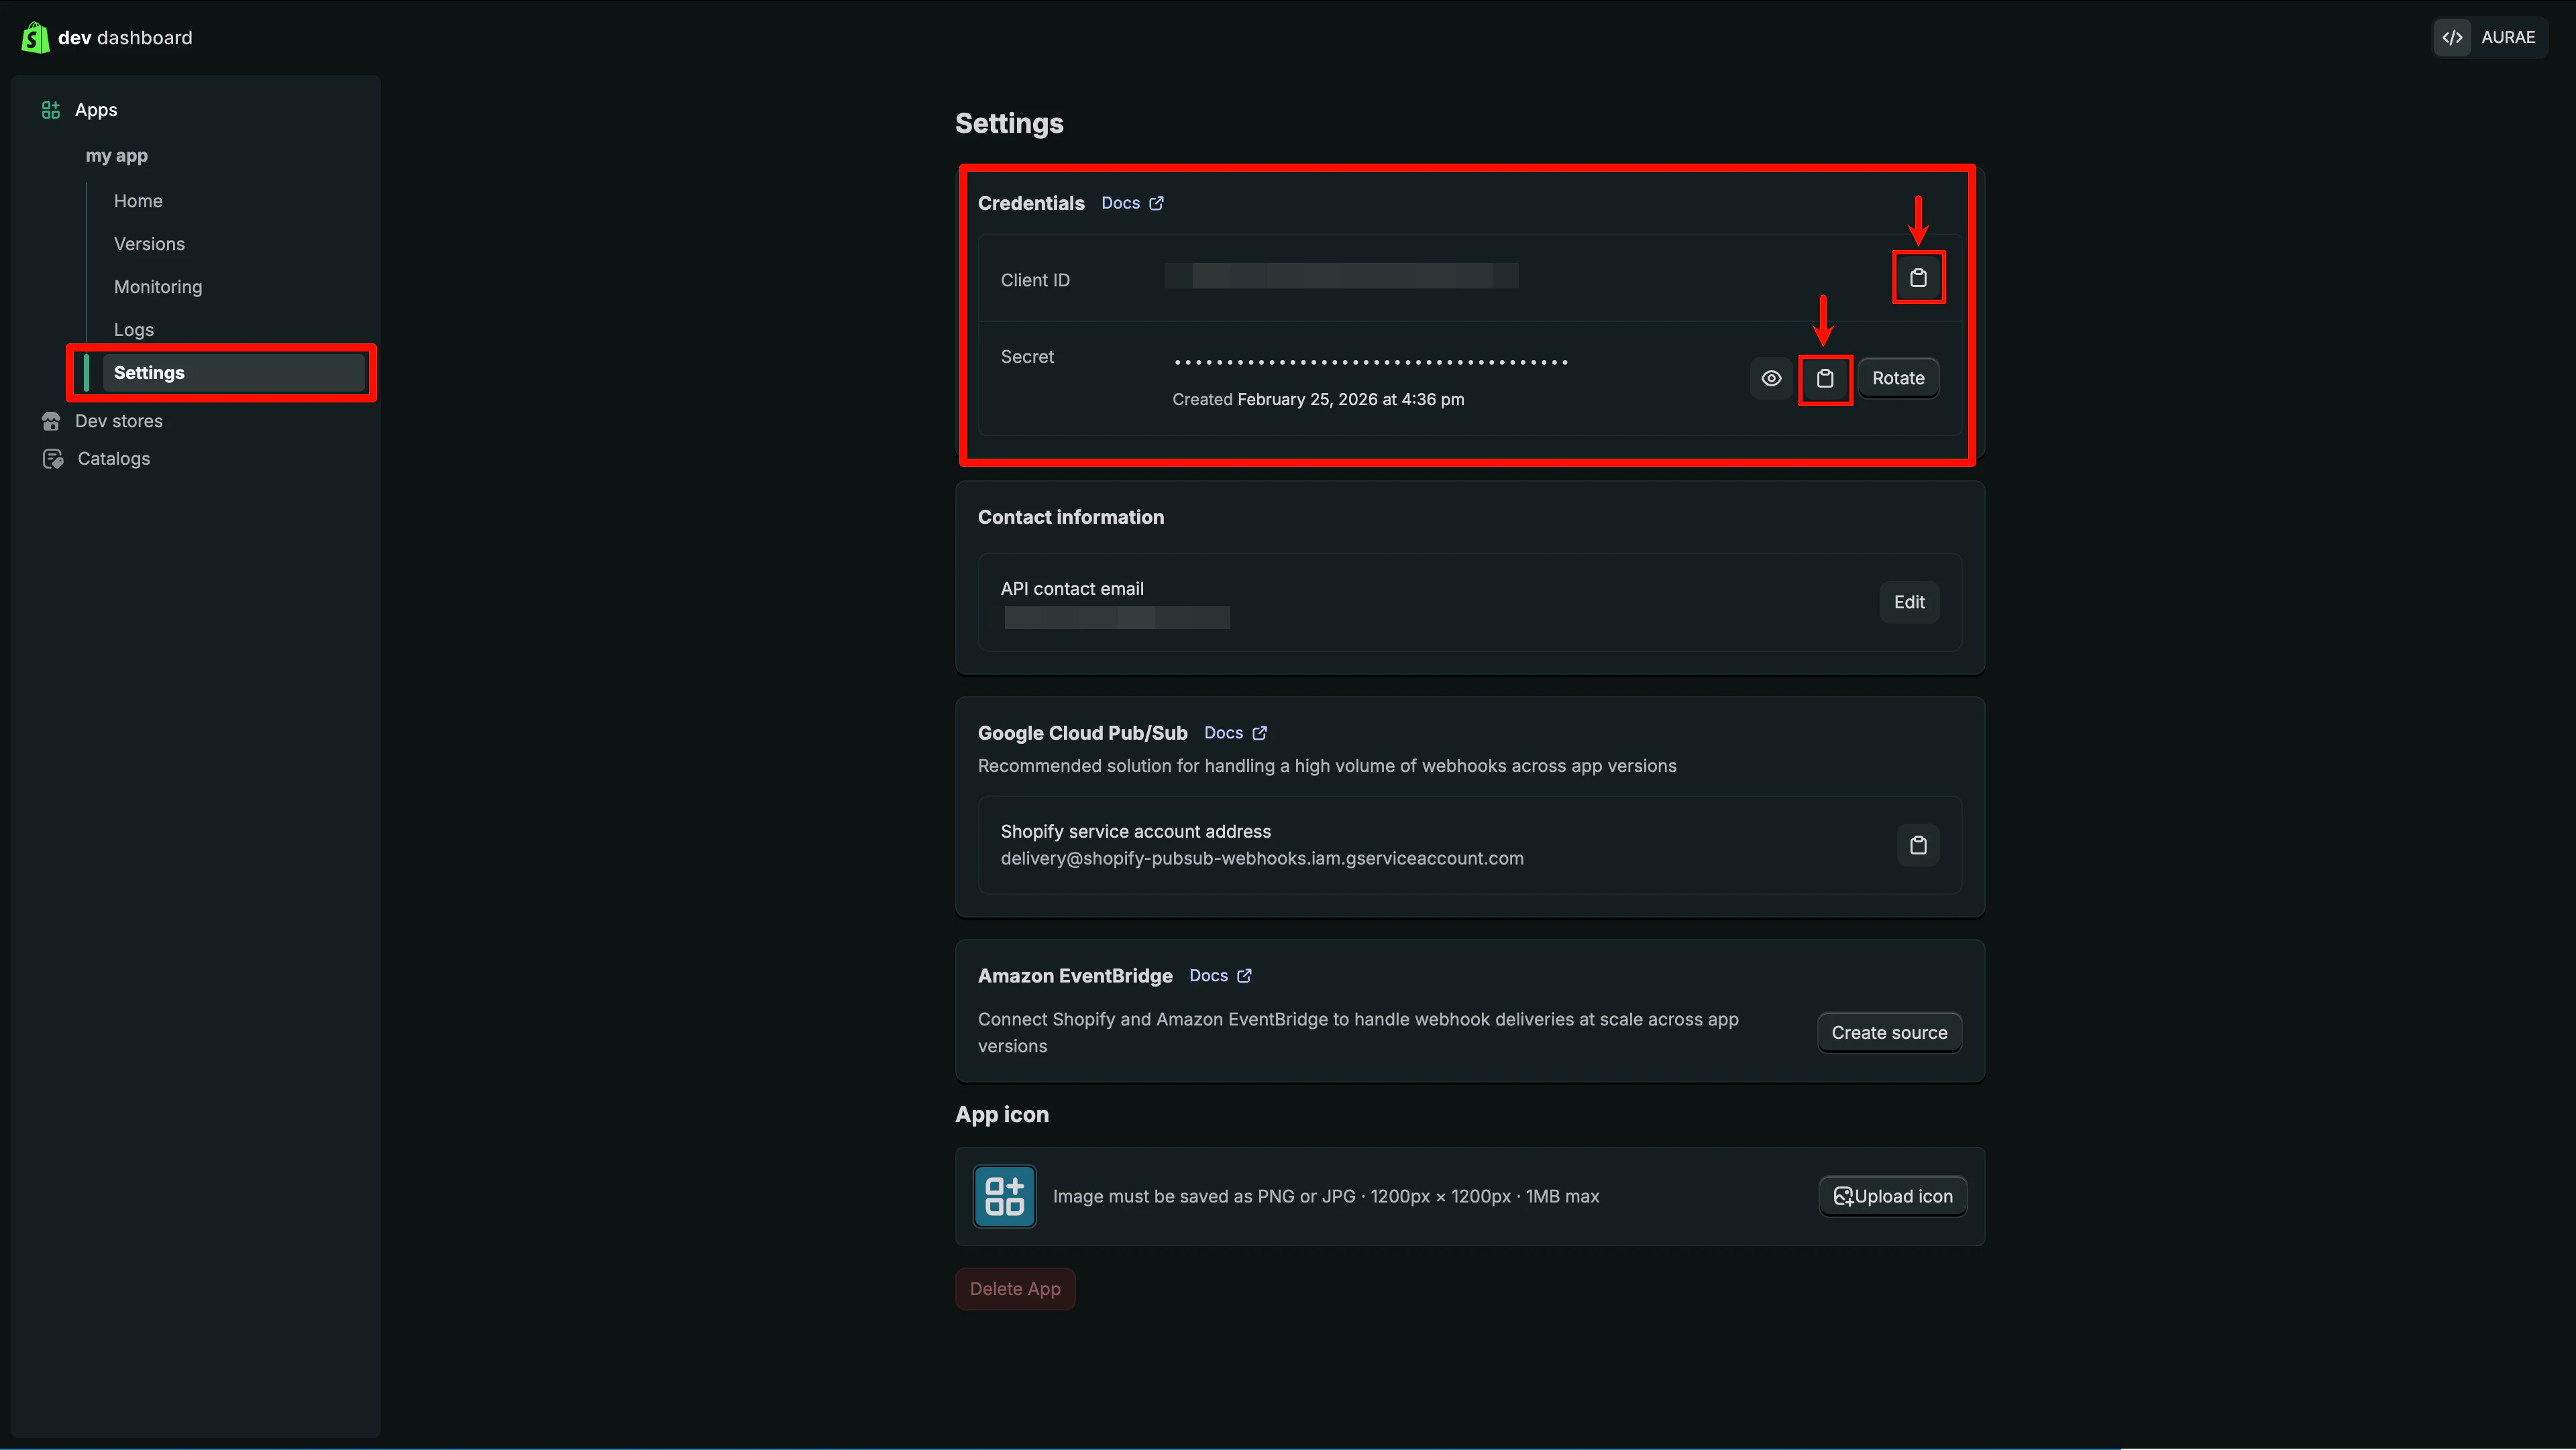
After the release, go to the app's **Settings** page in the Developer Dashboard. You'll find your **Client ID** and **Client secret** displayed here. **Copy and save both values.**
## 7. Get Client ID and Secret
After the release, go to the app's **Settings** page in the Developer Dashboard. You'll find your **Client ID** and **Client secret** displayed here. **Copy and save both values.**
 ## 8. Install the App
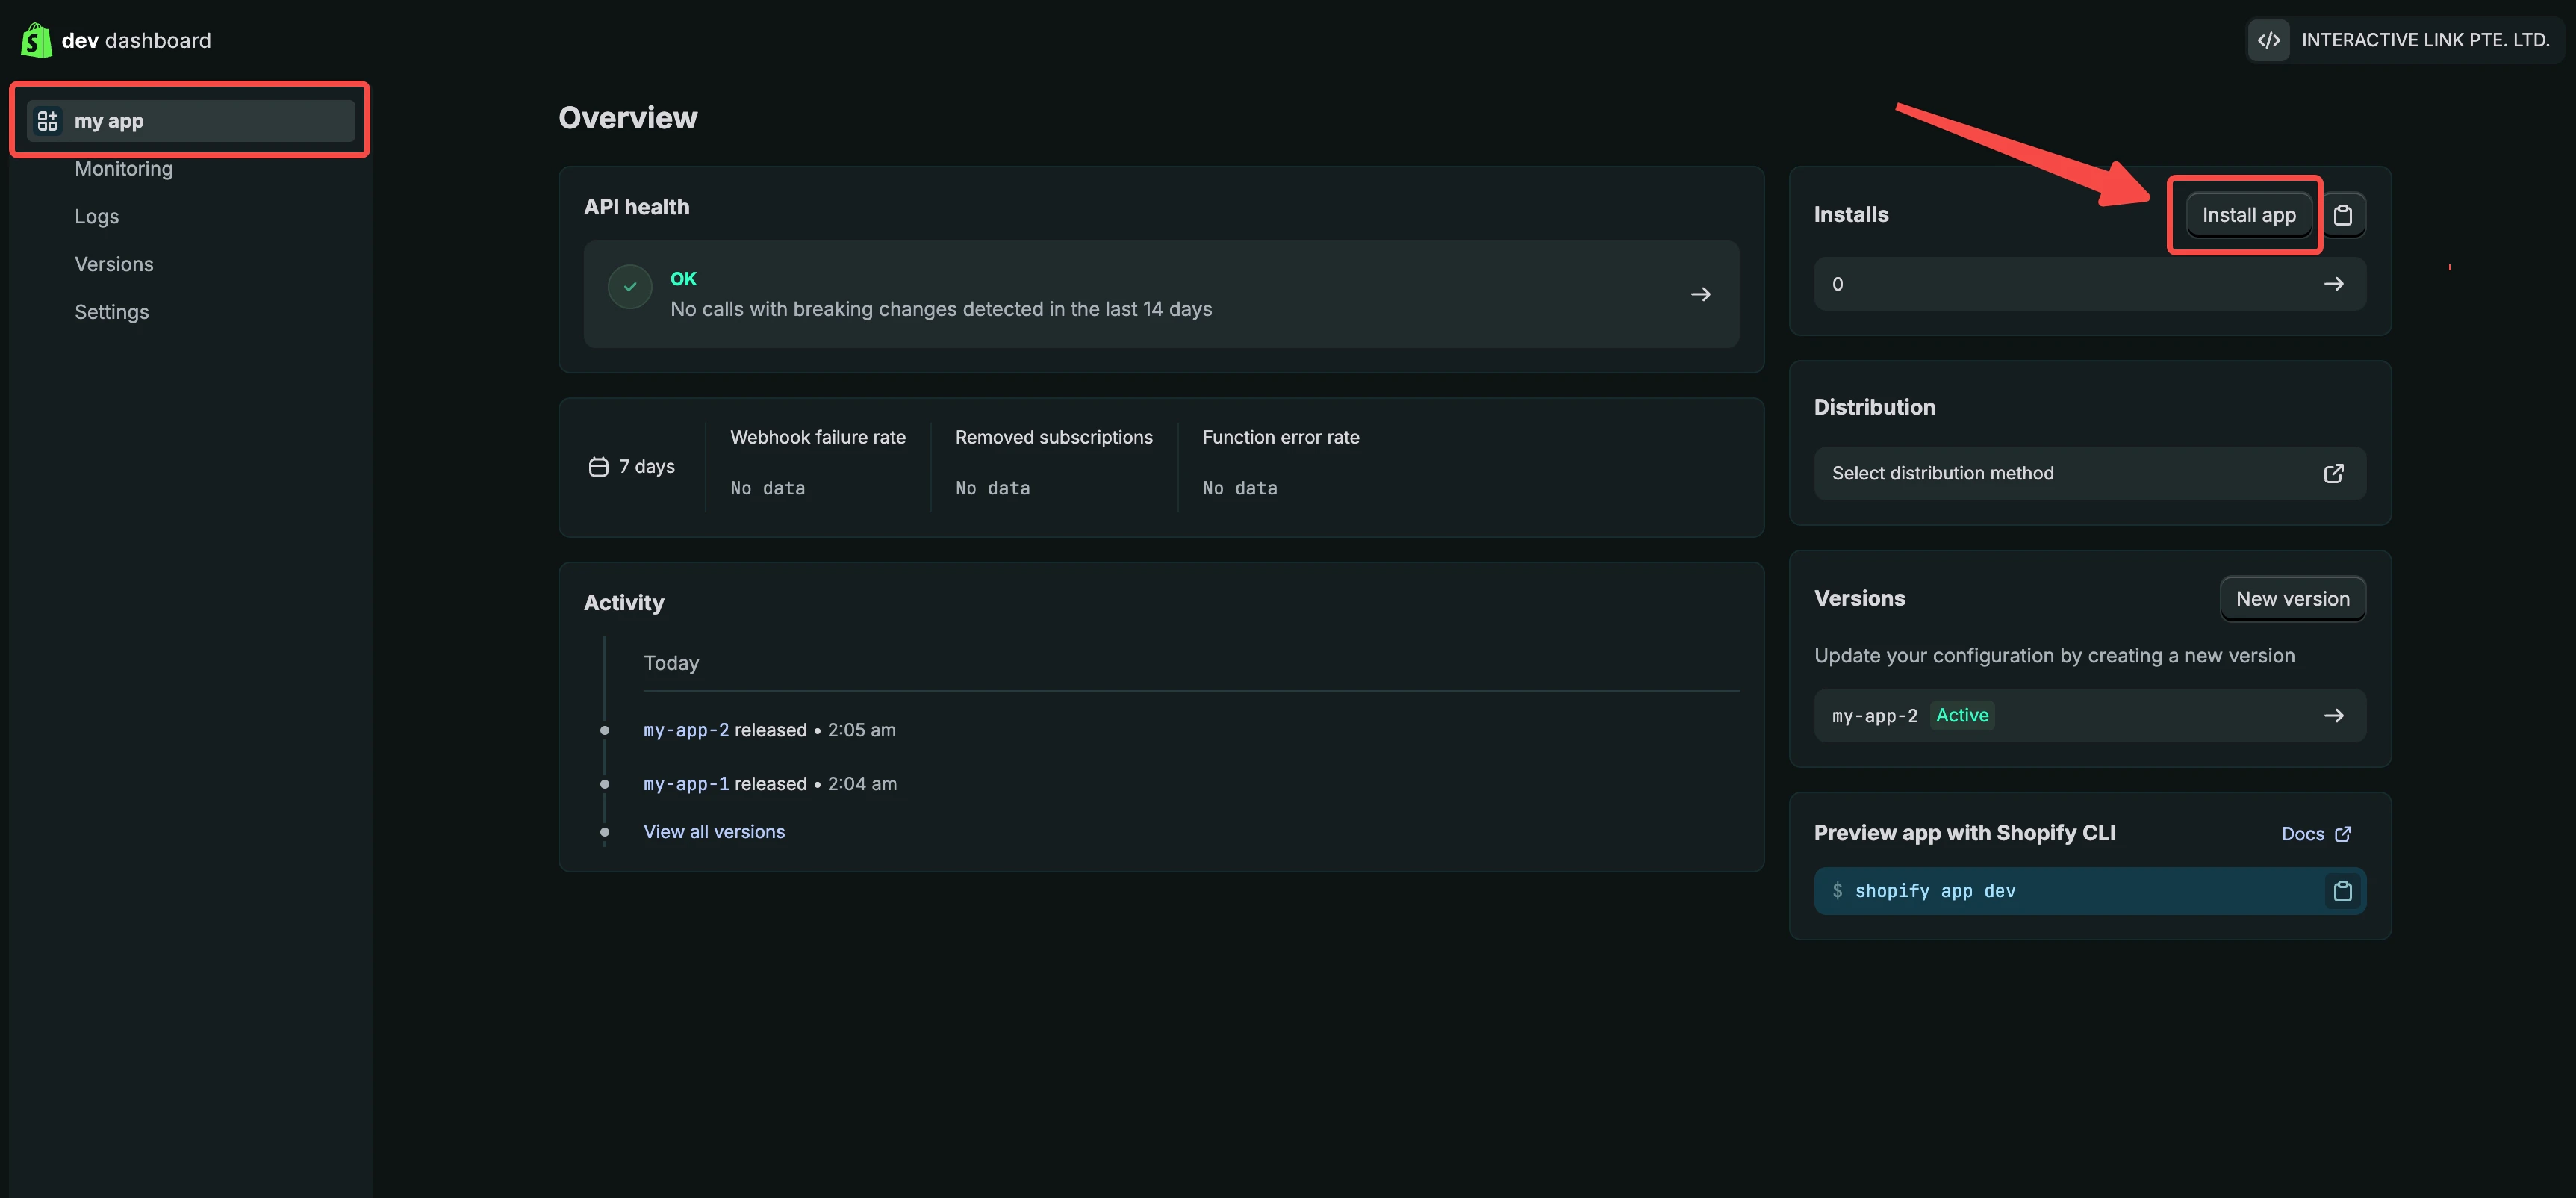
Go back to the Developer Dashboard **My app** page and click "**Install app**".
## 8. Install the App
Go back to the Developer Dashboard **My app** page and click "**Install app**".
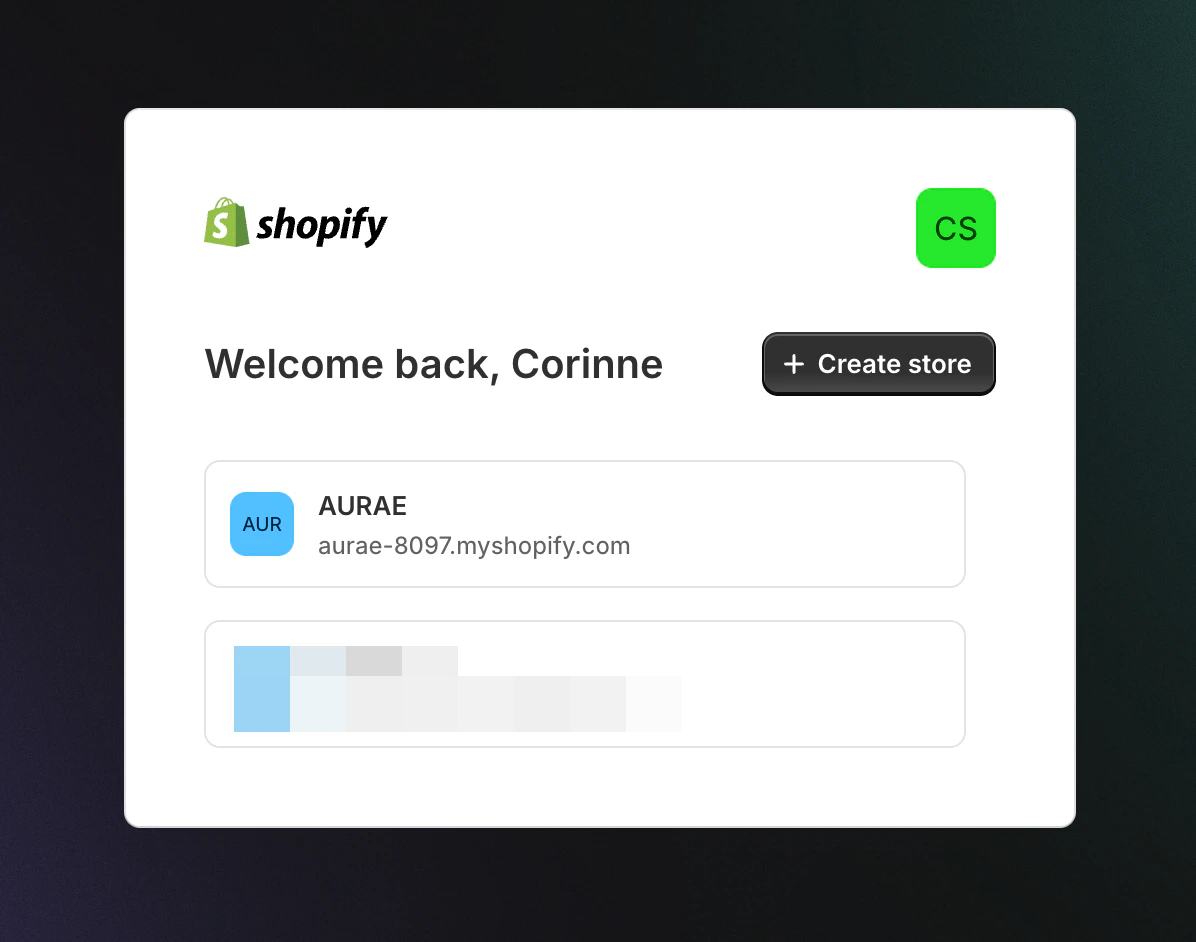
 You'll be redirected to your store's homepage. Select your store to proceed.
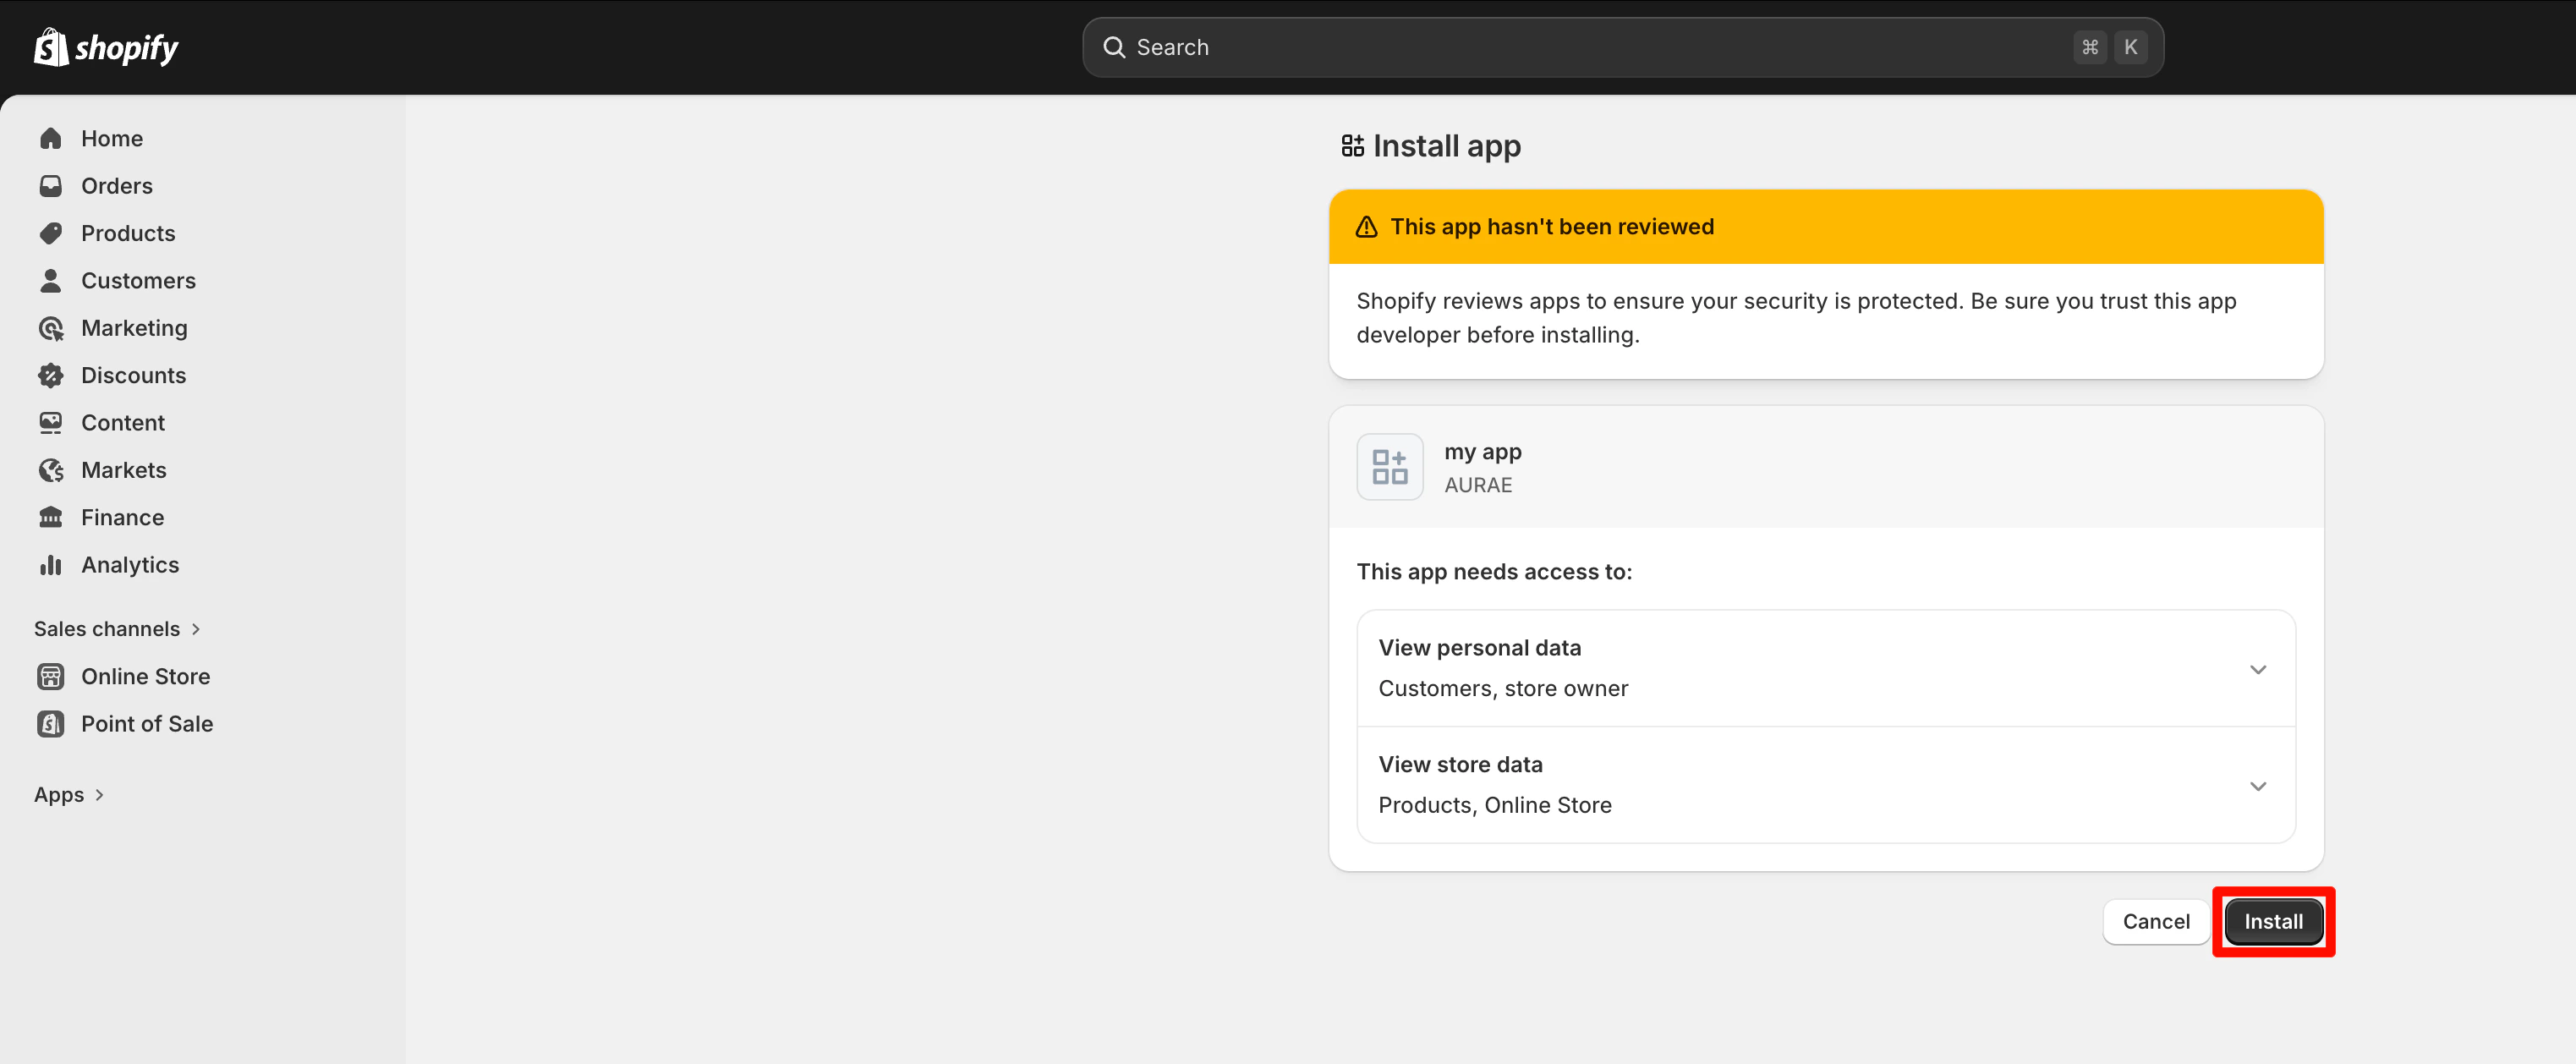
 Review the permissions and click "**Install**".
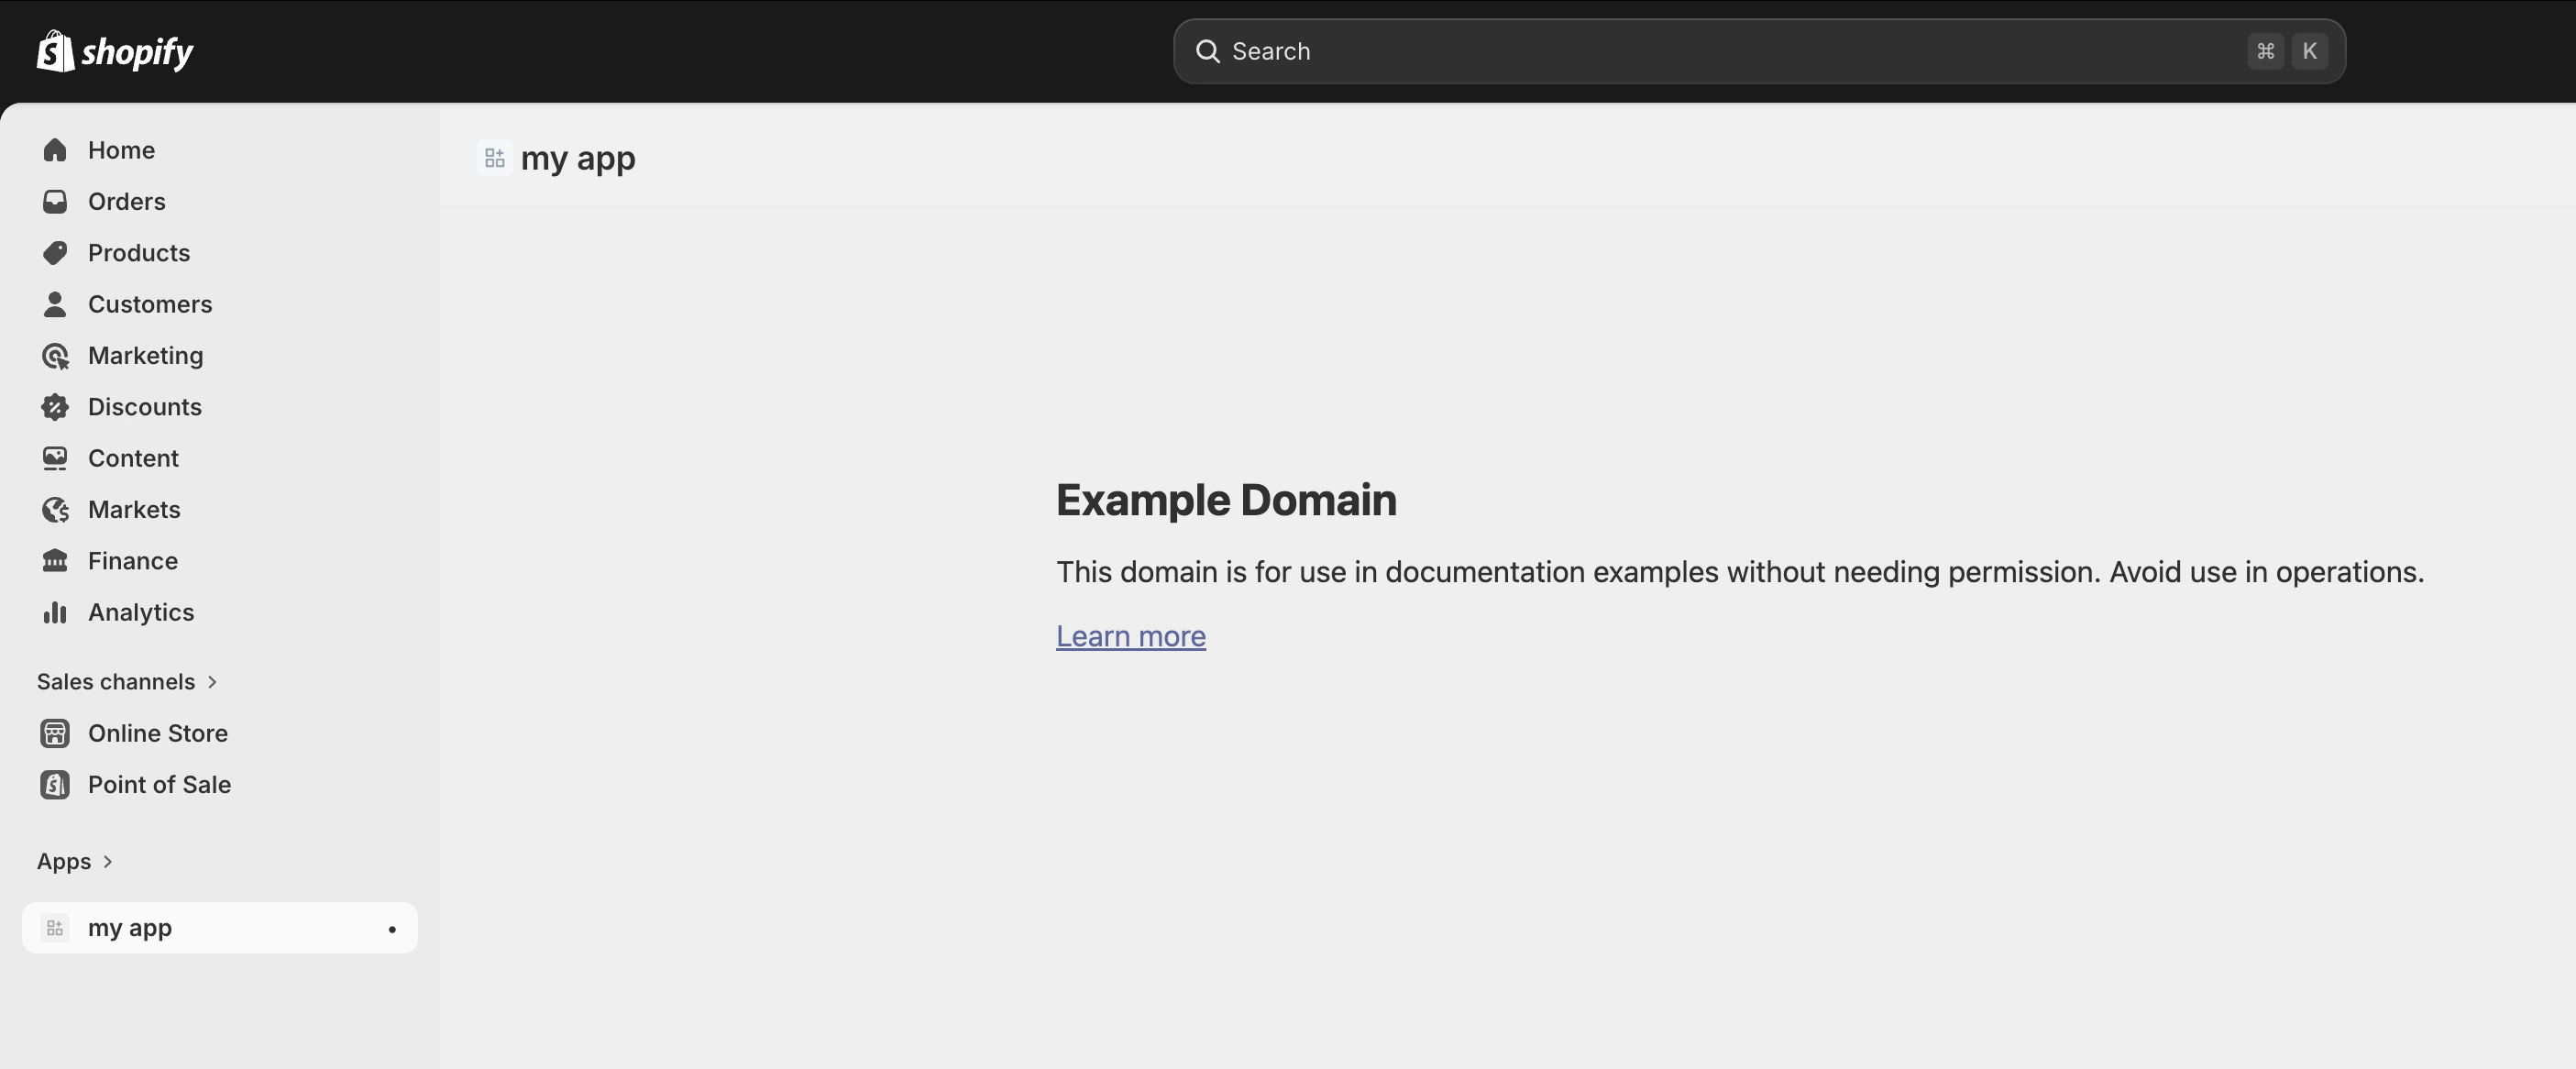
 Once the installation is complete, you'll see a success confirmation.
 ## 9. Connect Your Store in Readdy
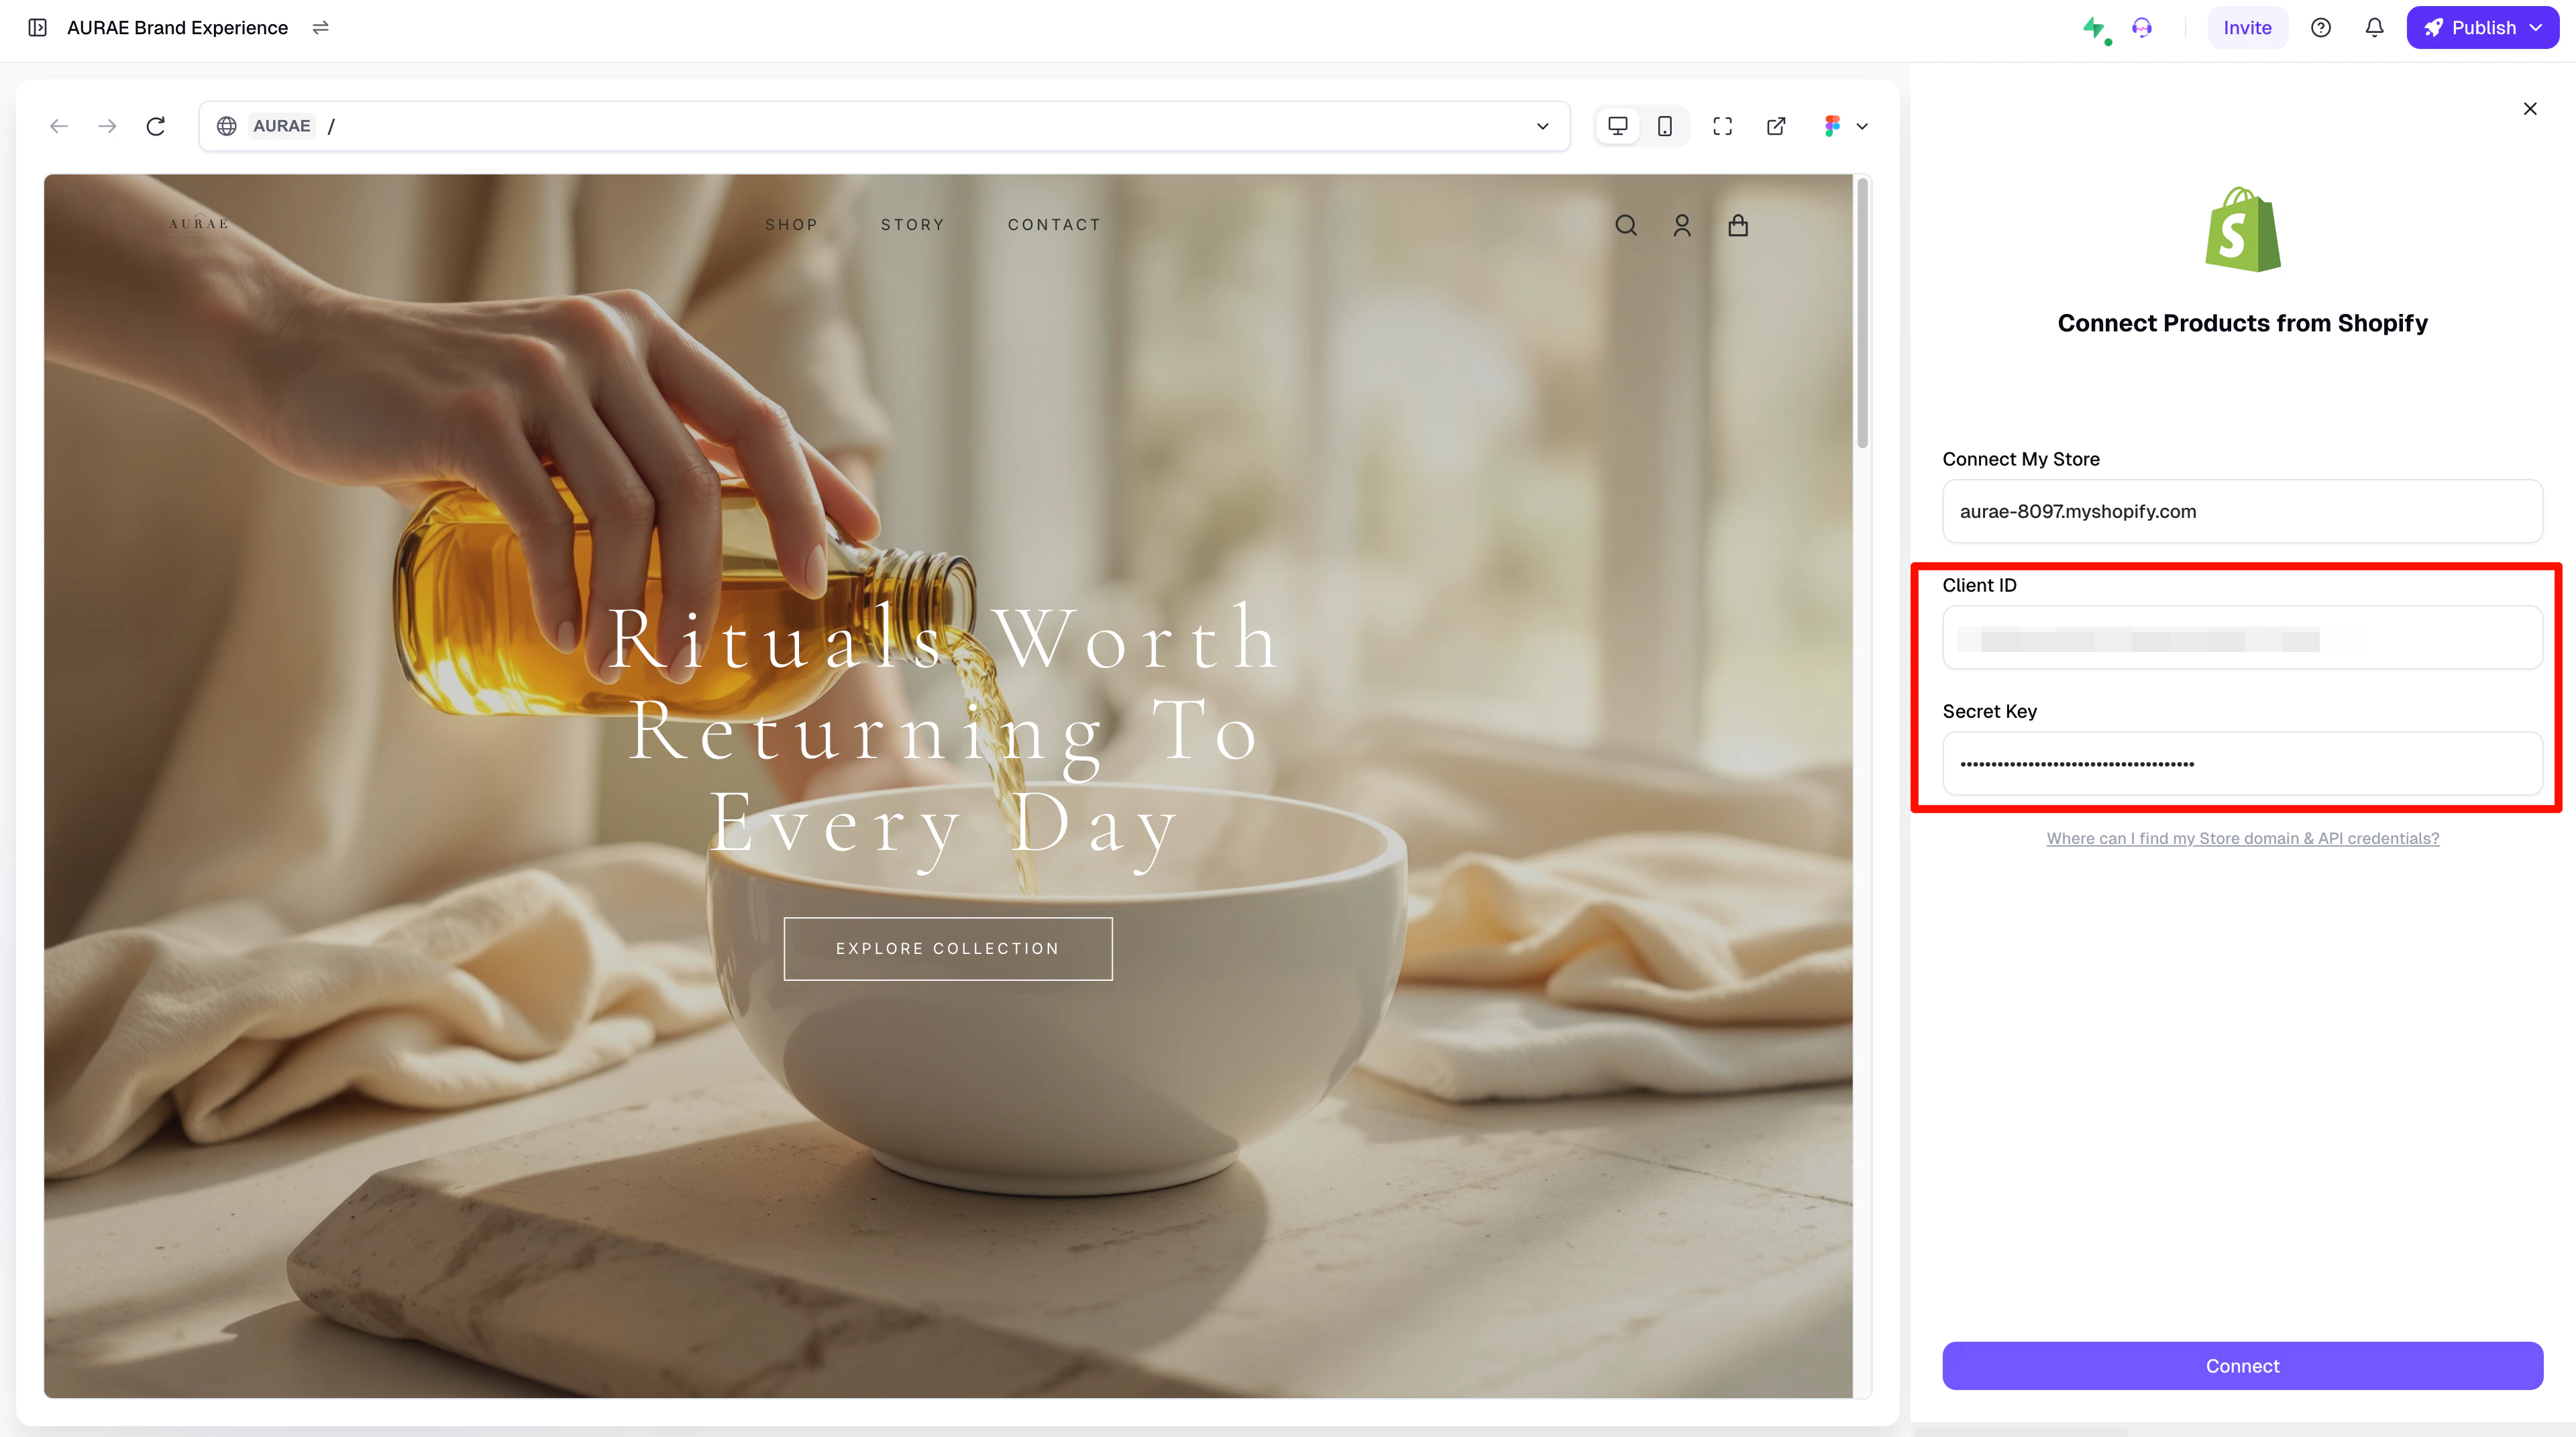
Go back to Readdy's Shopify panel. Enter the **Store Domain** you saved earlier.
## 9. Connect Your Store in Readdy
Go back to Readdy's Shopify panel. Enter the **Store Domain** you saved earlier.
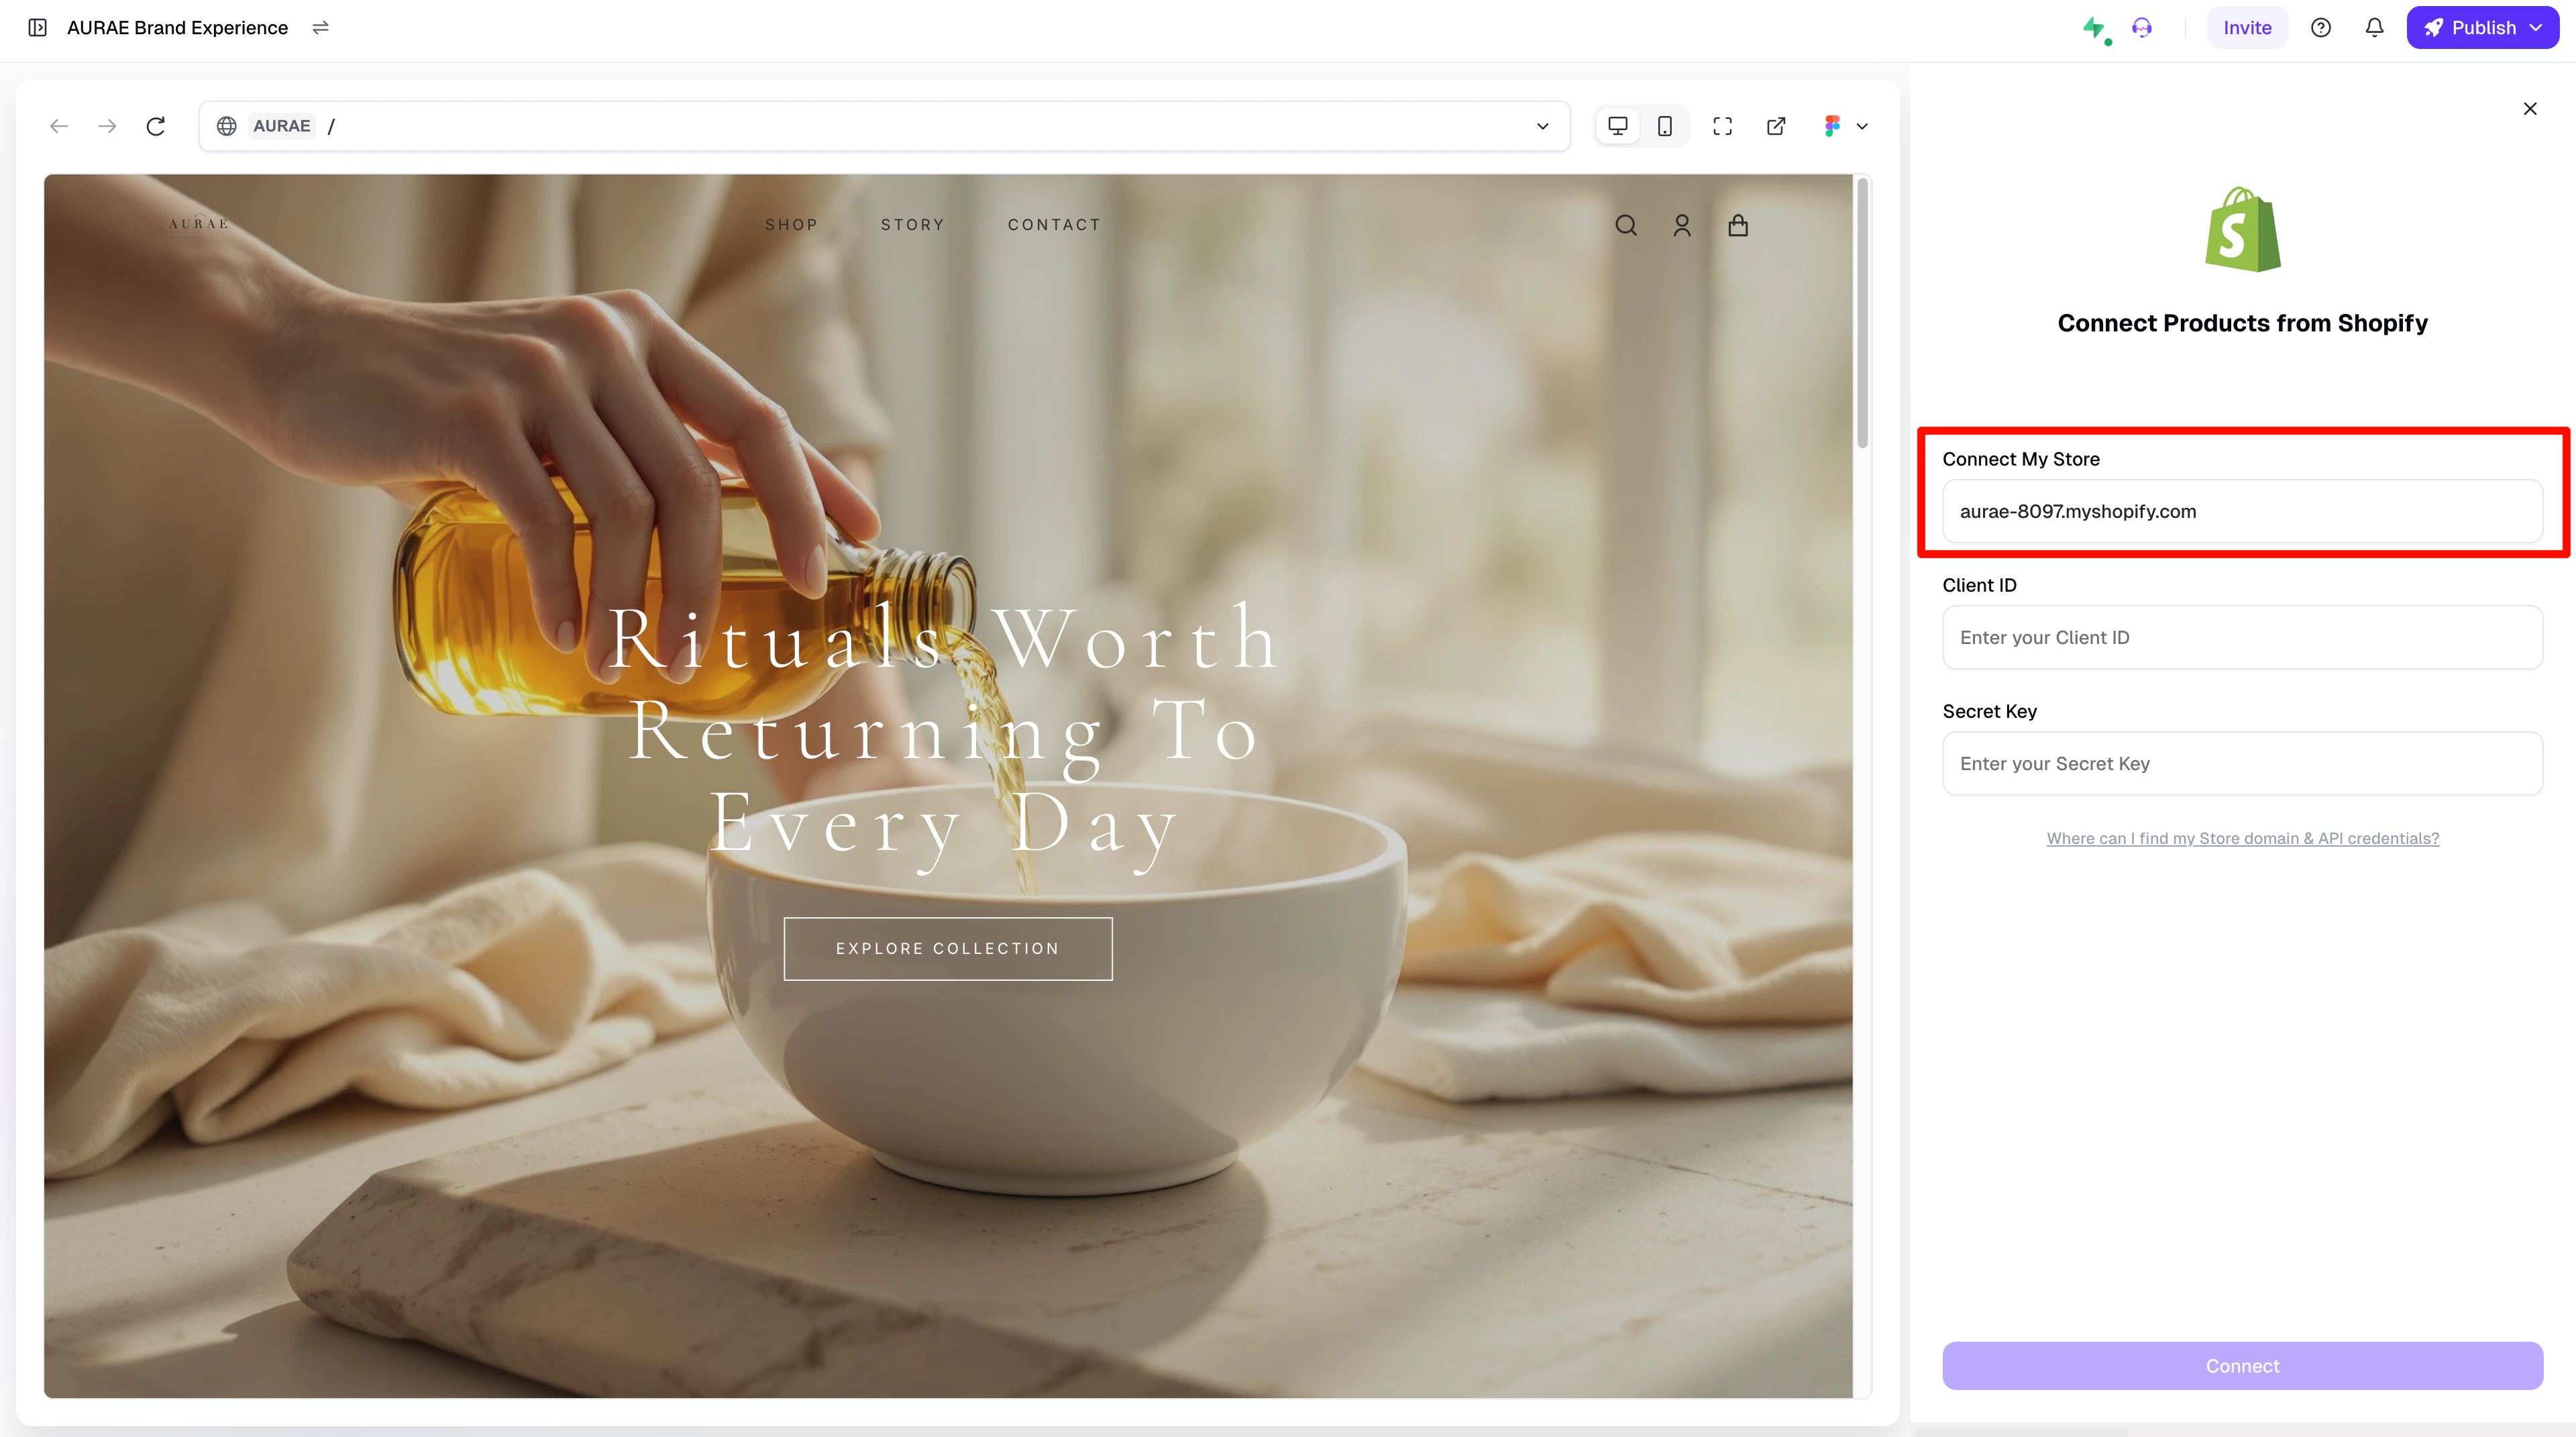 Enter the **Client ID** and **Secret Key** you copied from the Developer Dashboard, then click "**Connect**".
 ## 10. Connect Products to Your Website
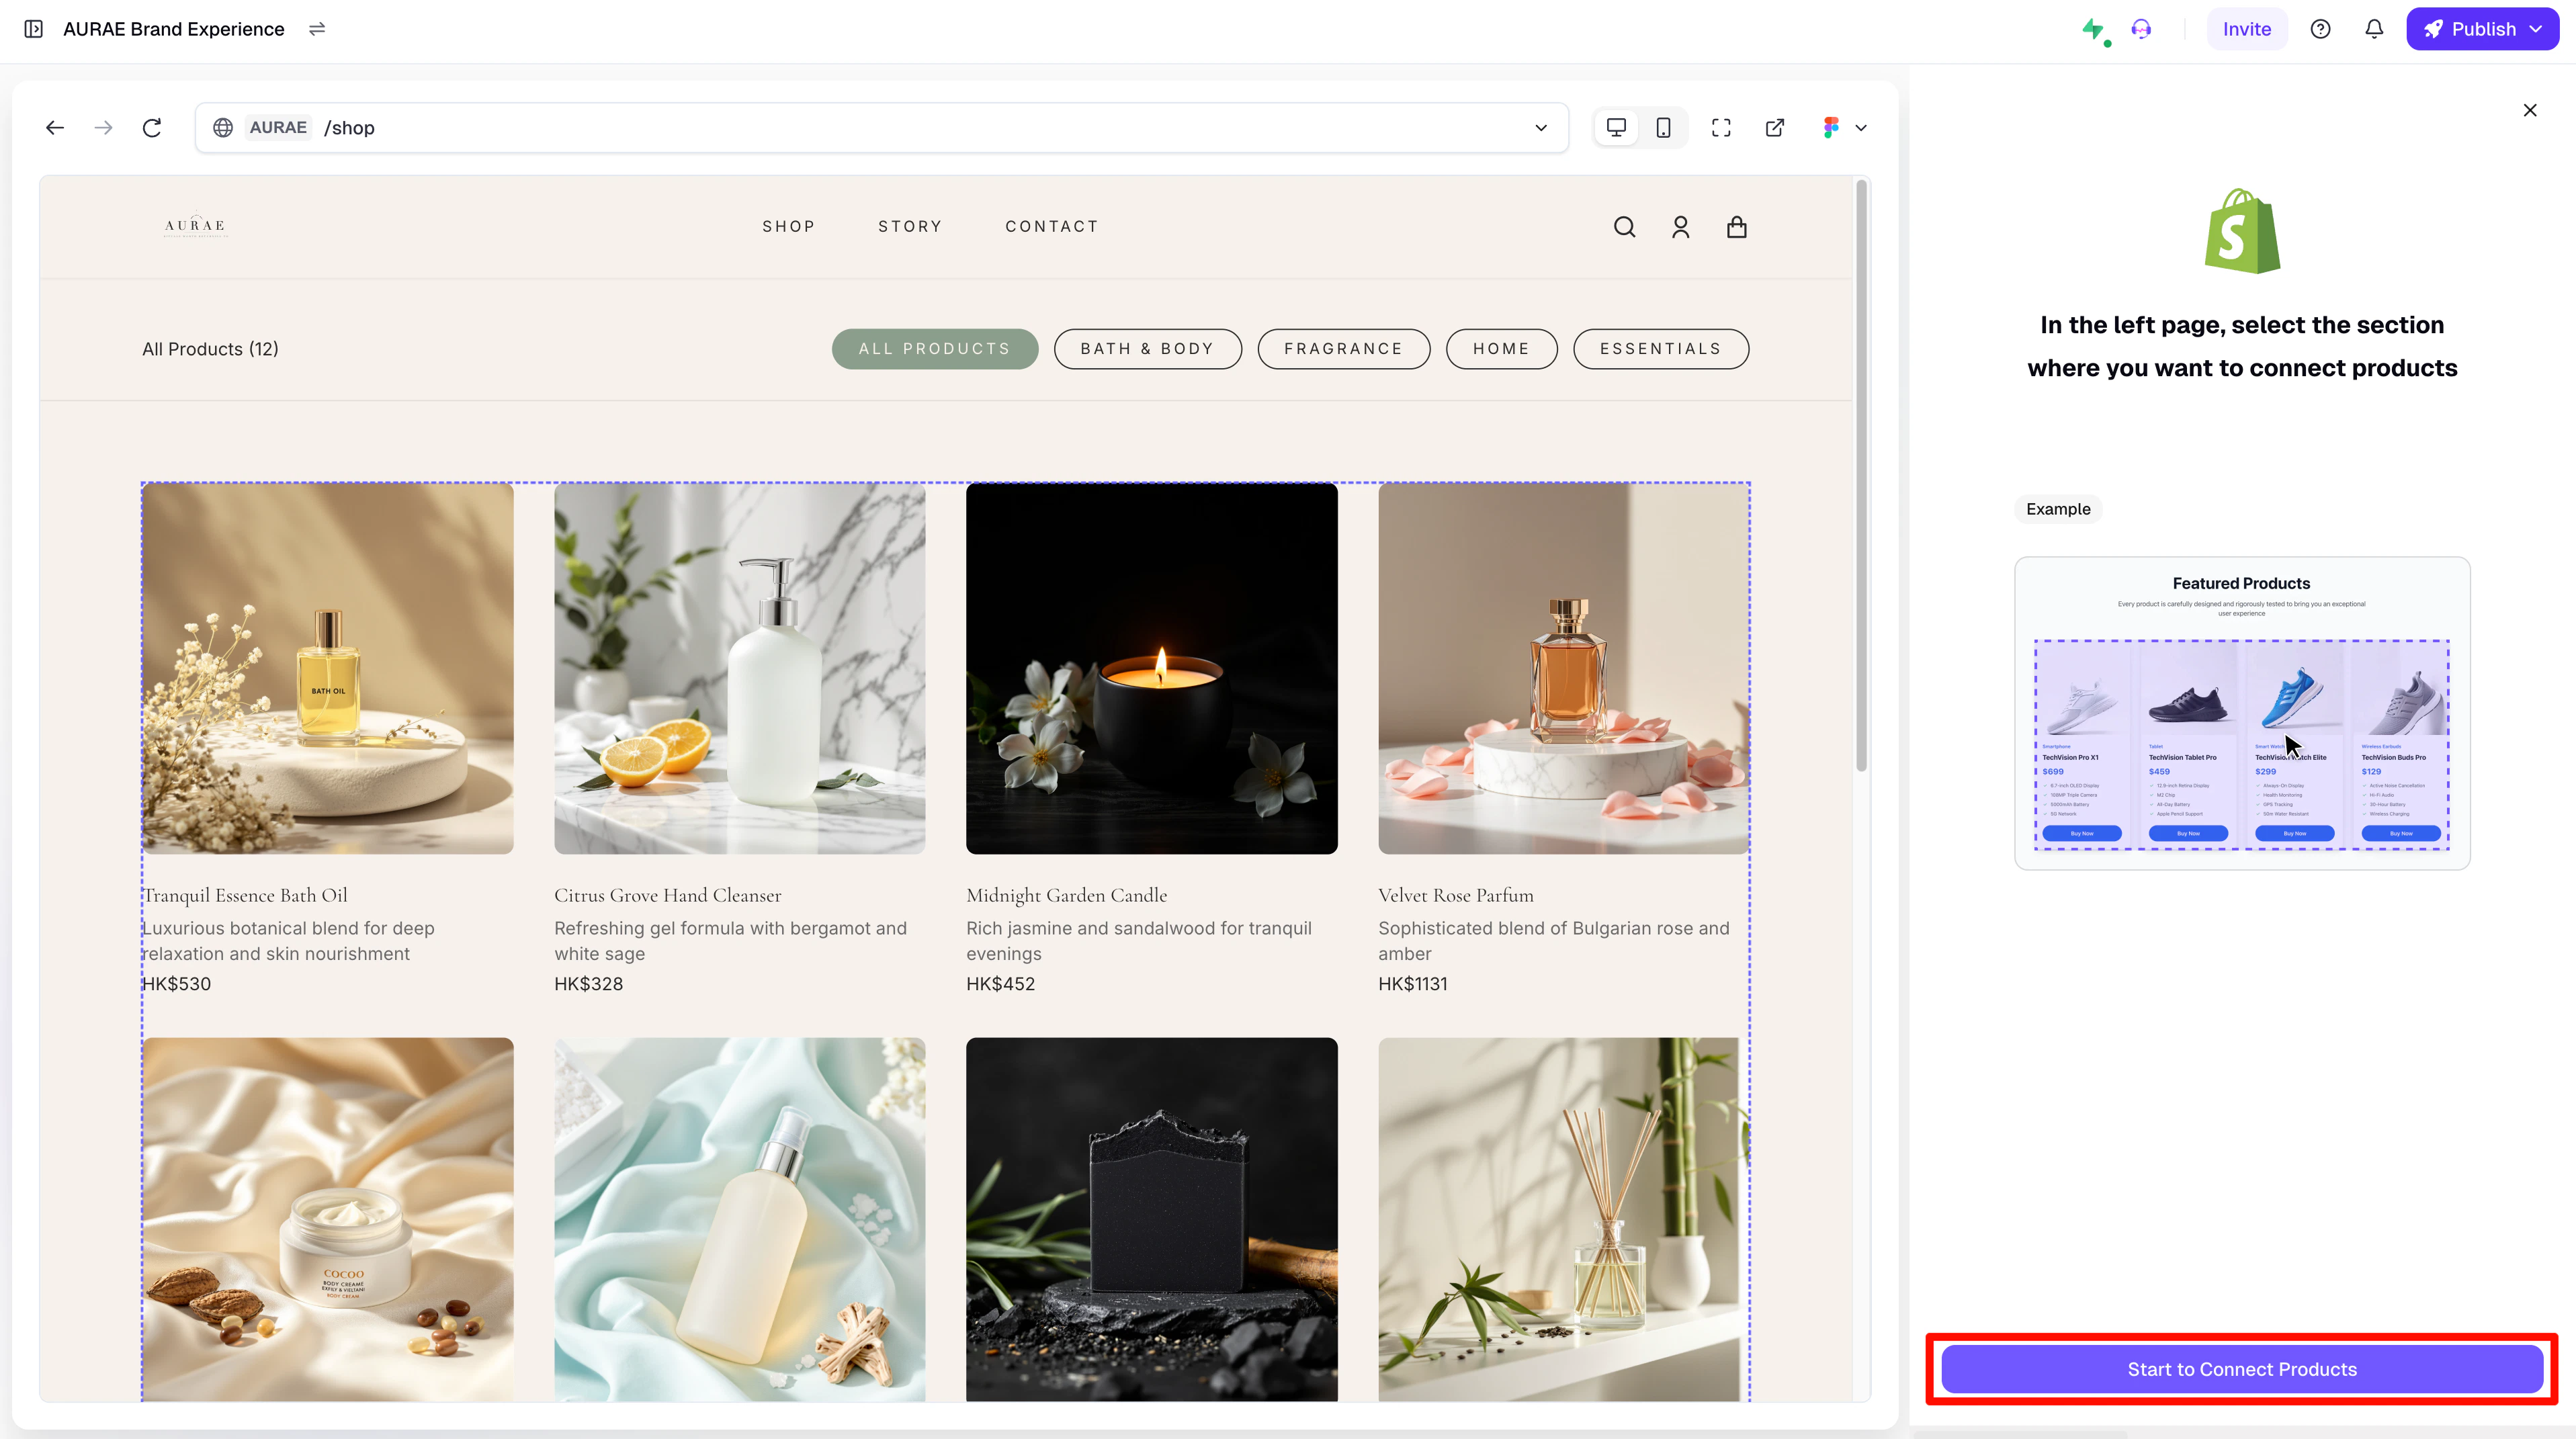
Once the connection is established, follow the on-screen instructions to select the product section on the page displayed on the left.
We recommend selecting the **entire product section** instead of individual elements like a single piece of text, one image, or other minor components within the product information.
Once you've made your selection, click "**Start to Connect Products**".
## 10. Connect Products to Your Website
Once the connection is established, follow the on-screen instructions to select the product section on the page displayed on the left.
We recommend selecting the **entire product section** instead of individual elements like a single piece of text, one image, or other minor components within the product information.
Once you've made your selection, click "**Start to Connect Products**".
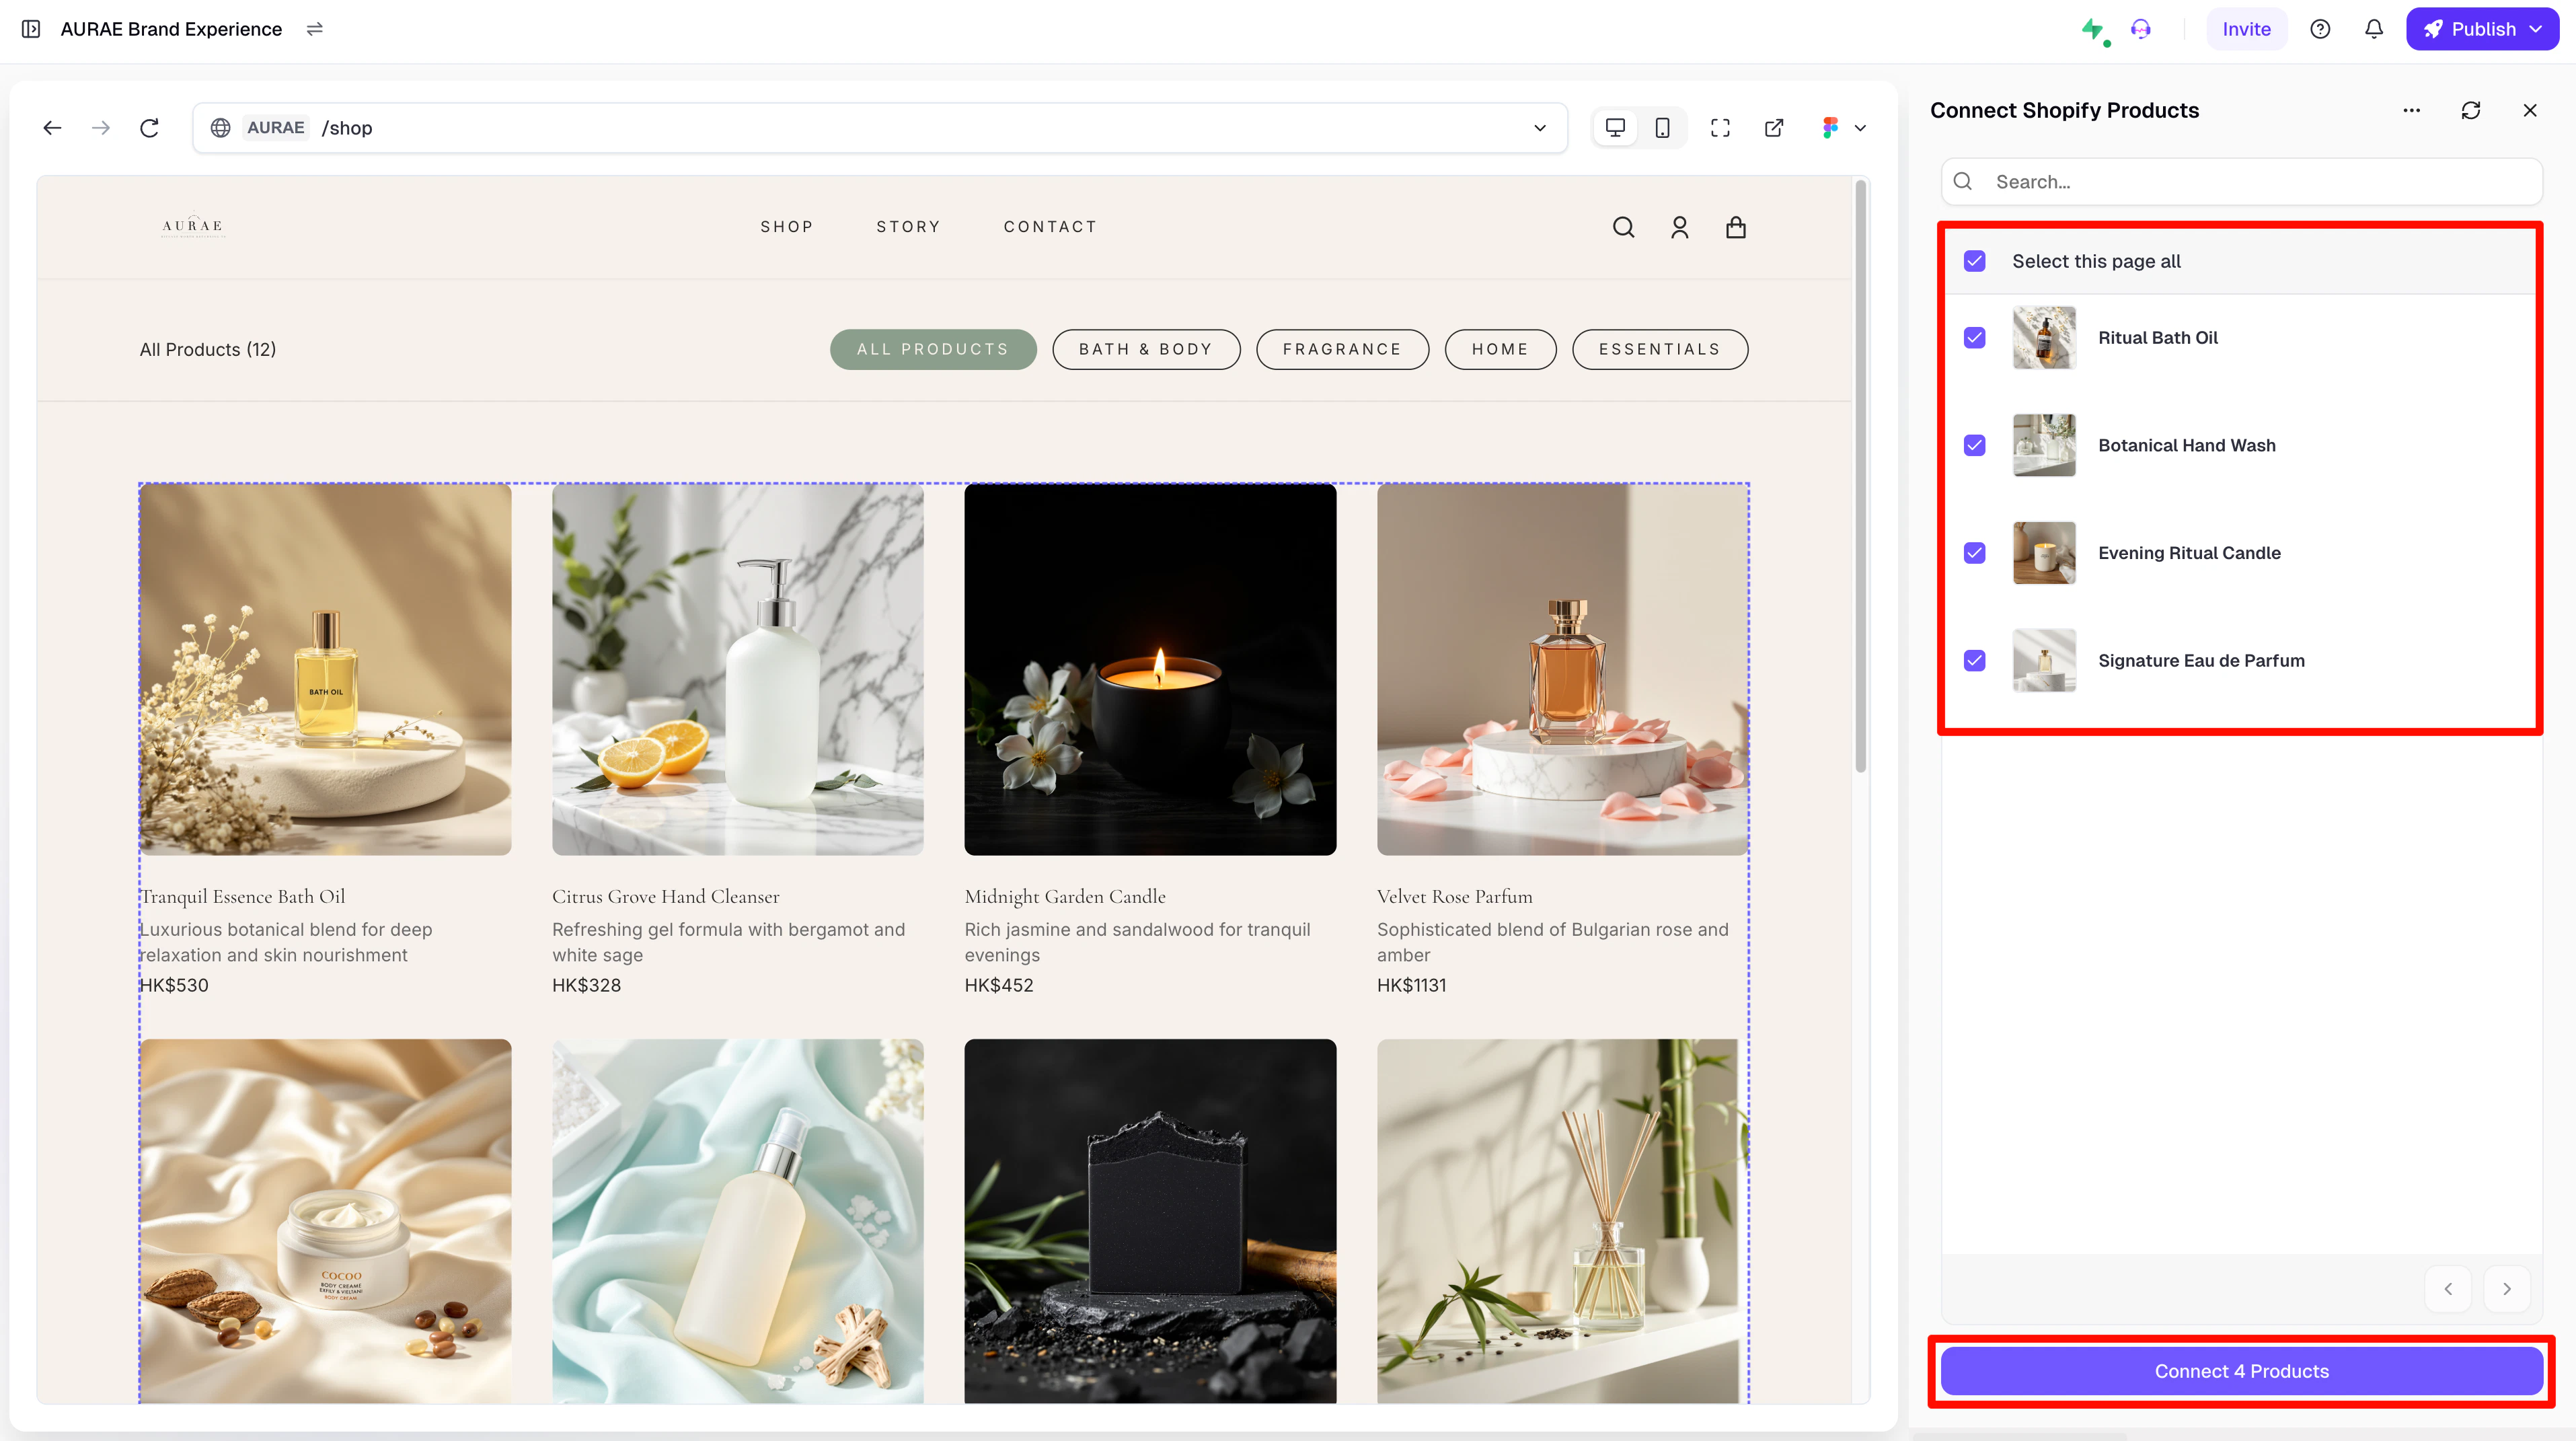
 Within the panel, select the products you want to connect, then click "**Connect x Products**".
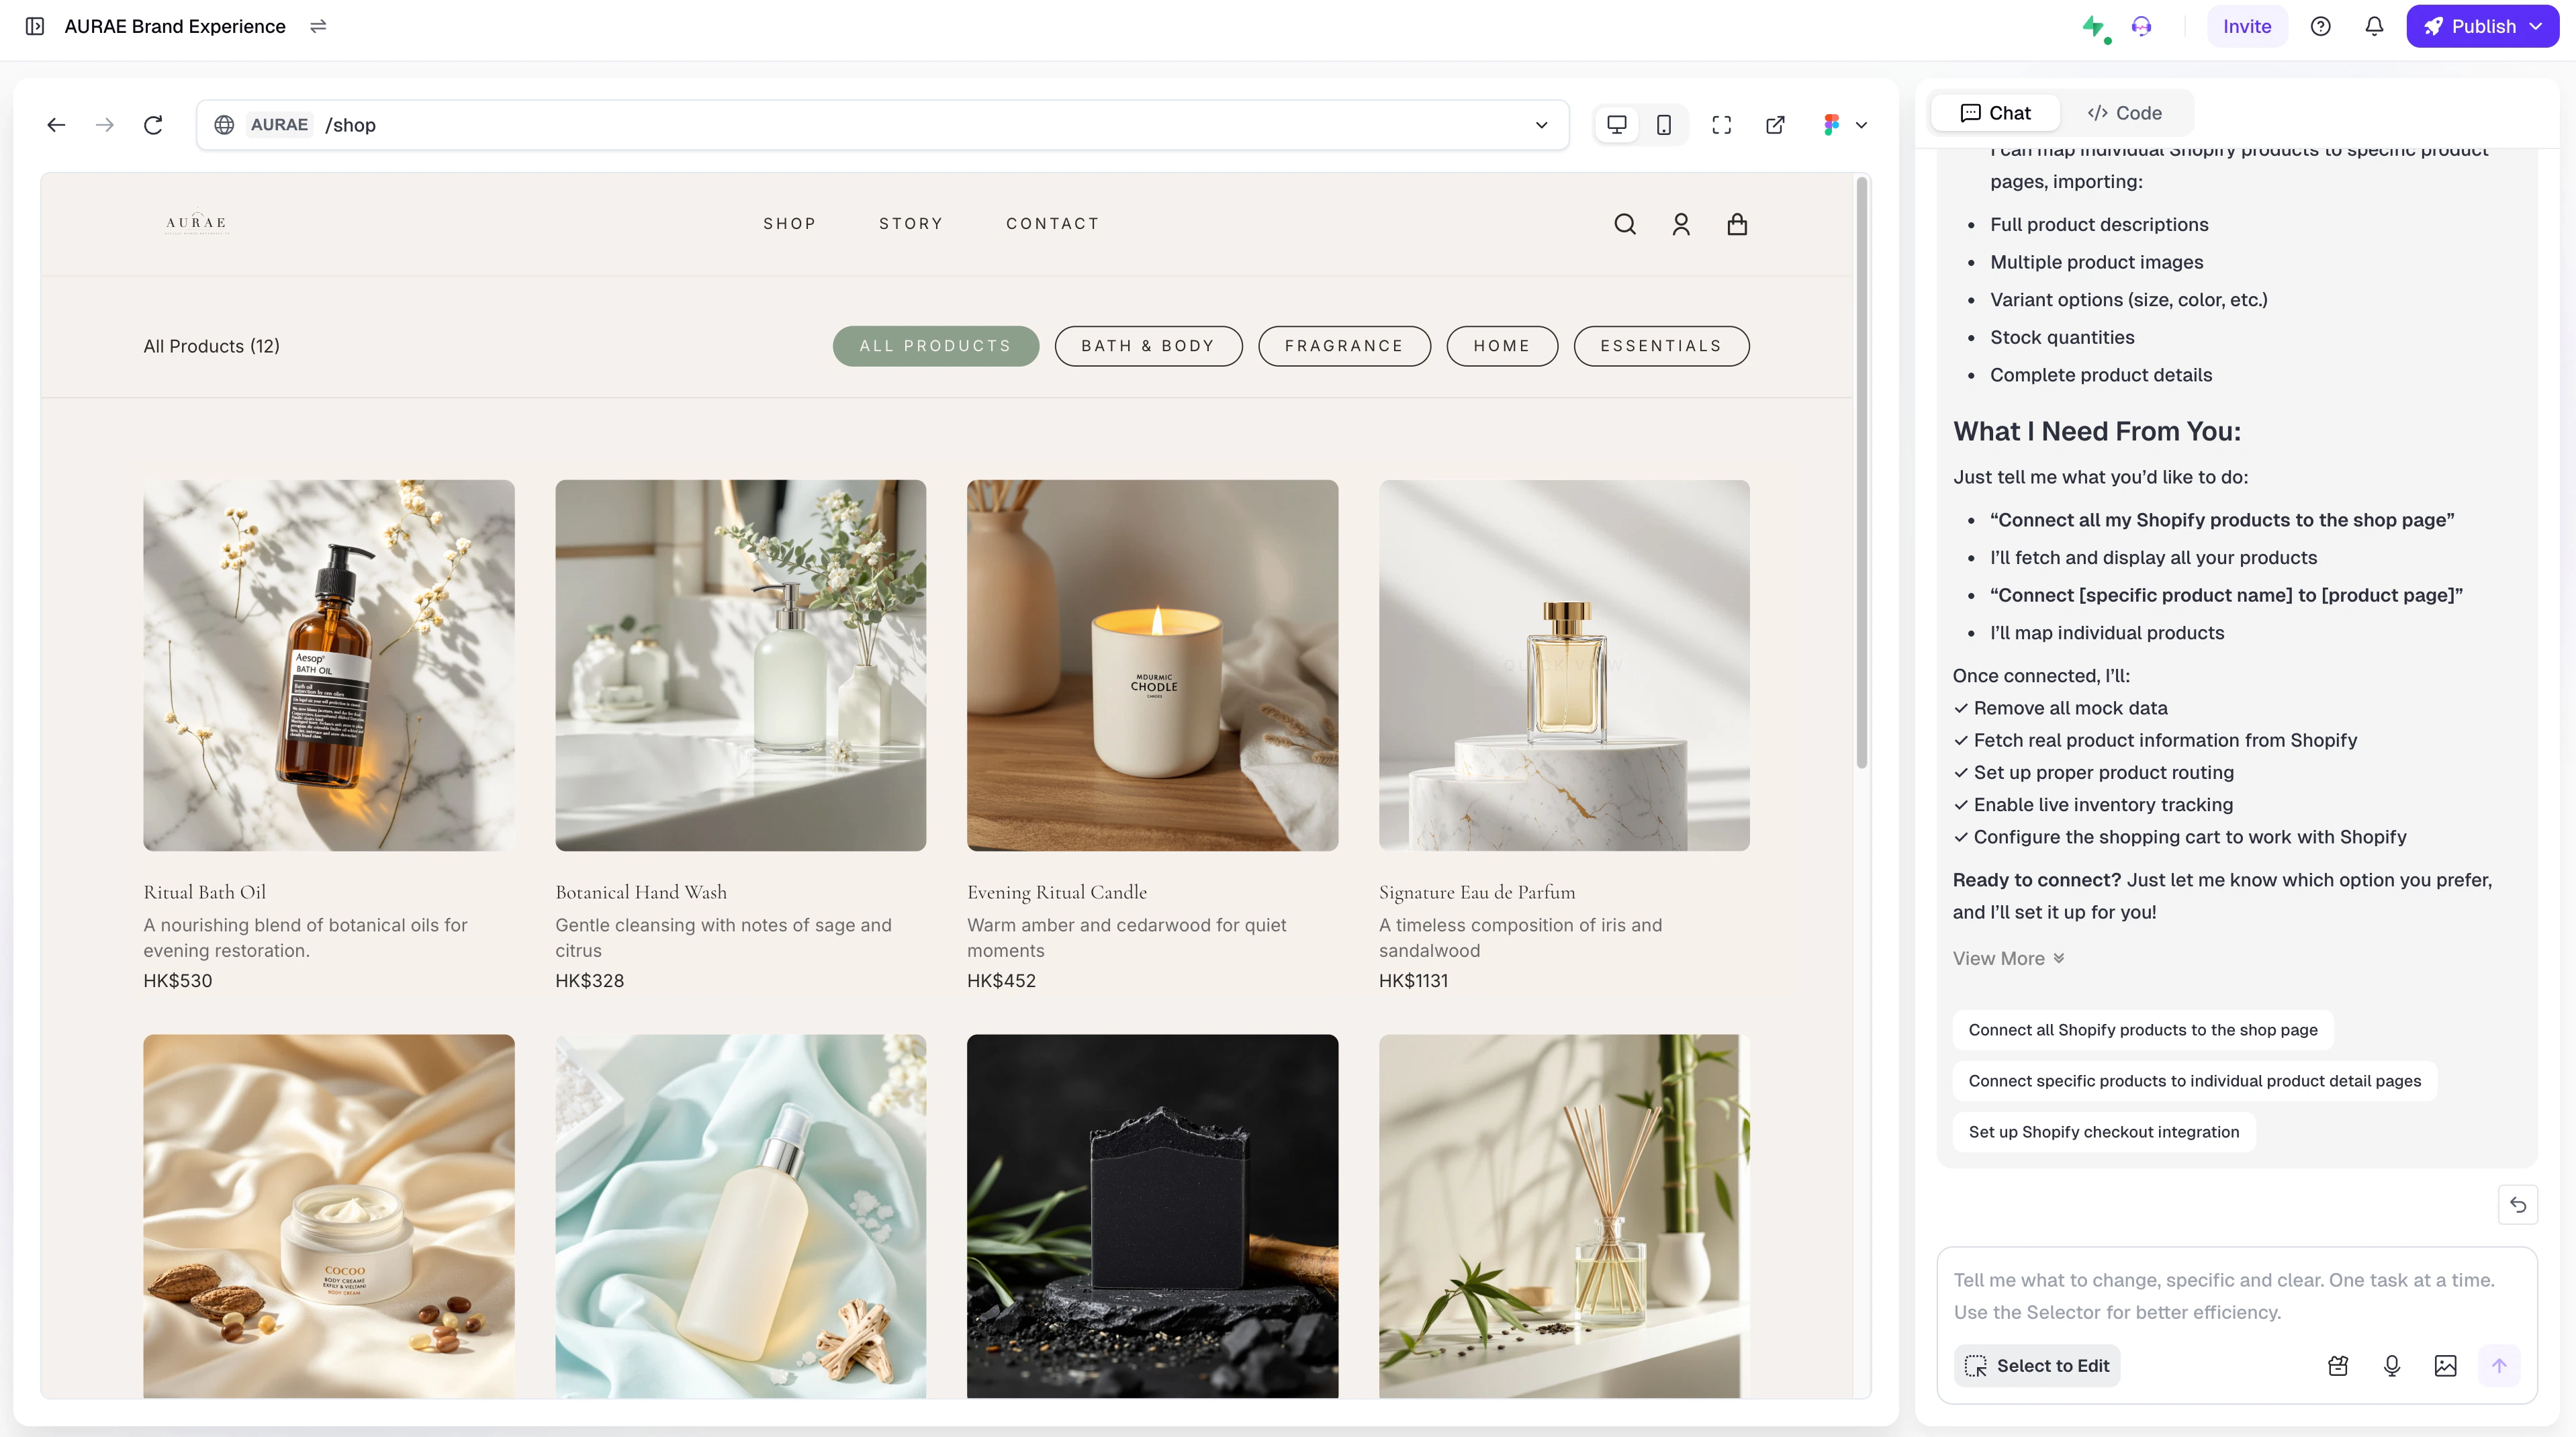
 Wait briefly for the AI to connect your selected products to the page. After successful connection, when you edit the product information in Shopify (including product names, images, etc.), it will automatically sync to your Readdy page. Note that you'll need to refresh the page to see the updated information.
 ## 11. Connect to Shopify Checkout
Once product connection is successful, you must establish the corresponding payment workflow to enable customer purchases on your website. Please follow these recommended procedures:
1. Begin by implementing the shopping cart functionality within your web project, ensuring all features operate correctly including: adding products to cart, removing cart items, enforcing stock quantity limits, accurate price calculations, and other essential cart operations.
2. Within the shopping cart interface, instruct the AI by saying "When the payment button is clicked, connect to my Shopify payment page." The AI will then generate the appropriate payment integration functionality.
3. Upon completion of the payment setup, thoroughly test the entire payment workflow to verify that products can be purchased without issues.
## 12. Tips
**Best Practices for Improving Product Connection Success:**
* **Proper Area Selection:** When selecting regions for product connection, choose complete product sections rather than individual elements such as isolated text, images, or buttons
* **Quantity Alignment:** Ensure the number of selected products matches the actual product count displayed on the page. To adjust quantities, first request the AI to modify the page display, then proceed with connection
**Troubleshooting Common Issues:**
* **Mock data persistence:** Use "Delete the mock data in the xxx area, keep the Shopify-connected data"
* **Incorrect product ordering:** Use "The product display order in the xxx area should be: ..."
* **Unwanted additional products:** Use "Remove the xxx product from the xxx area, keep the xxx product"
* **Missing product attributes:** Use "The page is missing the xxx attribute, connect the product's xxx attribute"
* **Shopify-pay page cannot be accessed:** Shopify payment pages cannot be accessed directly from Readdy's editor. Please use your project's share link to open the project, or publish your website first and visit your domain — the payment process will work correctly there.
## Need Help?
If this guide doesn't resolve your issue, [submit a support ticket](https://readdy.ai/feedback). We're here to help!
## 11. Connect to Shopify Checkout
Once product connection is successful, you must establish the corresponding payment workflow to enable customer purchases on your website. Please follow these recommended procedures:
1. Begin by implementing the shopping cart functionality within your web project, ensuring all features operate correctly including: adding products to cart, removing cart items, enforcing stock quantity limits, accurate price calculations, and other essential cart operations.
2. Within the shopping cart interface, instruct the AI by saying "When the payment button is clicked, connect to my Shopify payment page." The AI will then generate the appropriate payment integration functionality.
3. Upon completion of the payment setup, thoroughly test the entire payment workflow to verify that products can be purchased without issues.
## 12. Tips
**Best Practices for Improving Product Connection Success:**
* **Proper Area Selection:** When selecting regions for product connection, choose complete product sections rather than individual elements such as isolated text, images, or buttons
* **Quantity Alignment:** Ensure the number of selected products matches the actual product count displayed on the page. To adjust quantities, first request the AI to modify the page display, then proceed with connection
**Troubleshooting Common Issues:**
* **Mock data persistence:** Use "Delete the mock data in the xxx area, keep the Shopify-connected data"
* **Incorrect product ordering:** Use "The product display order in the xxx area should be: ..."
* **Unwanted additional products:** Use "Remove the xxx product from the xxx area, keep the xxx product"
* **Missing product attributes:** Use "The page is missing the xxx attribute, connect the product's xxx attribute"
* **Shopify-pay page cannot be accessed:** Shopify payment pages cannot be accessed directly from Readdy's editor. Please use your project's share link to open the project, or publish your website first and visit your domain — the payment process will work correctly there.
## Need Help?
If this guide doesn't resolve your issue, [submit a support ticket](https://readdy.ai/feedback). We're here to help!